
본 포스팅은 https://www.udemy.com/course/certified-kubernetes-administrator-with-practice-tests 강의와 https://kodekloud.com/의 내용을 공부하며 기록한 내용입니다.
- 186 Container Storage Interface
- 188 Volumes
- 189 Persistent Volumes
- 190 Persistent Volume Claims
- 196 Storage Class
Kubernetes상에서 데이터를 영구저장하는 방법인 Persistent volume에 대해서 알아본다. Kubernetes에서 Storage에 대해서 알아보려면 Docker에서 storage를 어떻게 다루는지 알아봐야한다.
Storage Driver, Volume Driver 를 잘 이해해야 한다.
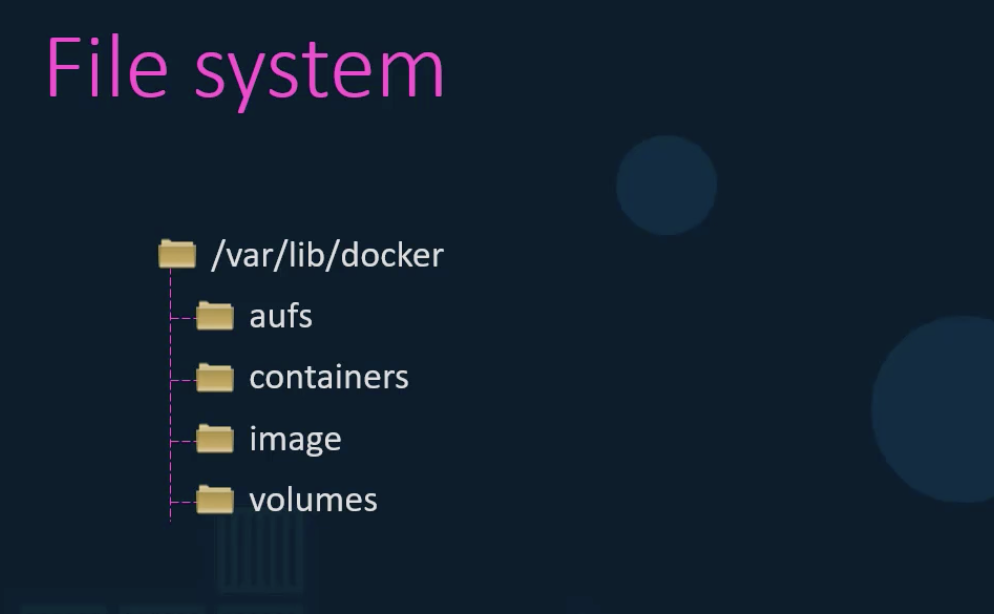
Docker를 설치하면 /var/lib/docker 폴더가 생기고 그 하부에 여러가지 폴더들도 생긴다.
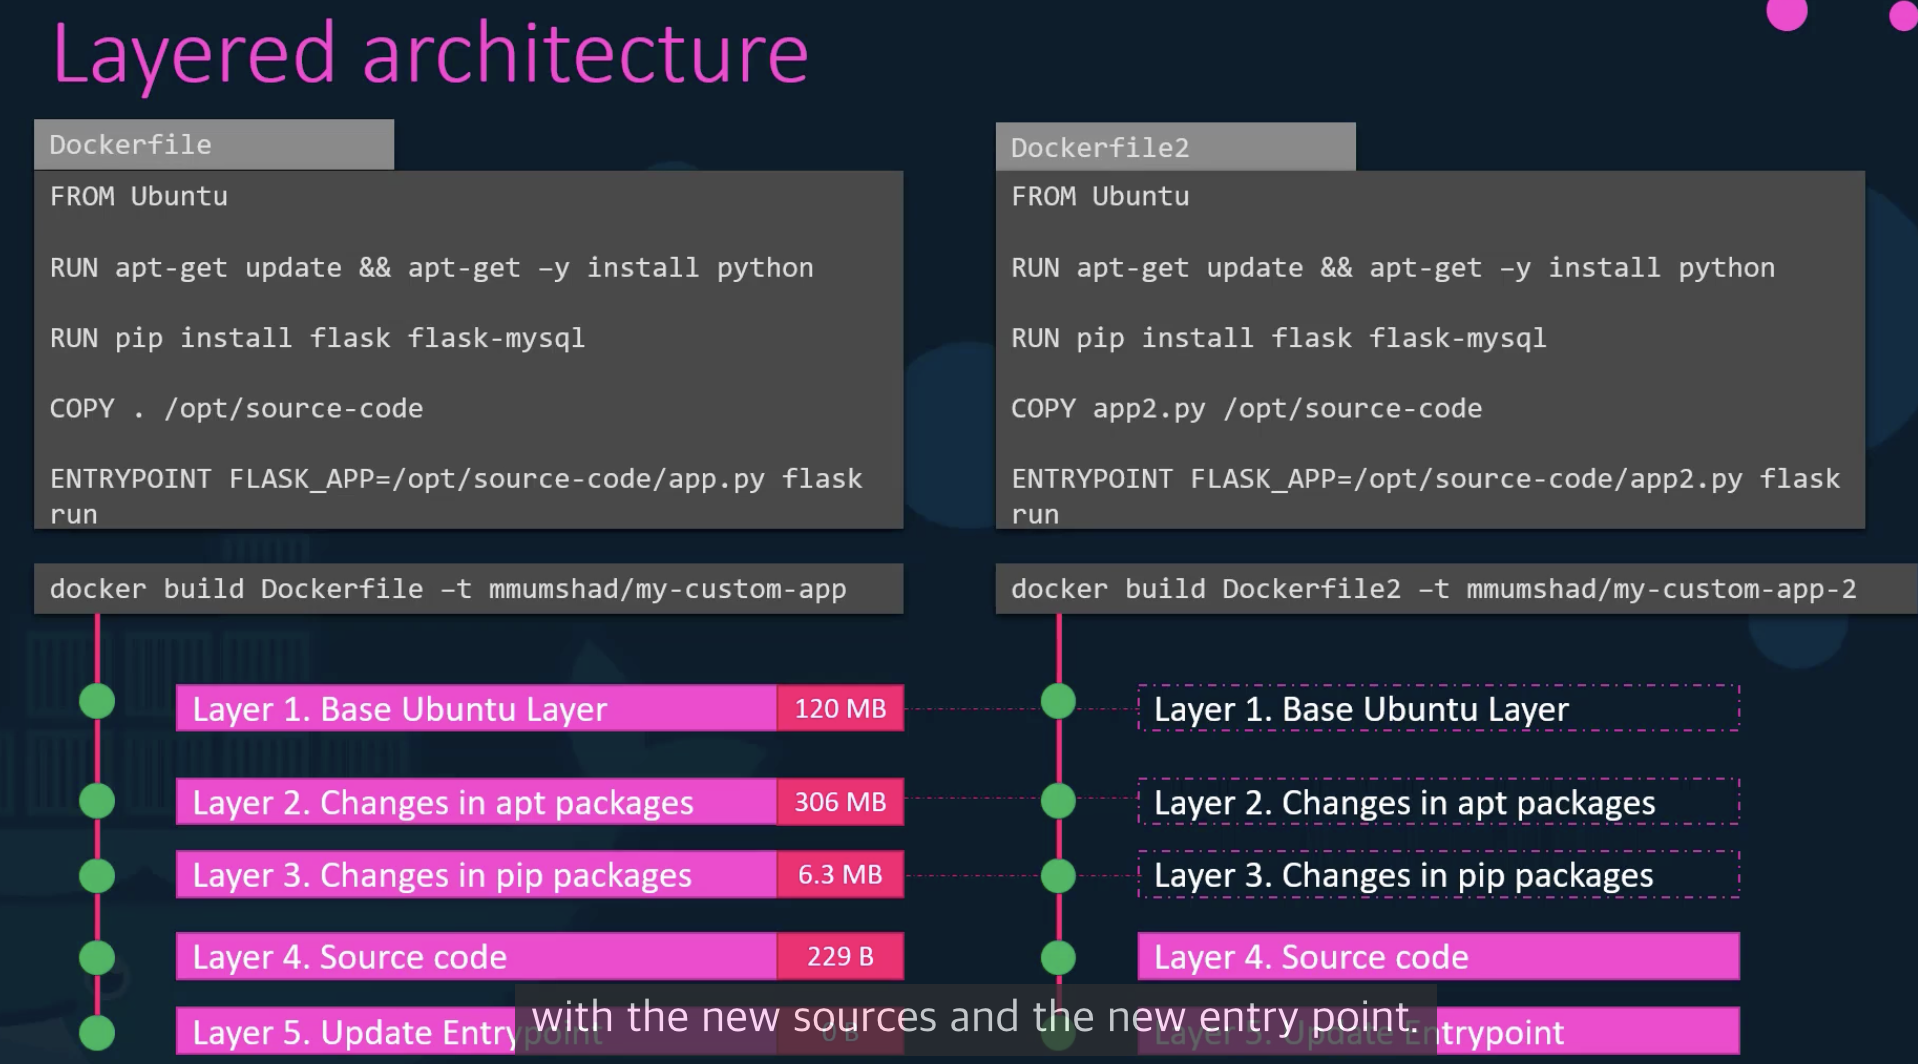
Docker는 이전에 사용했던 docker image를 cache에 저장해두었다가 재사용하여 빠르게 build할 수 있다.
Read Write 영역은 컨테이너가 삭제될 때 함께 삭제되기 때문에, Data를 영구적으로 저장하려면 다른 방법이 필요하다. Read Write 영역에 Host의 저장소와 연결된 폴더를 mount 시키는 방법으로 진행하면 된다.
Volume mount와 Bind mount가 있다. bind mount는 docker host의 어떤 directory도 mounting 할 수 있다.
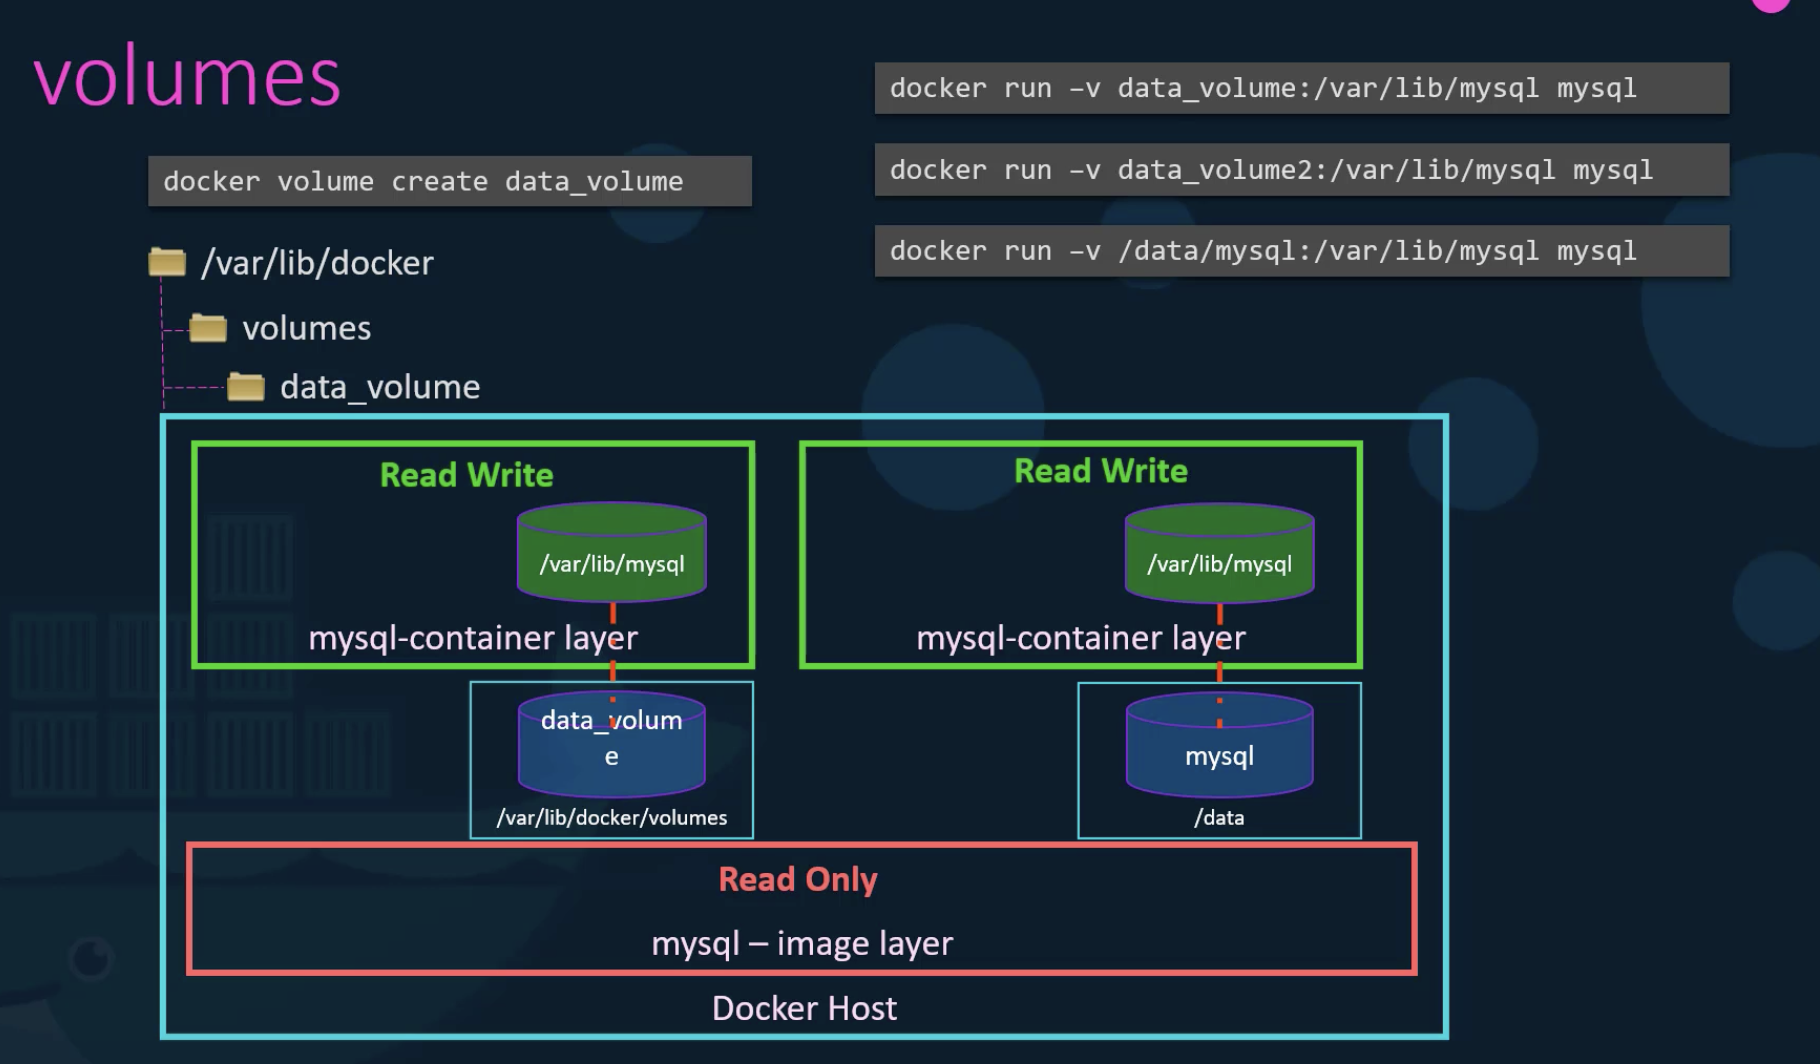
--mount 가 더 나은 방법이다.
$ dockker run --mount type=bind,source/data/mysql,target=/var/lib/mysql mysql
Storage drivers 가 여러개 있는데, docker는 자동으로 가장 적합한 것을 선택한다.
- AUFS(Ubuntu)
- ZFS
- BTRFS
- Device Mapper
- Overlay
- Overlay2
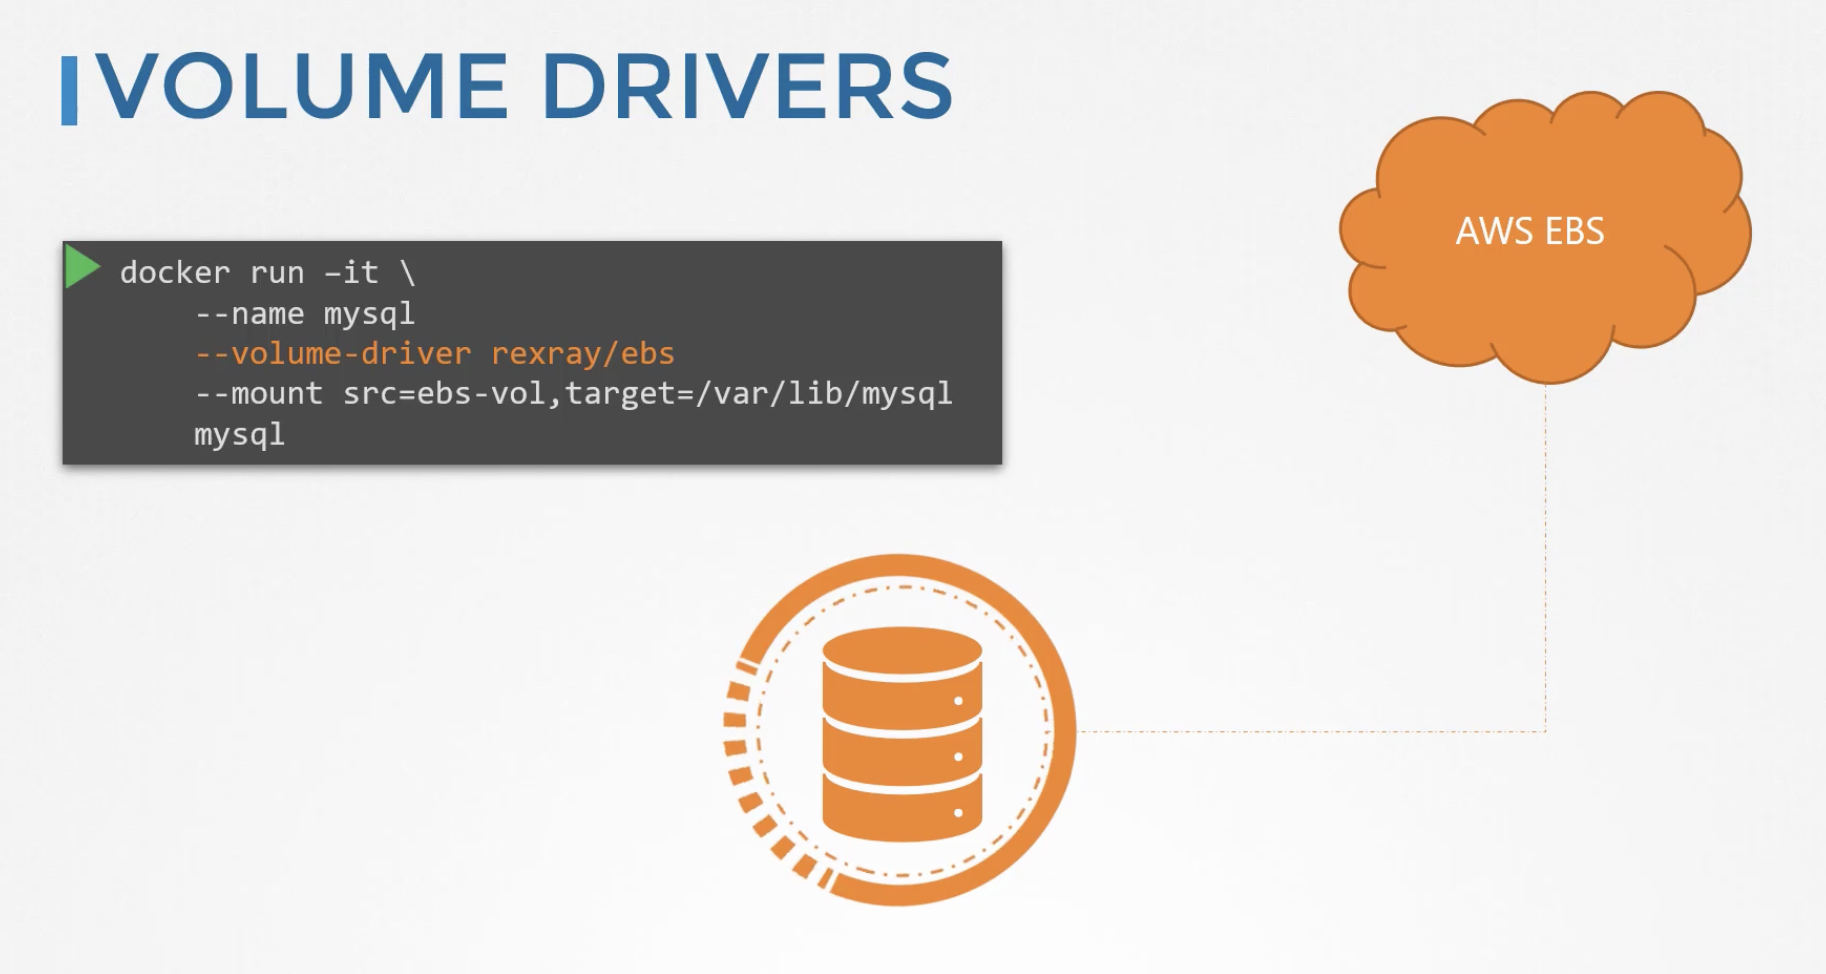
Volume Driver에는 Local, Azure File Storage, Convoy, DigitalOcean Block Storage, RexRay 등등이 있다.
186 Container Storage Interface
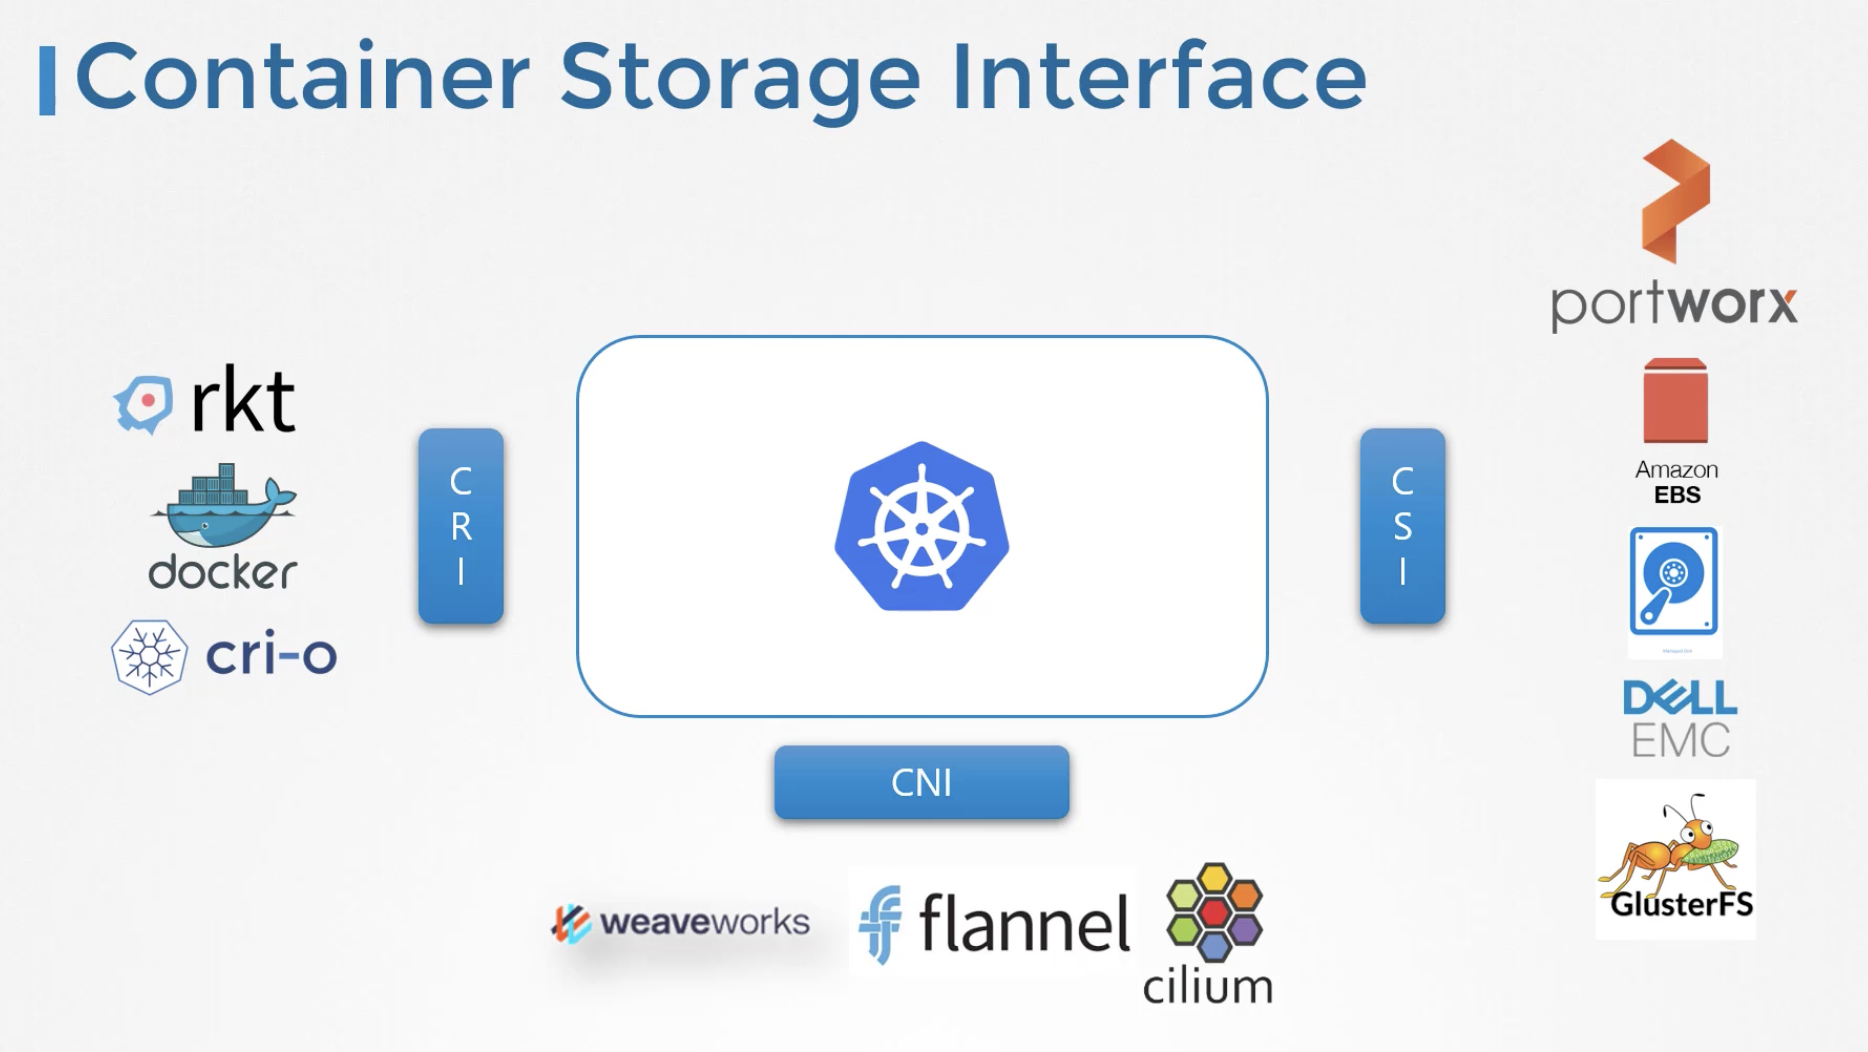
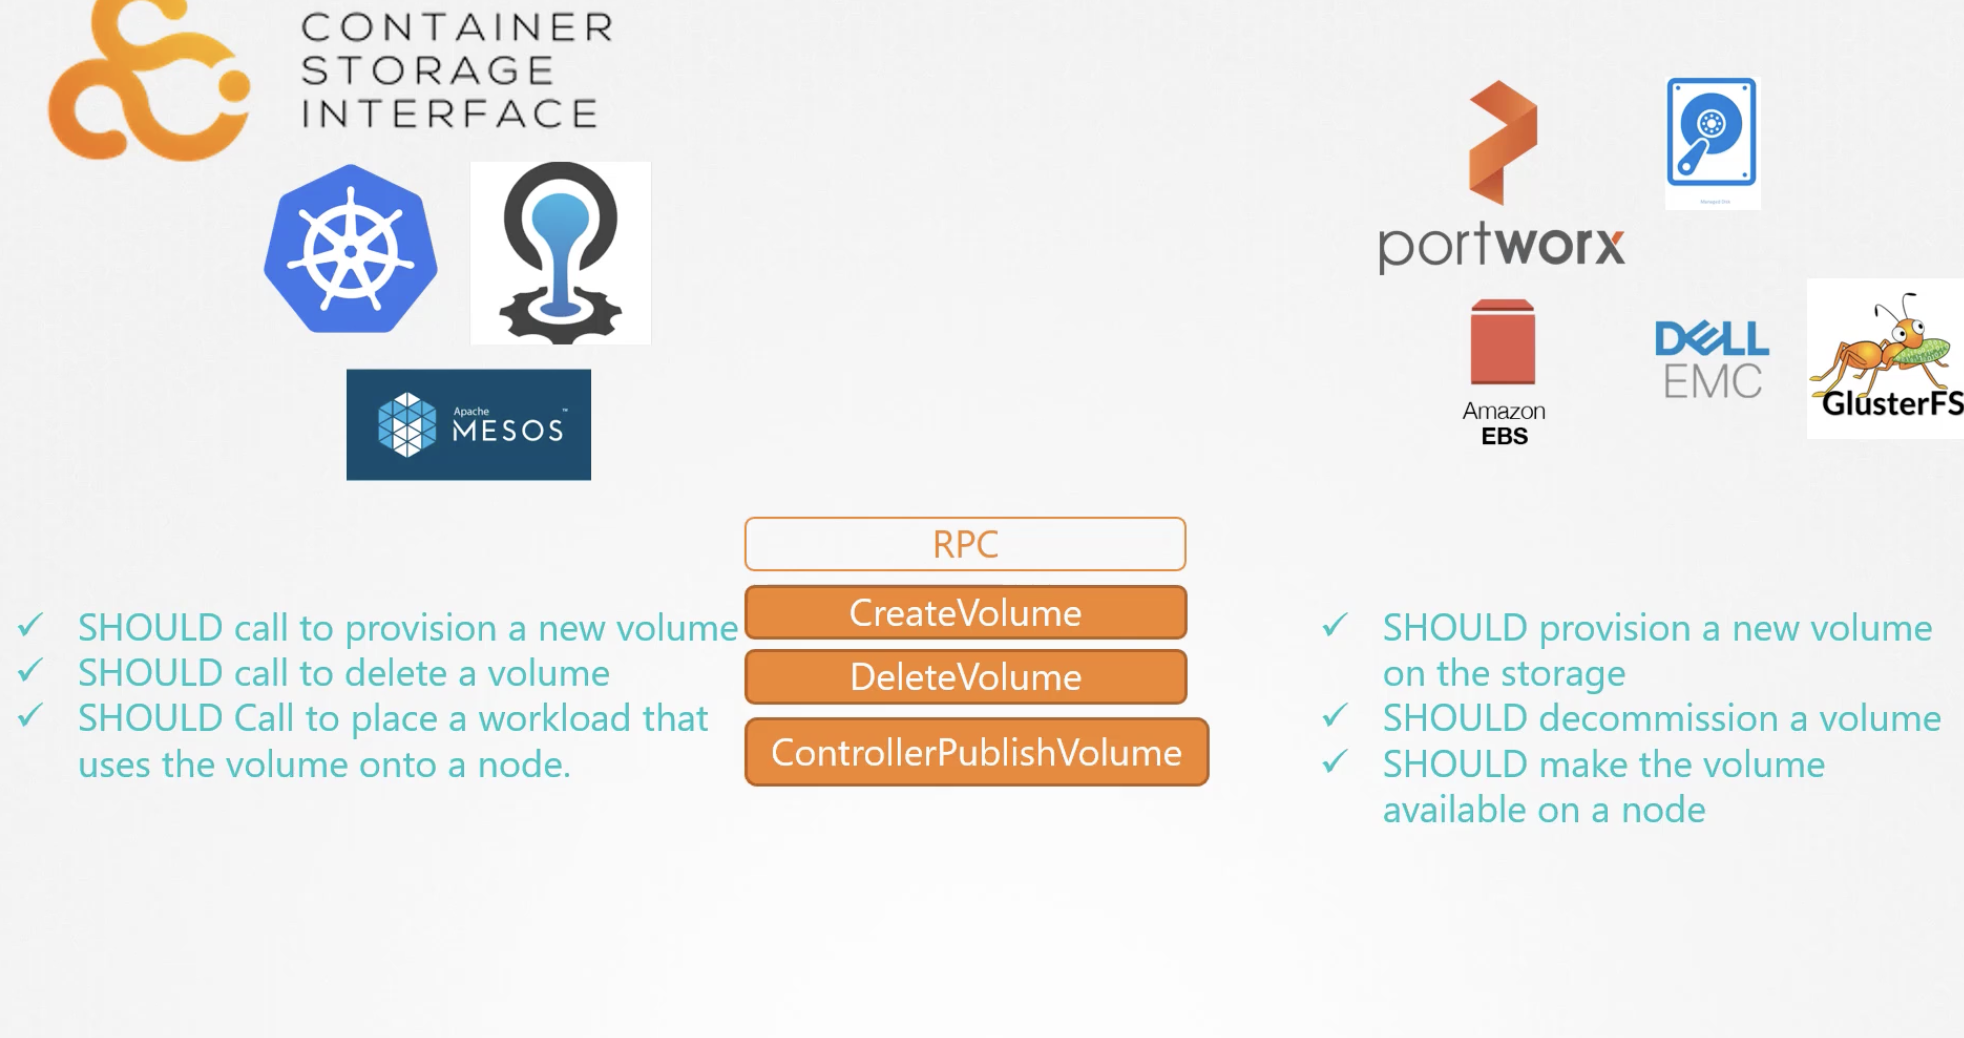
Container Runtime Interface Standard 가 있으므로 해서, Kubernetes와 Container Runtime(Docker, cir-o, rkt)와의 종속성이 없어졌다. 비슷하게도 CNI라는 것이 있으므로 해서 kubernetes와 Network add on(Flaneel, cilium, calico)을 분리할 수 있었다. Storage쪽에도 CSI라는 것이 있으므로 해서 Container Storage Interface를 통해 plugable하게 사용할 수 있다.
188 Volumes
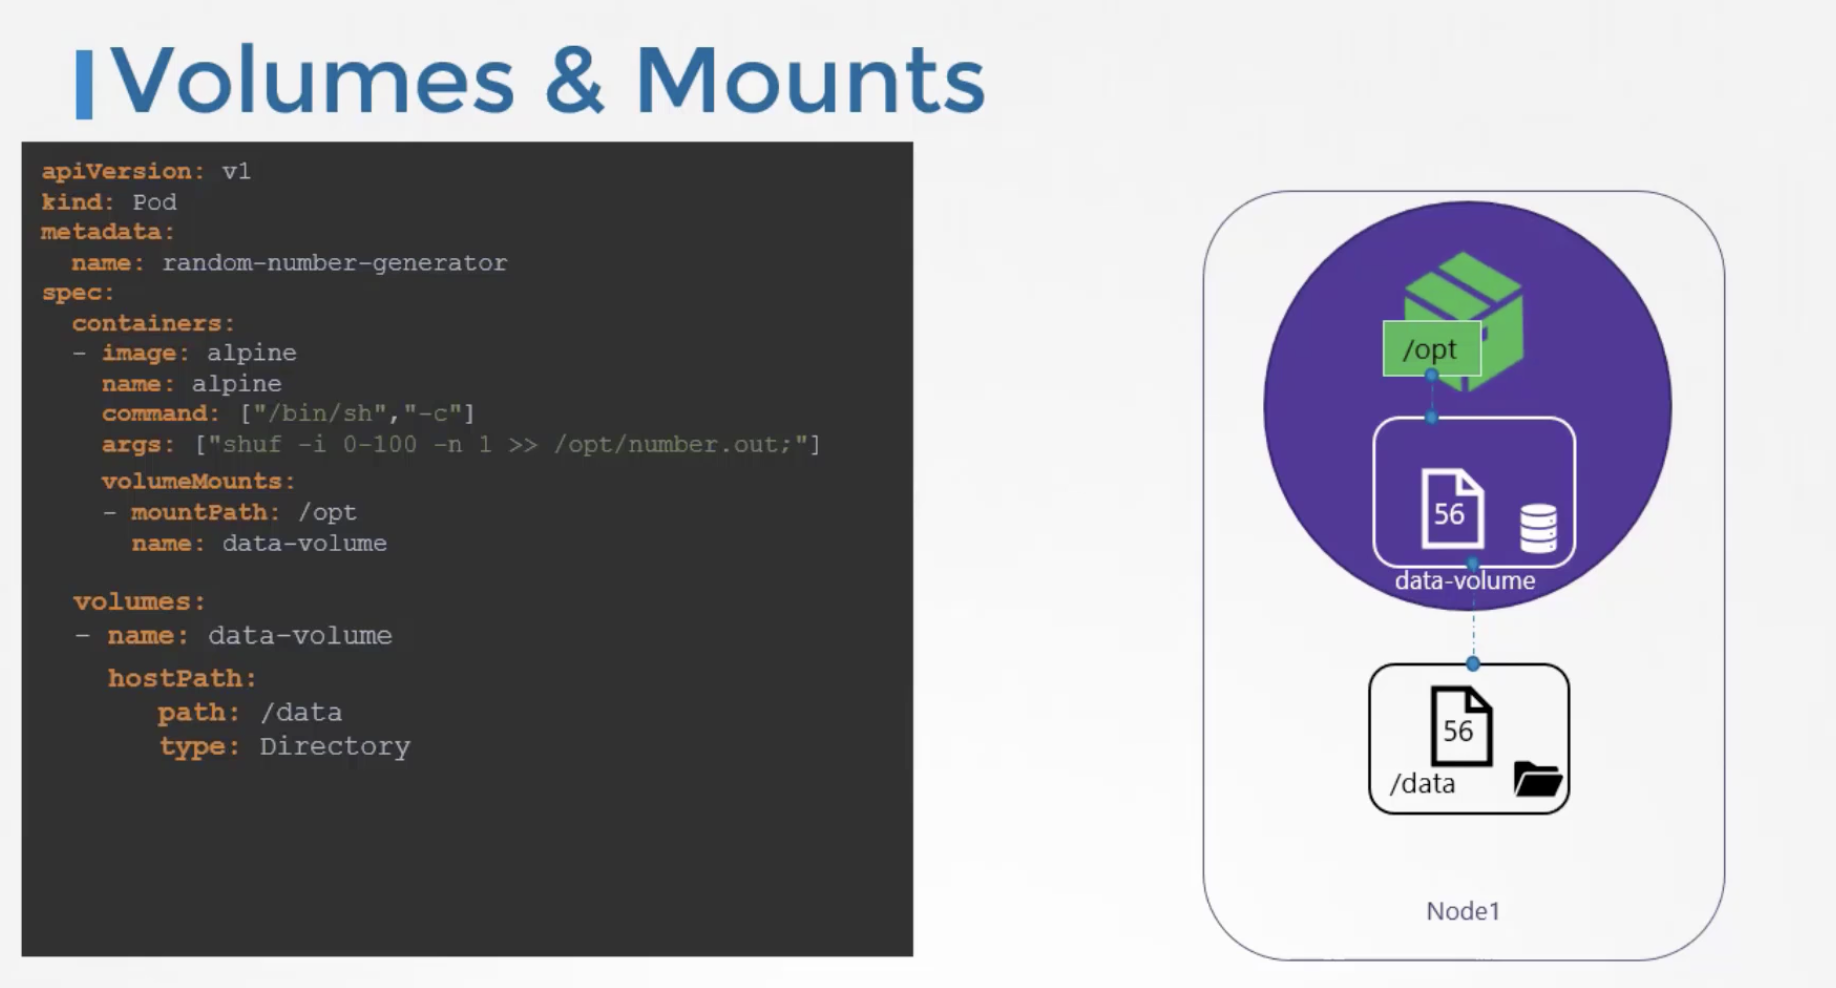
Kubernetes 상에서 Single Node 클러스터 환경이라면 아래처럼 간단하게 host machine의 volume을 container에 mount 시킬 수 있다. 그런데 Multi Node 환경으로 가면 문제점이 있는데, pod가 생성되는 위치에 따라서 host는 언제든지 달라질 수 있으므로 volume의 data 내용이 바뀔 수 있다. 때문에 Kubernetes에서 제공하는 Persistent Volume 이란 것을 사용해야한다.
189 Persistent Volumes
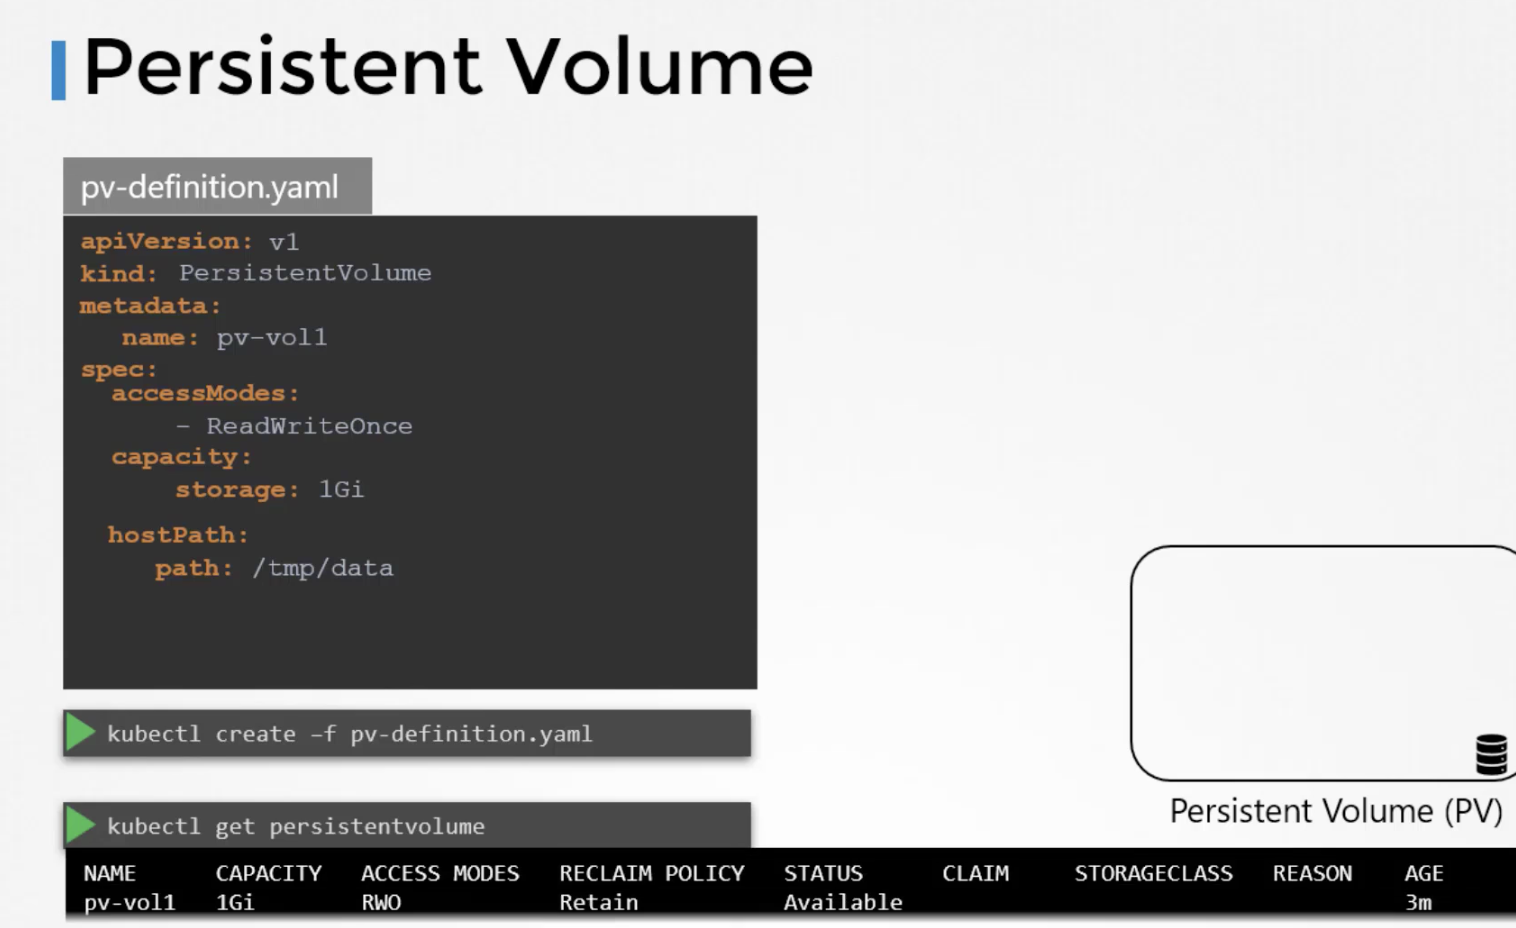
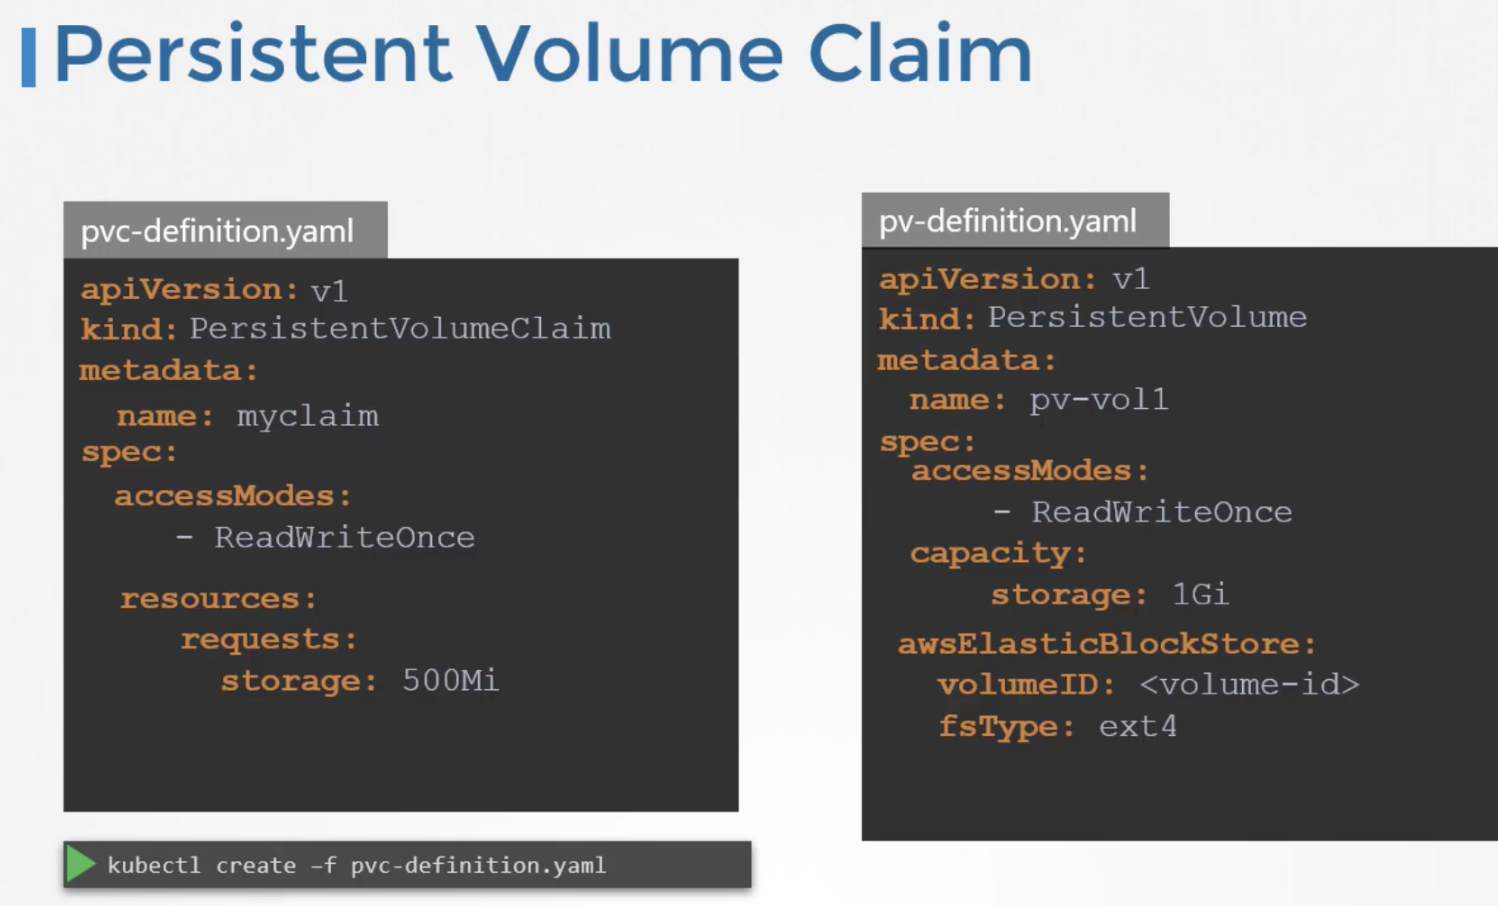
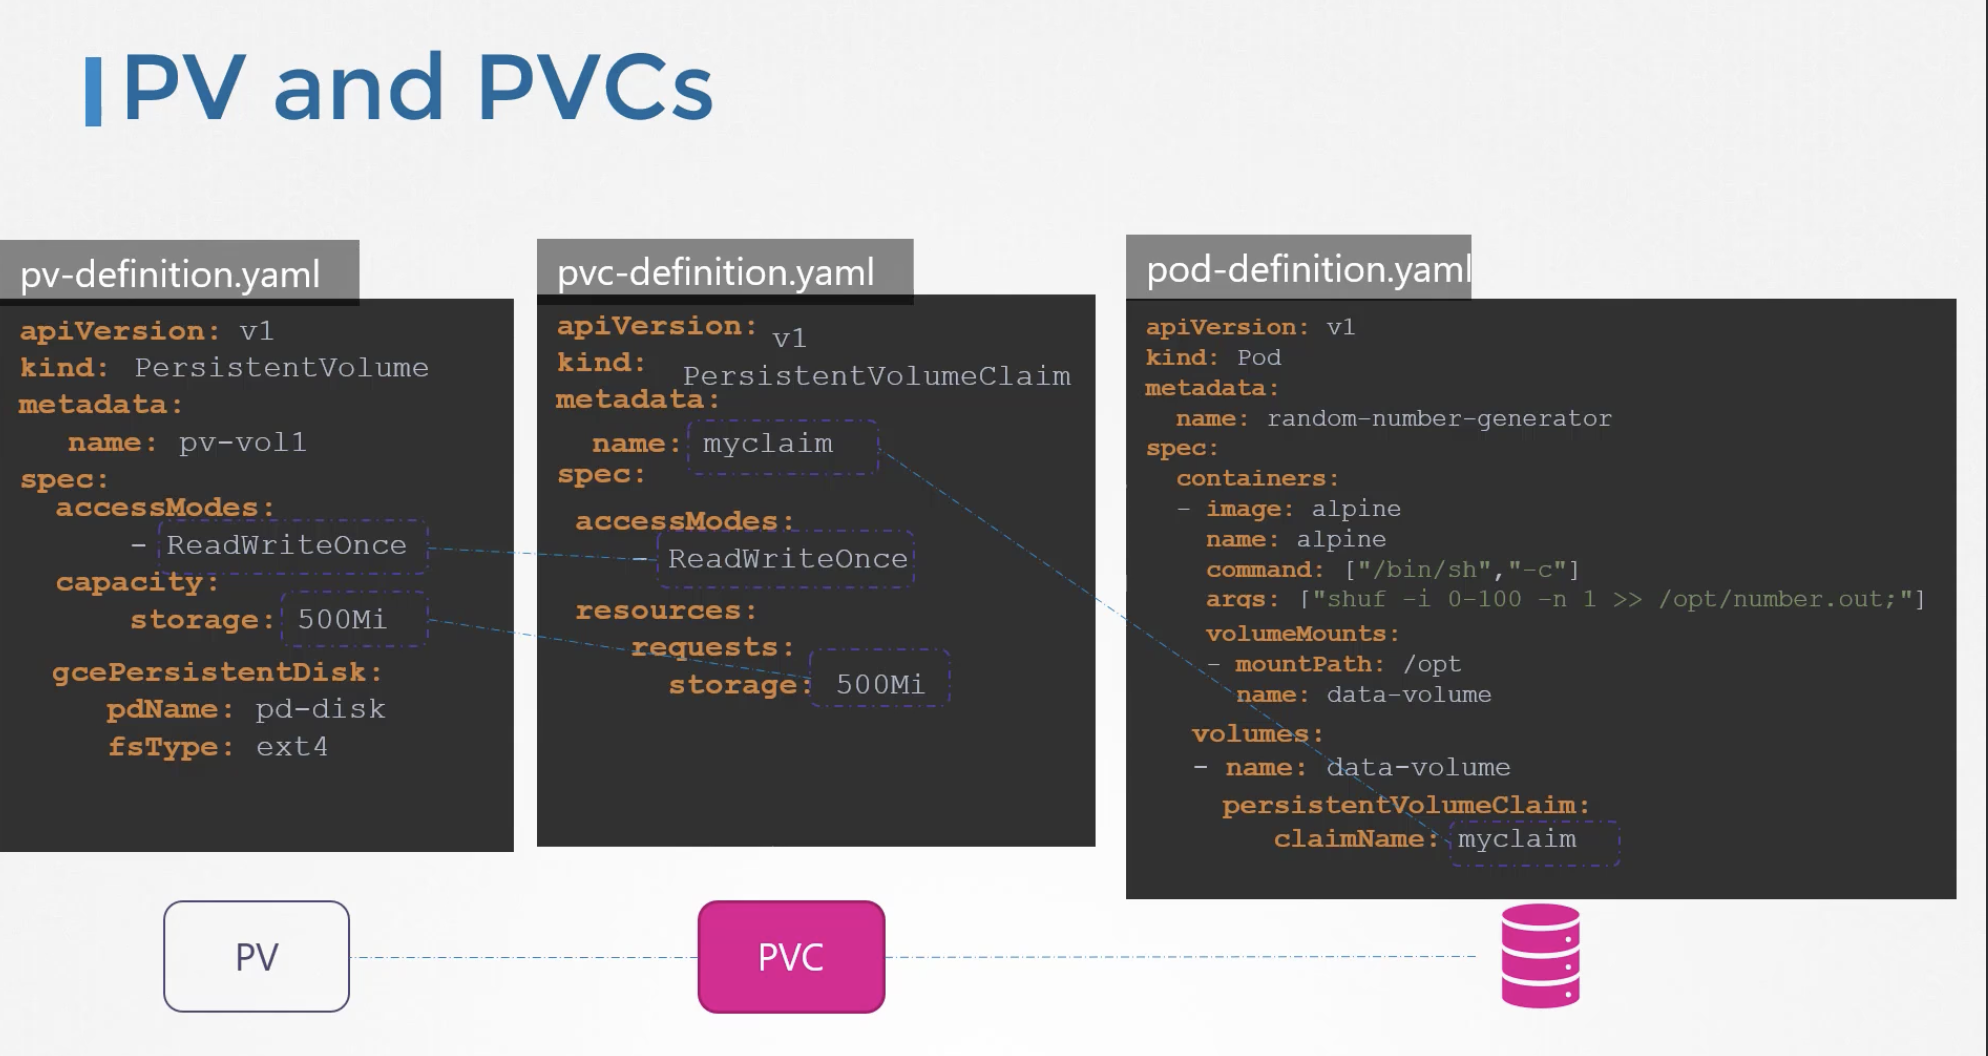
Persistent Volume은 아래와 같이 정의할 수 있고, 이렇게 생성된 persistent volume은 Persistent Volume Clame으로 사용될 수 있다. HostPath 부분을 awsElasticBlockStore와 같은 것으로 변경하면 다른 datastorage로 사용이 가능하다.
190 Persistent Volume Claims
일반적으로 Administrator가 Persistent Volume을 만들어두고, User가 Persistent Volume Clame을 사용하는 구조다. Selecting을 Label로 할 수 도 있고, 후보가 2개 이상이라면 kubernetes가 적당한 volume을 binding 해준다. PV랑 PVC는 1대1 관계이기 떄문에 PVC가 PV를 선점할 때 딱 들어맞는 용량이 없어 큰 용량에 binding 된 경우 낭비되는 저장소가 생길수 있다.
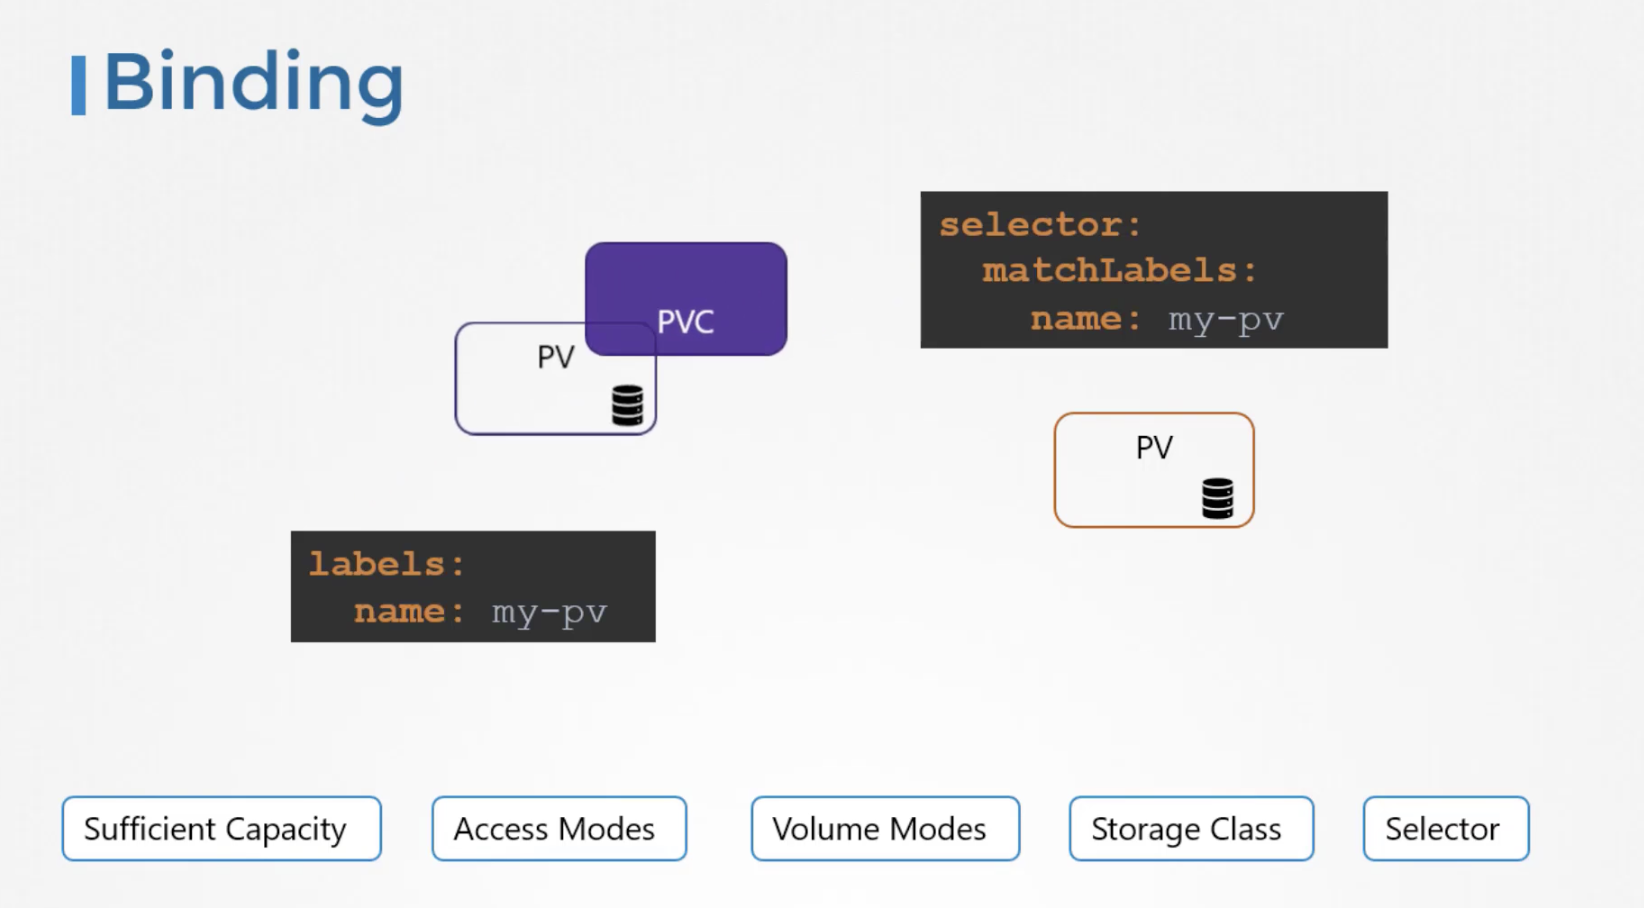
Persistent Volume Clame 을 처음 생성했을 때는 pending 상태로 있다가, 맞아 떨어지는 Persistent Volume이 생길 경우에는 할당된 상태로 변경된다.
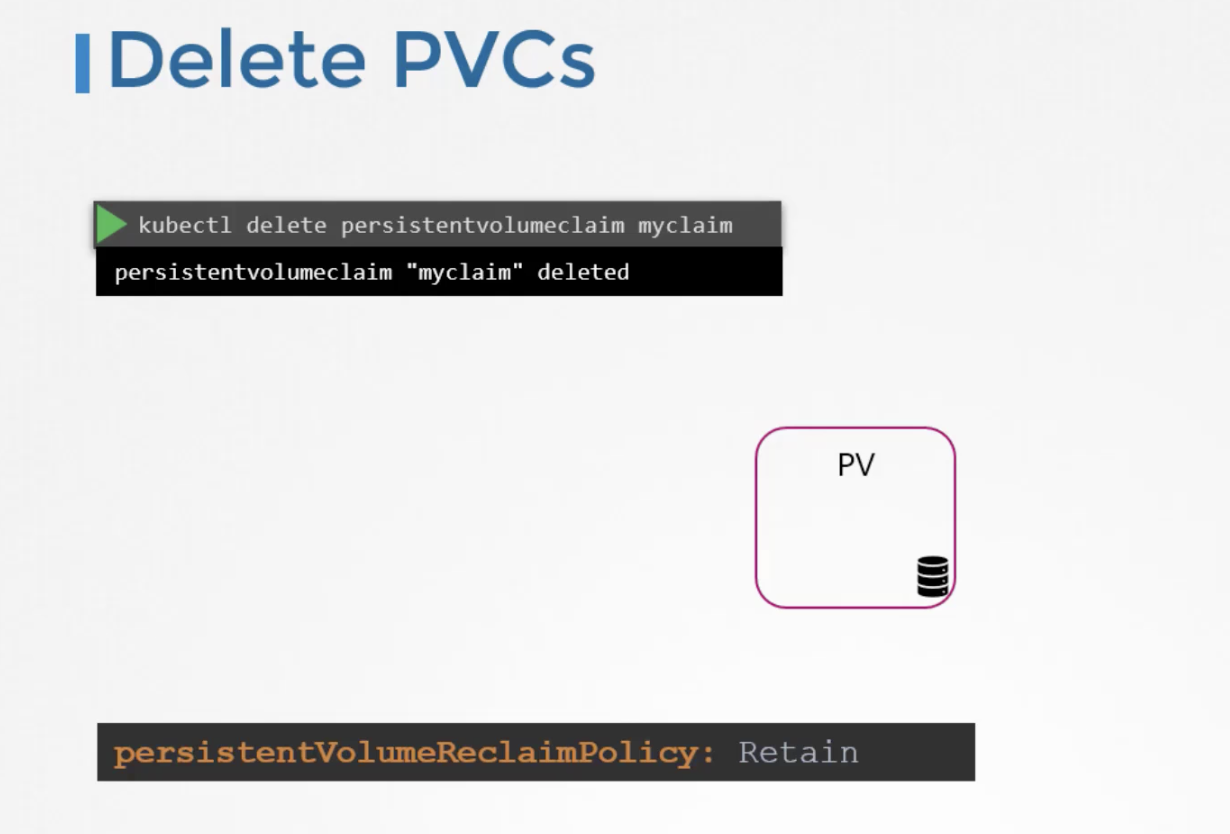
PVC가 삭제될 경우 PV는 어떻게 되는가? 기본적으로 Retain방식으로 작동하며, 이는 PV는 그대로 남아있는 것이다. Manual하게 PV를 삭제해야 된다. 자동으로 PV를 지우는 Delete 나 Recycle이 있다.
apiVersion: v1
kind: Pod
metadata:
  name: mypod
spec:
  containers:
    - name: myfrontend
      image: nginx
      volumeMounts:
      - mountPath: "/var/www/html"
        name: mypd
  volumes:
    - name: mypd
      persistentVolumeClaim:
        claimName: myclaim
아래 설정대로 persistent volume 생성 Volume Name: pv-log Storage: 100Mi Access Modes: ReadWriteMany Host Path: /pv/log Reclaim Policy: Retain
apiVersion: v1
kind: PersistentVolume
metadata:
  name: pv-log
spec:
  capacity:
    storage: 100Mi
  accessModes:
  - ReadWriteMany
  hostPath:
    path: "/pv/log"
  persistentVolumeReclaimPolicy: Retain
Persistent Volume Claim 생성 방법 Volume Name: claim-log-1 Storage Request: 50Mi Access Modes: ReadWriteOnce
kind: PersistentVolumeClaim
apiVersion: v1
metadata:
  name: claim-log-1
spec:
  accessModes:
    - ReadWriteOnce
  resources:
    requests:
      storage: 50Mi
pod에서 persistentVolume 사용법
spec:
  containers:
    volumeMounts:
    - mountPath: /log
      name: webapp
  volumes
  - name: webapp
    persistentVolumeClaim:
      claimName: claim-log-1
196 Storage Class
PV와 PVC를 미리 setting하고나서 Application에서 사용하는 것을 static provisioning이라고 한다.
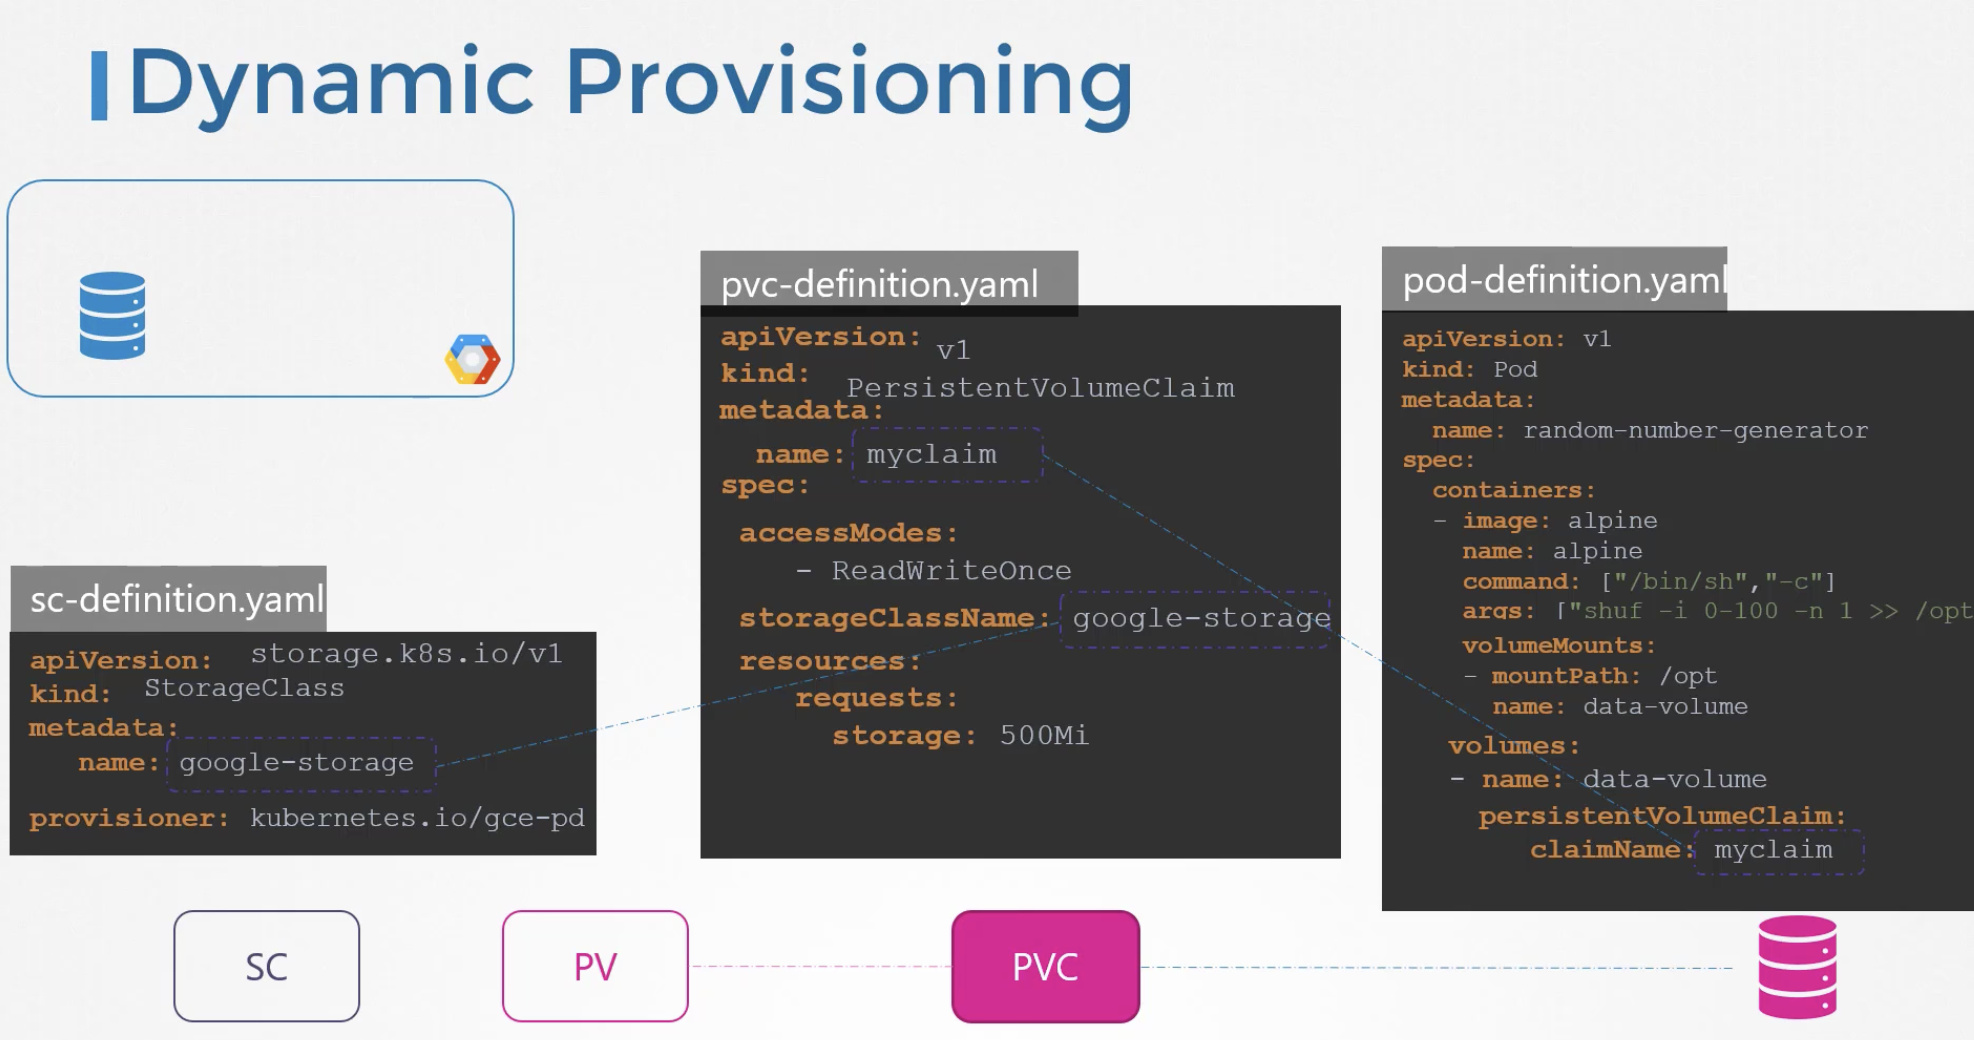
만약 Google Cloude를 이용하고 있다면, Persistent Volume을 매번 생성하지 않고, Persistent Volume Clame이 생성될 때 마다 자동으로 생성되게끔 할 수 있다. 이것을 가능하게 하느 것이 storage class이다.
provisioner는 여러 개가 있다. AWS ebs, gce, ceph, Azure ..
또한 storage class에 따라 replication 여부와, disk종류(HDD, SSD, nvme SSD) 방식을 나눌수도 있다.
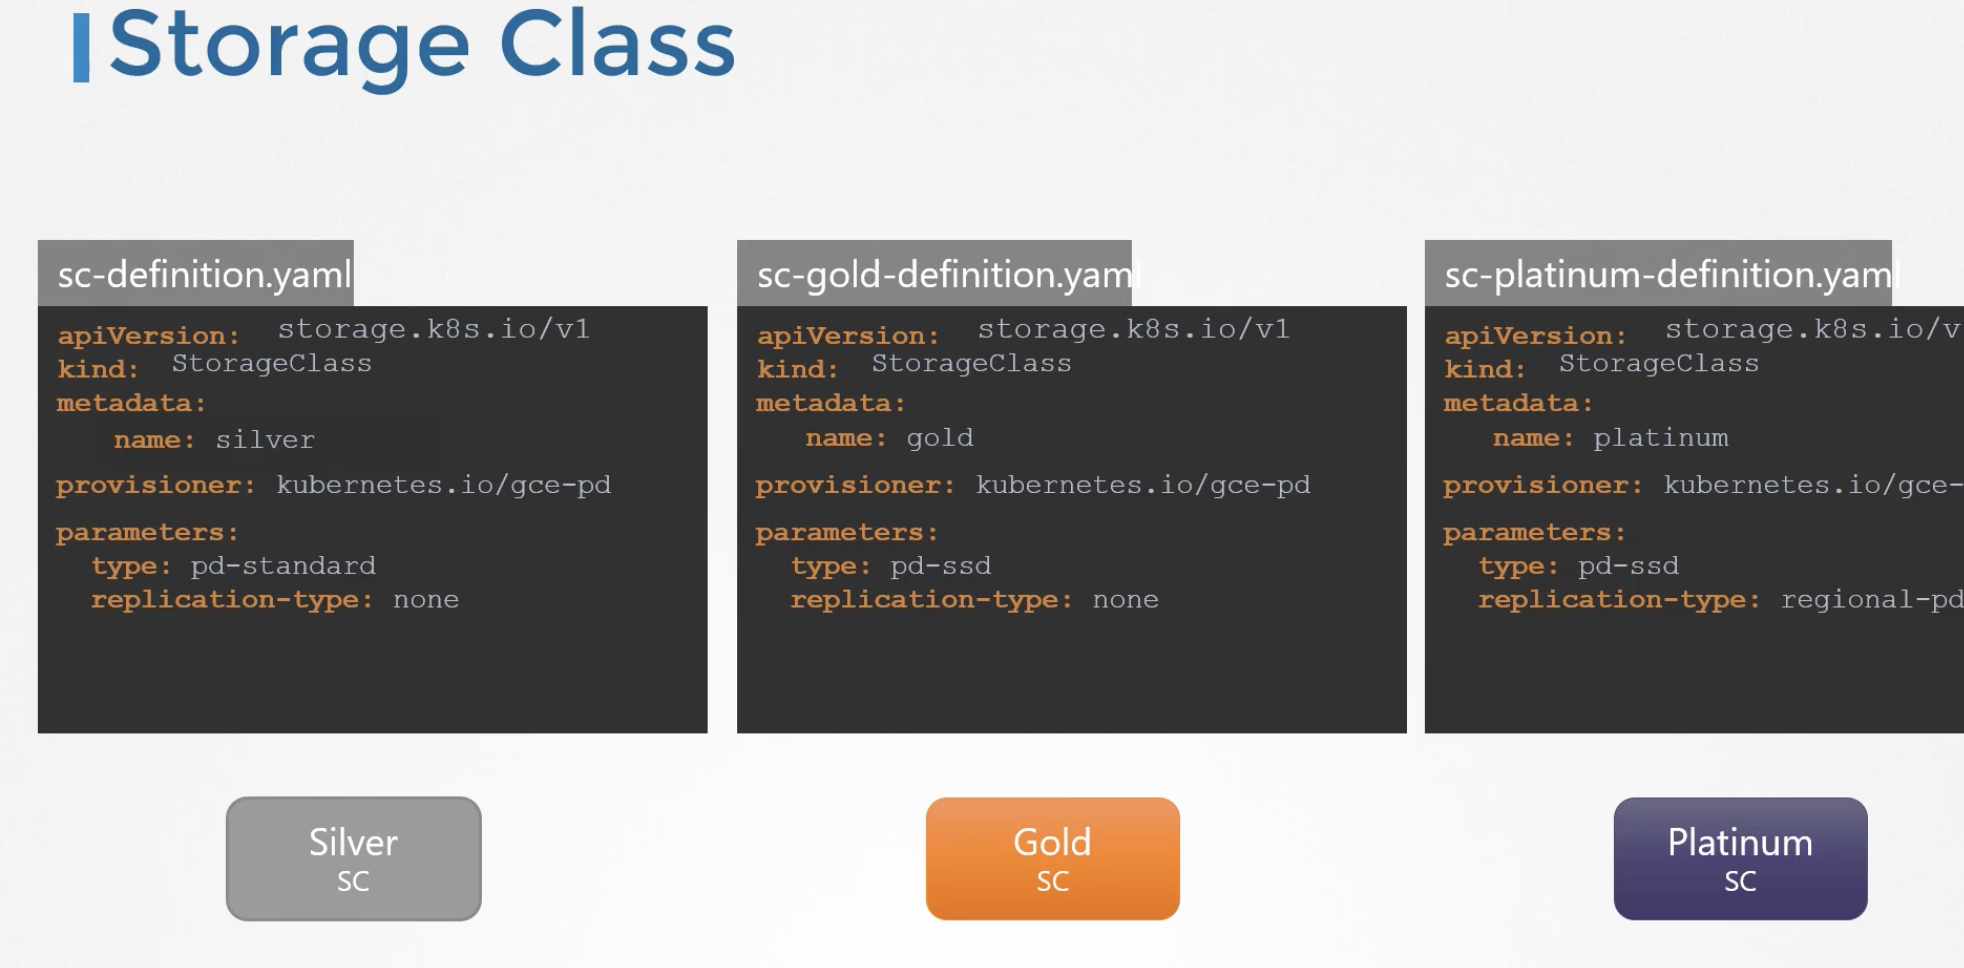
$ kubectl get storageclasses
NAME                   PROVISIONER             RECLAIMPOLICY   VOLUMEBINDINGMODE      ALLOWVOLUMEEXPANSION   AGE
local-path (default)   rancher.io/local-path   Delete          WaitForFirstConsumer   false                  15m
he Storage Class called local-storage makes use of VolumeBindingMode set to WaitForFirstConsumer. This will delay the binding and provisioning of a PersistentVolume until a Pod using the PersistentVolumeClaim is created.