
This post is a study note based on the https://www.udemy.com/course/certified-kubernetes-administrator-with-practice-tests course and content from https://kodekloud.com/.
- 53 Manual Scheduling
- 56 Labels and Selectors in Kubernetes
- 59 Taints and Tolerations
- 63. Node Affinity
- 67 Resource Requirements and Limits
- 71 DaemonSets
- 74 Static Pods
- 77 Multiple Schedulers
- 80 Configuring Scheduler Profiles
53 Manual Scheduling
What happens if there is no scheduler in Kubernetes? Pods would likely remain in a pending state indefinitely. Instead, you can explicitly specify the node for a Pod by setting the nodeName in the Pod definition file.
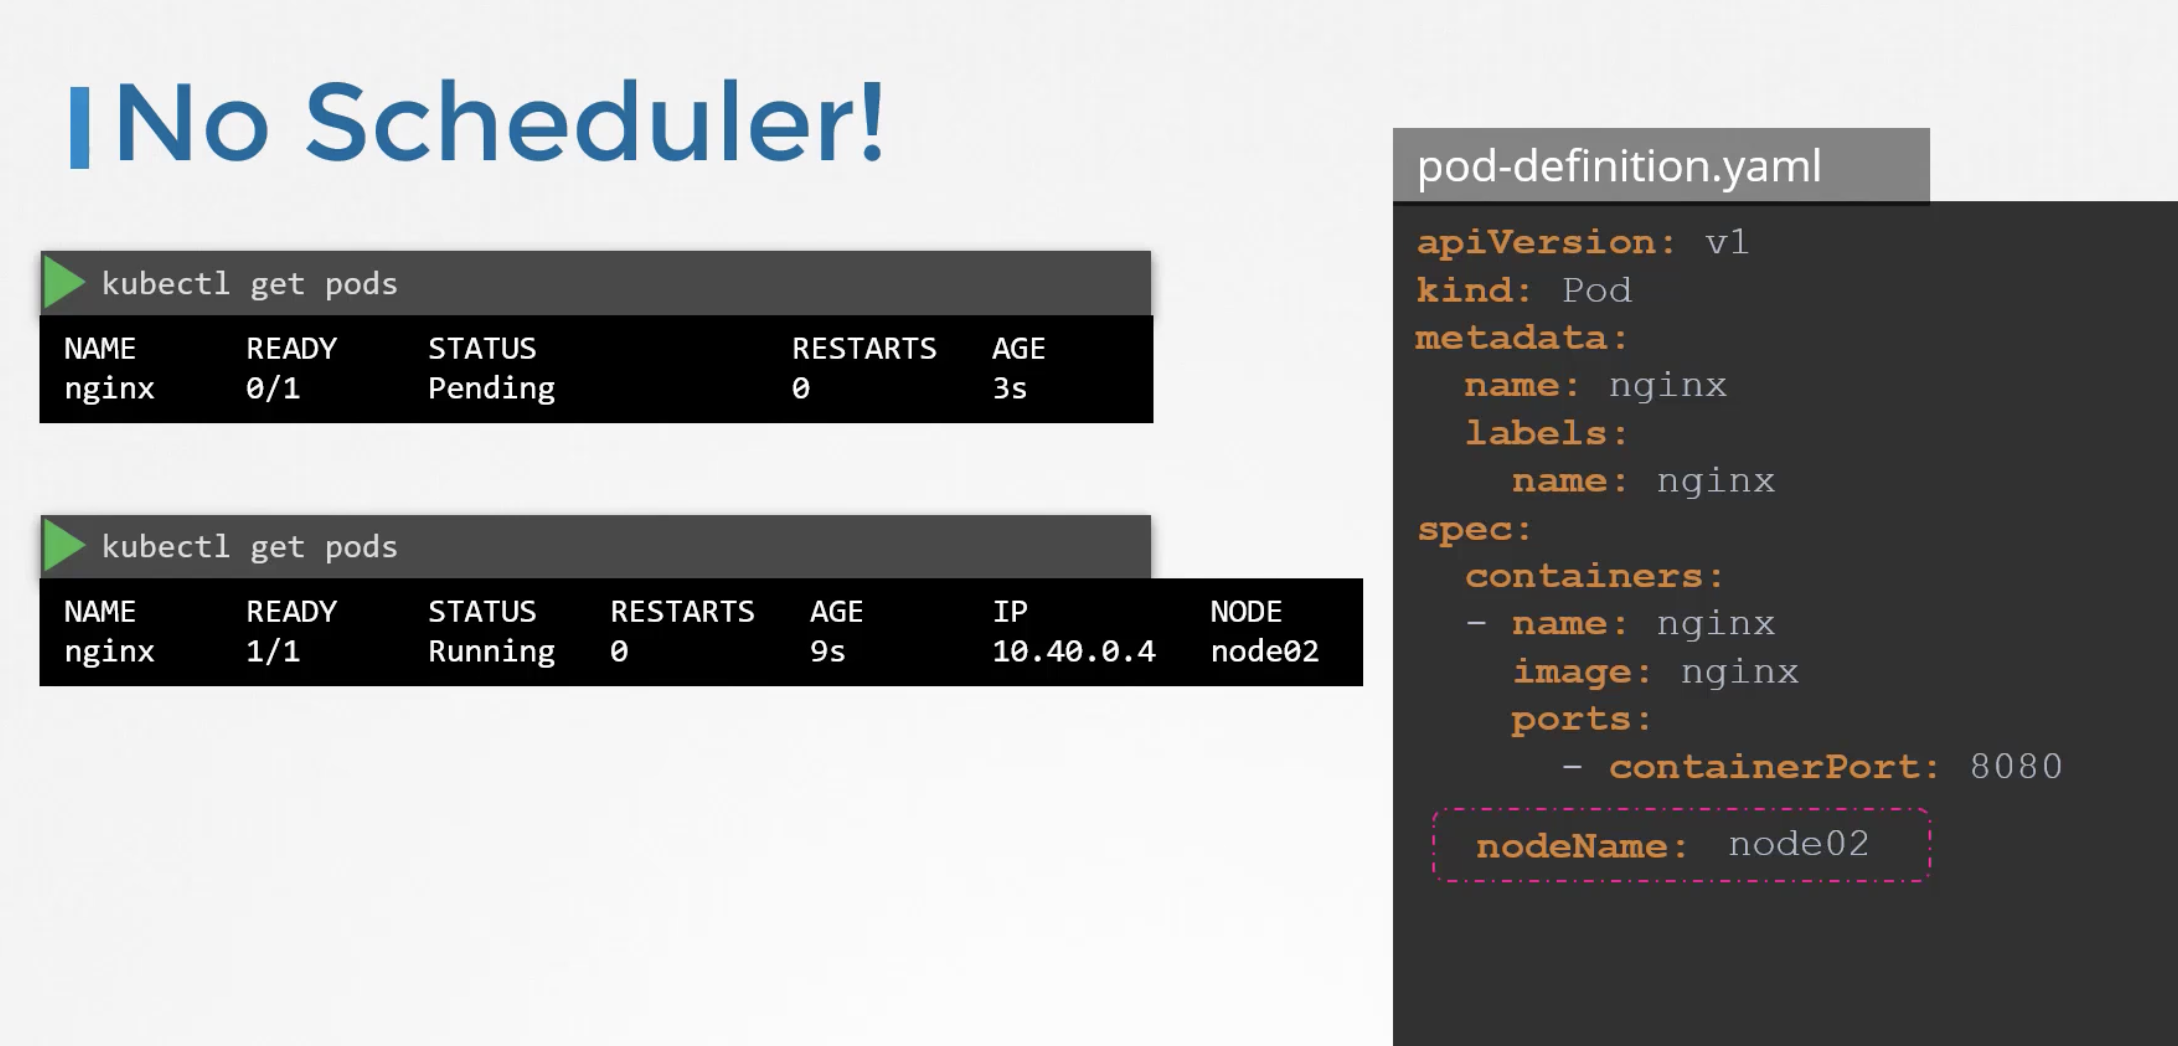
How do you assign an already running Pod to a specific node?
You can use the Binding API.
apiVersion: v1
kind: Binding
metadata:
  name: nginx
target:
  apiVersion:v1
  kind: Node
  name: node2
Alternatively, you can stop the running Pod, specify the nodeName, and recreate the Pod.
56 Labels and Selectors in Kubernetes
Labels can be specified as key-value pairs.
For resources, labels are defined under metadata -> labels. In places like Replica Sets where specific Pods need to be filtered, key-value pairs are specified in selector -> matchLabels.
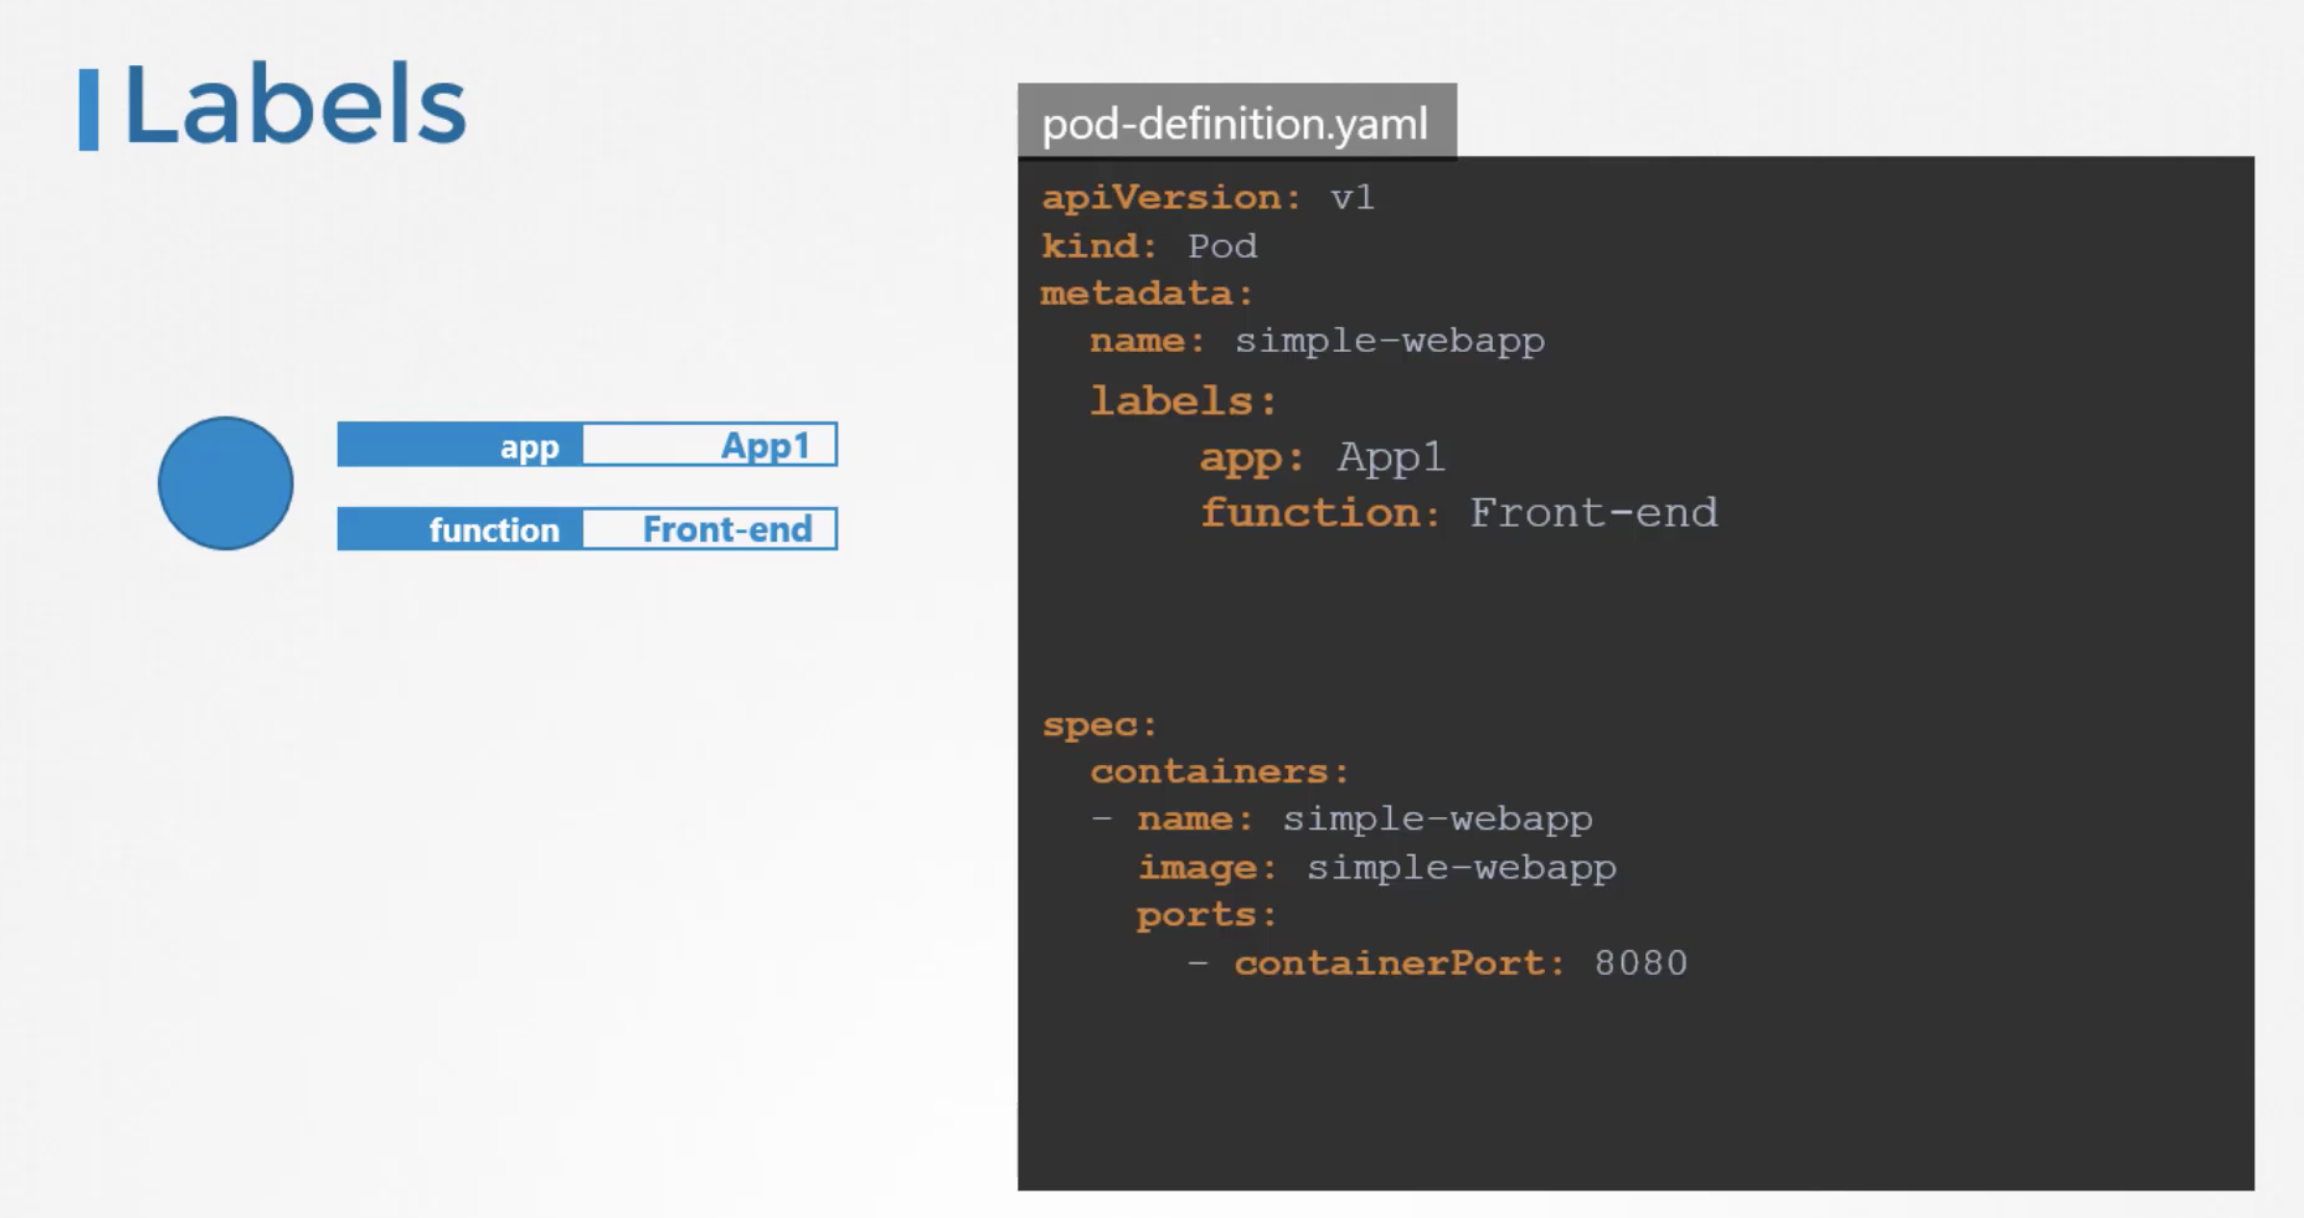
Labels and selectors are used for grouping and selecting.
Annotations are also used to store additional metadata.
Selecting only Pods with the label env=dev:
$ kubectl get pods --show-labels=true
NAME          READY   STATUS    RESTARTS   AGE    LABELS
app-1-krzm7   1/1     Running   0          3m3s   bu=finance,env=dev,tier=frontend
db-2-8lwj8    1/1     Running   0          3m2s   bu=finance,env=prod,tier=db
db-1-gw7lc    1/1     Running   0          3m3s   env=dev,tier=db
app-1-tbwcg   1/1     Running   0          3m3s   bu=finance,env=dev,tier=frontend
app-2-5lt89   1/1     Running   0          3m3s   env=prod,tier=frontend
db-1-btt4j    1/1     Running   0          3m3s   env=dev,tier=db
auth          1/1     Running   0          3m2s   bu=finance,env=prod
app-1-qqhbb   1/1     Running   0          3m3s   bu=finance,env=dev,tier=frontend
db-1-chgq9    1/1     Running   0          3m3s   env=dev,tier=db
db-1-wgvgf    1/1     Running   0          3m3s   env=dev,tier=db
app-1-zzxdf   1/1     Running   0          3m2s   bu=finance,env=prod,tier=frontend


$ kubectl get pods --selector env=prod
NAME          READY   STATUS    RESTARTS   AGE
db-2-8lwj8    1/1     Running   0          5m2s
app-2-5lt89   1/1     Running   0          5m3s
auth          1/1     Running   0          5m2s
app-1-zzxdf   1/1     Running   0          5m2s


$ kubectl get all  --selector env=prod
NAME              READY   STATUS    RESTARTS   AGE
pod/db-2-8lwj8    1/1     Running   0          6m26s
pod/app-2-5lt89   1/1     Running   0          6m27s
pod/auth          1/1     Running   0          6m26s
pod/app-1-zzxdf   1/1     Running   0          6m26s

NAME            TYPE        CLUSTER-IP   EXTERNAL-IP   PORT(S)    AGE
service/app-1   ClusterIP   10.43.7.99   <none>        3306/TCP   6m26s

NAME                    DESIRED   CURRENT   READY   AGE
replicaset.apps/db-2    1         1         1       6m27s
replicaset.apps/app-2   1         1         1       6m27s


$ kubectl get pods --selector env=prod,bu=finance,tier=frontend
NAME          READY   STATUS    RESTARTS   AGE
app-1-zzxdf   1/1     Running   0          8m1s
59 Taints and Tolerations
"Taint" means contaminated, and "Toleration" means resistance. If a Taint is applied to a specific Node, Pods without the corresponding Toleration will not be scheduled on that Node. Conversely, Pods with the matching Toleration can be scheduled on that Node.
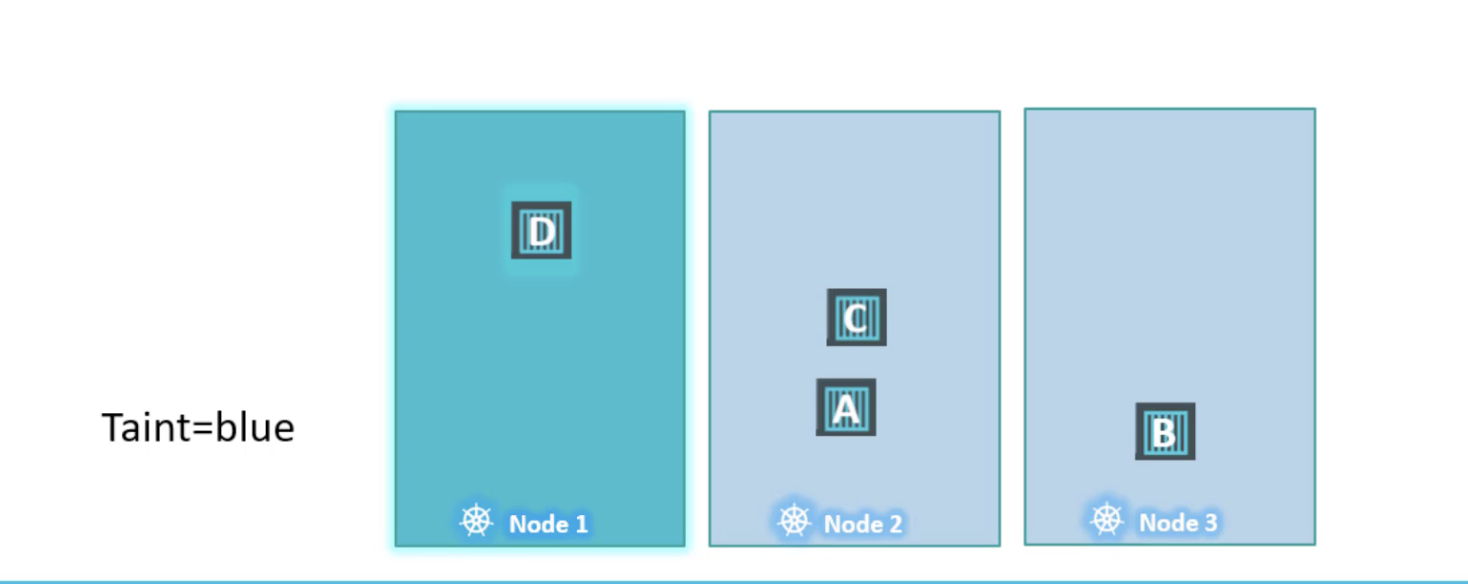
Taint Node
Specify the Node name in node-name and choose one of three taint effects: NoSchedule, PreferNoSchedule, or NoExecute.
$ kubectl taint nodes node-name key=value:taint-effect

# example
$ kubectl taint nodes node01 spray=mortein:NoSchedule
node/node01 modified
Define the Toleration in the spec section. All values inside must be enclosed in double quotes.
apiVersion: v1
kind: Pod
metadata:
  name: myapp-pod
spec:
  containers:
  - name: nginx-container
    image: nginx
  tolerations:
  - key: "app"
    operator: "Equal"
    value: "blue"
    effect:"NoSchedule"
The NoExecute taint effect deserves closer attention. NoExecute includes the functionality of NoSchedule but also evicts existing Pods that are already running. Therefore, if you set a Taint with NoExecute on a node that is already in operation, it may affect running Pods, so caution is needed.
Looking at Taints and Tolerations, you might think they are used to direct specific Pods to specific Nodes. However, they are actually used to prevent specific Pods from being scheduled on specific Nodes. Assigning Pods to specific Nodes is related to Node Affinity.
In Kubernetes, there is a Master Node, and the Master Node also has the environment to run Pods (you can actually move Pods to the Master Node). However, Pods are generally not scheduled on the Master Node because it has a Taint applied to it, preventing user Pods from running there.
You can check the taint with kubectl describe node kubemaster | grep Taint.
Create another pod named bee with the nginx image, which has a toleration set to the taint mortein.
$ kubectl run bee --image nginx --dry-run=client -o yaml
apiVersion: v1
kind: Pod
metadata:
  creationTimestamp: null
  labels:
    run: bee
  name: bee
spec:
  containers:
  - image: nginx
    name: bee
    resources: {}
  dnsPolicy: ClusterFirst
  restartPolicy: Always
status: {}

# Edit like below
apiVersion: v1
kind: Pod
metadata:
  creationTimestamp: null
  labels:
    run: bee
  name: bee
spec:
  tolerations:
    - key: "spray"
      operator: "Equal"
      value: "mortein"
      effect: "NoSchedule"
  containers:
  - image: nginx
    name: bee
    resources: {}
  dnsPolicy: ClusterFirst
  restartPolicy: Always
status: {}

$ kubectl create -f bee.yaml

$ kubectl describe nodes node01 | grep mort
Taints:             spray=mortein:NoSchedule

$ kubectl describe nodes controlplane | grep Taints
Taints:             node-role.kubernetes.io/control-plane:NoSchedule
Remove taints of controlplane node.
$ kubectl taint nodes controlplane node-role.kubernetes.io/control-plane:NoSchedule-
node/controlplane untainted

$ kubectl describe nodes controlplane | grep Taints
Taints:             <none>
63. Node Affinity
You can assign nodes using Node Selector labels or Node Affinity. The node must have labels assigned to it beforehand.
There are two options: requiredDuringSchedulingIgnoredDuringExecution and preferredDuringSchedulingIgnoredDuringExecution. The difference is whether the rule is mandatory or optional. With Required, if there is no suitable node for the Pod, it will not be scheduled. With Preferred, the scheduler will try its best but will still schedule the Pod elsewhere if needed.
nodeSelector:
  size: Large
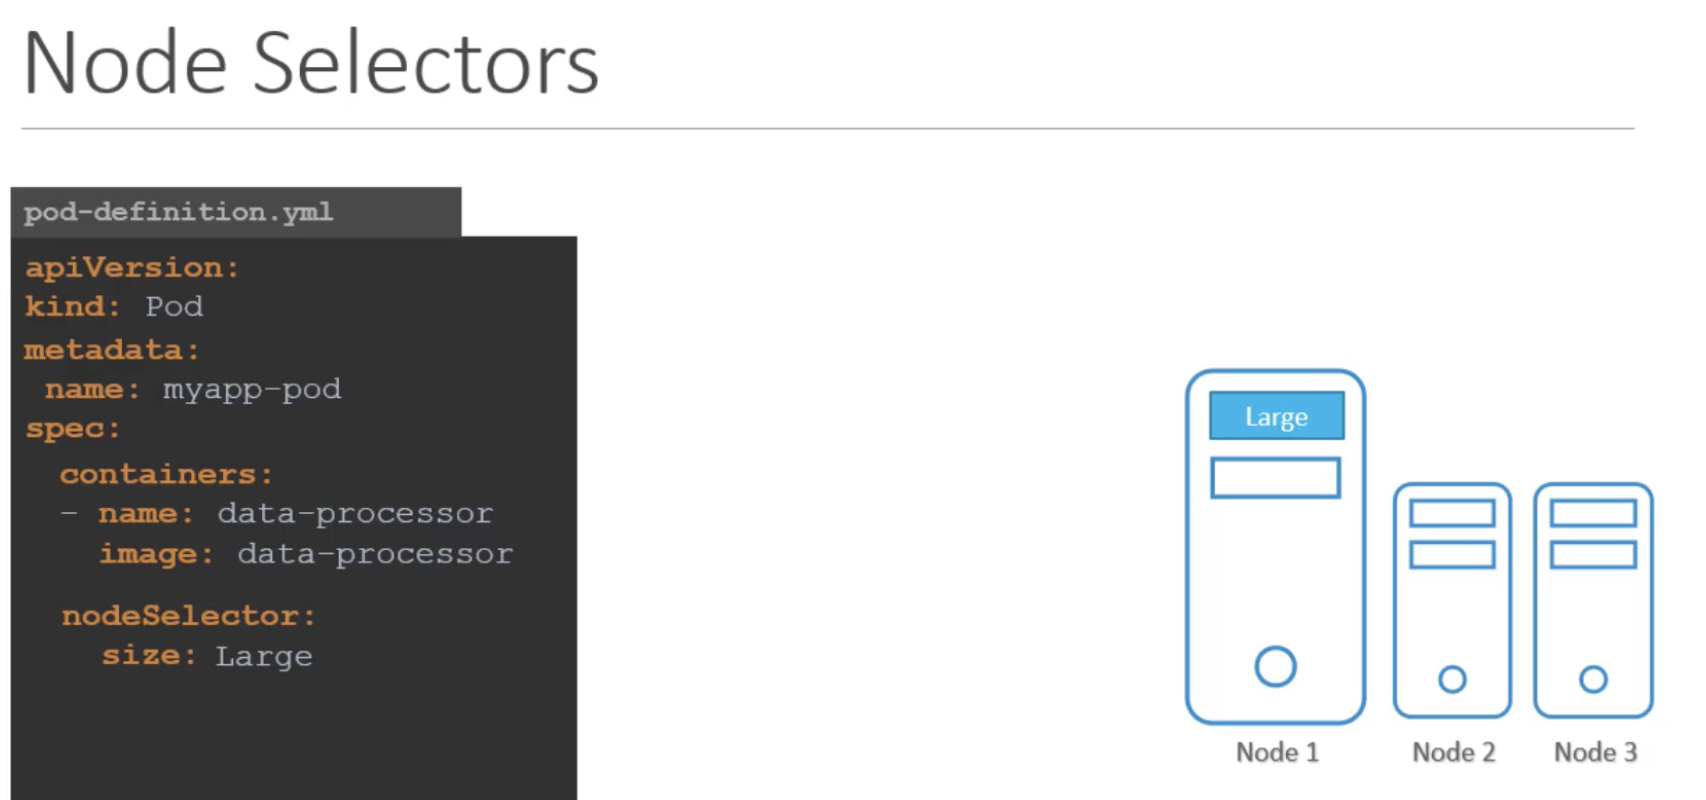
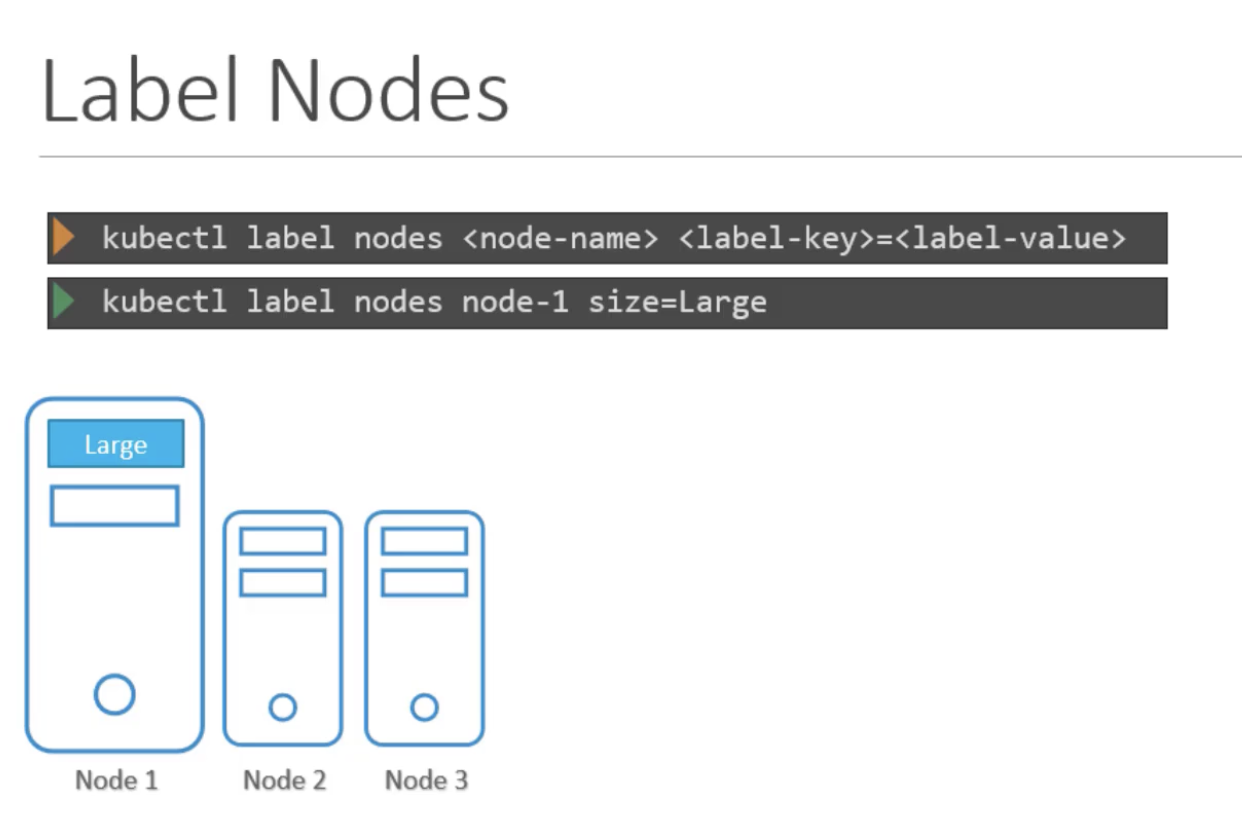
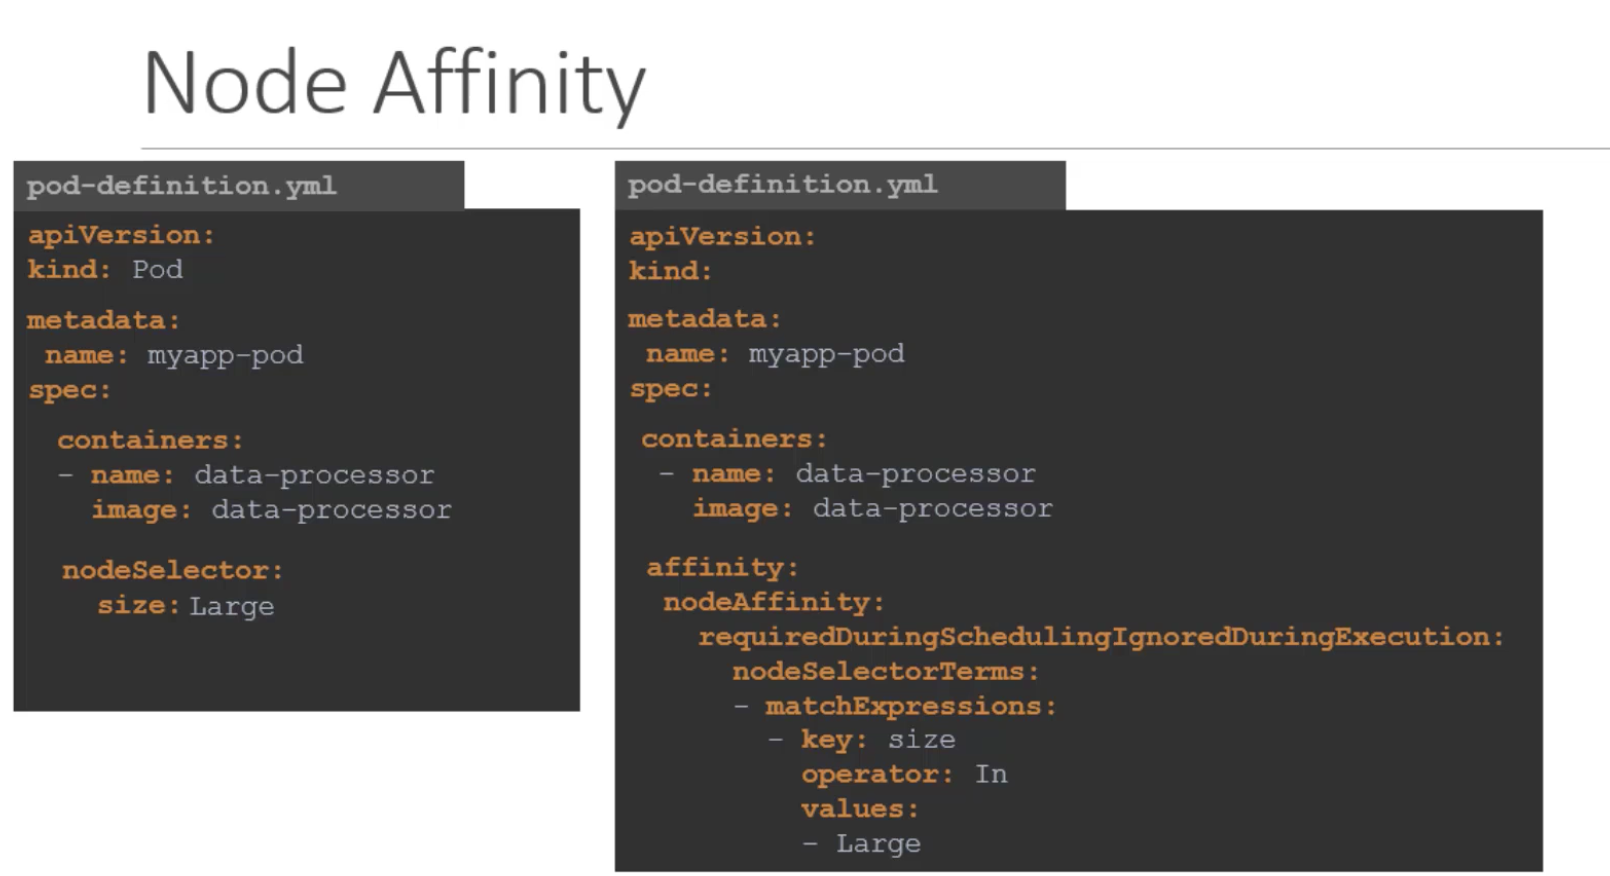
Apply label to a node.
kubectl label nodes node01 color=blue
node/node01 labeled
Create a new deployment named red with the nginx image and 2 replicas, and ensure it gets placed on the controlplane node only. Use the label key - node-role.kubernetes.io/control-plane - which is already set on the controlplane node.
apiVersion: apps/v1
kind: Deployment
metadata:
  creationTimestamp: null
  labels:
    app: red
  name: red
spec:
  replicas: 2
  selector:
    matchLabels:
      app: red
  strategy: {}
  template:
    metadata:
      creationTimestamp: null
      labels:
        app: red
    spec:
      affinity:
        nodeAffinity:
          requiredDuringSchedulingIgnoredDuringExecution:
            nodeSelectorTerms:
            - matchExpressions:
              - key: node-role.kubernetes.io/control-plane
                operator: Exists
      containers:
      - image: nginx
        name: nginx
        resources: {}
status: {}
Using only Taints and Tolerations cannot guarantee that a specific Pod will be scheduled on a specific Node. Using only Node Affinity also cannot guarantee this. By combining both Taints & Tolerations and Node Affinity, you can ensure that only specific Pods are scheduled on specific Nodes.
67 Resource Requirements and Limits
You can request the hardware resources needed for a Pod to run from Kubernetes. Limits can also be set.
spec:
 continers:
 - name: simple-webapp
   image: nginx
   ports:
   - containerPort: 8080
   resources:
     requests:
       memory: "1Gi"
       cpu: 1
     limits:
       memory: "2Gi"
       cpu: 2
CPU resources can be set to less than 1 vCPU. For example, 0.1 means 100ms. If CPU usage exceeds the limit, throttling is applied. However, memory works differently. When memory usage is exceeded, an OOM (Out Of Memory) error occurs and the Pod is terminated.
You can also set minimum and maximum ranges for limits at the Namespace level.
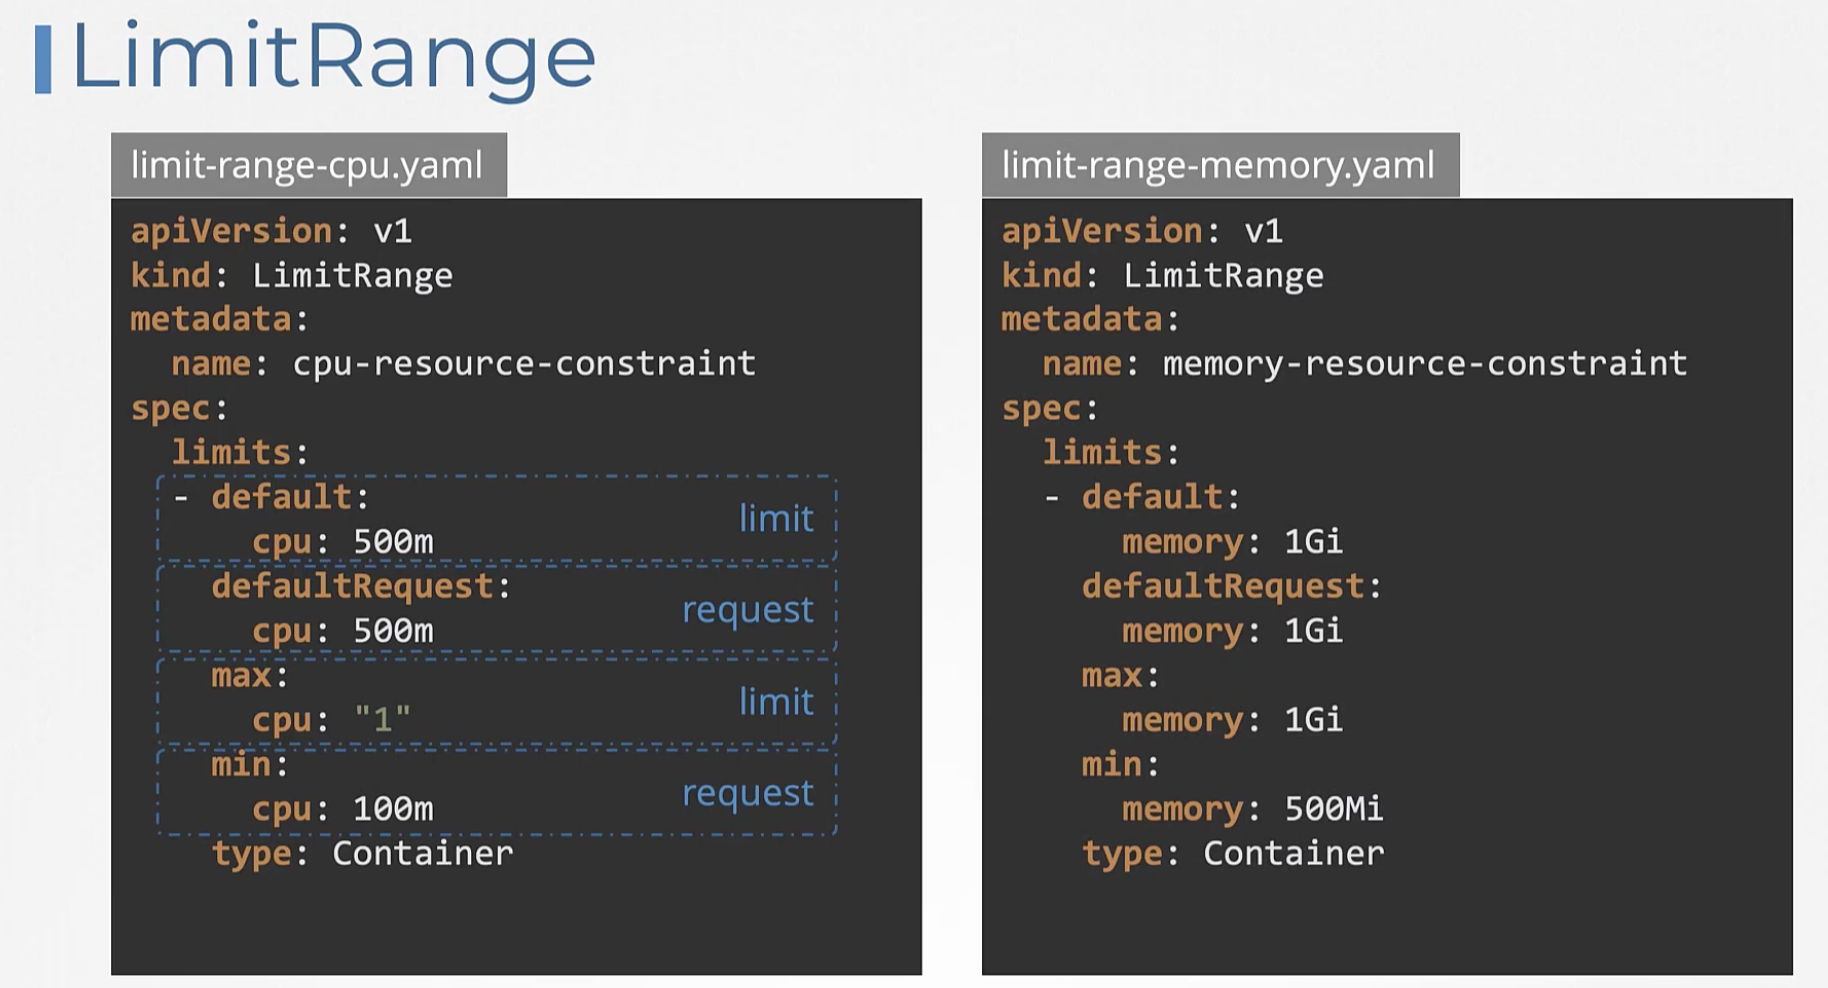
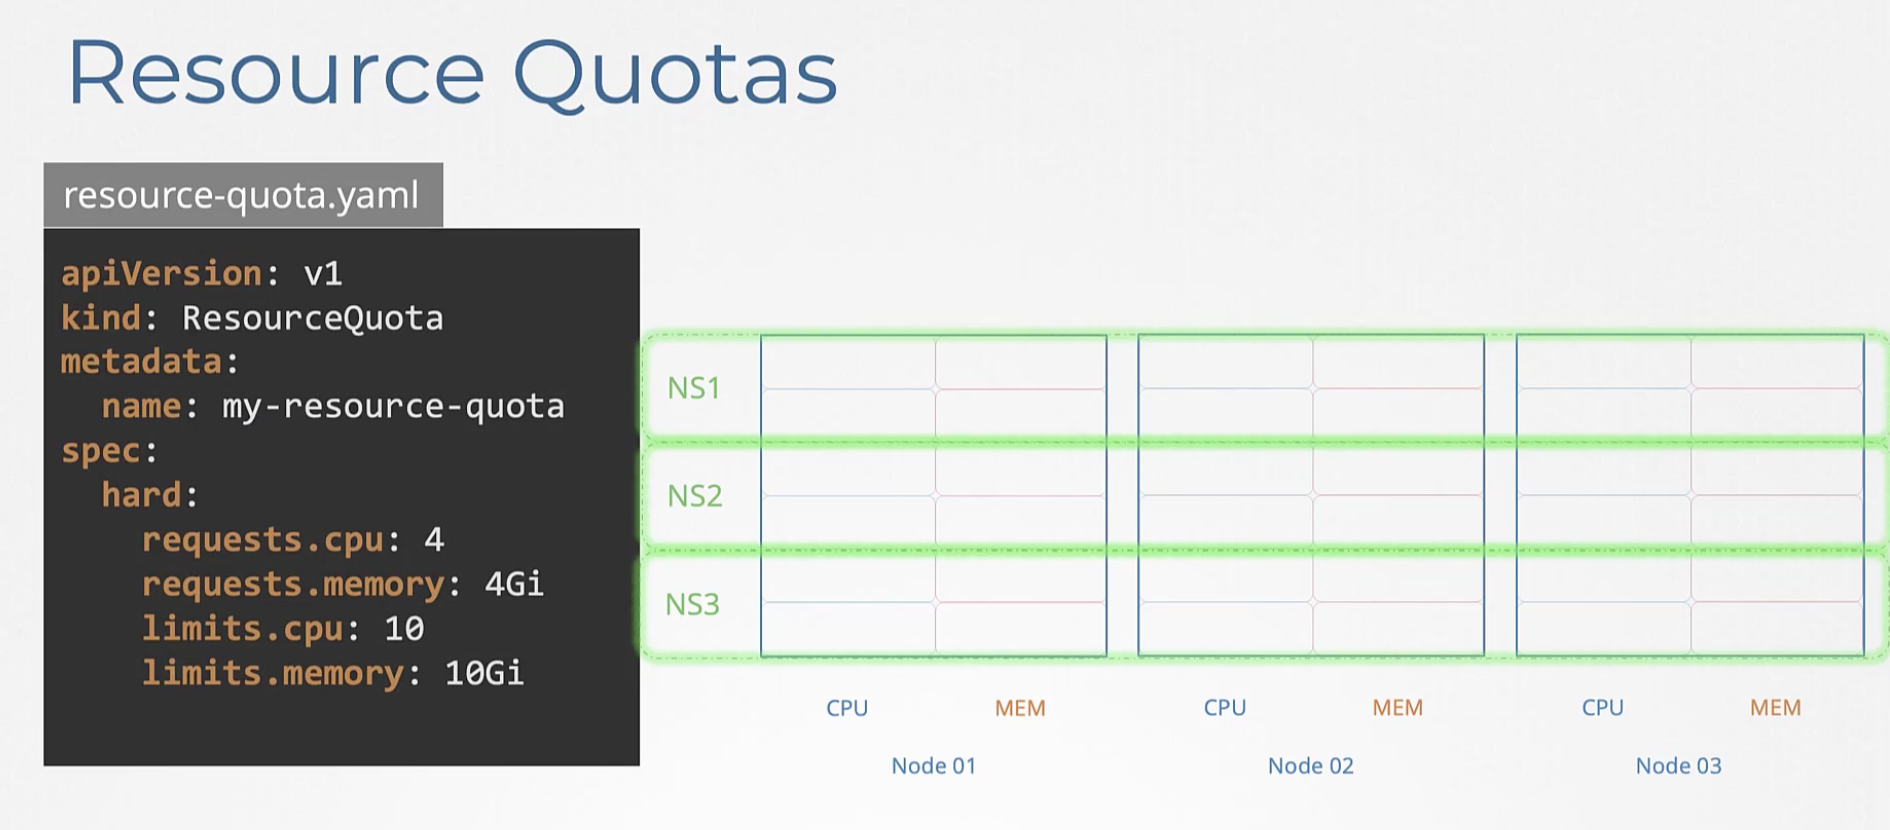
Quotas can also be set at the Namespace level to allocate the maximum hardware resources that a namespace can create.
71 DaemonSets
A DaemonSet is used to run exactly one Pod per Node. As the name suggests, it is a daemon that runs continuously without terminating. When a new node is added, the DaemonSet automatically adds a Pod to it.
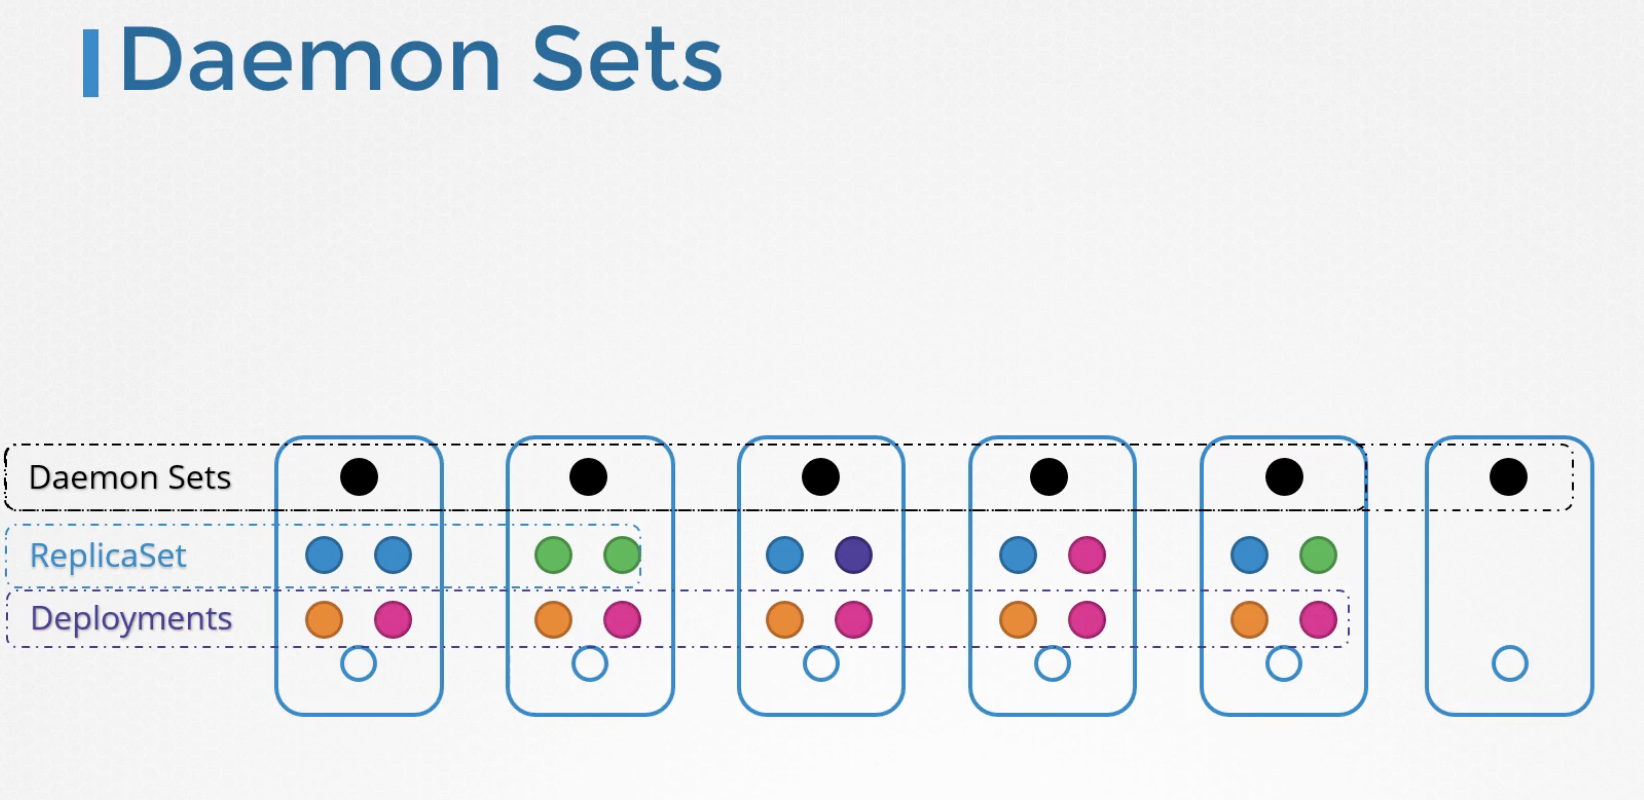
DaemonSets are typically used for monitoring solutions or log viewers. The most well-known DaemonSet in Kubernetes is kube-proxy.
Defining a DaemonSet is almost identical to defining a ReplicaSet.
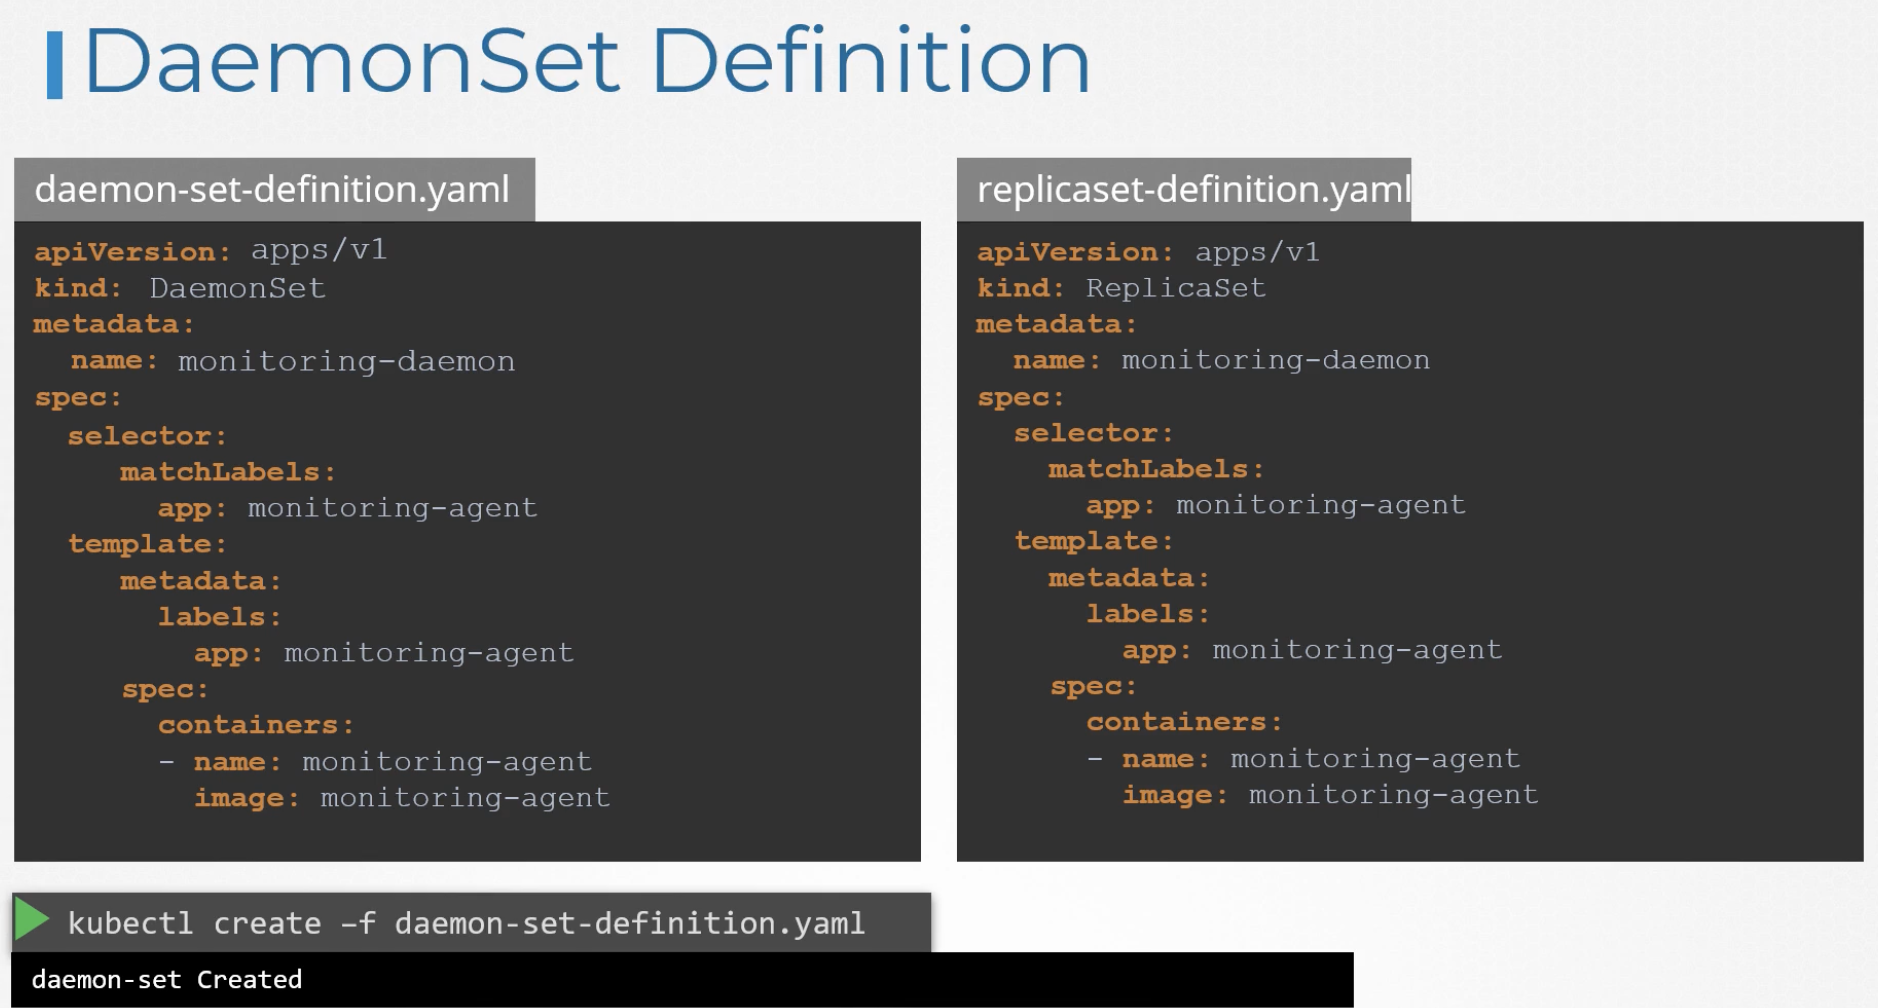
kubectl get daemonsets
Can DaemonSets guarantee that a Pod always resides on each node? The answer is yes. In v1.12, this was ensured by explicitly specifying the node in the nodeName property of the DaemonSet's Pod specification.
From Kubernetes versions after v1.12, the approach is slightly different -- instead of explicit specification, it uses NodeAffinity and the default scheduler to create DaemonSets.
Question: Create Daemonset which requires below specification.
Name: elasticsearch Namespace: kube-system Image: registry.k8s.io/fluentd-elasticsearch:1.20
kubectl create deployment elasticsearch --namespace=kube-system --image=registry.k8s.io/fluentd-elasticsearch:1.20 --dry-run=client -o yaml
74 Static Pods
If there is no Kubernetes API Server, ETCD, or Scheduler (no master node exists), and only a single Worker Node with just a Kubelet (including the container runtime) is running, can Pods still be started? The answer is yes. There is a special type of Pod called a Static Pod, which allows Pod creation without the other system utilities (API Server, ETCD, Scheduler).
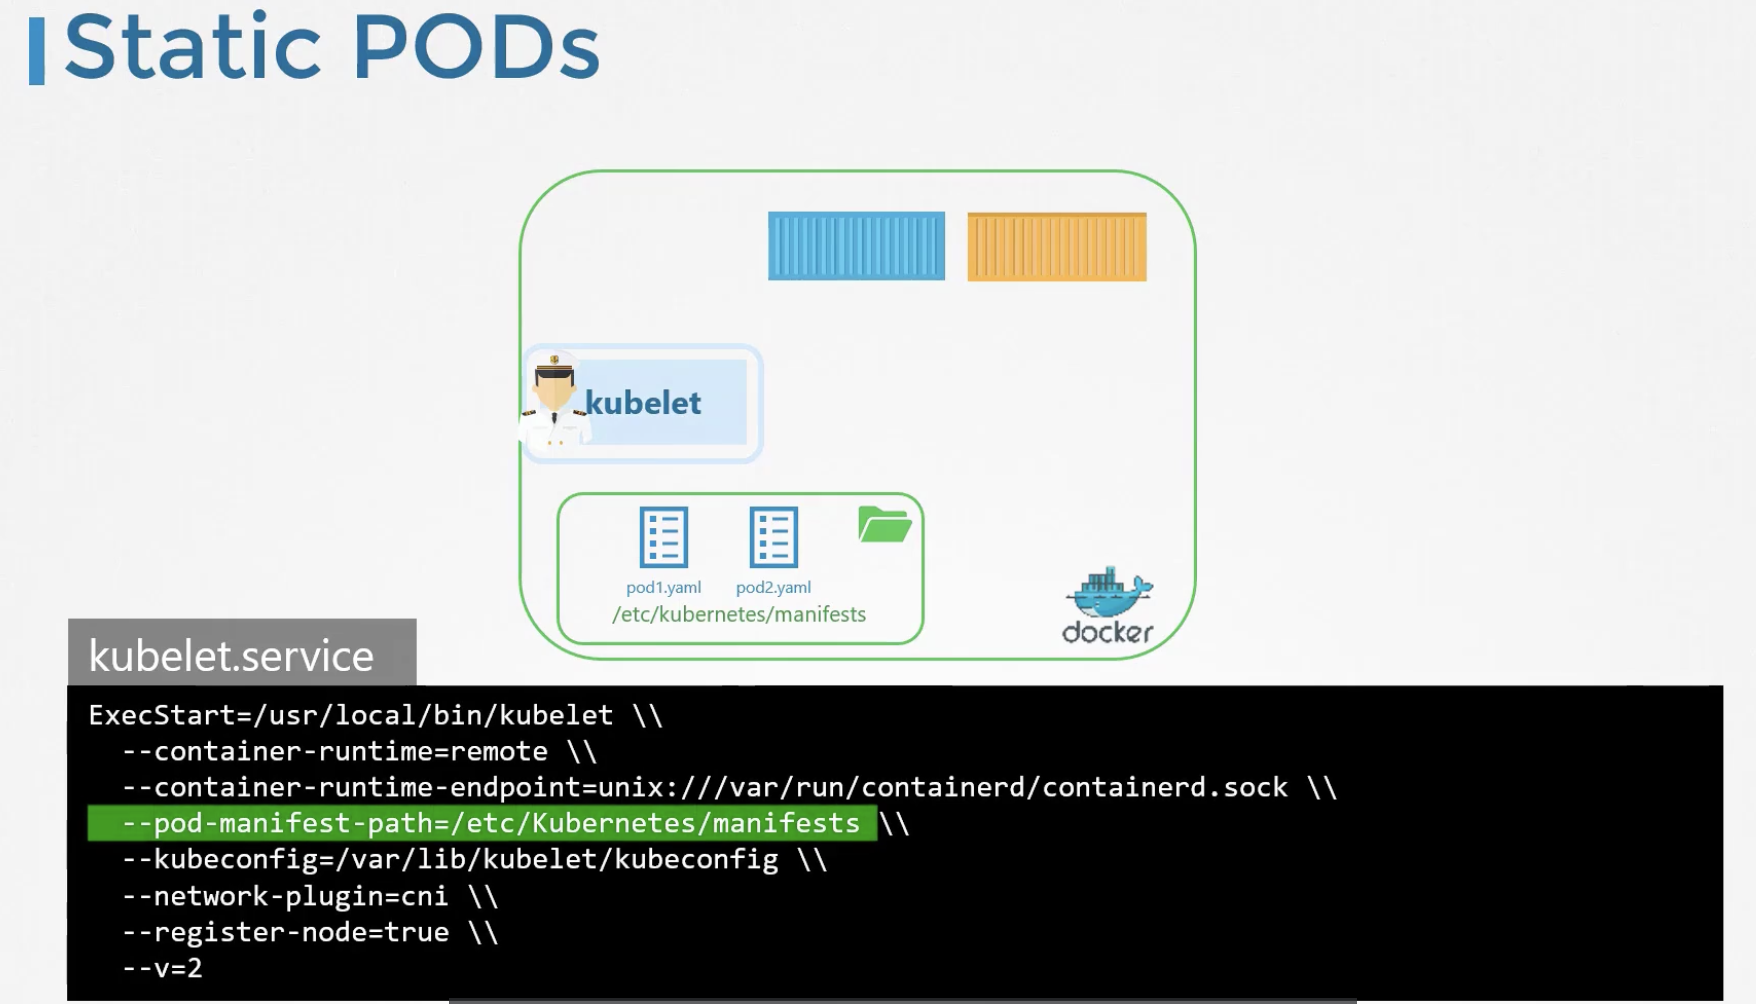
To run Static Pods, Pod definitions must be placed under the /etc/kubernetes/manifests directory.
Kubelet periodically checks this directory and creates Pods from the files found there.
Below is an example of listing the contents of this directory on a master node:
$ ls -al /etc/kubernetes/manifests/
total 24
drwxr-xr-x 2 root root 4096  8월 12 10:56 ./
drwxr-xr-x 4 root root 4096  8월 12 10:56 ../
-rw------- 1 root root 2411  8월 12 10:56 etcd.yaml
-rw------- 1 root root 4047  8월 12 10:56 kube-apiserver.yaml
-rw------- 1 root root 3429  8월 12 10:56 kube-controller-manager.yaml
-rw------- 1 root root 1463  8월 12 10:56 kube-scheduler.yaml
youngjukim@cubi01:~$
If a file is deleted, Kubelet automatically removes the corresponding Pod. If it is updated, Kubelet automatically recreates the Pod.
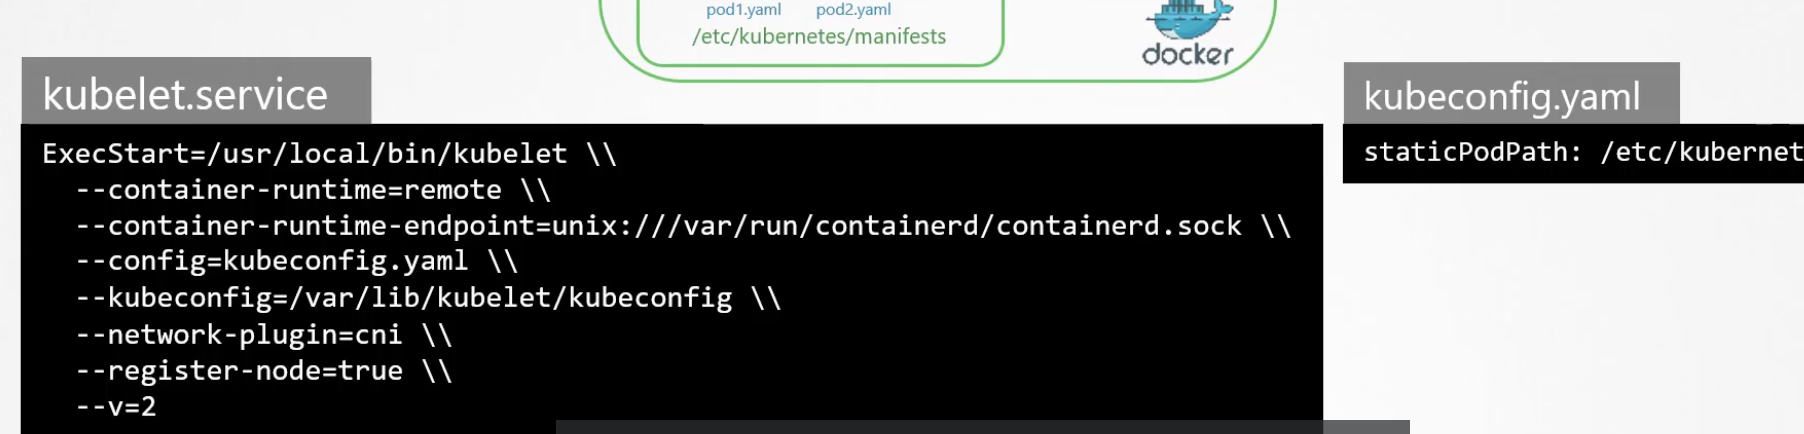
The path for Static Pod definitions does not have to be /etc/kubernetes/manifests -- it can be configured to a different directory. However, changing this path requires restarting the Kubelet.
Another approach is to pass a config file as an argument and set the path using staticPodPath.
If a standalone Kubelet is running without a master node, how can you verify that Static Pods are running correctly?
Since there is no master node, there is no API Server, and therefore kubectl commands cannot be used. In this case, you must use docker ps or crictl ps to check whether the Pods are running properly.
Can the API Server detect the existence of Static Pods running on a Worker Node's Kubelet when a Master Node is present? The answer is yes. However, it can only detect their existence -- modifications to the Static Pods are not possible. The API Server has read-only permissions for Static Pods. Another notable characteristic is that Static Pods automatically have the node name appended to the Pod name.
Static Pods are not dependent on the Kubernetes control plane and can be deployed simply by placing a Pod definition file in the designated directory, making deployment straightforward. Most Pods in kube-system are Static Pods, and the kubeadm tool also leverages this mechanism.
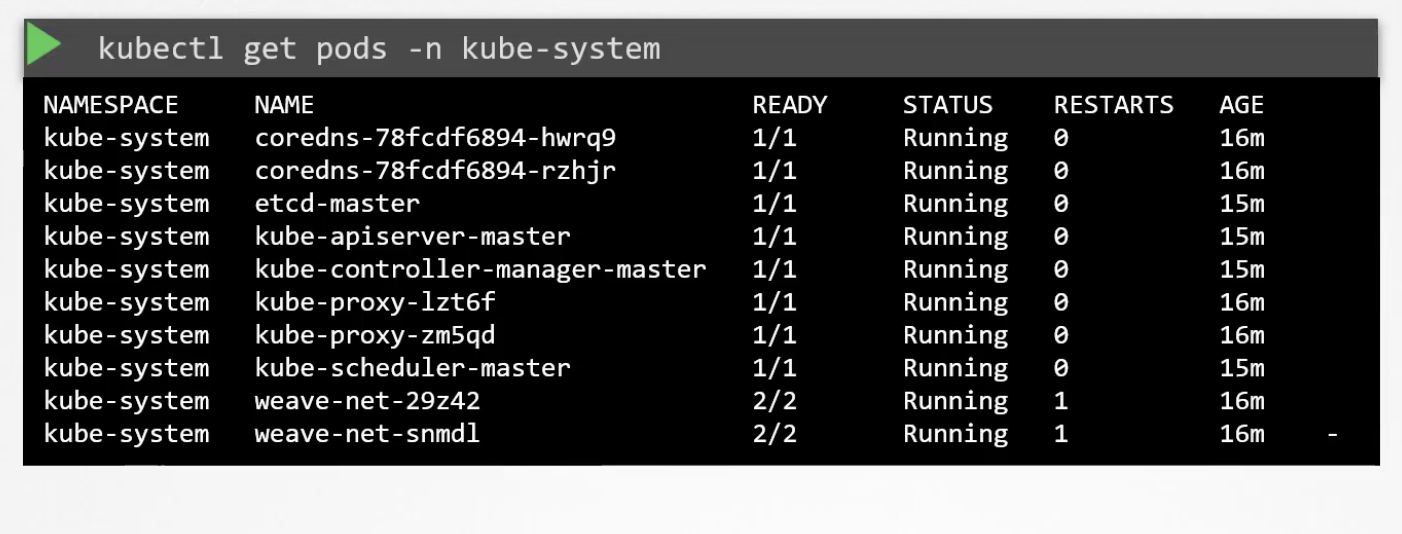
DaemonSets and Static Pods can be confused. They share the common trait of not being affected by the kube-scheduler, but everything else is entirely different. A DaemonSet runs exactly one Pod per node and is created by the API Server. In contrast, a Static Pod is created by the Kubelet.
apiVersion: v1
kind: Pod
metadata:
  creationTimestamp: null
  labels:
    run: static-busybox
  name: static-busybox
spec:
  containers:
  - command:
    - sleep
    - "1000"
    image: busybox
    name: static-busybox
    resources: {}
  dnsPolicy: ClusterFirst
  restartPolicy: Always
status: {}
77 Multiple Schedulers
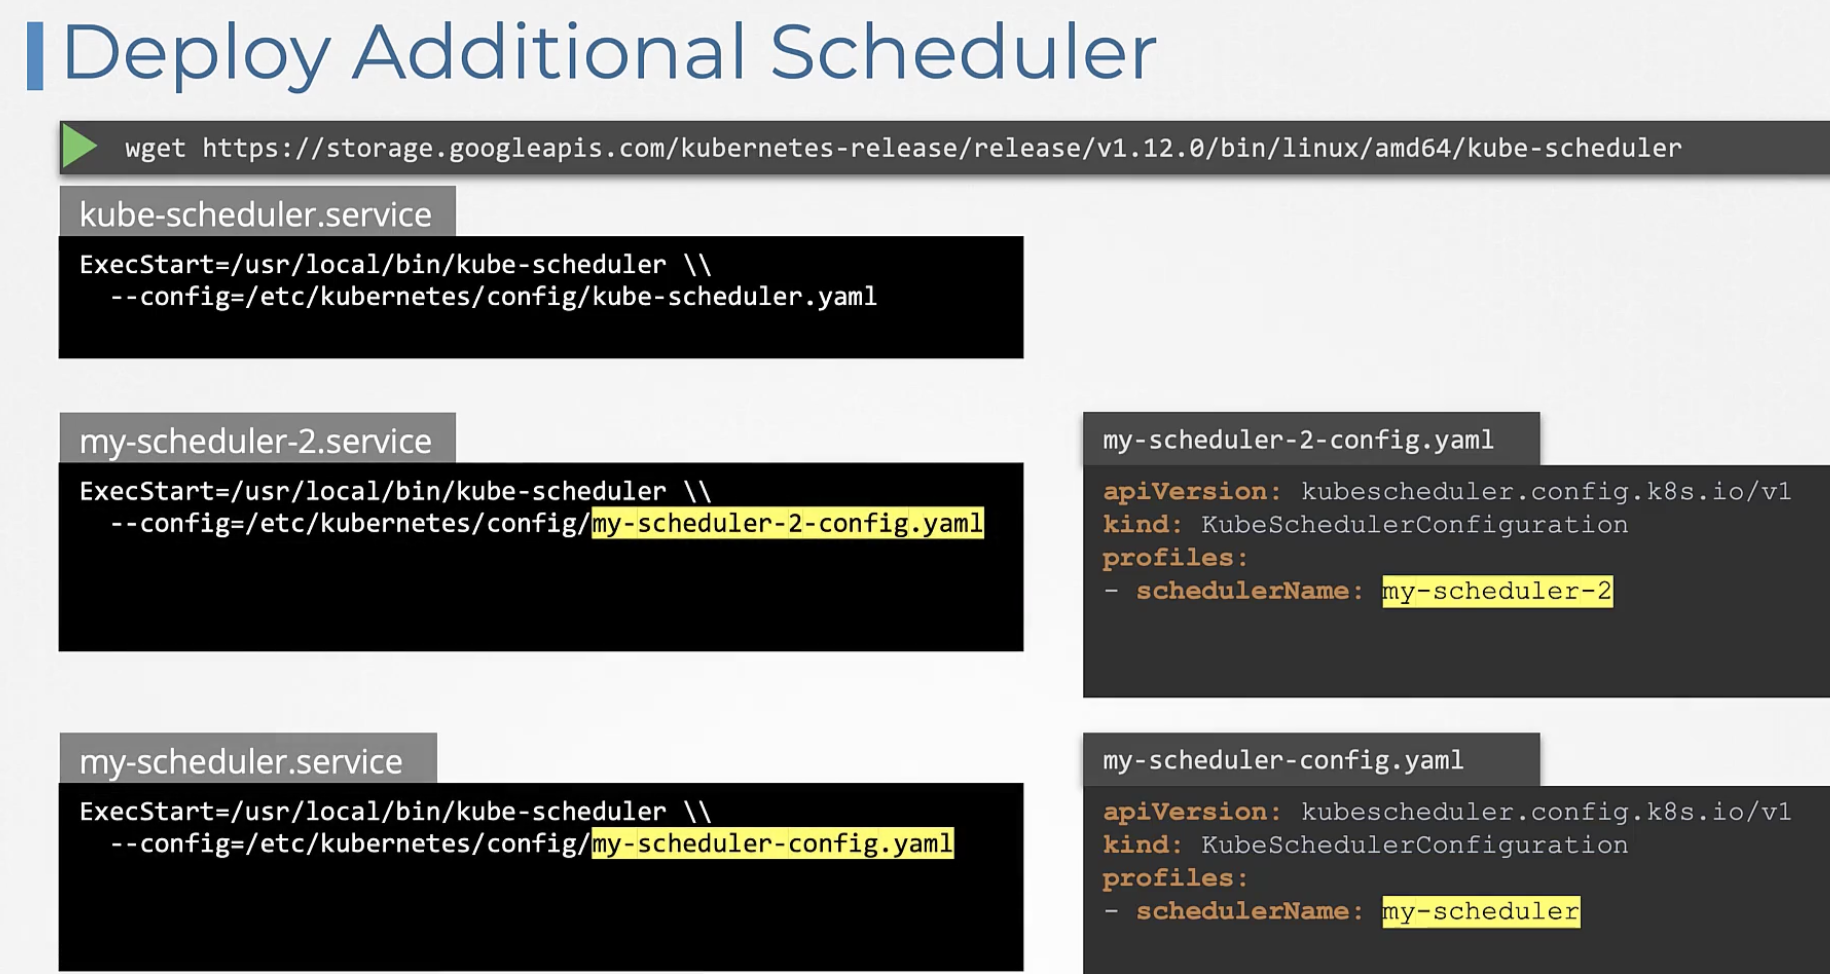
Kubernetes supports multiple schedulers. You can also configure which scheduler to use when scheduling a Pod.
The simplest way to add a custom scheduler is as shown below, but this method is no longer used in practice:
The current standard practice is to run the scheduler as a Pod, as shown below:
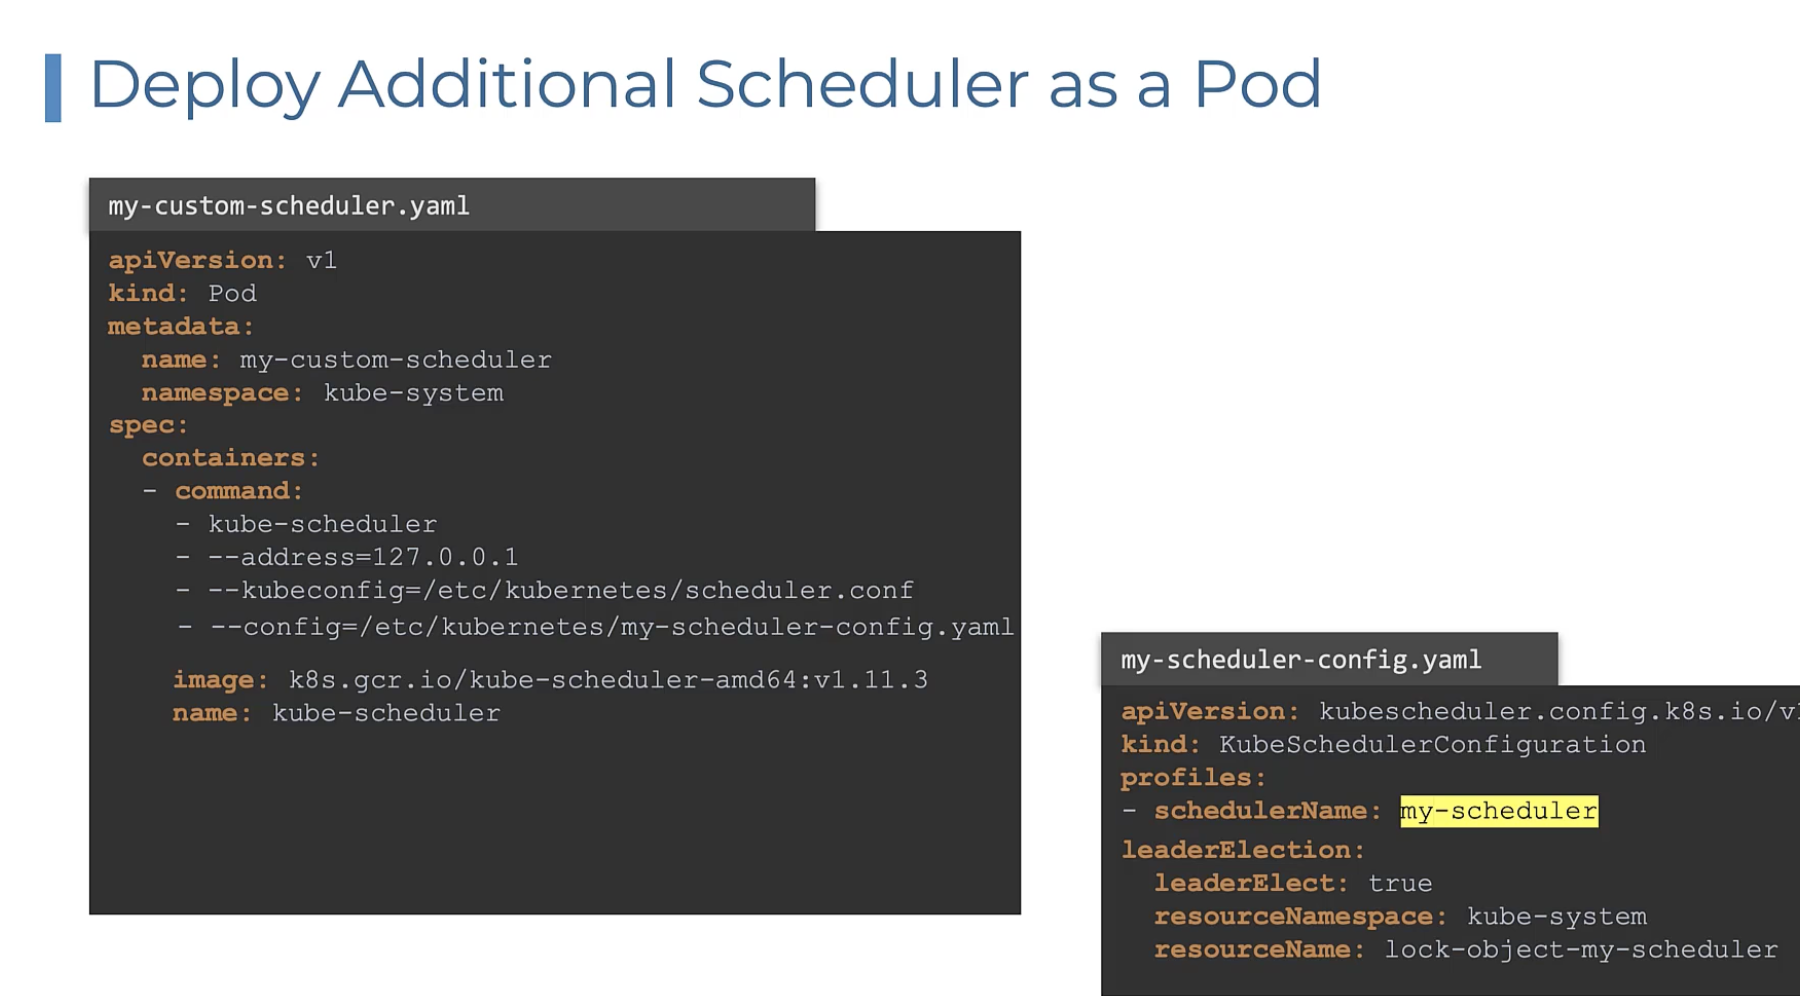
For the latest approach, refer to the official Kubernetes guide: Configuring Multiple Schedulers.
To explicitly specify a scheduler when running a Pod, set the scheduler name in the schedulerName field under spec.
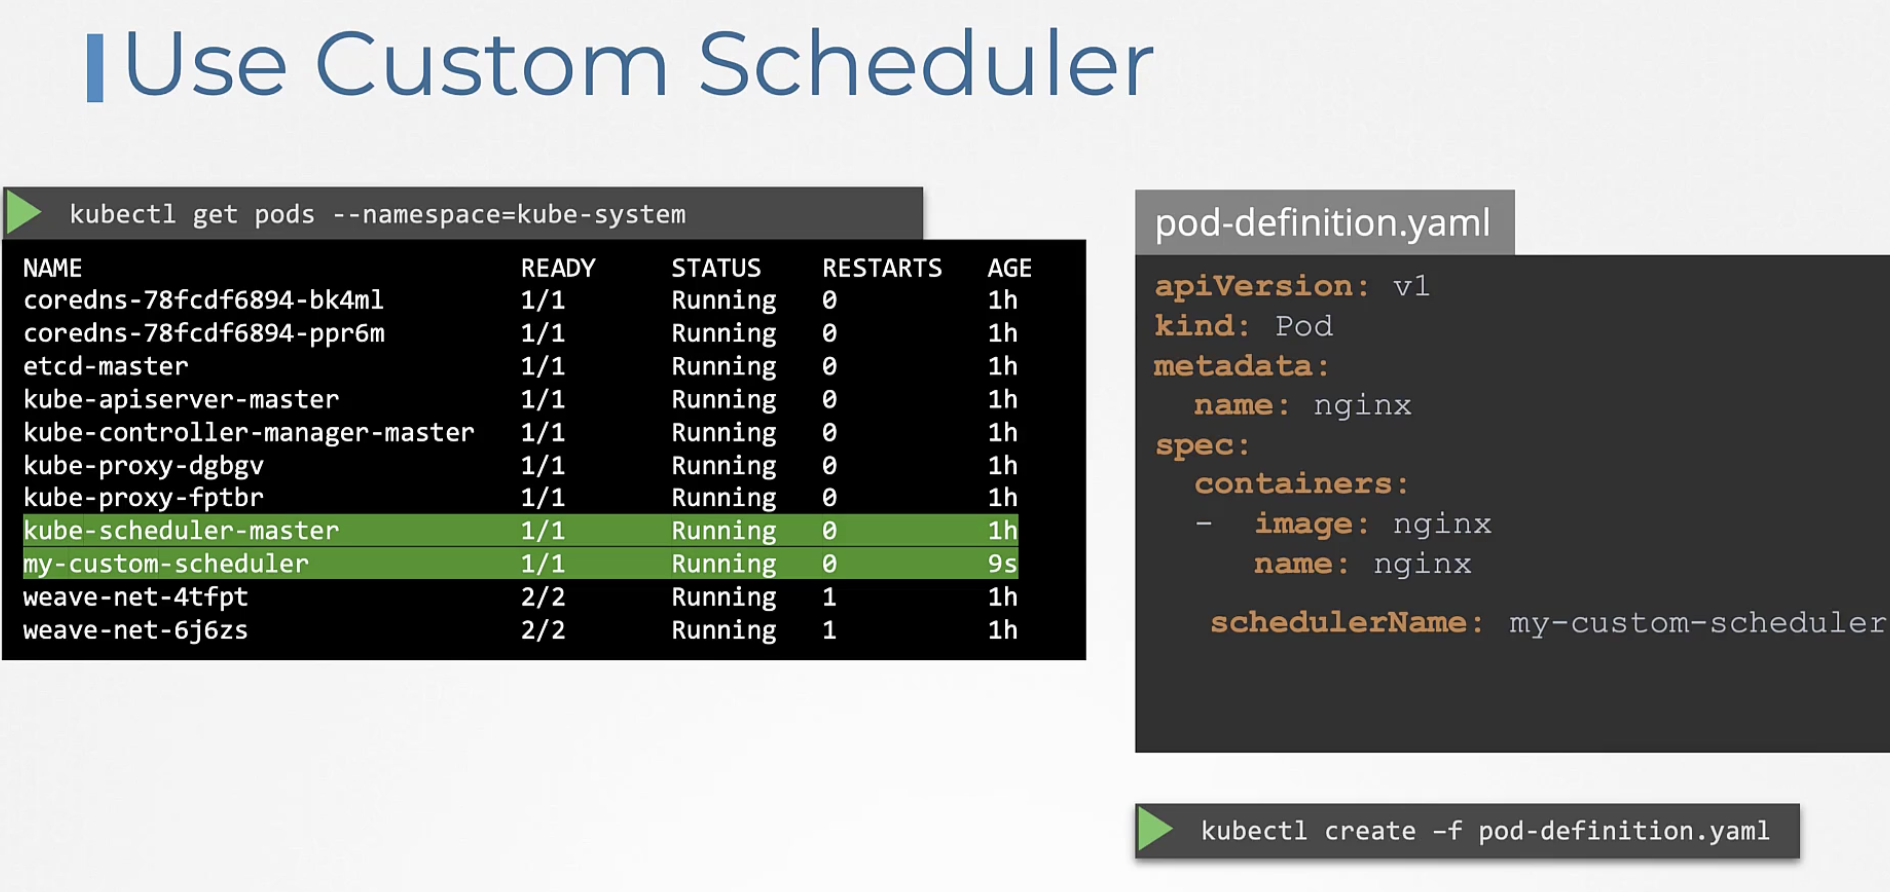
To verify that the newly created my-custom-scheduler is scheduling correctly, check with kubectl get events -o wide.
Alternatively, check the scheduler logs with kubectl logs my-custom-scheduler --name-space=kube-system.
apiVersion: kubescheduler.config.k8s.io/v1beta2
kind: KubeSchedulerConfiguration
profiles:
  - schedulerName: my-scheduler
leaderElection:
  leaderElect: false
apiVersion: v1
data:
  my-scheduler-config.yaml: |
    apiVersion: kubescheduler.config.k8s.io/v1beta2
    kind: KubeSchedulerConfiguration
    profiles:
      - schedulerName: my-scheduler
    leaderElection:
      leaderElect: false
kind: ConfigMap
metadata:
  creationTimestamp: null
  name: my-scheduler-config
  namespace: kube-system
Creating the ConfigMap:
$ kubectl create configmap my-scheduler-config --from-file=/root/my-scheduler-config.yaml -n kube-system
configmap/my-scheduler-config created
Creating the custom scheduler:
apiVersion: v1
kind: Pod
metadata:
  labels:
    run: my-scheduler
  name: my-scheduler
  namespace: kube-system
spec:
  serviceAccountName: my-scheduler
  containers:
  - command:
    - /usr/local/bin/kube-scheduler
    - --config=/etc/kubernetes/my-scheduler/my-scheduler-config.yaml
    image: registry.k8s.io/kube-scheduler:v1.27.0
    livenessProbe:
      httpGet:
        path: /healthz
        port: 10259
        scheme: HTTPS
      initialDelaySeconds: 15
    name: kube-second-scheduler
    readinessProbe:
      httpGet:
        path: /healthz
        port: 10259
        scheme: HTTPS
    resources:
      requests:
        cpu: '0.1'
    securityContext:
      privileged: false
    volumeMounts:
      - name: config-volume
        mountPath: /etc/kubernetes/my-scheduler
  hostNetwork: false
  hostPID: false
  volumes:
    - name: config-volume
      configMap:
        name: my-scheduler-config
80 Configuring Scheduler Profiles
Pods enter a Scheduling Queue before being scheduled, where they are sorted by priority. Next, during the Filtering phase, only nodes that can accommodate the Pod are shortlisted. The filtering targets are nodes. In the Scoring phase, scores are assigned among the remaining nodes to select one. Finally, Binding is performed.
Each phase has its own plugins, as shown below. Kubernetes provides Extension Points to allow customization of these plugins.
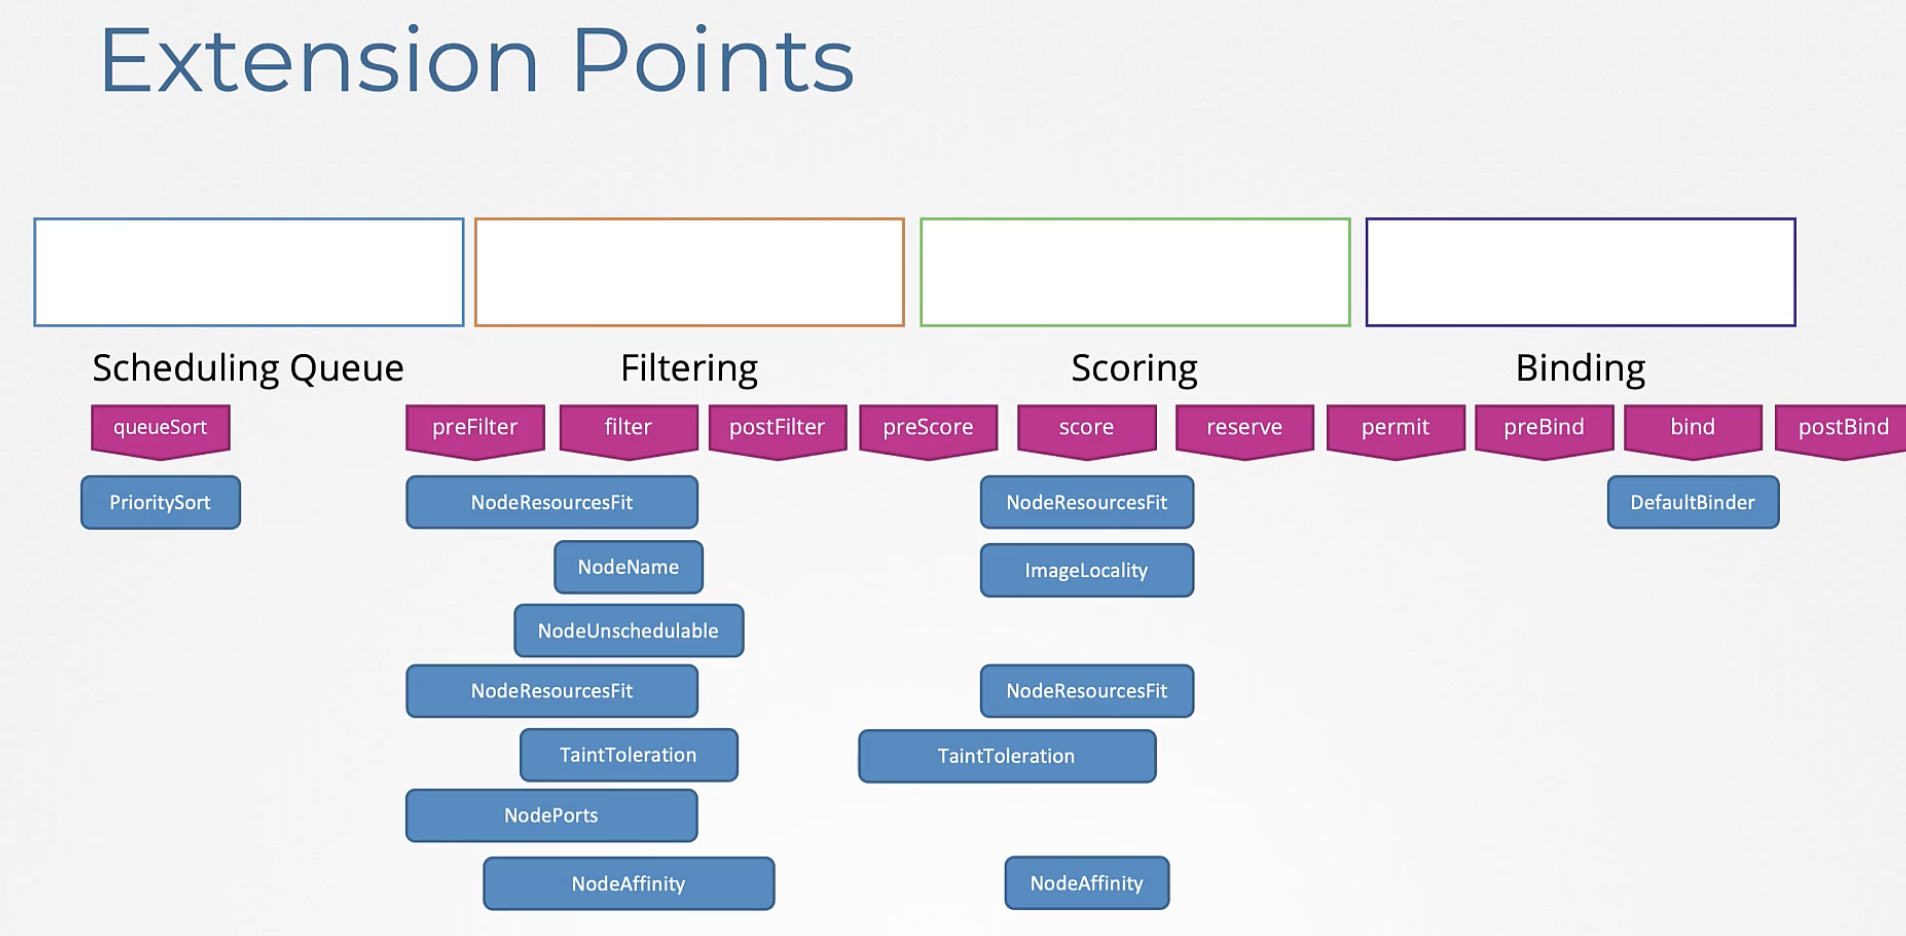
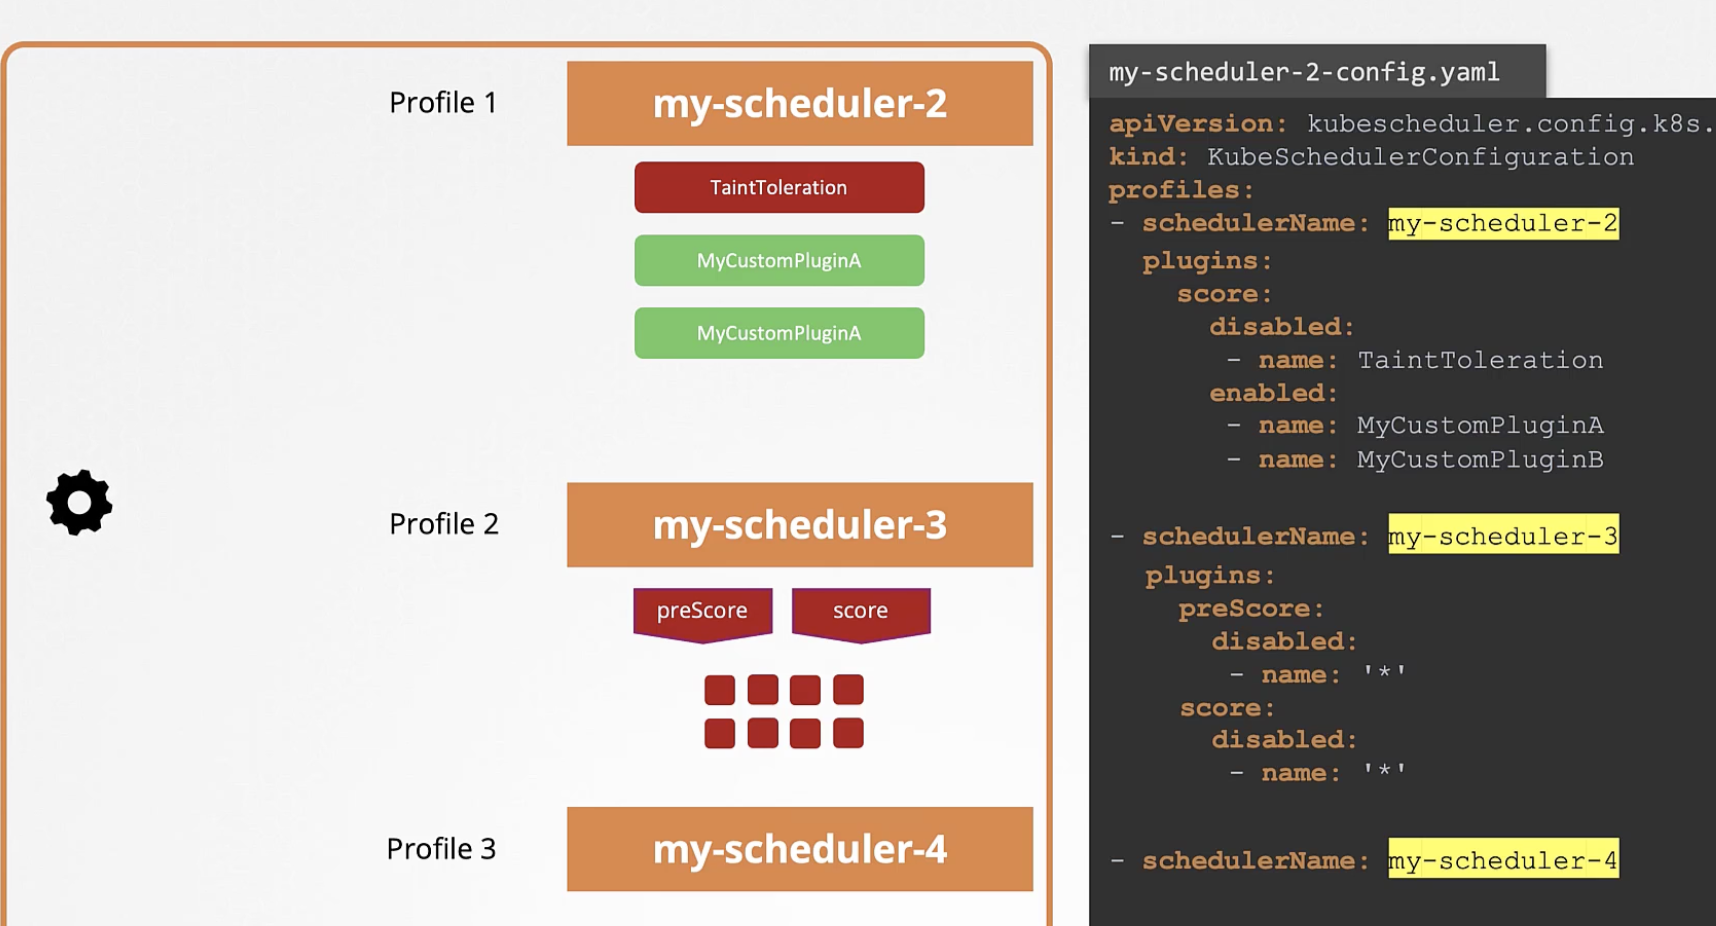
In the Kubernetes v1.18 release, the concept of Multiple Profiles was introduced to prevent conflicts between Multiple Schedulers. Each profile using the same binary can enable or disable numerous plugins. For example, the Score Plugin phase can be skipped.
Quiz
Q1: What is the main topic covered in "CKA_3_Scheduling"?
CKA_3_Scheduling
Q2: What is Taint Node?
Specify the Node name in node-name and choose one of three taint effects: NoSchedule,
PreferNoSchedule, or NoExecute. Define the Toleration in the spec section. All values inside must
be enclosed in double quotes. The NoExecute taint effect deserves closer attention.