본 포스팅은 https://www.udemy.com/course/certified-kubernetes-administrator-with-practice-tests 강의와 https://kodekloud.com/의 내용을 공부하며 기록한 내용입니다.
- 53 Manual Scheduling
- 56 Labels and Selectors in Kubernetes
- 59 Taints and Tolerations
- 63. Node Affinity
- 67 Resources Requirements and Limits
- 71 DaemonSets
- 74 Static Pods
- 77 Multiple Schedulers
- 80 Configuring Scheduler profiles
53 Manual Scheduling
만약 kubernetes에 스캐쥴러가 없다면 어떻게 될까? Pod는 아마도 계속 pending상태로 있을 것이다. 대신 pod definition File에 nodeName을 명시적으로 지정하여 pod를 띄울 node를 설정할 수 있다.
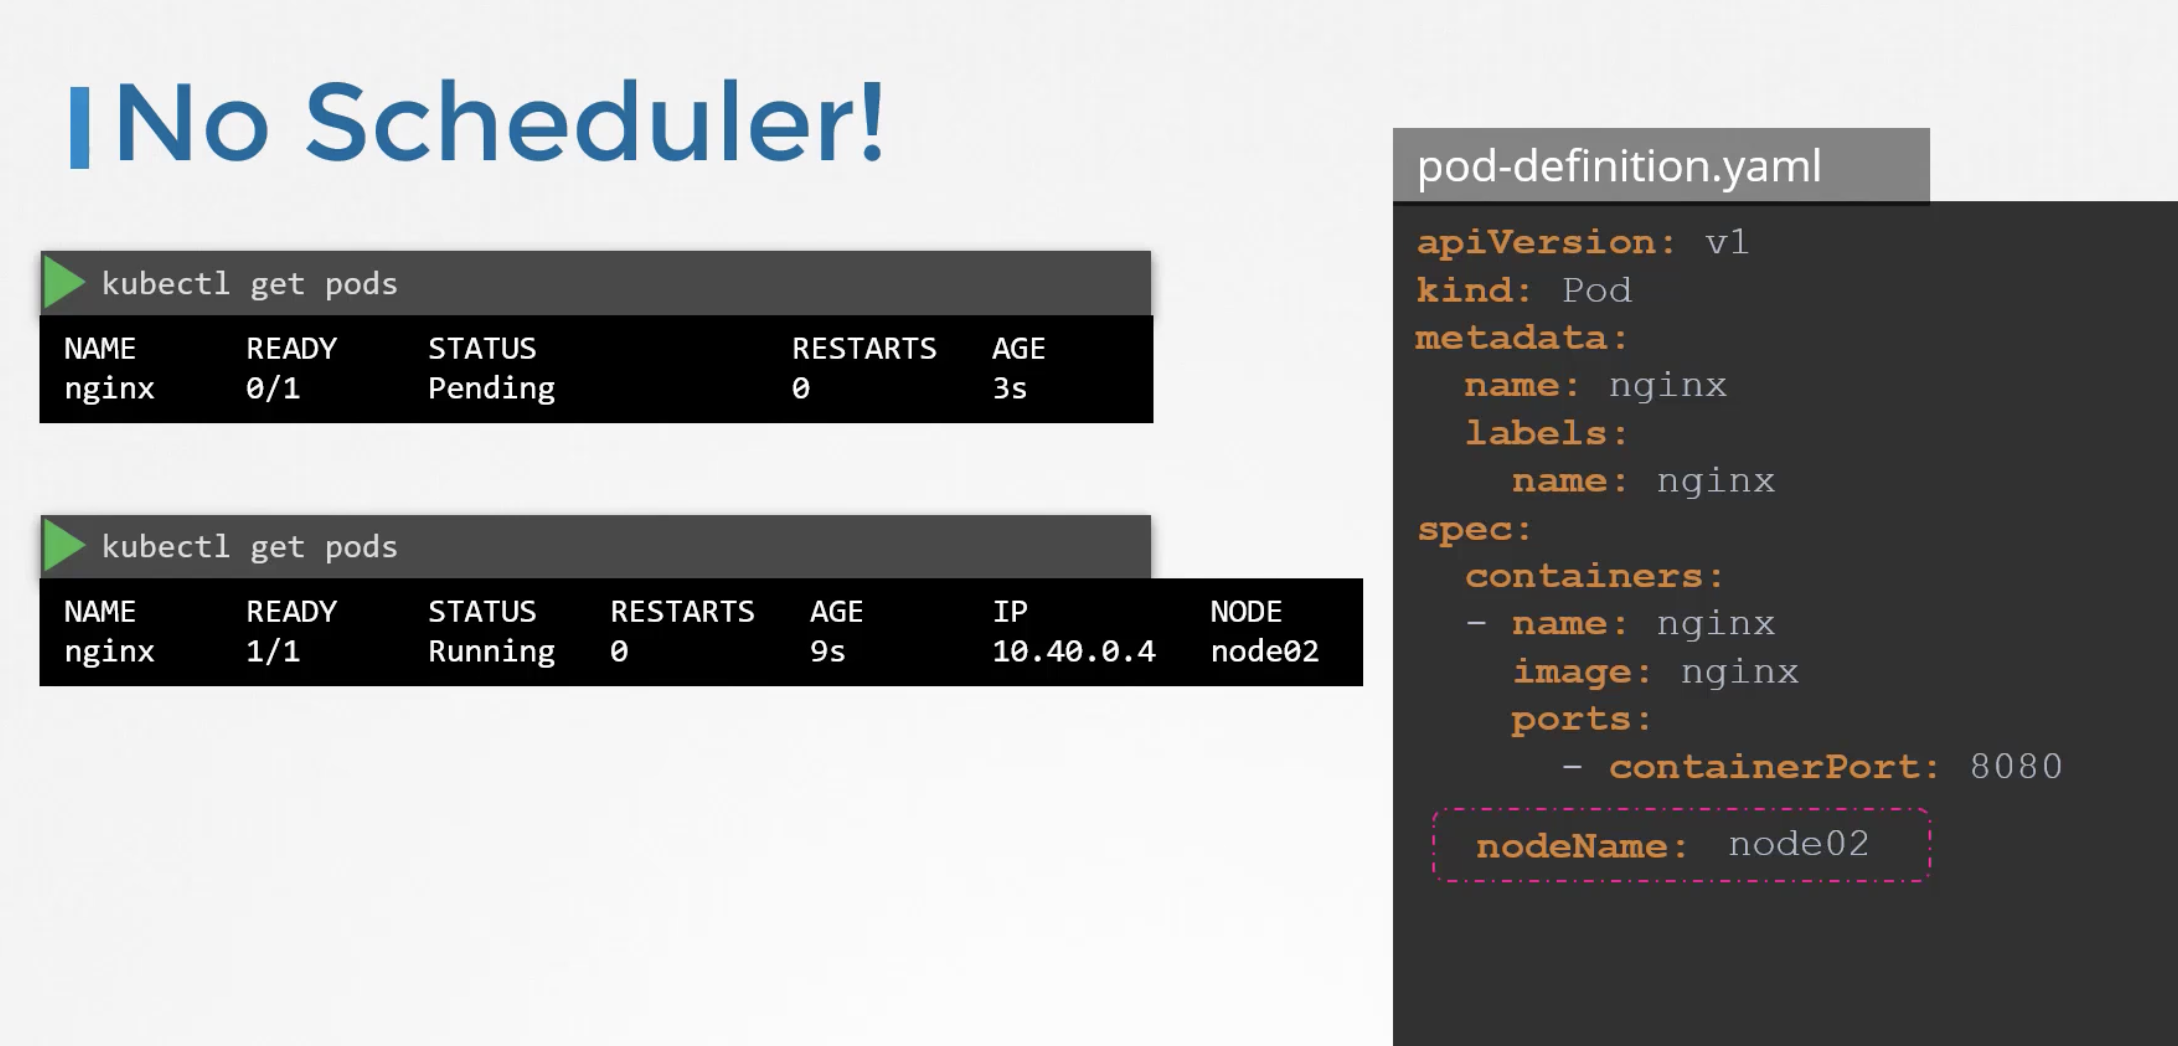
이미 존재하는 실행중인 pod를 어떤 노드에 할당하려면 어떻게 해야할까?
Binding API를 활용하면 된다.
apiVersion: v1
kind: Binding
metadata:
  name: nginx
target:
  apiVersion:v1
  kind: Node
  name: node2
또는 실행중인 pod를 중지하고, nodeName을 명시하여 Pod를 다시 생성한다.
56 Labels and Selectors in Kubernetes
Label은 key, value 쌍으로서 지정할 수 있다.
Resource 에는 metadata -> labels 하위에 label들을 정의하고, replica set처럼 특정 pod를 filtering 해야하는 곳에서는 selector -> matchLabels 에 key,value 쌍을 지정한다.
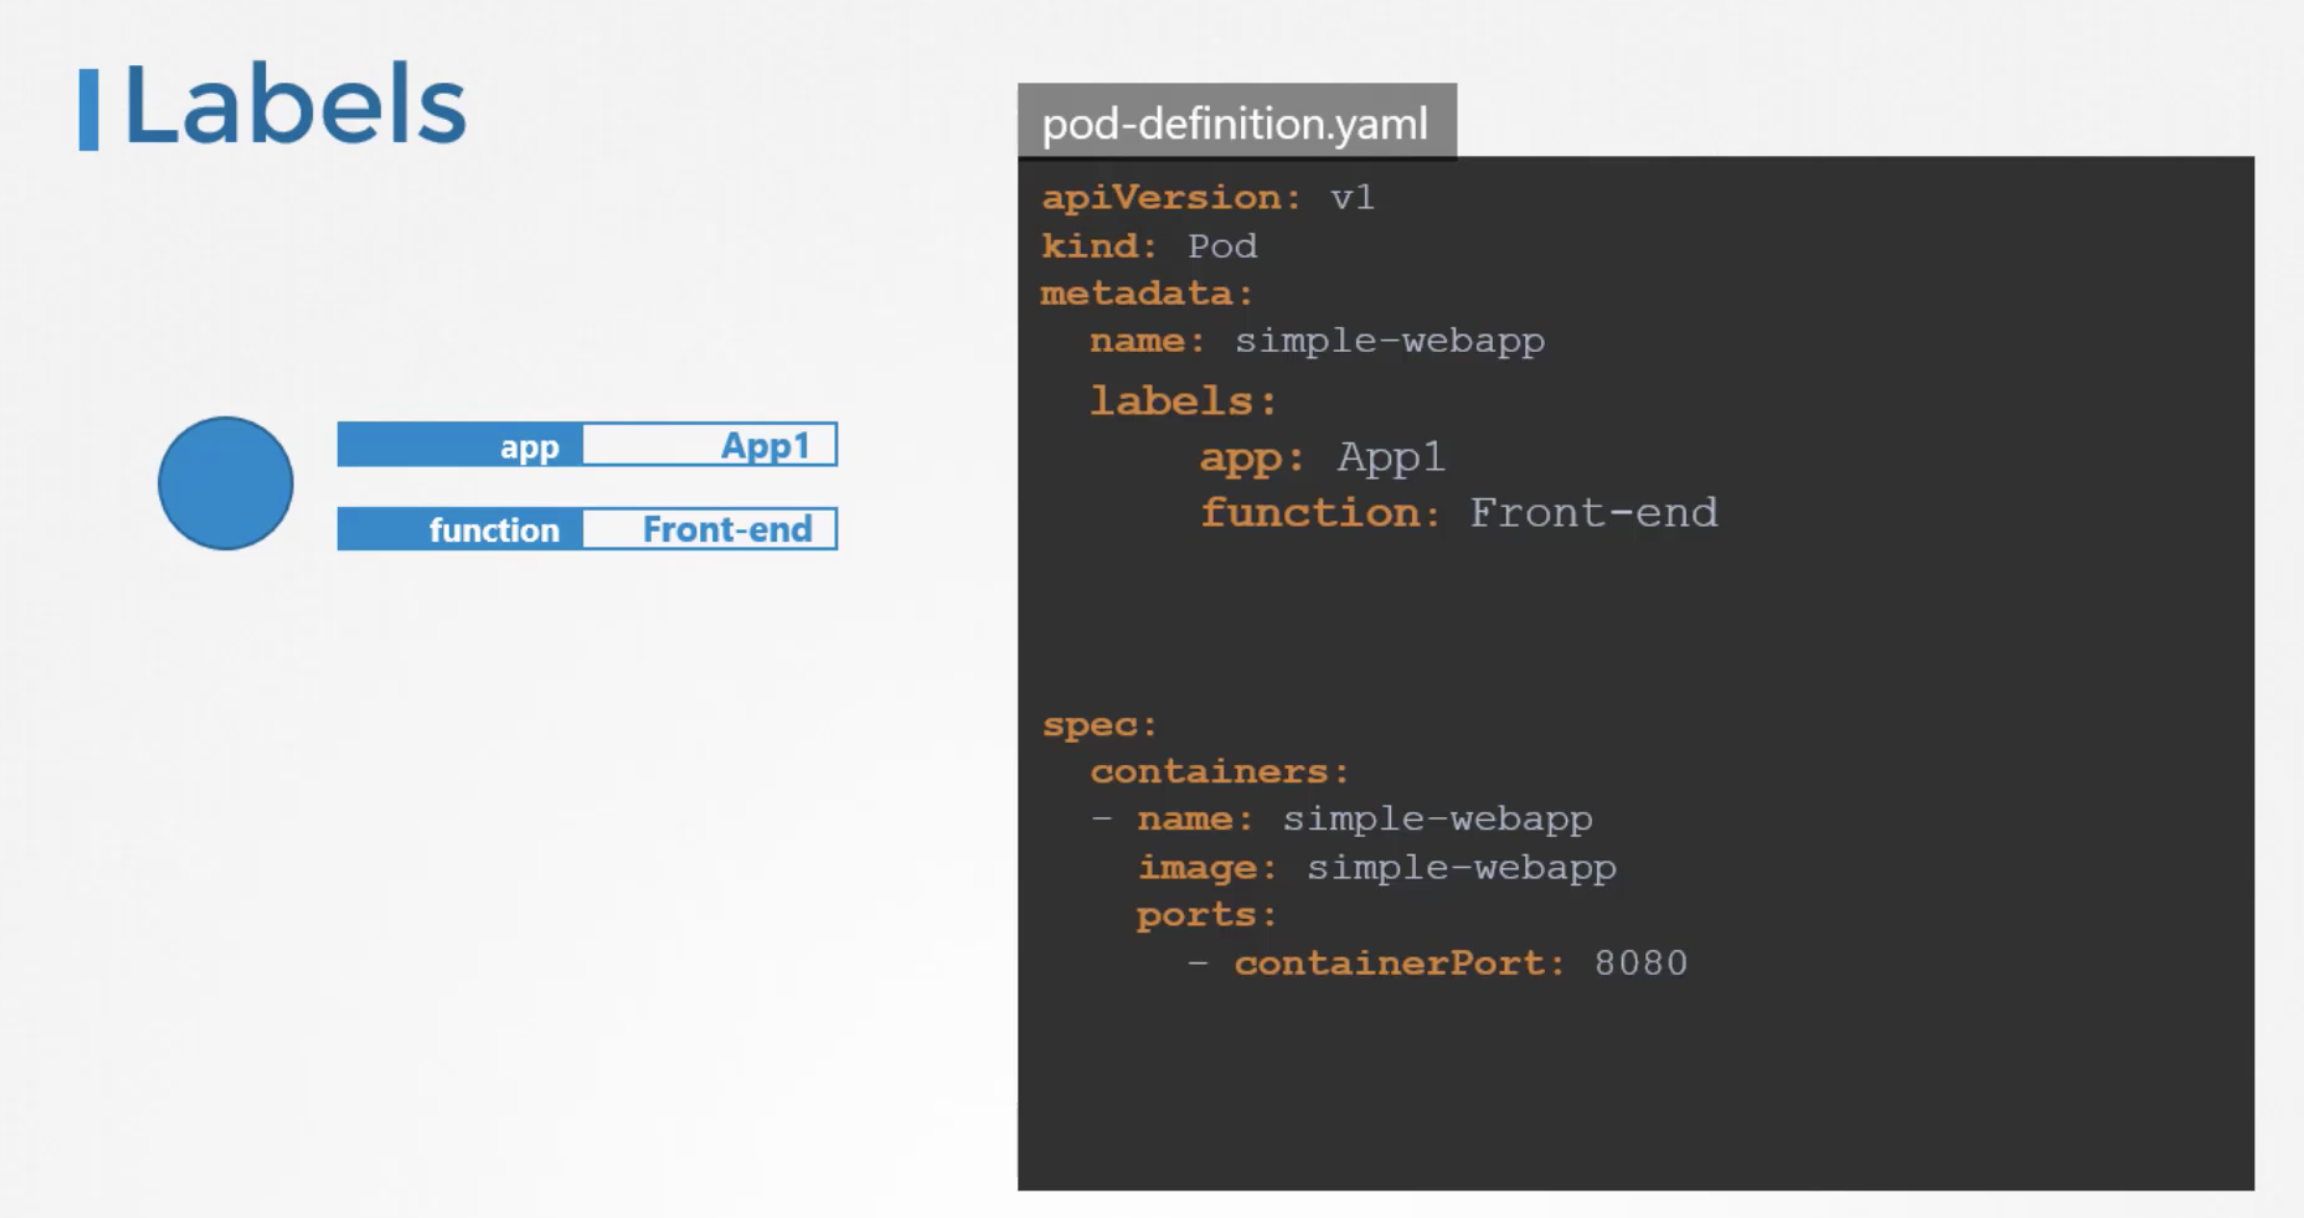
Grouping 과 Selecting을 위해서 label과 selector가 사용된다.
이외의 정보들을 저장해두기 위해서 Annotation도 사용된다.
dev 라는 label을 가진 pod만을 selecting하는 법.
$ kubectl get pods --show-labels=true
NAME          READY   STATUS    RESTARTS   AGE    LABELS
app-1-krzm7   1/1     Running   0          3m3s   bu=finance,env=dev,tier=frontend
db-2-8lwj8    1/1     Running   0          3m2s   bu=finance,env=prod,tier=db
db-1-gw7lc    1/1     Running   0          3m3s   env=dev,tier=db
app-1-tbwcg   1/1     Running   0          3m3s   bu=finance,env=dev,tier=frontend
app-2-5lt89   1/1     Running   0          3m3s   env=prod,tier=frontend
db-1-btt4j    1/1     Running   0          3m3s   env=dev,tier=db
auth          1/1     Running   0          3m2s   bu=finance,env=prod
app-1-qqhbb   1/1     Running   0          3m3s   bu=finance,env=dev,tier=frontend
db-1-chgq9    1/1     Running   0          3m3s   env=dev,tier=db
db-1-wgvgf    1/1     Running   0          3m3s   env=dev,tier=db
app-1-zzxdf   1/1     Running   0          3m2s   bu=finance,env=prod,tier=frontend


$ kubectl get pods --selector env=prod
NAME          READY   STATUS    RESTARTS   AGE
db-2-8lwj8    1/1     Running   0          5m2s
app-2-5lt89   1/1     Running   0          5m3s
auth          1/1     Running   0          5m2s
app-1-zzxdf   1/1     Running   0          5m2s


$ kubectl get all  --selector env=prod
NAME              READY   STATUS    RESTARTS   AGE
pod/db-2-8lwj8    1/1     Running   0          6m26s
pod/app-2-5lt89   1/1     Running   0          6m27s
pod/auth          1/1     Running   0          6m26s
pod/app-1-zzxdf   1/1     Running   0          6m26s

NAME            TYPE        CLUSTER-IP   EXTERNAL-IP   PORT(S)    AGE
service/app-1   ClusterIP   10.43.7.99   <none>        3306/TCP   6m26s

NAME                    DESIRED   CURRENT   READY   AGE
replicaset.apps/db-2    1         1         1       6m27s
replicaset.apps/app-2   1         1         1       6m27s


$ kubectl get pods --selector env=prod,bu=finance,tier=frontend
NAME          READY   STATUS    RESTARTS   AGE
app-1-zzxdf   1/1     Running   0          8m1s
59 Taints and Tolerations
Taint는 오염된 이란 의미고, Tolerations는 내성이란 의미다. 특정 Node에 Taint를 부여하면 Tolerations(내성)이 없는 pod는 해당 노드에 배정되지 않는다. 반면에 Tolerations가 있는 pod는 해단 node에 배정이 가능하다.
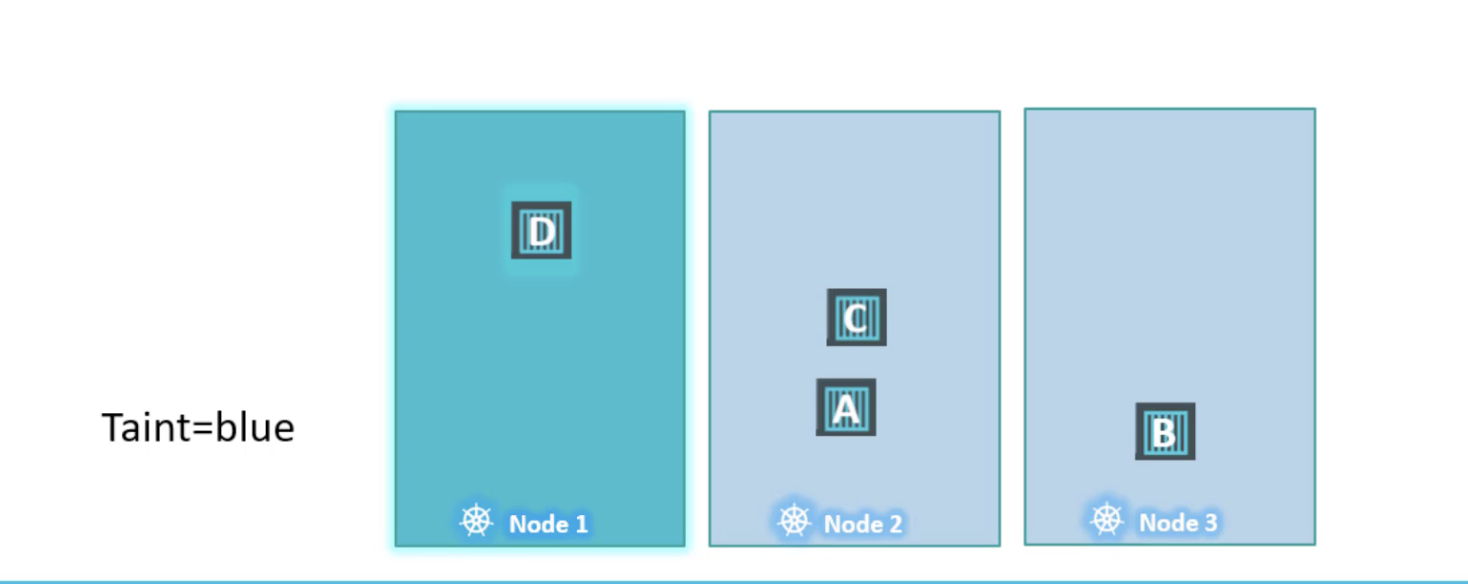
Taint node
node-name에는 Node의 이름을 적어주고 taint-effect에는 NoSchedule, PreferNoSchedule, NoExecute 세가지 중 하나를 선택한다.
$ kubectl taint nodes node-name key=value:taint-effect

# example
$ kubectl taint nodes node01 spray=mortein:NoSchedule
node/node01 modified
spec section에 Toleration을 정의한다. 그리고 이 안의 Value값들은 모두 double quote로 감싸야한다.
apiVersion: v1
kind: Pod
metadata:
  name: myapp-pod
spec:
  containers:
  - name: nginx-container
    image: nginx
  tolerations:
  - key: "app"
    operator: "Equal"
    value: "blue"
    effect:"NoSchedule"
Taint action에서 NoExecute 부분을 조금더 자세하게 볼 필요가 있다. NoExecute는 기존 NoSchedule의 기능에 기존에 동작하던 Pod까지 삭제하는 것까지 포함한다. 따라서 기존에 운영중인 node에 Taint를 설정한다면 NoExecute는 운영중인 Pod에 영향을 줄 수 있으니 신중해야한다.
Taint나 Toleration을 보면 이용하면 특정 Pod을 특정 node로 이동하도록 하는 것으로 오해할 수 있다. 하지만 정확히는 특정 pod이 특정 노드에 배정되는 것을 막는 것이다. pod를 특정 node에 배정하는 것은 Node affinity랑 관련이 있다.
K8S에는 Master Node가 존재한다. 그리고 Master Node또한 pod를 실행할 수 있는 환경이 마련되어있다.(실제로 master node로 Pod를 옮길 수 도 있다) 하지만 master Node에는 일반적으로 pod이 실행되지 않는다. 그 이유는 master Node에는 Taint가 설정되어 있기 때문에 user가 실행한 pod이 실행되지 않는다.
kubectl describe node kubemaster | grep Taint 를 통해 taint를 확인할 수 있다.
Create another pod named bee with the nginx image, which has a toleration set to the taint mortein.
$ kubectl run bee --image nginx --dry-run=client -o yaml
apiVersion: v1
kind: Pod
metadata:
  creationTimestamp: null
  labels:
    run: bee
  name: bee
spec:
  containers:
  - image: nginx
    name: bee
    resources: {}
  dnsPolicy: ClusterFirst
  restartPolicy: Always
status: {}

# Edit like below
apiVersion: v1
kind: Pod
metadata:
  creationTimestamp: null
  labels:
    run: bee
  name: bee
spec:
  tolerations:
    - key: "spray"
      operator: "Equal"
      value: "mortein"
      effect: "NoSchedule"
  containers:
  - image: nginx
    name: bee
    resources: {}
  dnsPolicy: ClusterFirst
  restartPolicy: Always
status: {}

$ kubectl create -f bee.yaml

$ kubectl describe nodes node01 | grep mort
Taints:             spray=mortein:NoSchedule

$ kubectl describe nodes controlplane | grep Taints
Taints:             node-role.kubernetes.io/control-plane:NoSchedule
Remove taints of controlplane node.
$ kubectl taint nodes controlplane node-role.kubernetes.io/control-plane:NoSchedule-
node/controlplane untainted

$ kubectl describe nodes controlplane | grep Taints
Taints:             <none>
63. Node Affinity
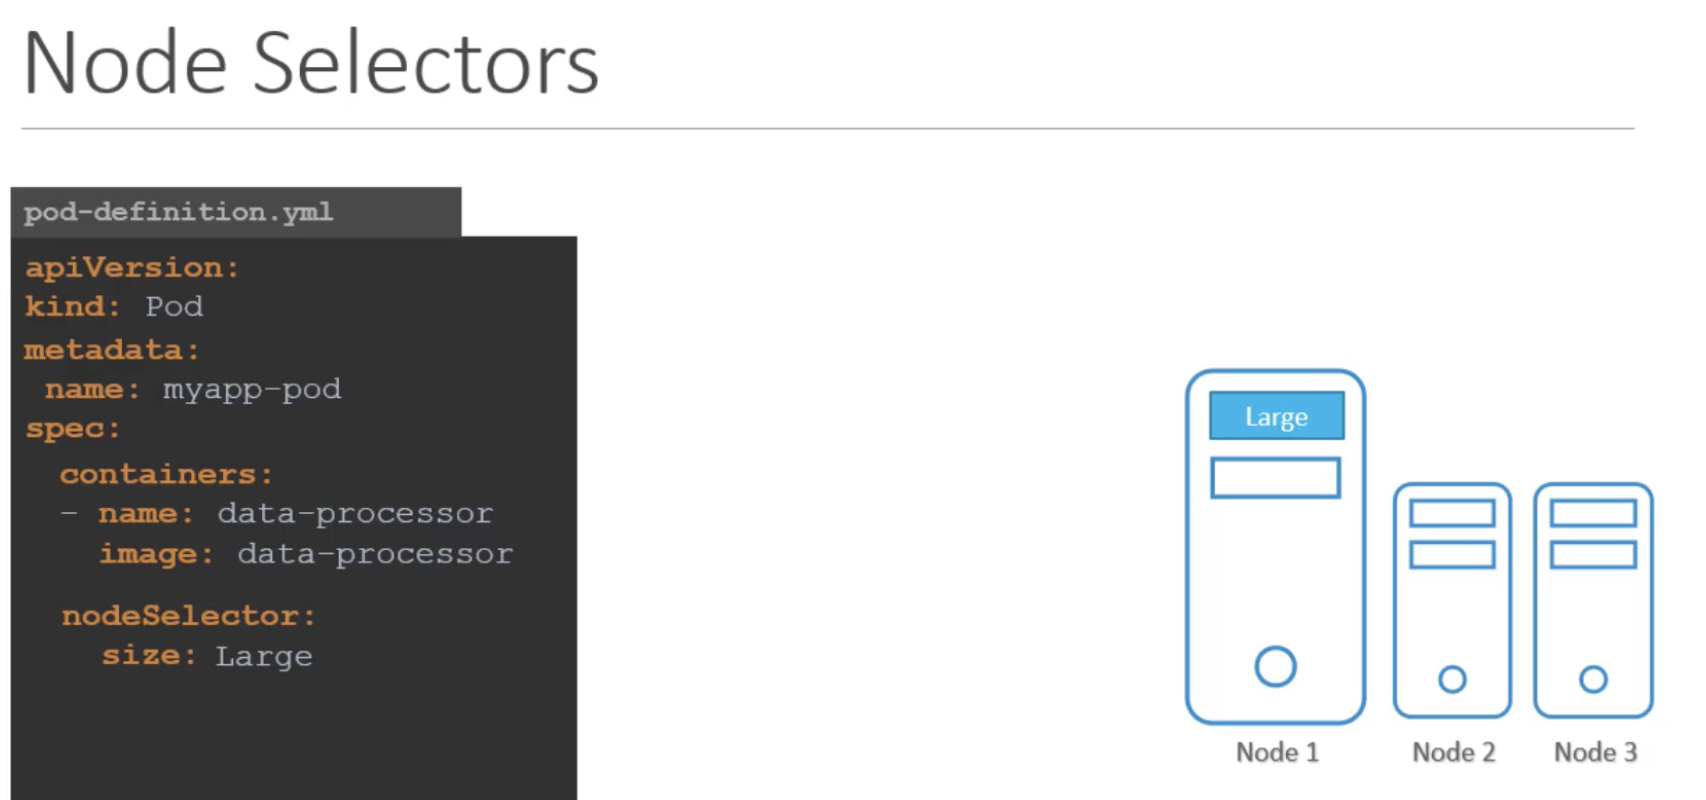
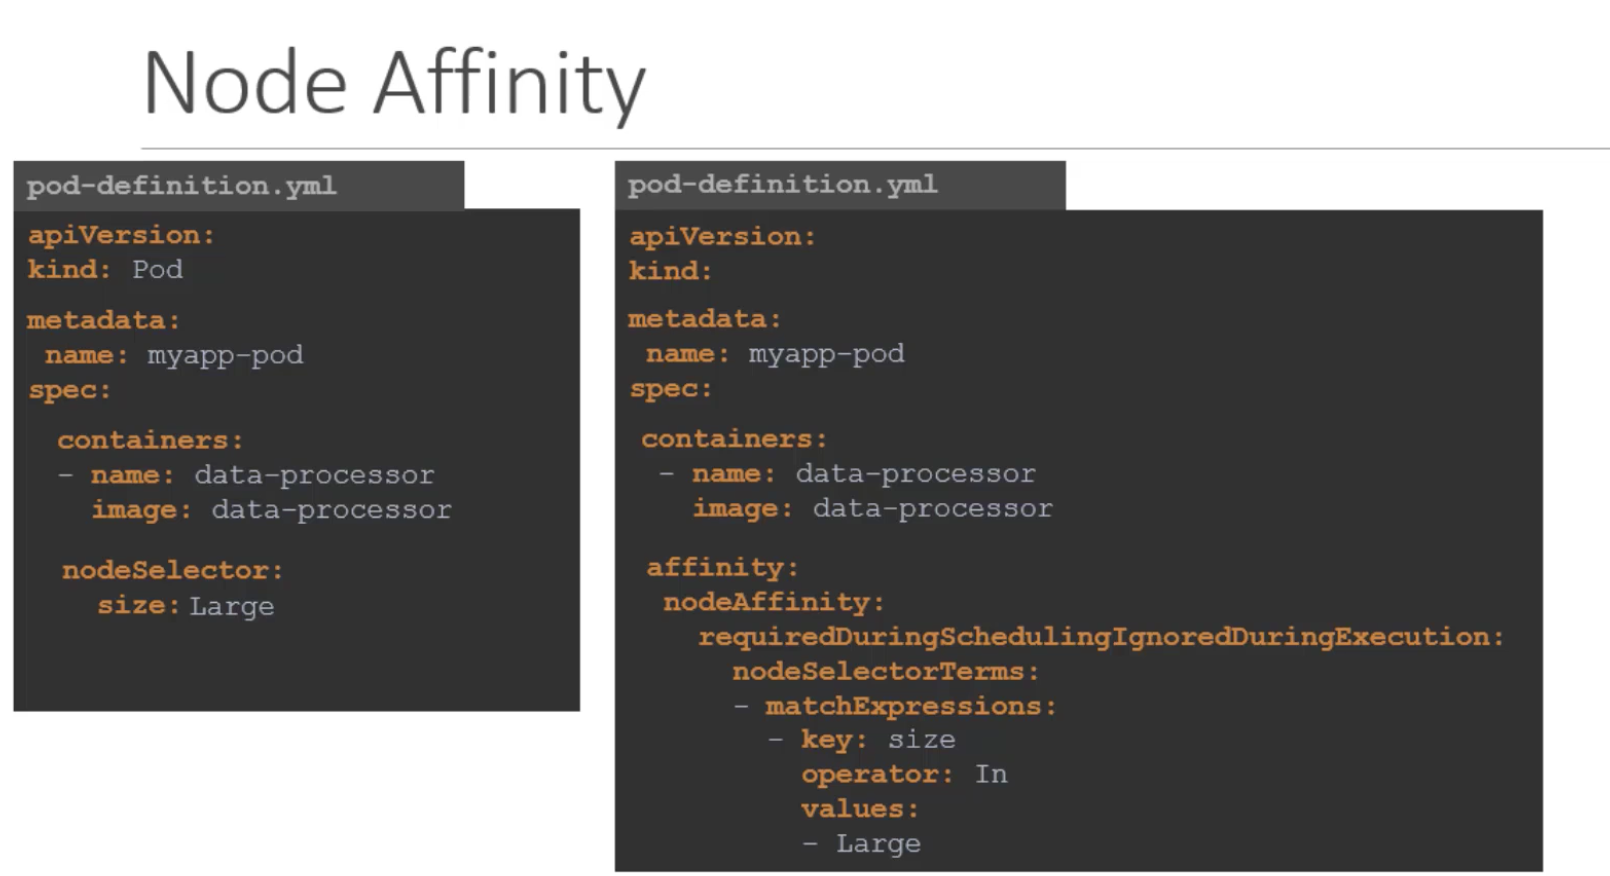
Node Selector의 label이나 node affinity를 통해 node를 지정할 수 있다. 그리고 이전에 node에는 Label이 지정되어있어야 한다.
requiredDuringSchedulingIgnoredDuringExecution 과 preferredDuringSchedulingIgnoredDuringExecution 두가지 옵션이 있는데 필수냐 옵션이냐의 차이다. Required라면, 만약 해당 pod를 할당할 수 있는 적절한 node가 없는 경우 pod가 할당되지 않는다. 반면에 preffered라면,
nodeSelector:
  size: Large
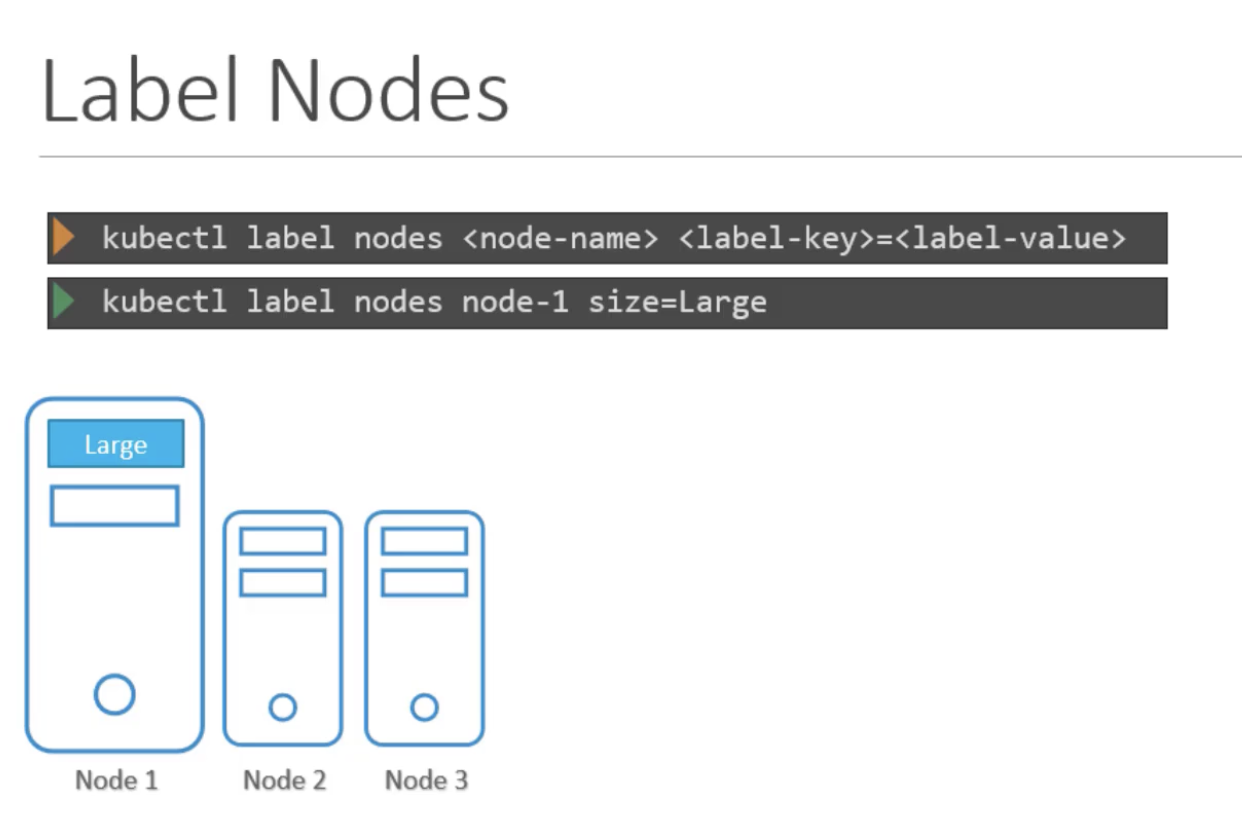
Apply label to a node.
kubectl label nodes node01 color=blue
node/node01 labeled
Create a new deployment named red with the nginx image and 2 replicas, and ensure it gets placed on the controlplane node only. Use the label key - node-role.kubernetes.io/control-plane - which is already set on the controlplane node.
apiVersion: apps/v1
kind: Deployment
metadata:
  creationTimestamp: null
  labels:
    app: red
  name: red
spec:
  replicas: 2
  selector:
    matchLabels:
      app: red
  strategy: {}
  template:
    metadata:
      creationTimestamp: null
      labels:
        app: red
    spec:
      affinity:
        nodeAffinity:
          requiredDuringSchedulingIgnoredDuringExecution:
            nodeSelectorTerms:
            - matchExpressions:
              - key: node-role.kubernetes.io/control-plane
                operator: Exists
      containers:
      - image: nginx
        name: nginx
        resources: {}
status: {}
Taint와 Toleration만을 사용하면, 특정 노드가 특정 Node에 배정되는 것을 보장할 수 없다. Node Affinity만 사용해서도 마찬가지로 보장할 수 없다. Taint&Toleration 그리고 Node Affinity 두 가지를 모두 사용하면 특정 Node에 특정 Pod만 배정하도록 보장할 수 있다.
67 Resources Requirements and Limits
pod가 실행되기 위해서 필요한 hardware의 resource를 k8s에 요청할 수 있다. Limit또한 설정할 수 있다.
spec:
 continers:
 - name: simple-webapp
   image: nginx
   ports:
   - containerPort: 8080
   resources:
     requests:
       memory: "1Gi"
       cpu: 1
     limits:
       memory: "2Gi"
       cpu: 2
CPU resource에는 값을 1vCPU 이하로 설정할 수도 있는데 예를들어 0.1 로, 0.1은 100ms를 의미한다. 만약 CPU 사용량이 limit을 넘어가면 throttling이 걸린다. 하지만 memory의 경우는 다르다. Memory사용량이 초과하는 경우에는 OOM(Out Of Memory) 애러가 발생하여 pod가 중지된다.
Namespace Level 에서 limit을 설정할 수 있는 minimum, maximum nrange를 설정할 수도 있다.
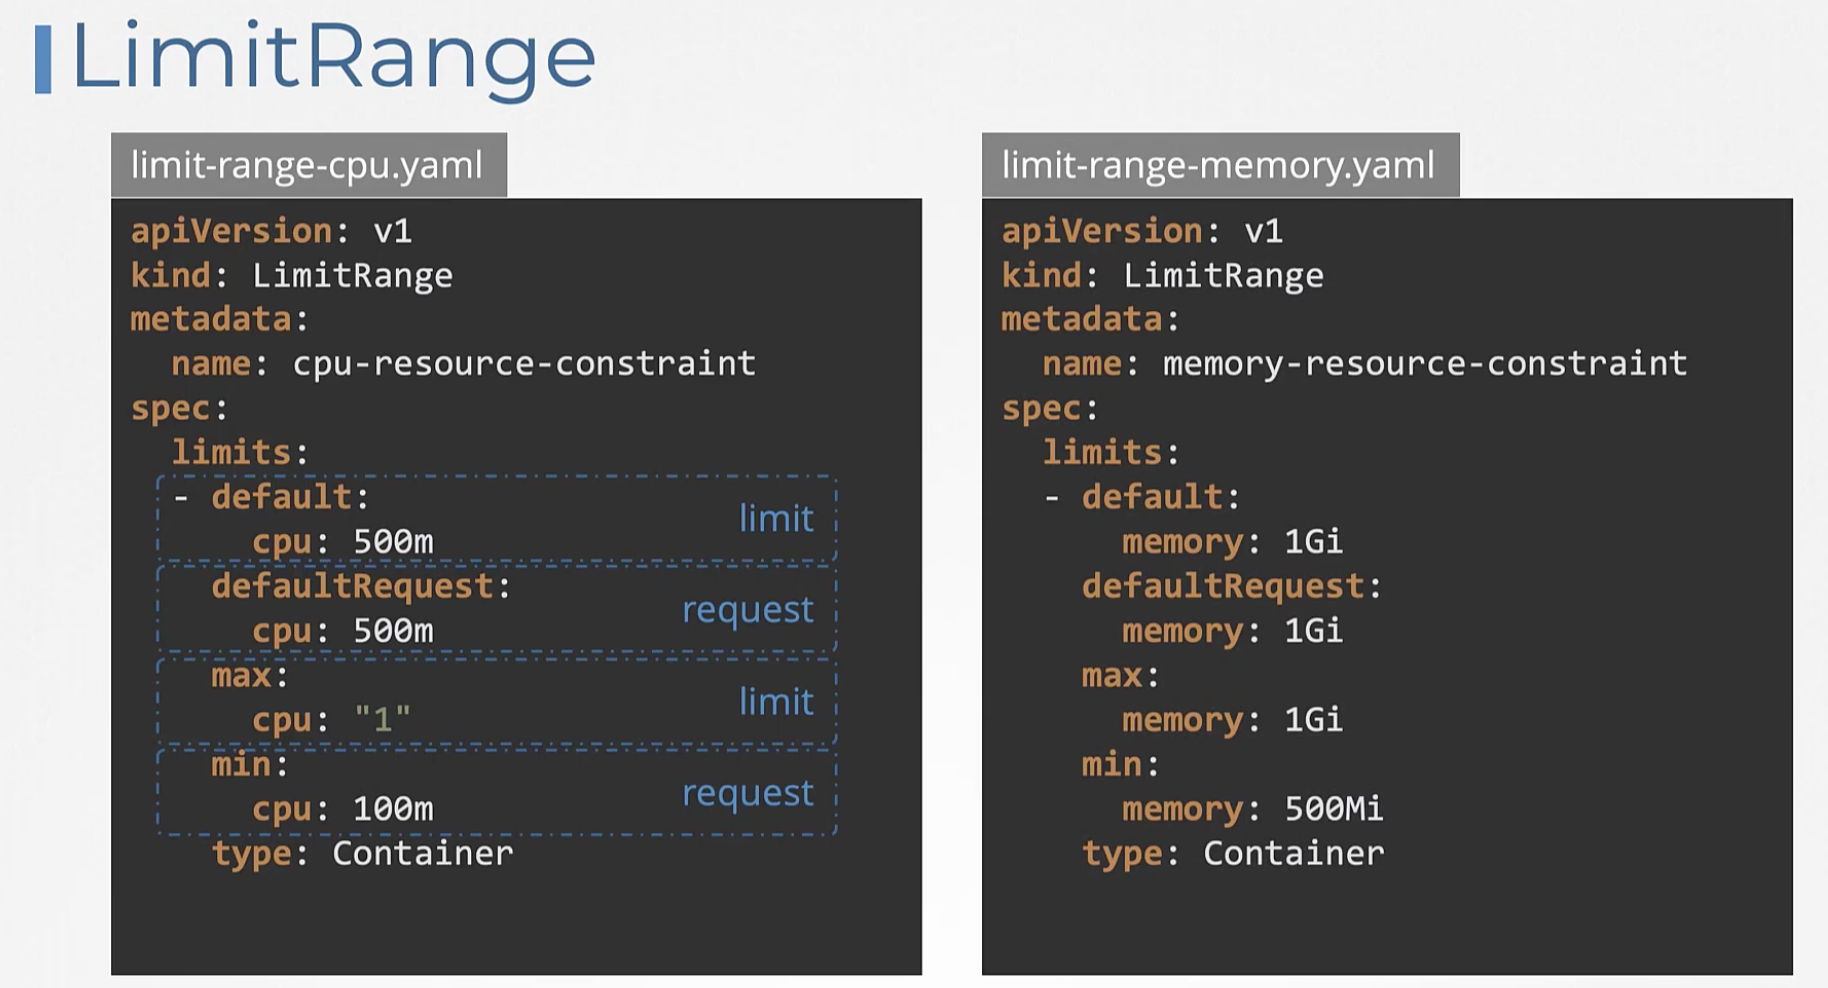
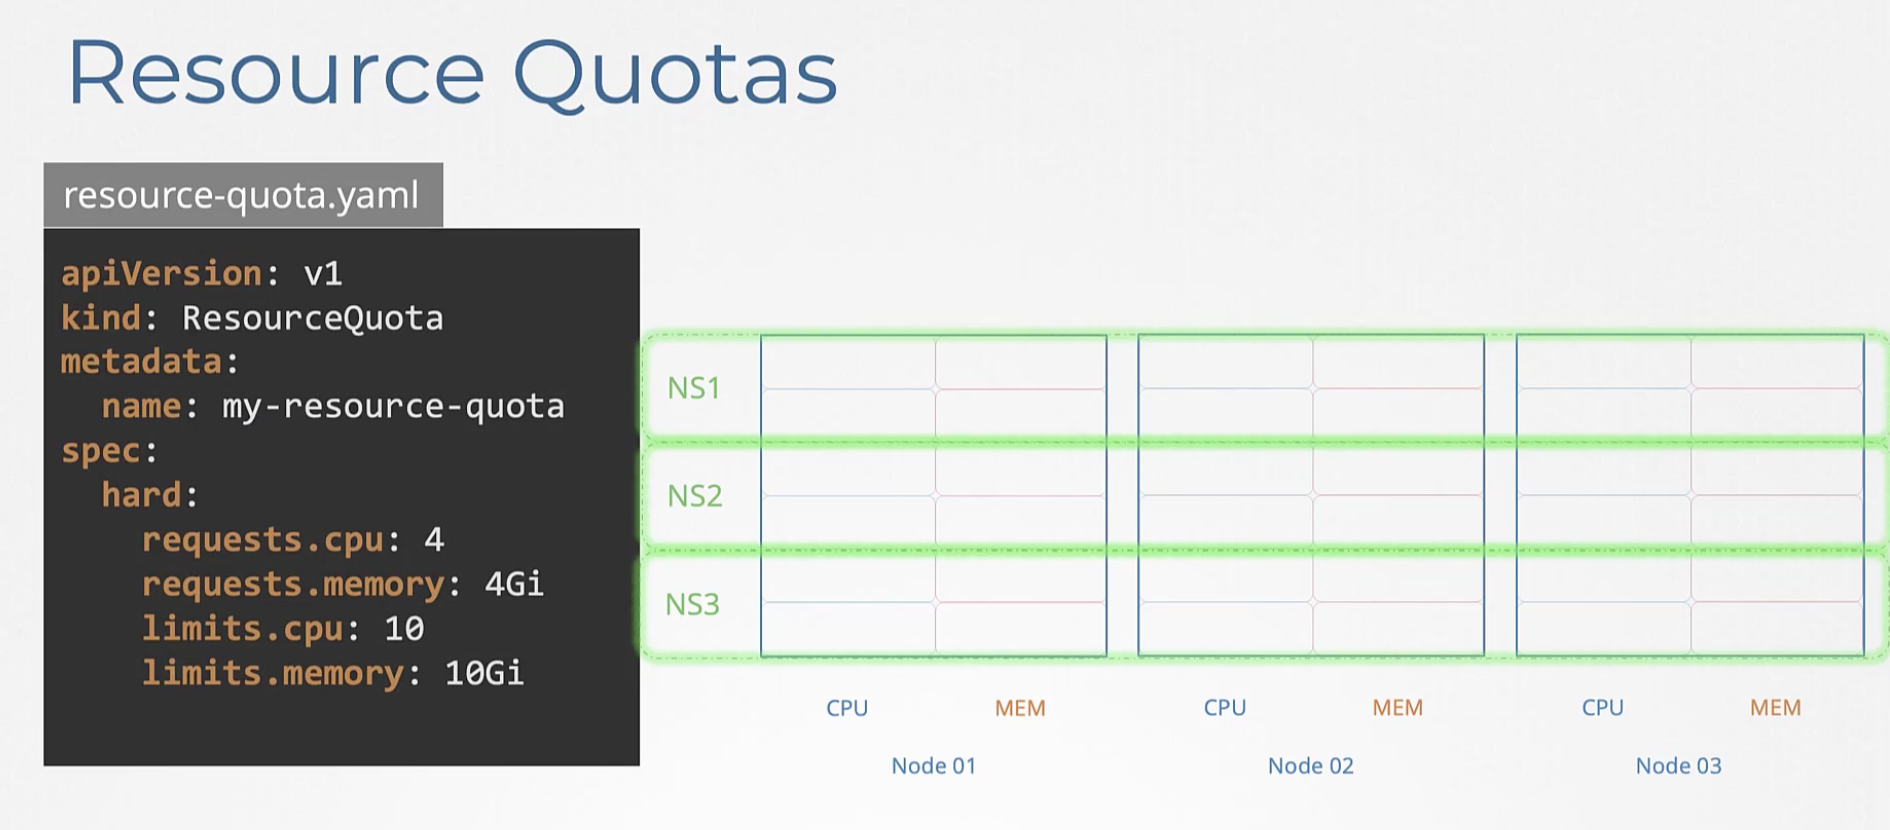
Quota또한 Namespace Level에서 설정할 수 있어 해당 namespace가 생성가능한 최대 hardware resource를 할당할 수 있다.
71 DaemonSets
DemonSet은 하나의 Node에 하나의 pod만 띄울 때 사용한다. 그리고 이름에서도 알 수 있듯이 Daemon이기 때문에 종료되지 않고 항상 실행되는 pod이다. 새로운 노드가 추가되면 Daemon set에서 pod를 추가한다.
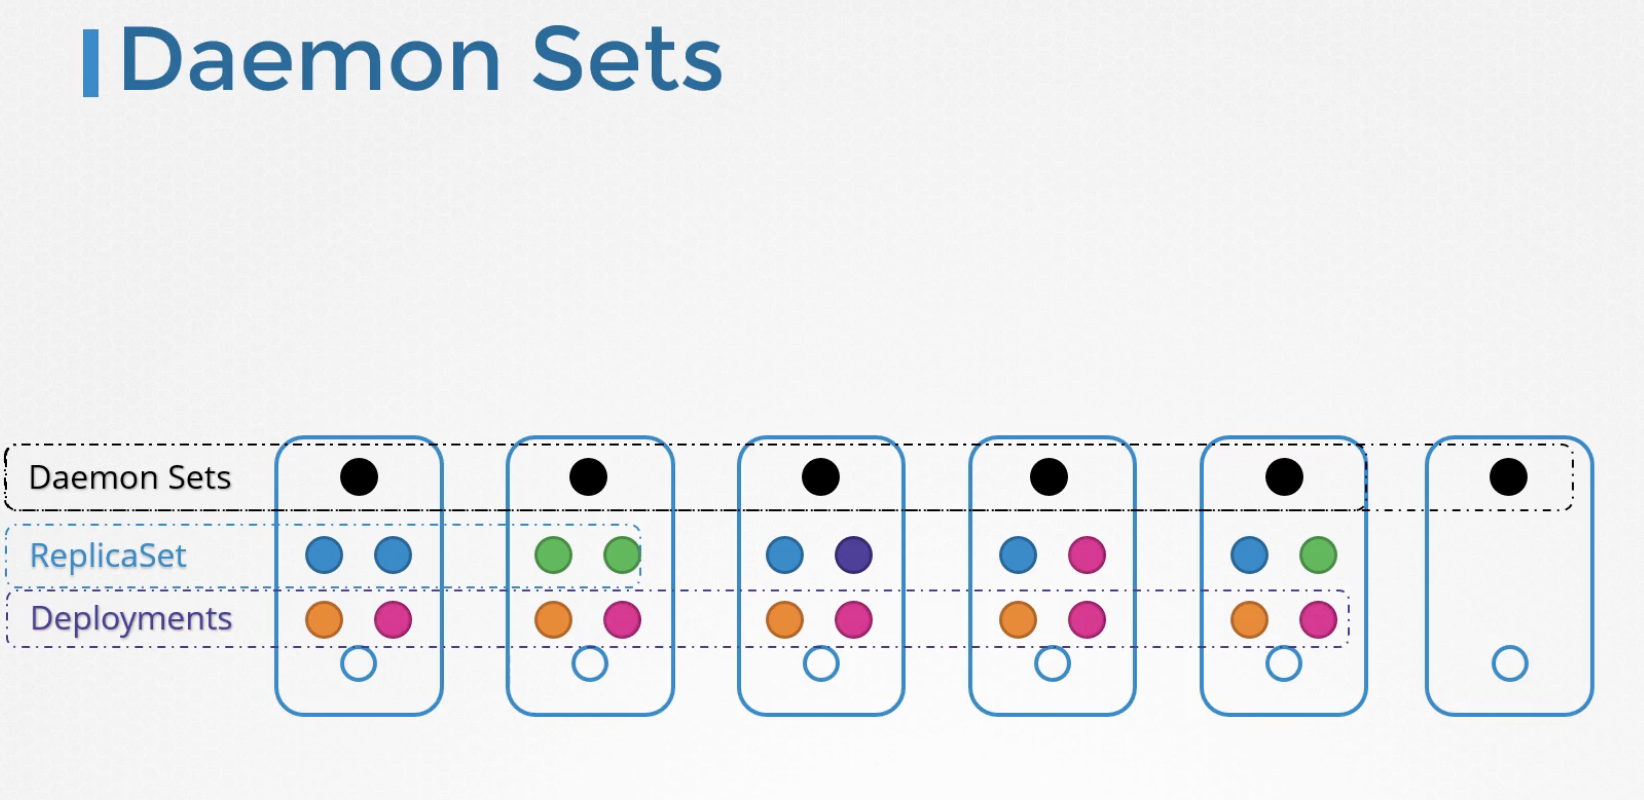
일반적으로 Monitoring solution이나 Log Viewer를 띄울 때 Daemonset 을 사용한다. K8S에서 가장 유명한 DaemonSet을 하나 꼽자면 kube proxy 이다.
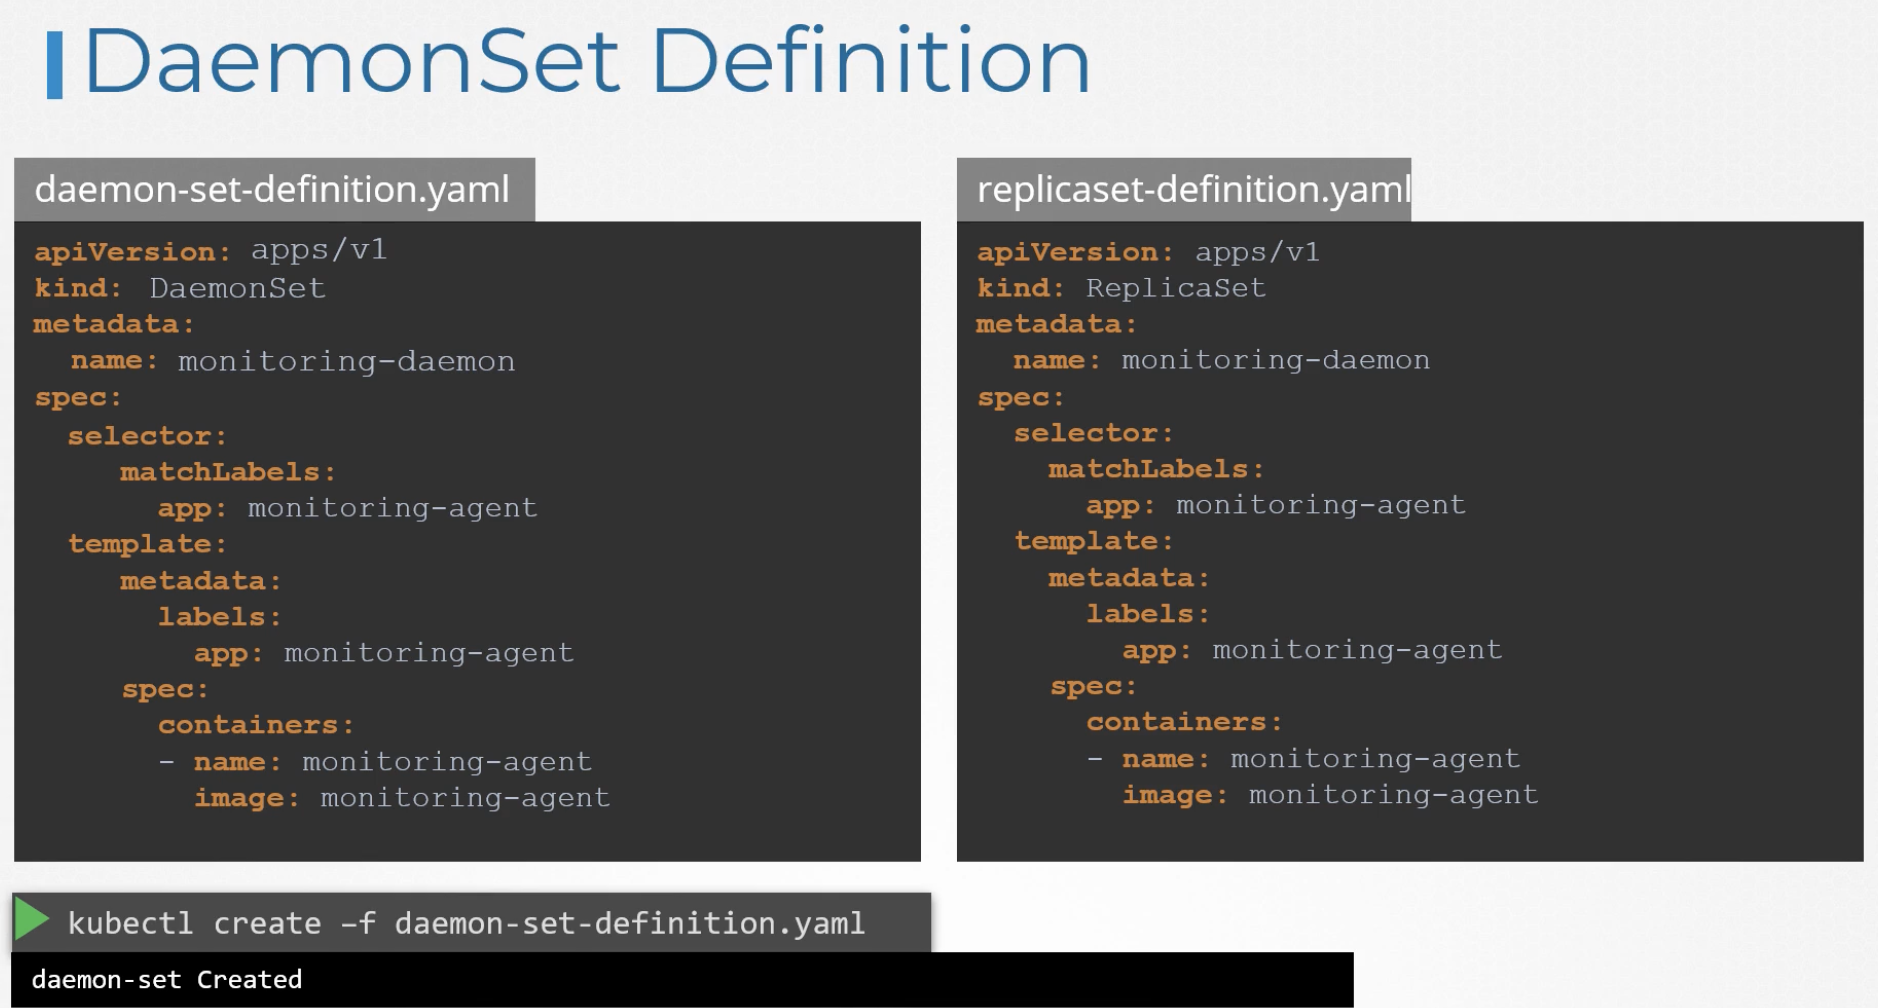
Daemonset을 정의하는 것은 replicaset이랑 거의 동일하다.
kubectl get daemonsets
Daemonset이 반드시 node에 상주한다는 것을 보장할 수 있는가? 정답은 보장할 수 있다 이다.
v1.12에서는 Daemonset의 Pod specification에 nodeName property에 Node를 명시적으로 지정하기 때문이다.
v1.12이후의 k8s version 부터는 조금 다른데, 명시적으로 설정하지 않고 NodeAffinity와 default scheduler를 활용해서 daemonset을 생성한다.
Question: Create Daemonset which requires below specificaiton.
Name: elasticsearch Namespace: kube-system Image: registry.k8s.io/fluentd-elasticsearch:1.20
kubectl create deployment elasticsearch --namespace=kube-system --image=registry.k8s.io/fluentd-elasticsearch:1.20 --dry-run=client -o yaml
74 Static Pods
Kubernetes API server나, Etcd, Scheduler가 모두 존재하지 않고(master노드가 존재 x), worker node 1대 즉 Kublet(container runtime 포함) 하나만 존재할 경우 pod를 실행할 수 있을까? 정답은 가능하다 이다. Static Pod이란 특별한 Pod이 있는데 이것을 이용하면 다른 util 시스템들(API 서버, ETCD, Scheduler) 없이도 pod 생성이 가능하다.
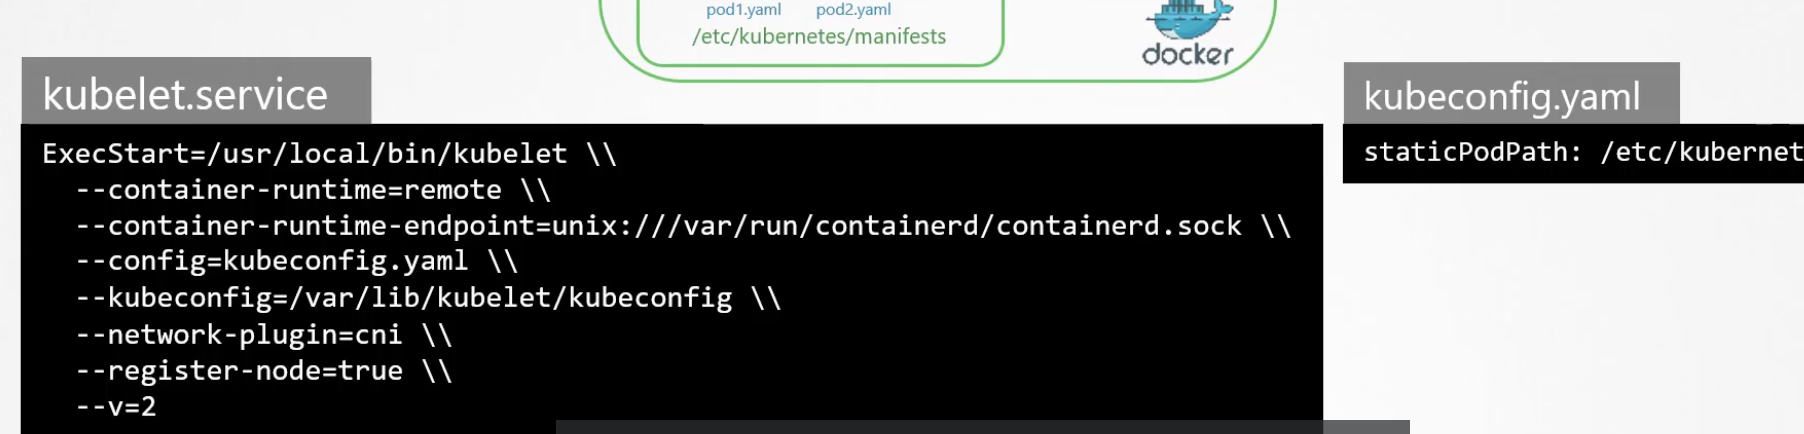
Static Pod를 실행하기 위해서는 /etc/kubernetes/manifests 디렉터리 하위에 pod이 정의되어있어야 한다.
kubelet은 이 폴더 아래에 있는 파일들을 주기적으로 check하면서 pod를 생성한다.
아래는 master Node에서 해당
$ ls -al /etc/kubernetes/manifests/
total 24
drwxr-xr-x 2 root root 4096  8월 12 10:56 ./
drwxr-xr-x 4 root root 4096  8월 12 10:56 ../
-rw------- 1 root root 2411  8월 12 10:56 etcd.yaml
-rw------- 1 root root 4047  8월 12 10:56 kube-apiserver.yaml
-rw------- 1 root root 3429  8월 12 10:56 kube-controller-manager.yaml
-rw------- 1 root root 1463  8월 12 10:56 kube-scheduler.yaml
youngjukim@cubi01:~$
이 파일이 지워지면 Kubelet은 자동으로 Pod을 지우기도 하고, 업데이트되면 pod을 자동으로 생성한다.
이 static pod를 정의하는 path가 반드시 /etc/kubernetes/manifests일 필요는 없고, 다른 directory로 설정도 가능하다. 그러나 이 path를 바꾸려면 Kublet을 재시작해야한다.
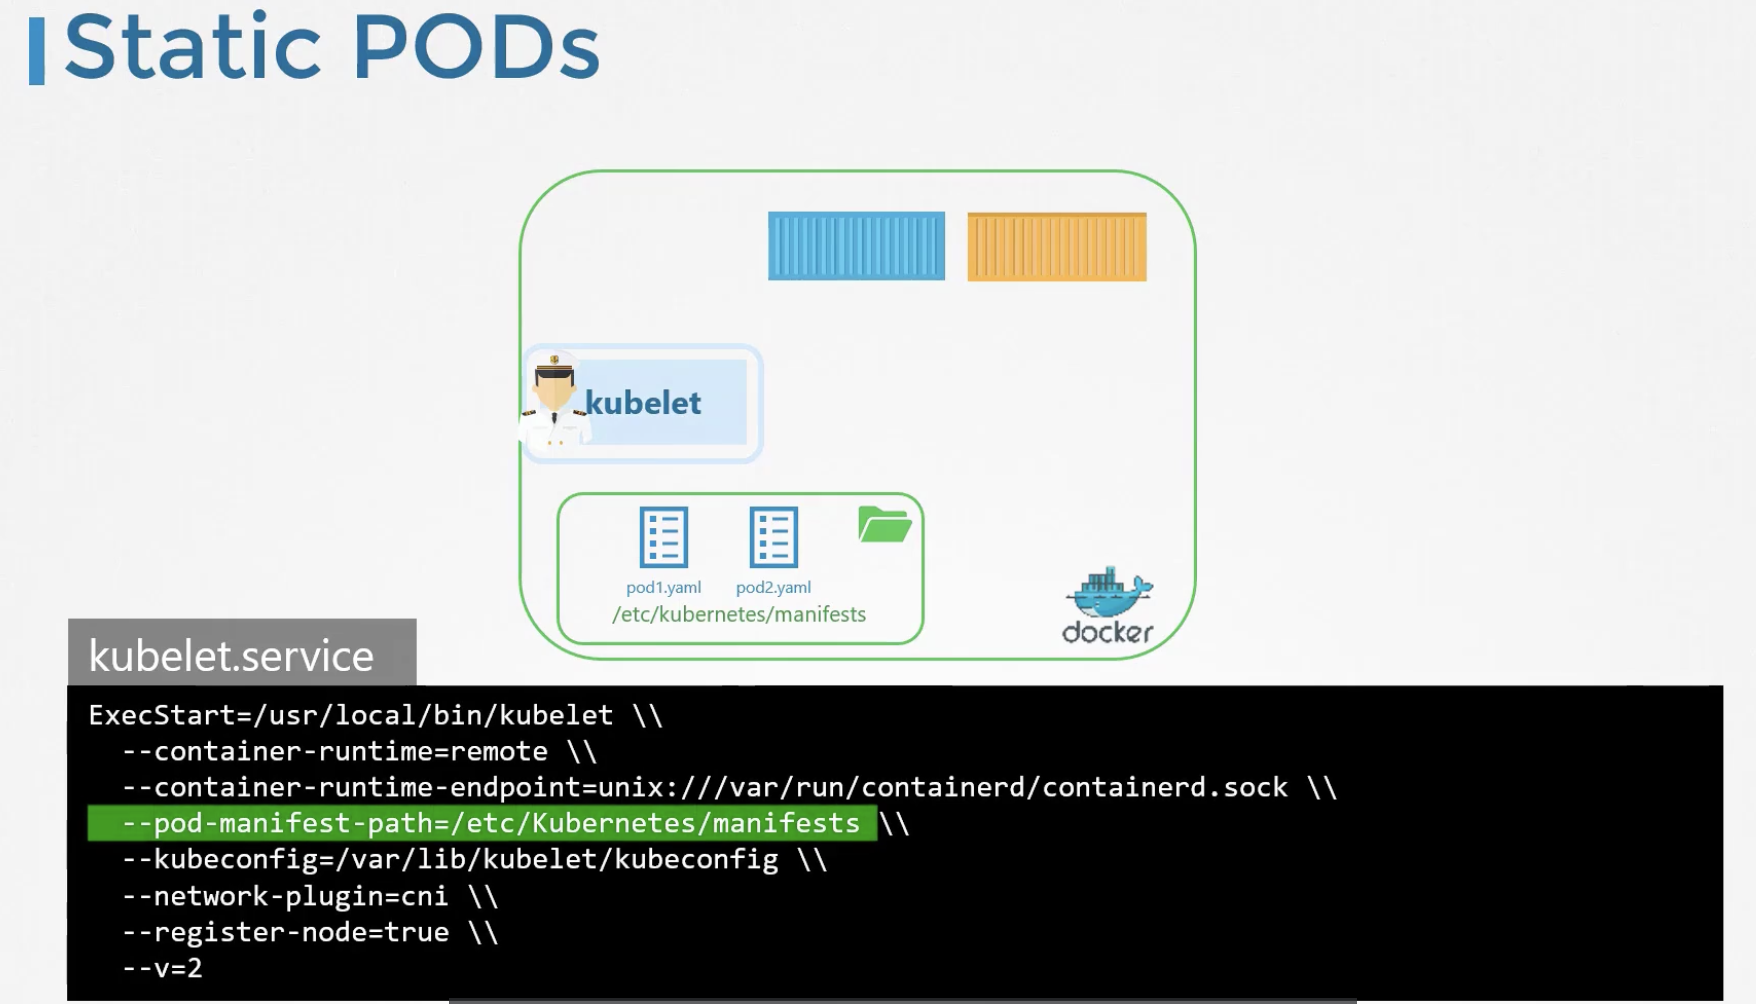
또는 config파일을 인자로 주고, staticPodPath로 해당 경로를 설정하는 방법도 있다.
마스터 노드 없이 단독으로 실행되는 Kublet이 실행되었을 경우, 이러한 static pod가 잘 실행되었는지를 확인하기 위해서는 어떻게 해야할까?
당연하게도 master node가 없기 때문에 API 서버도 없고, 따라서 kubectl 명령어도 사용할 수 없다. 이때는 docker ps 나 crictl ps 를 통해 pod이 제대로 실행되고 있는지 확인해야한다.
그렇다면 Master 노드가 있는 상황에서는 API server가 workernode의 Kublet에서 실행중인 Static Pod의 존재를 알 수 있을까? 정답은 그렇다 이다.
그렇지만 존재만 알 수 있기 때문에 해당 static Pod에 대한 조작은 불가능하다. API서버에서 Static Pod에 대한 권한은 read-only 뿐이다.
그리고 특이한 점은 Static Pod는 Pod의 이름에 node의 이름이 자동으로 붙는다.
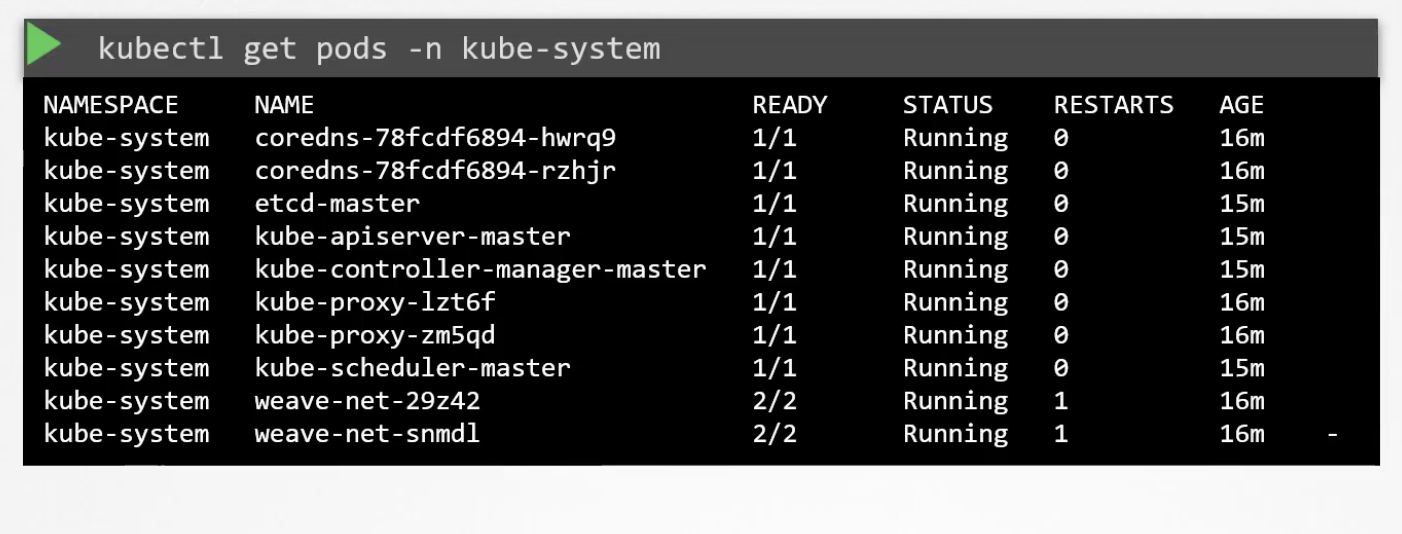
Static Pod은 Kubernetes control plane에 dependent하지 않고 지정한 폴더에 pod에 대한 정의를 추가한 파일만 만들면 되기 때문에 배포가 쉽다. kube-system의 대부분의 pod들은 static pod이고, kubeadm 툴도 이를 이용한다.
Daemonset과 StaticPod과 혼동할 수 있다 kube-scheduler에 영향을 받지 않는 다는 점은 동일하지만 그 외의 부분은 전혀 다르다. Daemonset은 node마다 1개씩만 실행되는 것이고 생성되는 주체도 API server이다. 반면에 Static pod는 생성 주체가 kublet이다.
apiVersion: v1
kind: Pod
metadata:
  creationTimestamp: null
  labels:
    run: static-busybox
  name: static-busybox
spec:
  containers:
  - command:
    - sleep
    - "1000"
    image: busybox
    name: static-busybox
    resources: {}
  dnsPolicy: ClusterFirst
  restartPolicy: Always
status: {}
77 Multiple Schedulers
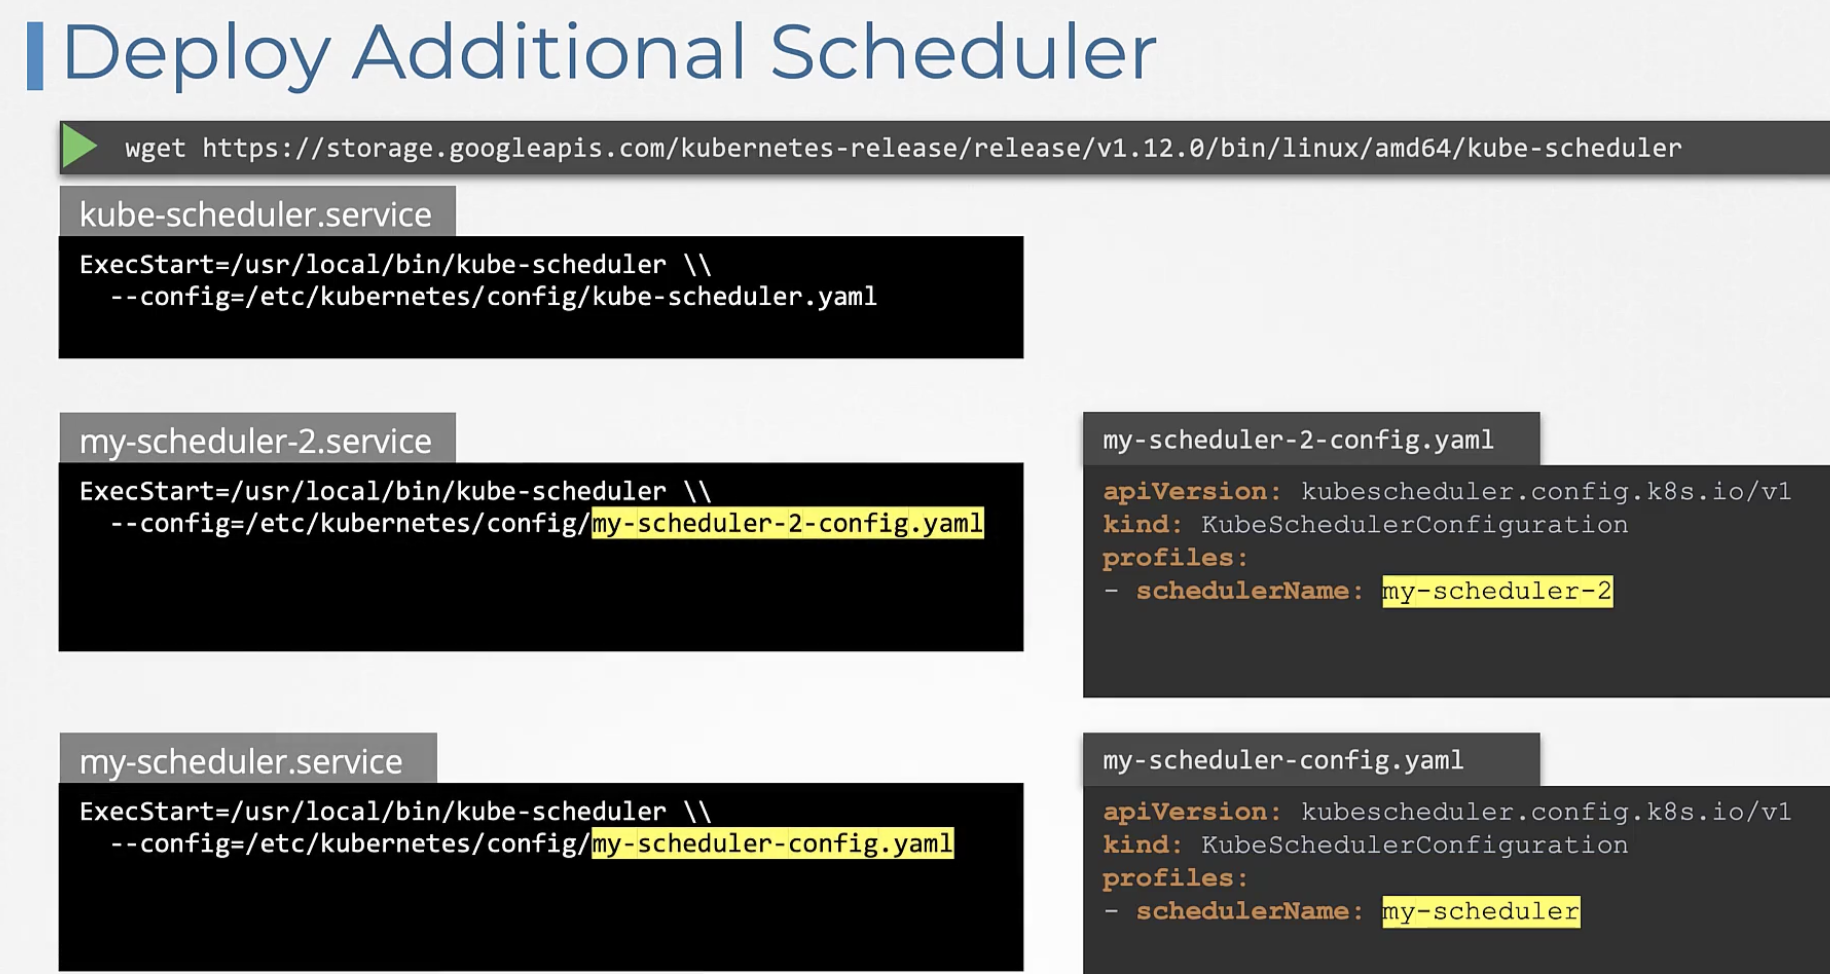
Kubernetes 에서는 다수의 Scheduler를 사용할 수 있다. 또한 pod를 scheduling할 때 어떤 scheduler를 이용할지도 설정할 수 있다.
가장 간단한 Custom Scheduler 추가는 아래와 같이 진행할 수 있지만, 현재는 아래처럼 실행하지 않는다.
현재는 아래와 같이 Scheduler도 Pod 형태로 실행하는 방법이 일반적이다.
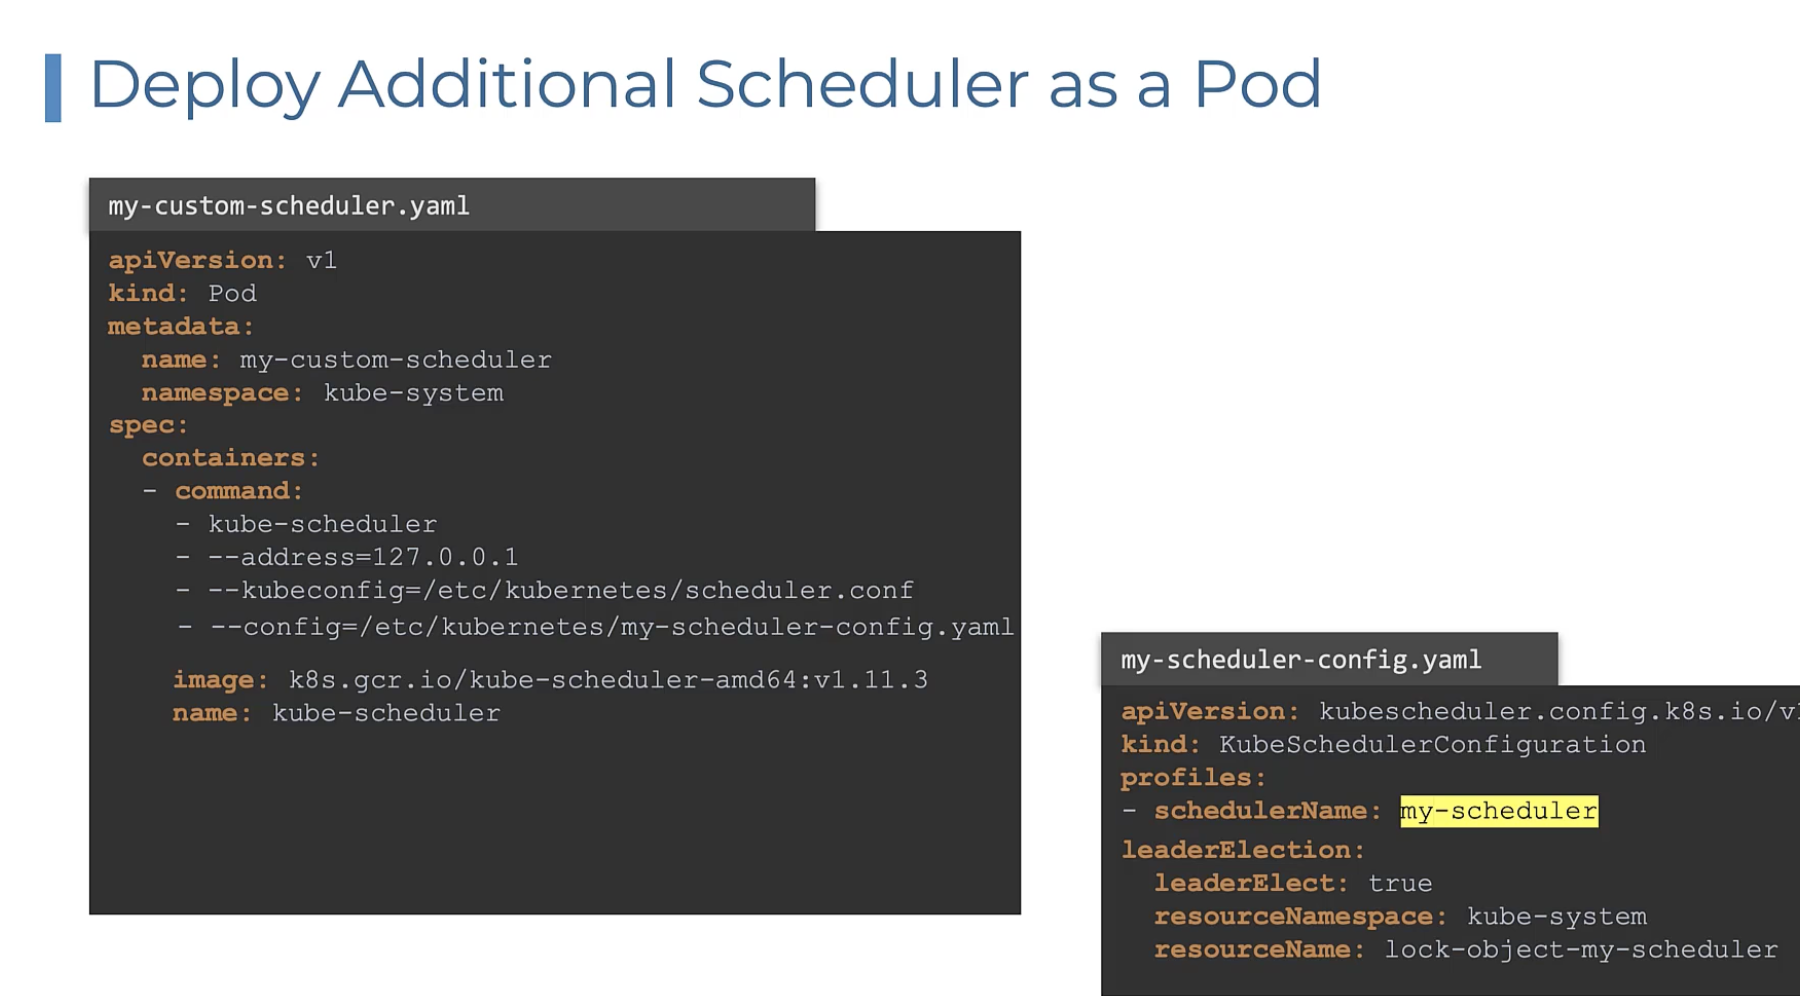
최신 방법은 kubernetes 공식 guide인 Configuring Multiple Schedulers 를 참조한다.
Pod를 실행할 때 명시적으로 scheduler를 지정하려면 spec 아래에 schedulerName 부분에 scheduler이름을 명시하면 된다.
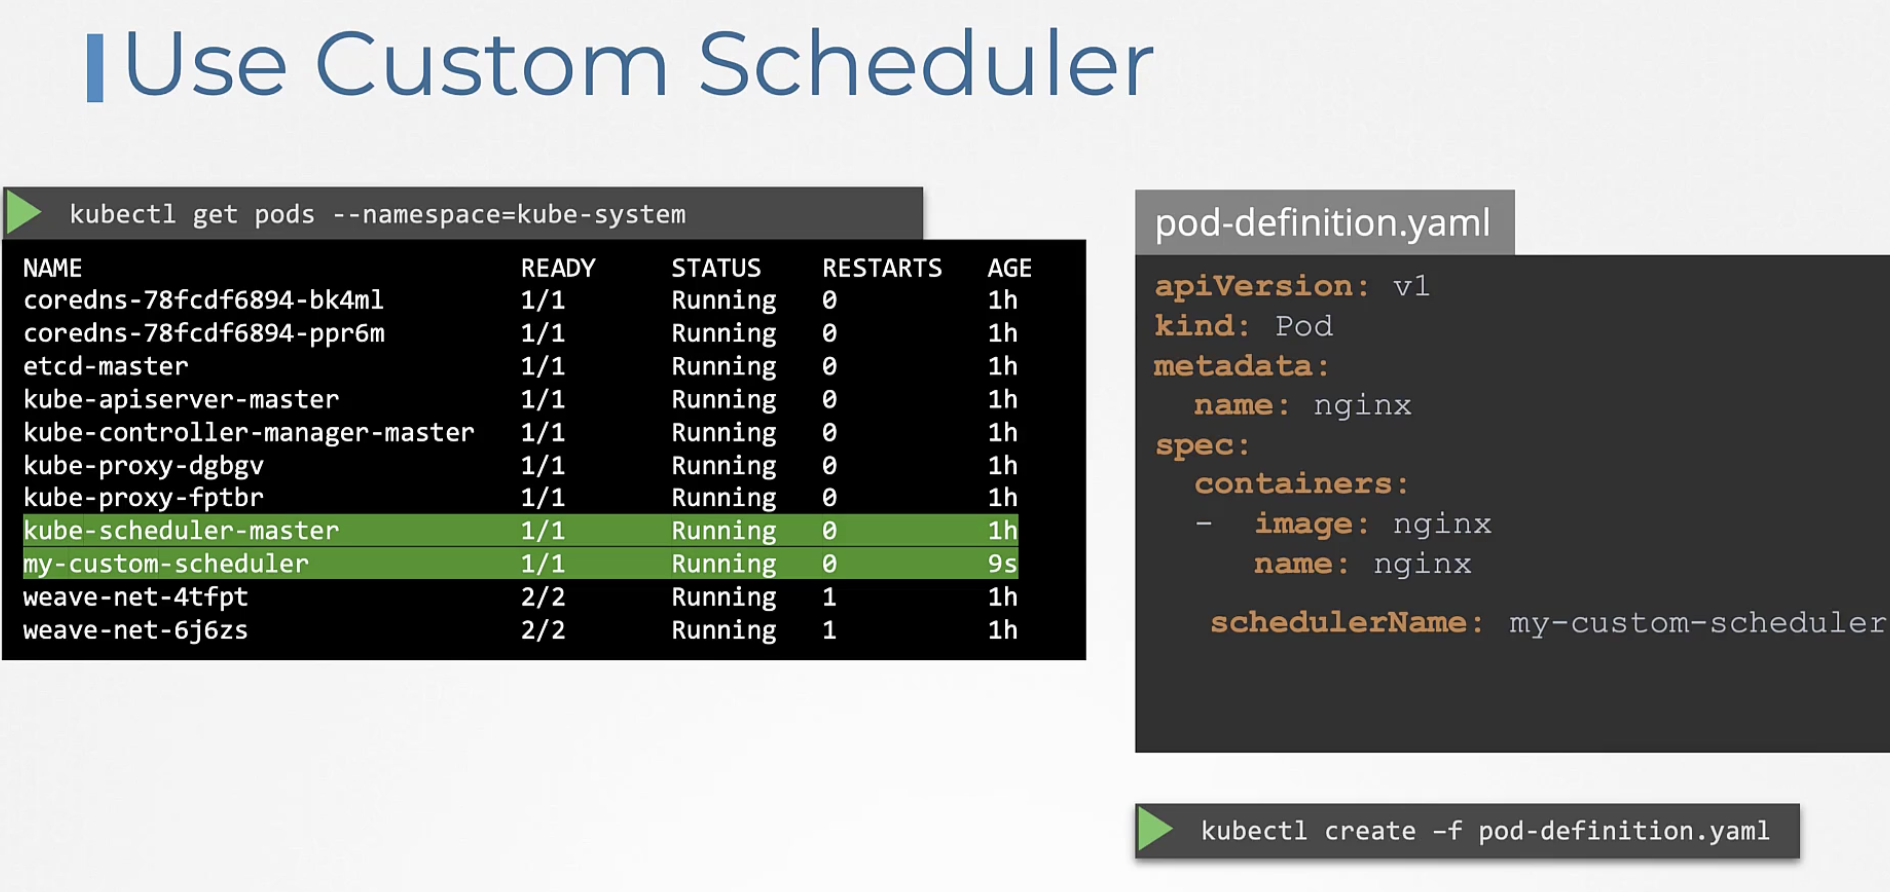
새롭게 만든 my-custom-scheduler로 Scheduling이 잘 되었는지 확인하려면 kubctl get events -o wide로 확인한다.
또는 kubectl logs my-custom-scheduler --name-space=kube-system 으로 scheduler의 로그를 확인한다.
apiVersion: kubescheduler.config.k8s.io/v1beta2
kind: KubeSchedulerConfiguration
profiles:
  - schedulerName: my-scheduler
leaderElection:
  leaderElect: false
apiVersion: v1
data:
  my-scheduler-config.yaml: |
    apiVersion: kubescheduler.config.k8s.io/v1beta2
    kind: KubeSchedulerConfiguration
    profiles:
      - schedulerName: my-scheduler
    leaderElection:
      leaderElect: false
kind: ConfigMap
metadata:
  creationTimestamp: null
  name: my-scheduler-config
  namespace: kube-system
config map 생성하기.
$ kubectl create configmap my-scheduler-config --from-file=/root/my-scheduler-config.yaml -n kube-system
configmap/my-scheduler-config created
my scheduler 생성하기
apiVersion: v1
kind: Pod
metadata:
  labels:
    run: my-scheduler
  name: my-scheduler
  namespace: kube-system
spec:
  serviceAccountName: my-scheduler
  containers:
  - command:
    - /usr/local/bin/kube-scheduler
    - --config=/etc/kubernetes/my-scheduler/my-scheduler-config.yaml
    image: registry.k8s.io/kube-scheduler:v1.27.0
    livenessProbe:
      httpGet:
        path: /healthz
        port: 10259
        scheme: HTTPS
      initialDelaySeconds: 15
    name: kube-second-scheduler
    readinessProbe:
      httpGet:
        path: /healthz
        port: 10259
        scheme: HTTPS
    resources:
      requests:
        cpu: '0.1'
    securityContext:
      privileged: false
    volumeMounts:
      - name: config-volume
        mountPath: /etc/kubernetes/my-scheduler
  hostNetwork: false
  hostPID: false
  volumes:
    - name: config-volume
      configMap:
        name: my-scheduler-config
80 Configuring Scheduler profiles
Pod는 scheduling 되기 전에 Scheduling Queue라는 곳에 들어간다. 이 곳에서 pod의 Prioryty에 따라 sorting 된다. 그 다음에 Filtering phase에서는 해당 pod이 들어갈 수 있는 node만 추려진다. filtering의 대상은 node이다. scoring phase에서는 나머지 노드들 중에 score를 매겨서 하나의 node를 정한다. 마지막으로 Binding을 진행한다.
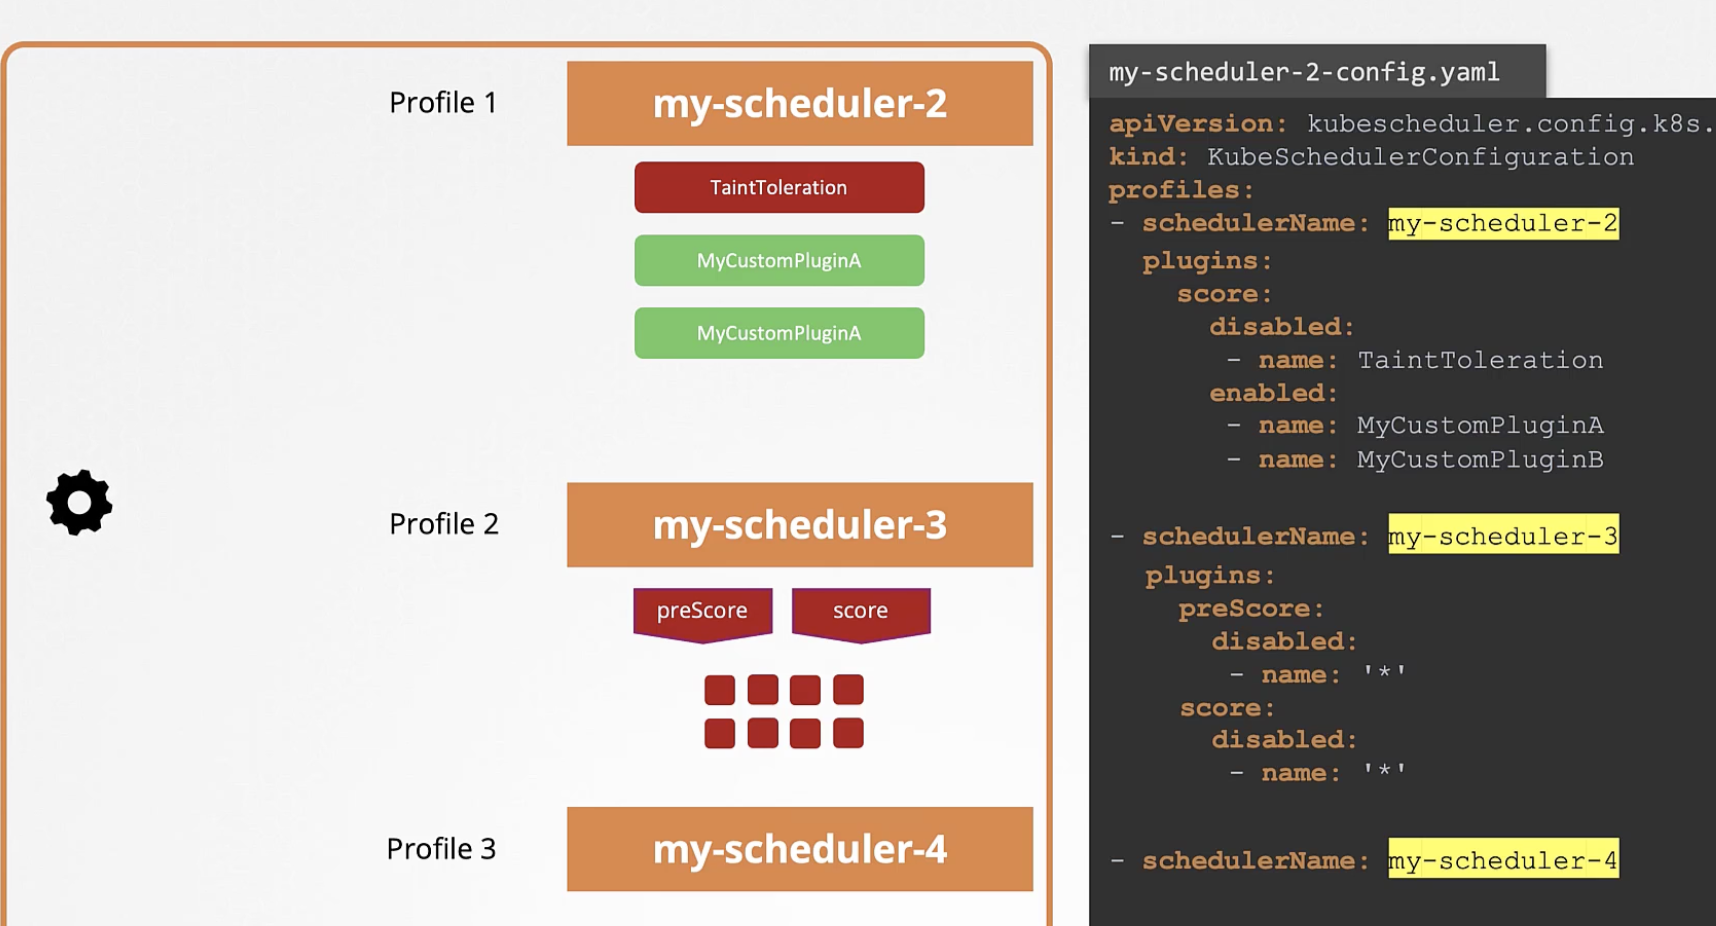
그리고 각각의 Phase마다 Plugin이 존재하는데, 아래와 같다. kubernetes는 이러한 plugin들을 customizing 할 수 있도록 Extension Point를 제공한다.
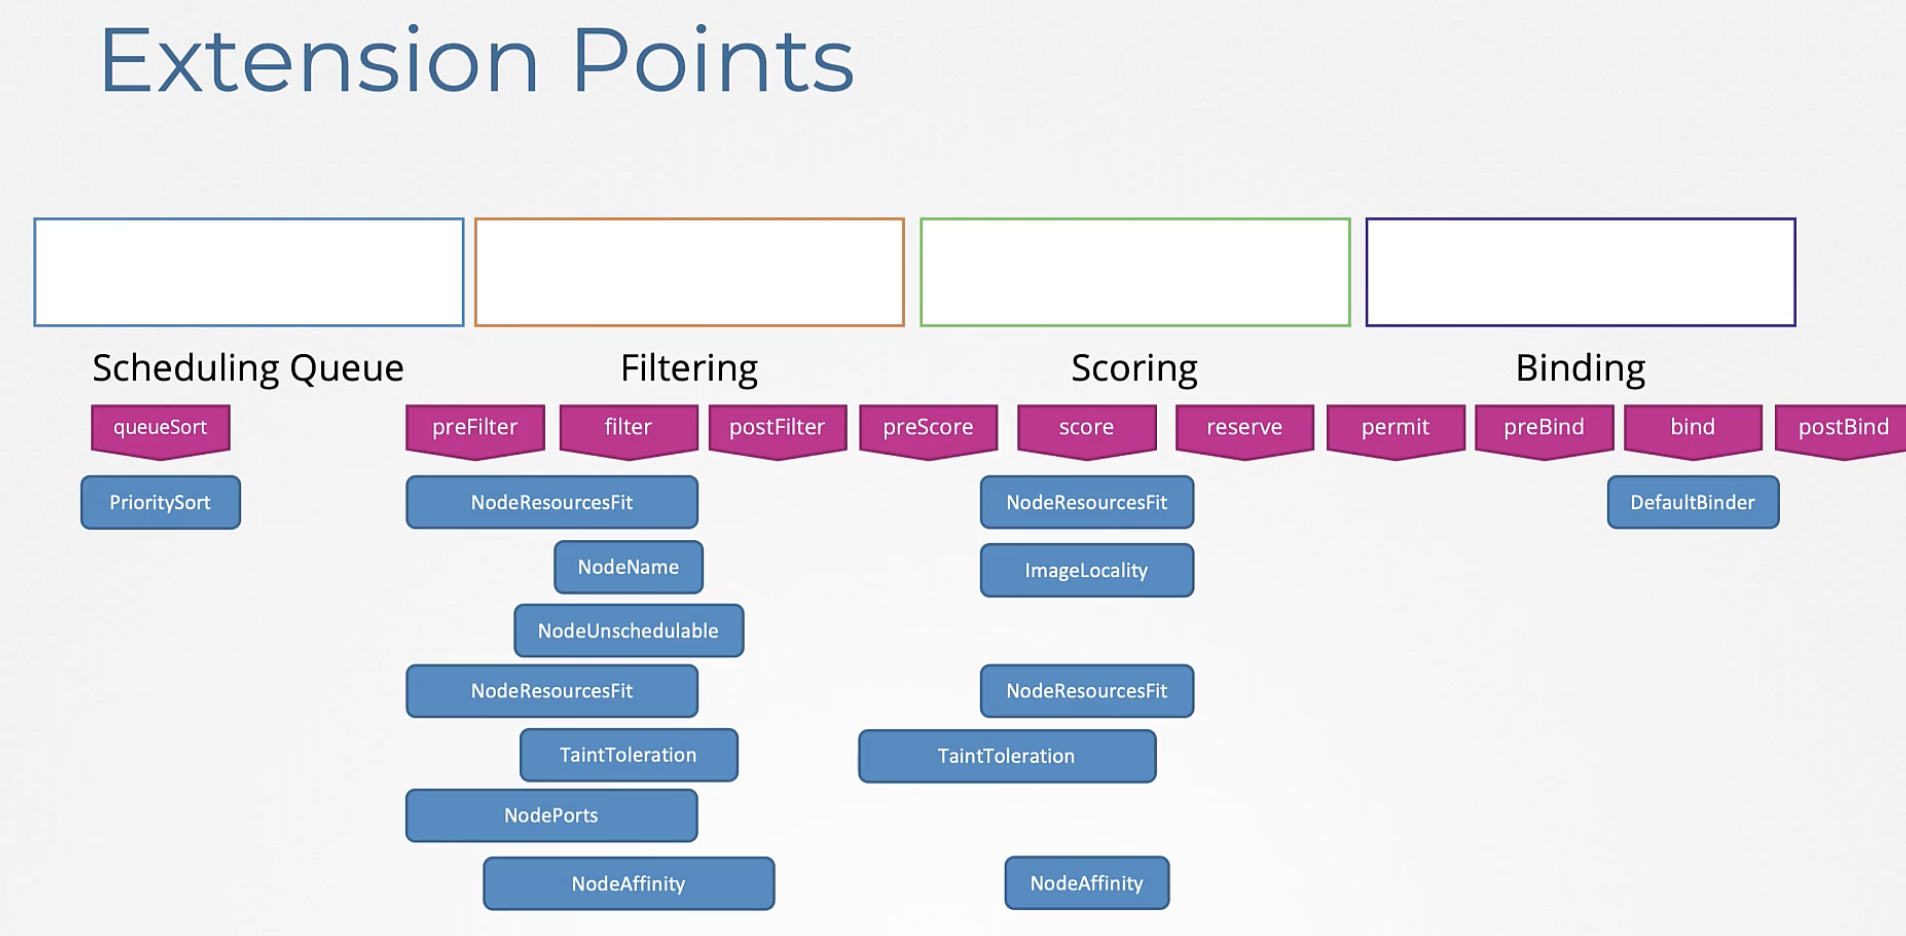
Kubernetes v1.18 release에서 Multiple Scheduler의 충돌을 막기 위해 Multiple profile 이란 개념을 도입했다. 그리고 동일한 binary를 사용하는 각각의 profile에 수많은 plugin들을 enable 또는 disable 설정할 수 있도록 하였다. 예를들어 score Plugin phase는 건너뛰도록 할 수있다.