
This post is a study note based on the https://www.udemy.com/course/certified-kubernetes-administrator-with-practice-tests course and content from https://kodekloud.com/.
- 11 Cluster Architecture
- 12 Docker-vs-ContainerD
- 13 ETCD for Beginners
- 14 ETCD in Kubernetes
- 16 Kube API Server
- 17 Kube Controller Manager
- 18 Kube Scheduler
- 19 Kubelet
- 20 Kube Proxy
- 21 Recap - Pods
- 22 Pods with YAML
- 29 Replica Sets
- 32 Deployments
- 36 Services
- 41 Namespaces
- Imperative vs Declarative
11 Cluster Architecture
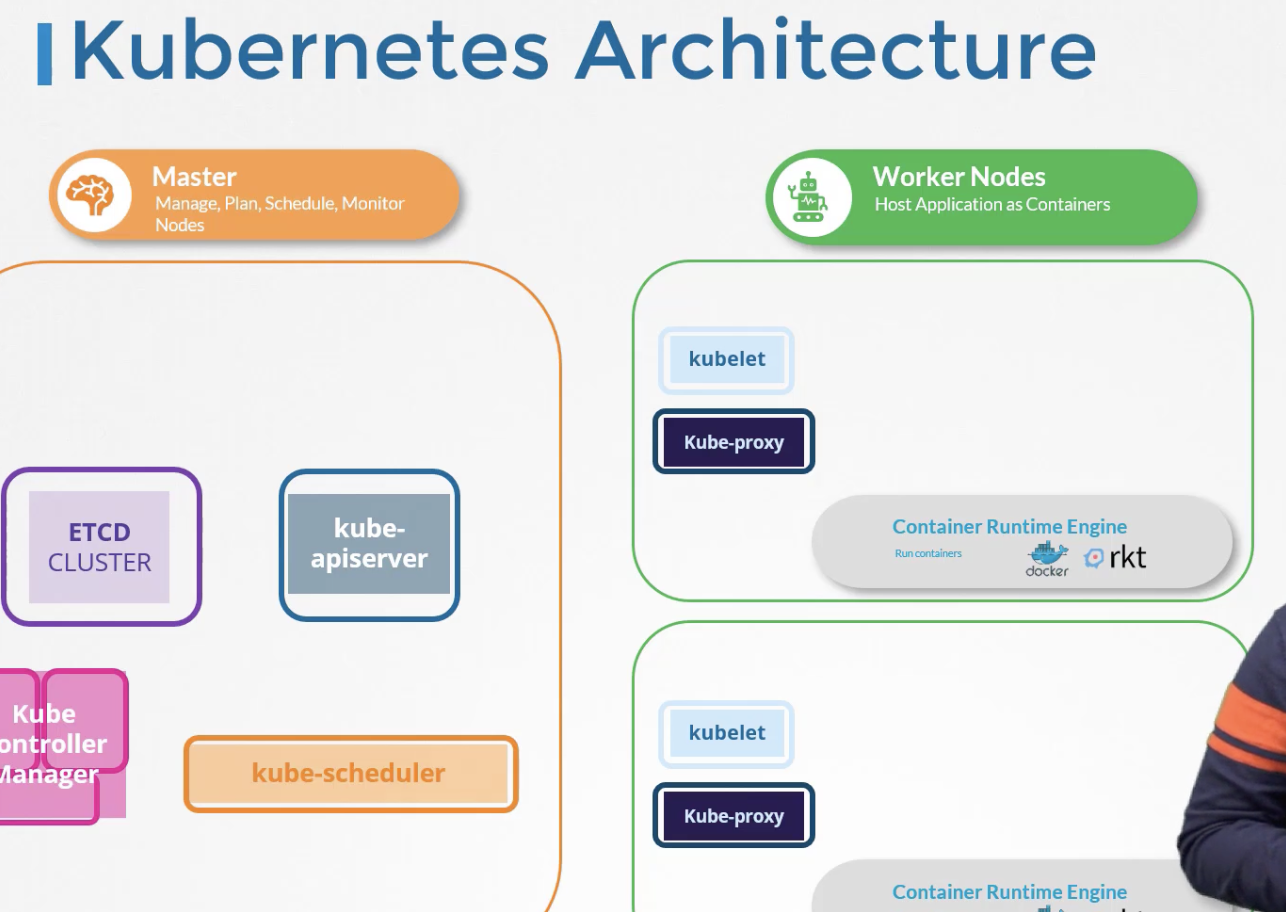
There are Master Nodes and Worker Nodes. Information about which containers exist and how they are running is stored in a data store called ETCD.
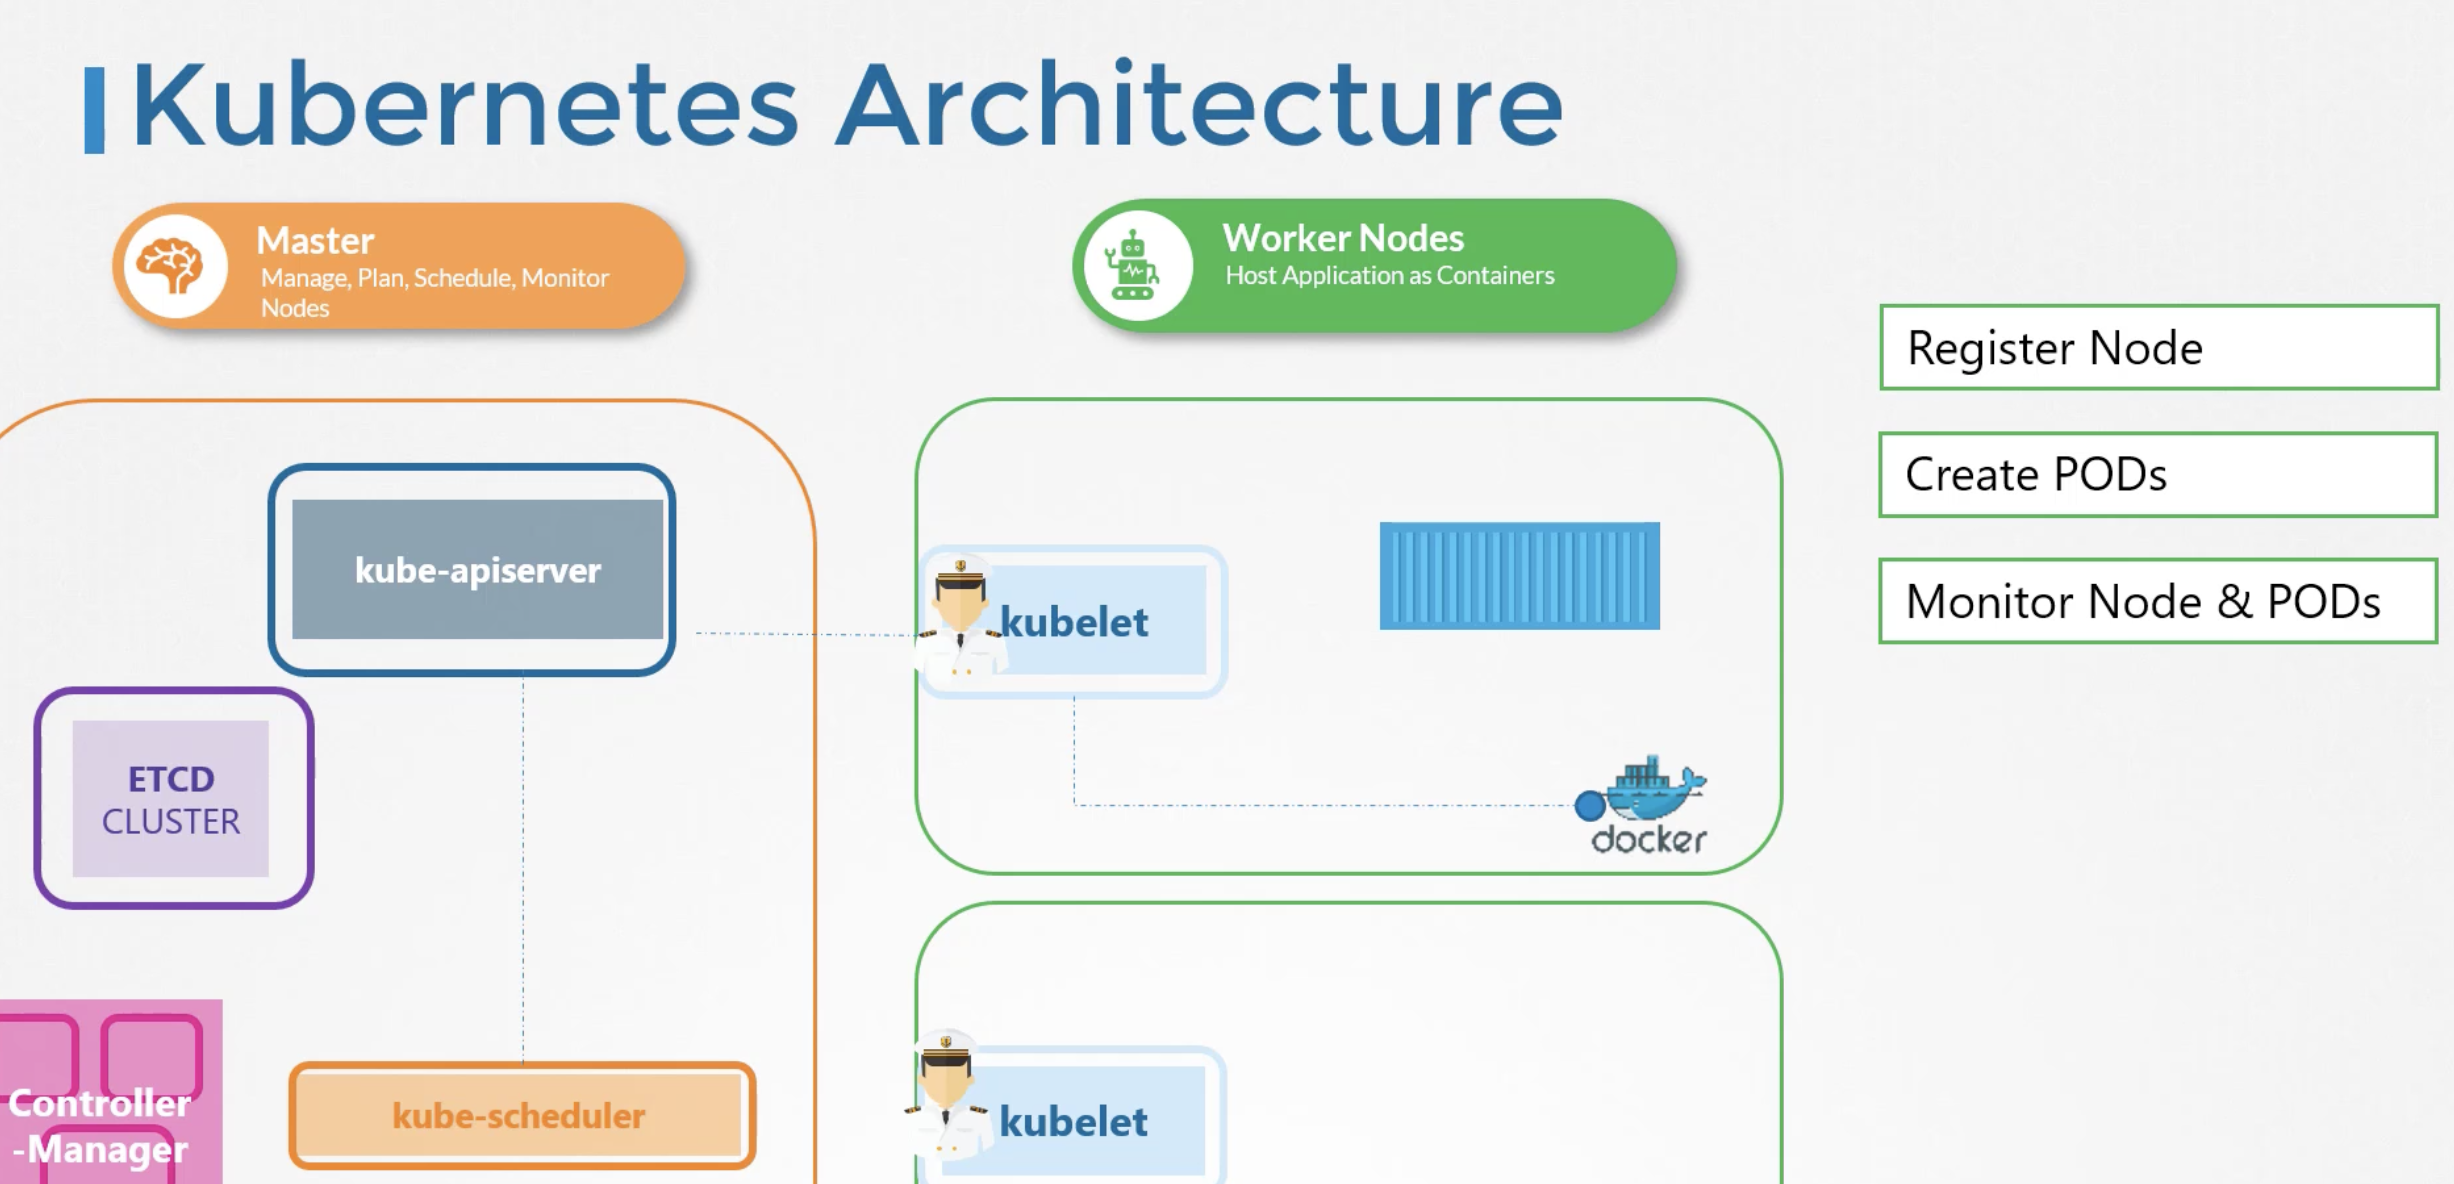
The relationship between the Master Node and Worker Nodes can be illustrated as follows:
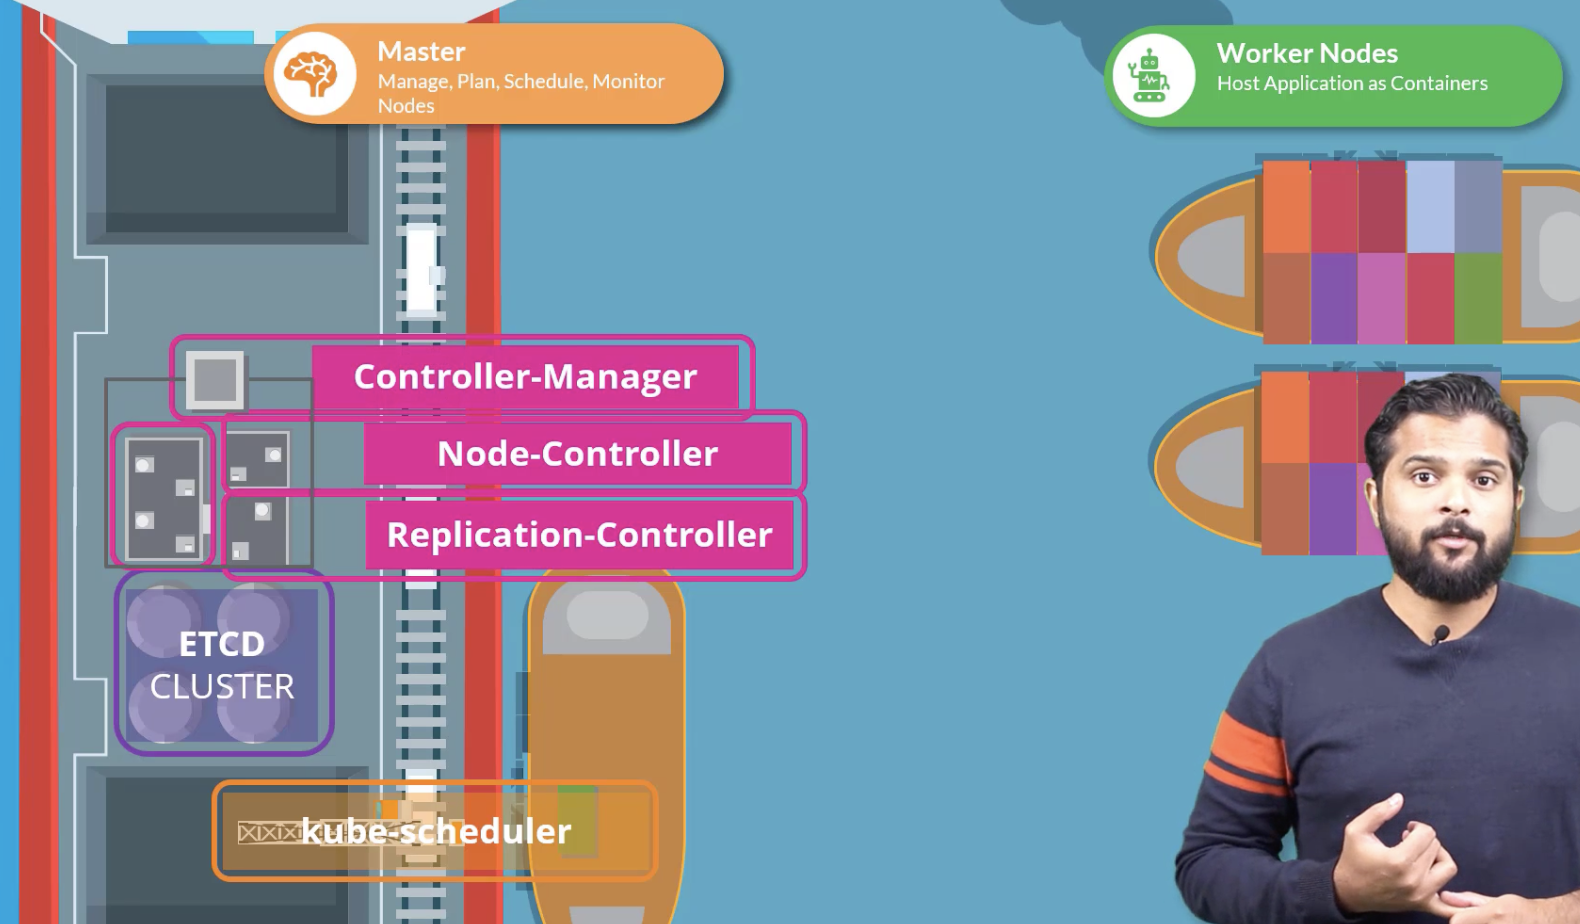
The Kube API Server orchestrates all operations and monitors everything.
Applications run as containers. DNS is also a container. Docker is the most popular container runtime engine, but it does not have to be Docker.
Kubelet is the captain of the Worker Node.
Kube Proxy Service facilitates communication between internal services.
12 Docker-vs-ContainerD
The dockershim that was supported in version 1 was removed in version 2. When containerd is installed, the ctl tool is also installed (not user-friendly, only limited features).
ctr images pull docker.io/library/redis:alpine
ctr run ...
nerdctl provides a Docker-like CLI tool, unlike ctr.
nerdctl run --name redis redis:alpine
crictl also exists and is being developed by the Kubernetes project. It is rarely used directly and is mostly used as a debugging tool. Since kubelet can forcibly delete containers it did not create, you need to be careful when using it standalone.
13 ETCD for Beginners
You can check the version with etcdctl --version. It is usually version 2 or 3.
It is a key-value store.
14 ETCD in Kubernetes
All information about Nodes, Pods, Configs, Secrets, Accounts, Roles, Bindings, and Others is stored in ETCD.
If you install Kubernetes manually, you need to install etcd manually as well.
The advertise-client-urls defaults to port 2379, which is needed for the kube-apiserver to connect to etcd.
If you install with kubeadm, you can confirm that the etcd daemon is running as a container.
sudo kubectl get pods -n kube-system
NAME                                     READY   STATUS    RESTARTS   AGE
coredns-5d78c9869d-2f2qt                 1/1     Running   0          38s
coredns-5d78c9869d-dn7b6                 1/1     Running   0          38s
etcd-docker-desktop                      1/1     Running   0          38s
kube-apiserver-docker-desktop            1/1     Running   0          38s
kube-controller-manager-docker-desktop   1/1     Running   0          39s
kube-proxy-24tjf                         1/1     Running   0          39s
kube-scheduler-docker-desktop            1/1     Running   0          42s
storage-provisioner                      1/1     Running   0          37s
vpnkit-controller                        1/1     Running   0          37s
You can set up High Availability with multiple master etcd instances.
Commands available in version 2:
etcdctl backup
etcdctl cluster-health
etcdctl mk
etcdctl mkdir
etcdctl set
16 Kube API Server
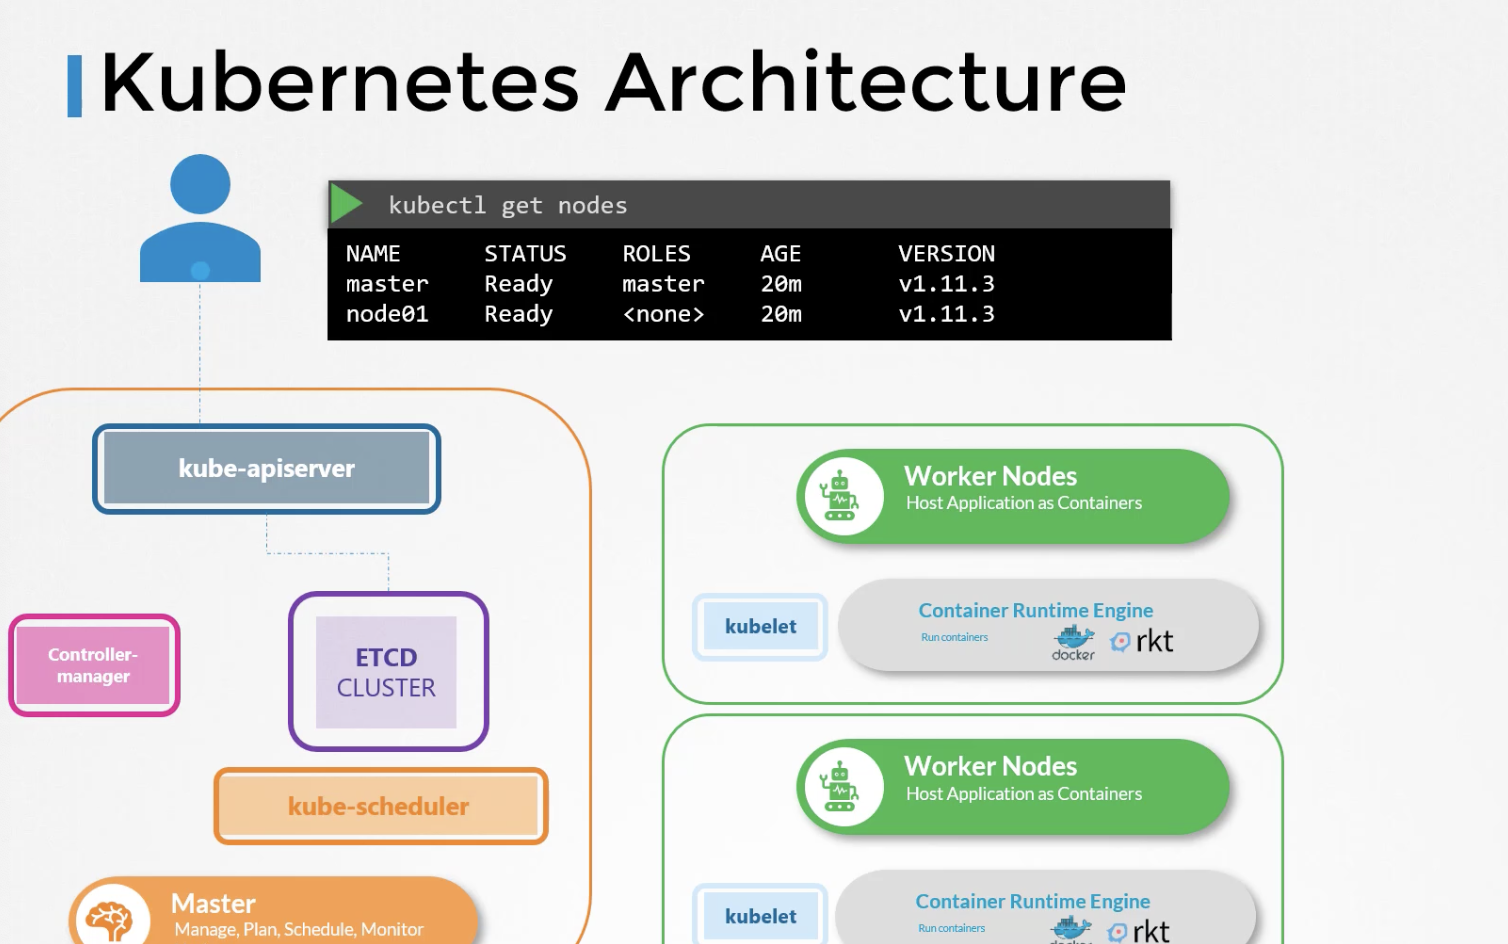
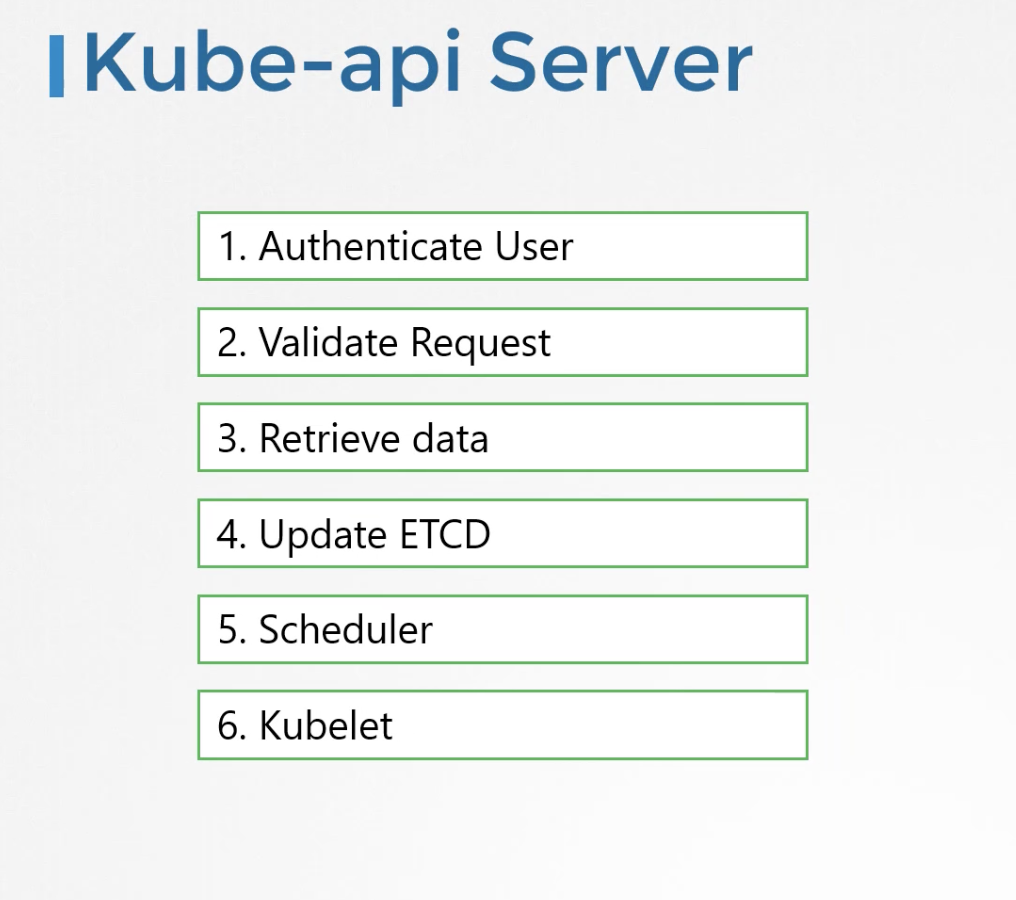
The kube-apiserver runs with various parameters.
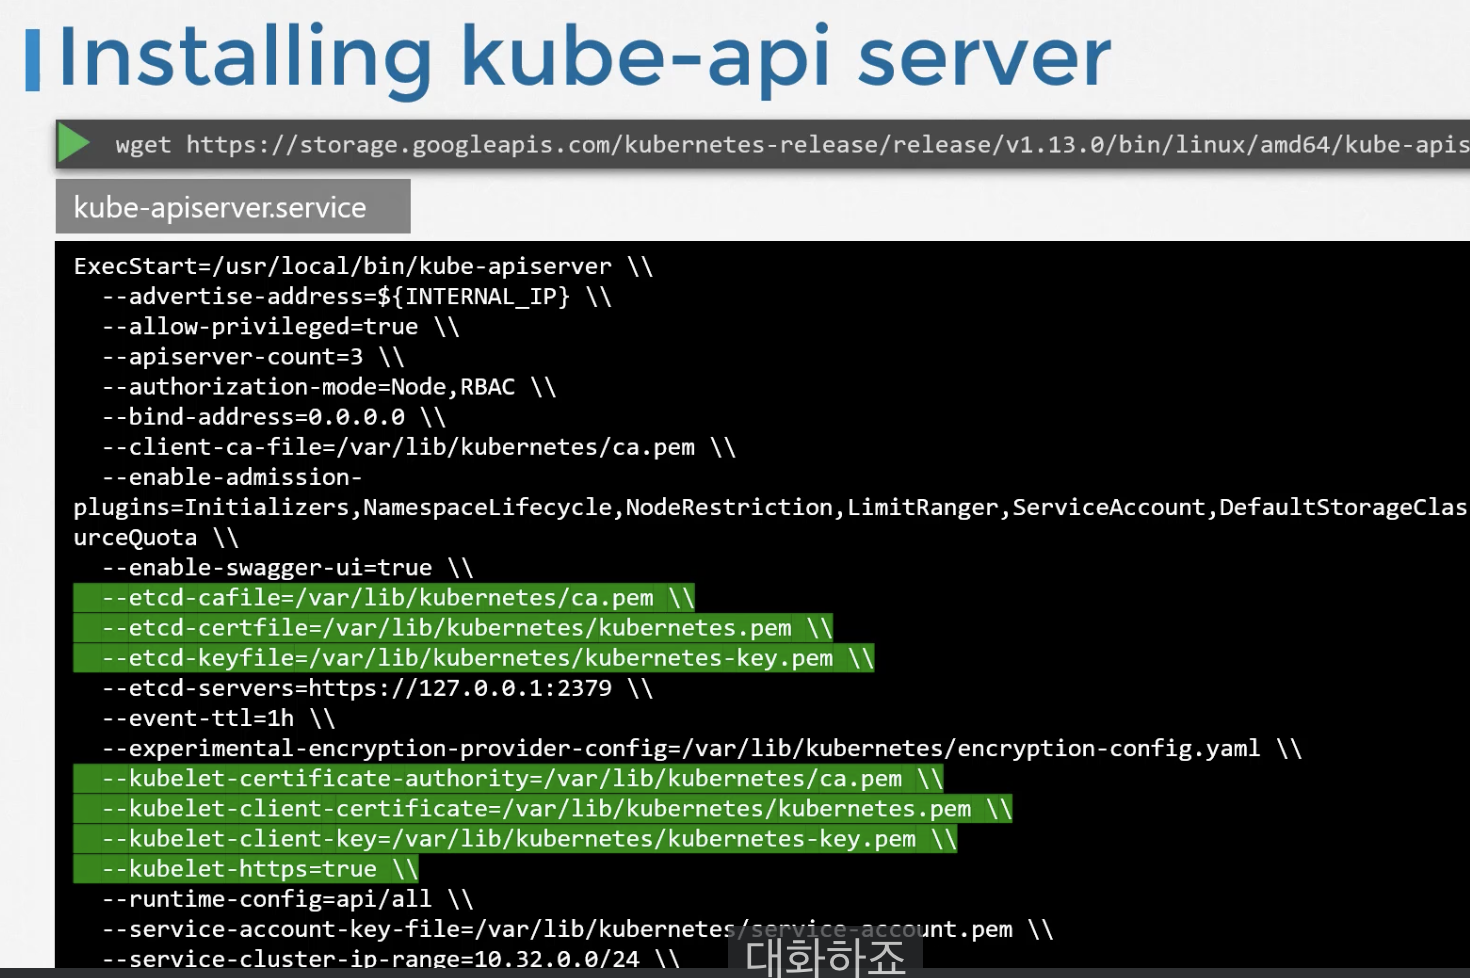
If installed with kubeadm, you can examine the API server options at /etc/kubernetes/manifests/kube-apiserver.yaml.
17 Kube Controller Manager
The Controller Manager continuously monitors node status and resolves issues. It sends heartbeats every 5 seconds.
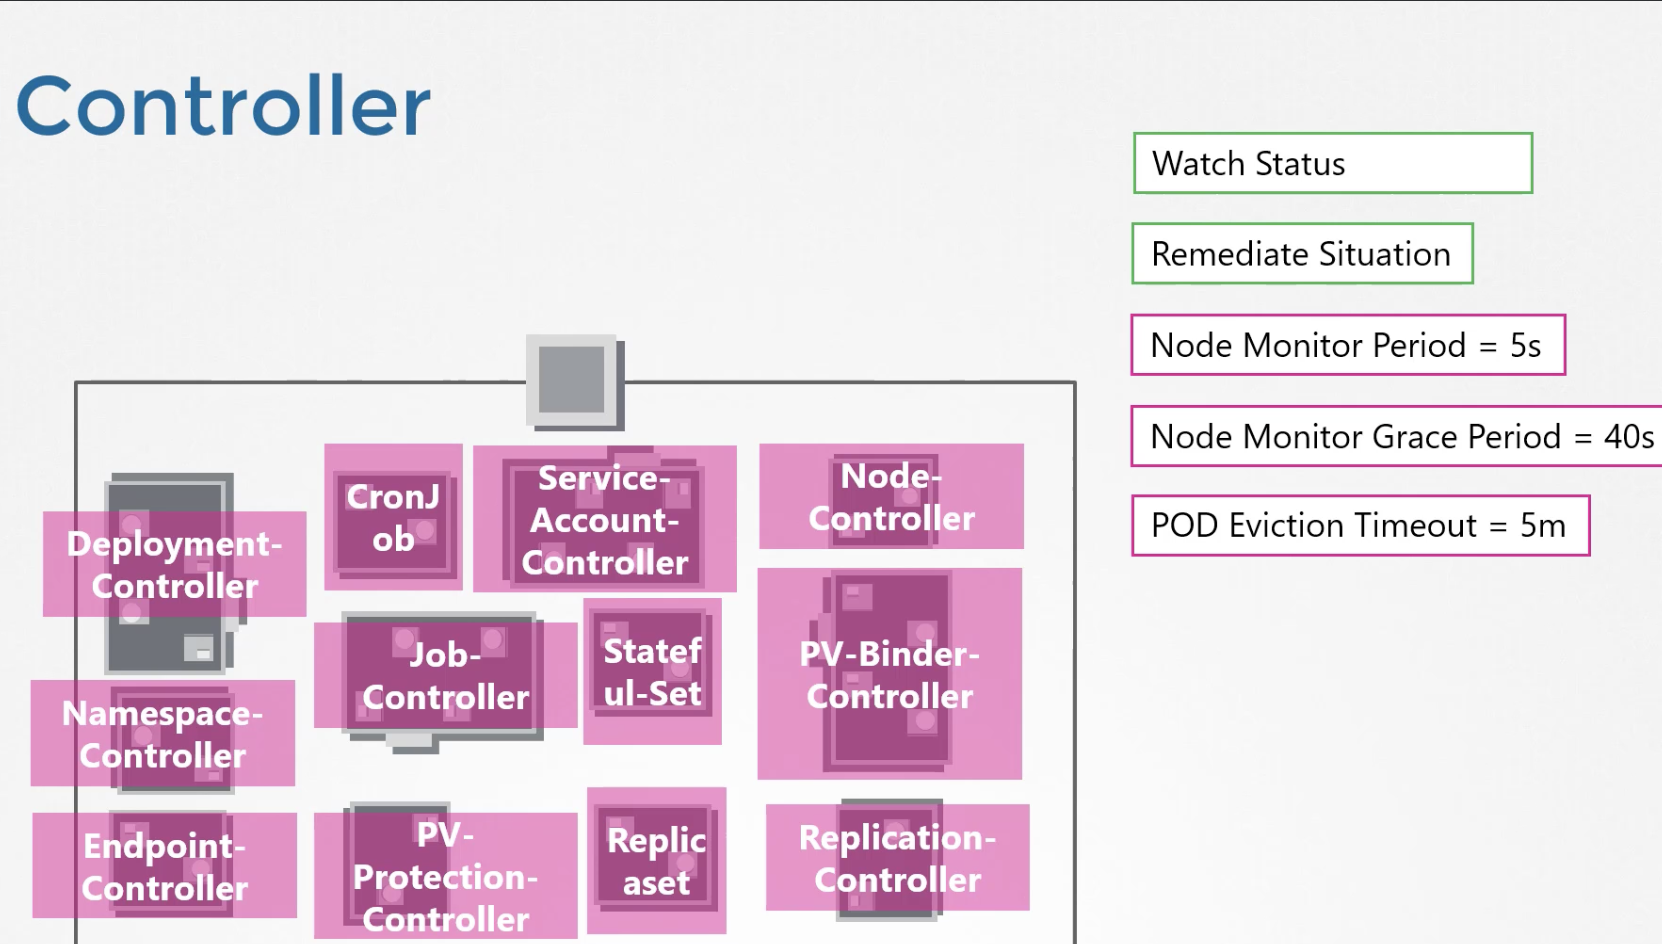
The Kube-Controller-Manager contains various managers within it.
If installed with kubeadm, you can check the Kube-Controller-Manager settings at /etc/kubernetes/manifests/kube-controller-manager.yaml.
18 Kube Scheduler
- Filter Nodes
- Rank Nodes
You can write your own custom scheduler.
Settings can be checked at /etc/kubernetes/manifests/kube-scheduler.yaml.
19 Kubelet
Kubelet is like the captain of a Worker Node.
20 Kube Proxy
One instance runs per node as a DaemonSet. It resolves IP addresses by service name.
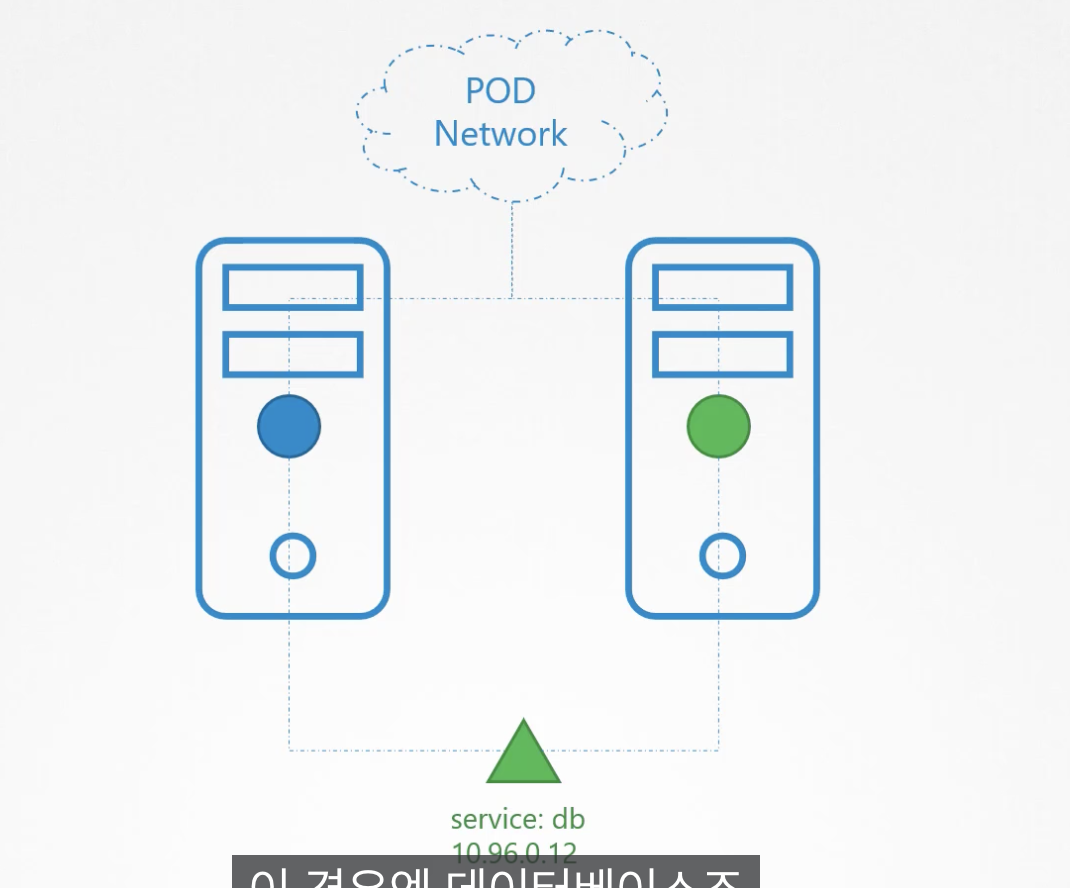
kubectl get daemonset -n kube-system
21 Recap - Pods
Applications are not deployed as bare containers but as an abstracted unit called a Pod.
Managing python-app and helper containers directly with Docker as shown below is quite cumbersome.
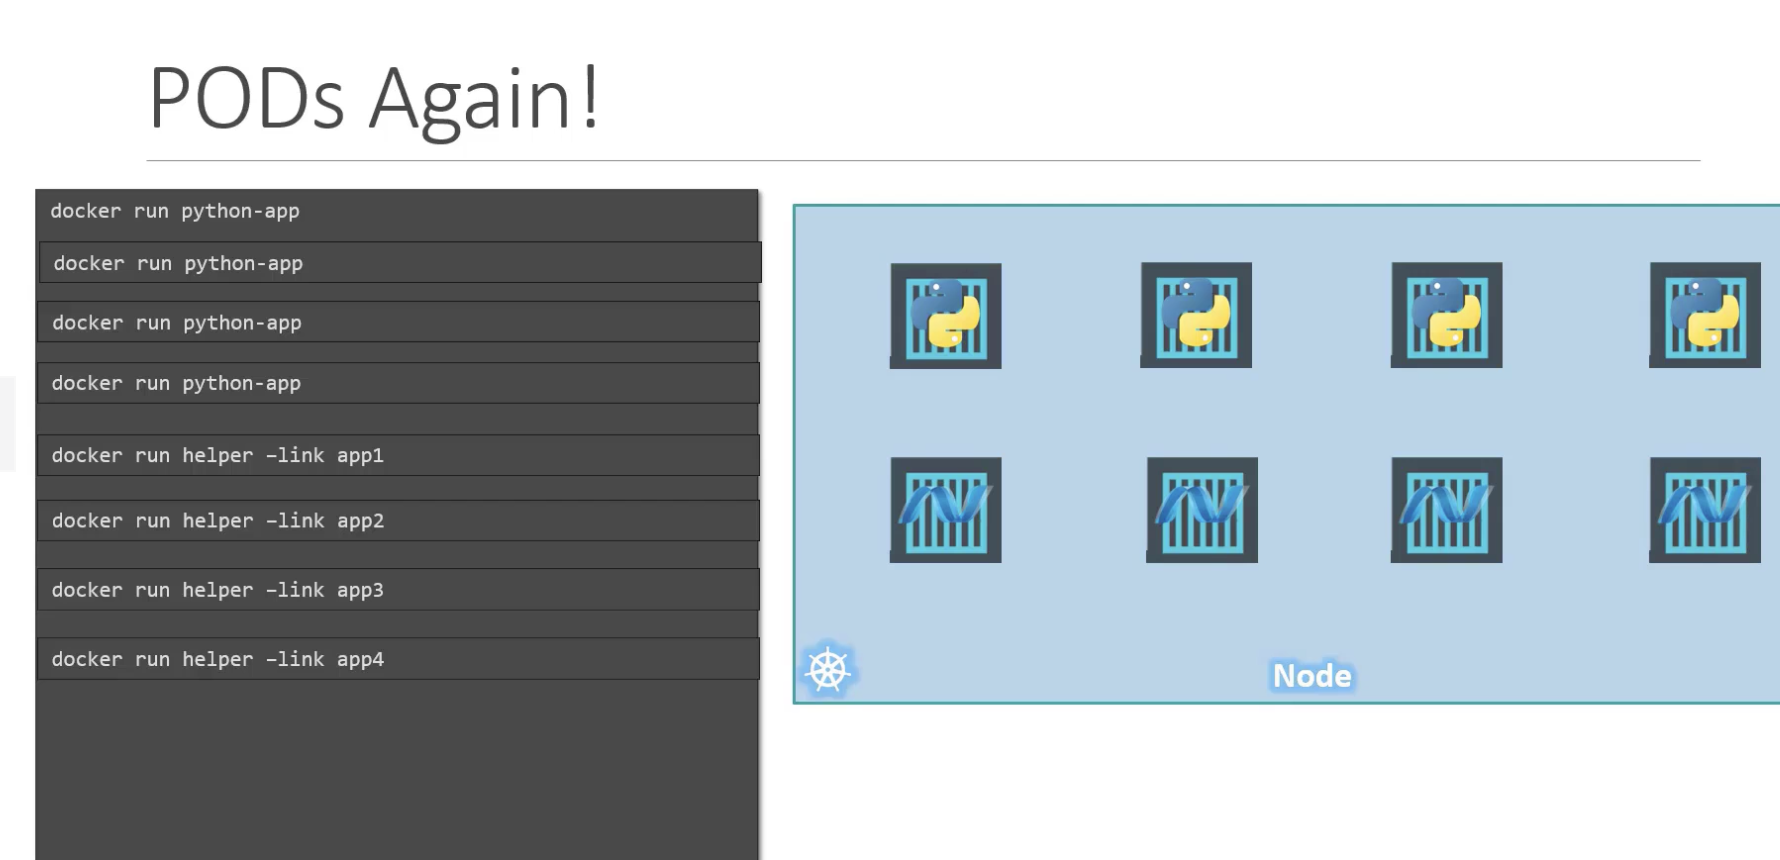
You can pull an image from Docker Hub with the following command:
$ kubectl run nginx --image nginx
$ kubectl run custom-nginx --image nginx --port=8080
22 Pods with YAML
Kubernetes deploys applications through YAML files.
apiVersion: v1 | v1 | apps/v1 | apps/v1
kind: POD | Service | ReplicaSet | Deployment
metadata:
    name: myapp-pods
    labels:
        app: myapp
spec:
29 Replica Sets
Replication Controllers can be used to ensure high availability of Pods. The Replication Controller guarantees that at least the specified number of Pods are always running. It is also used to scale up the number of Pods to handle increasing requests as users grow.
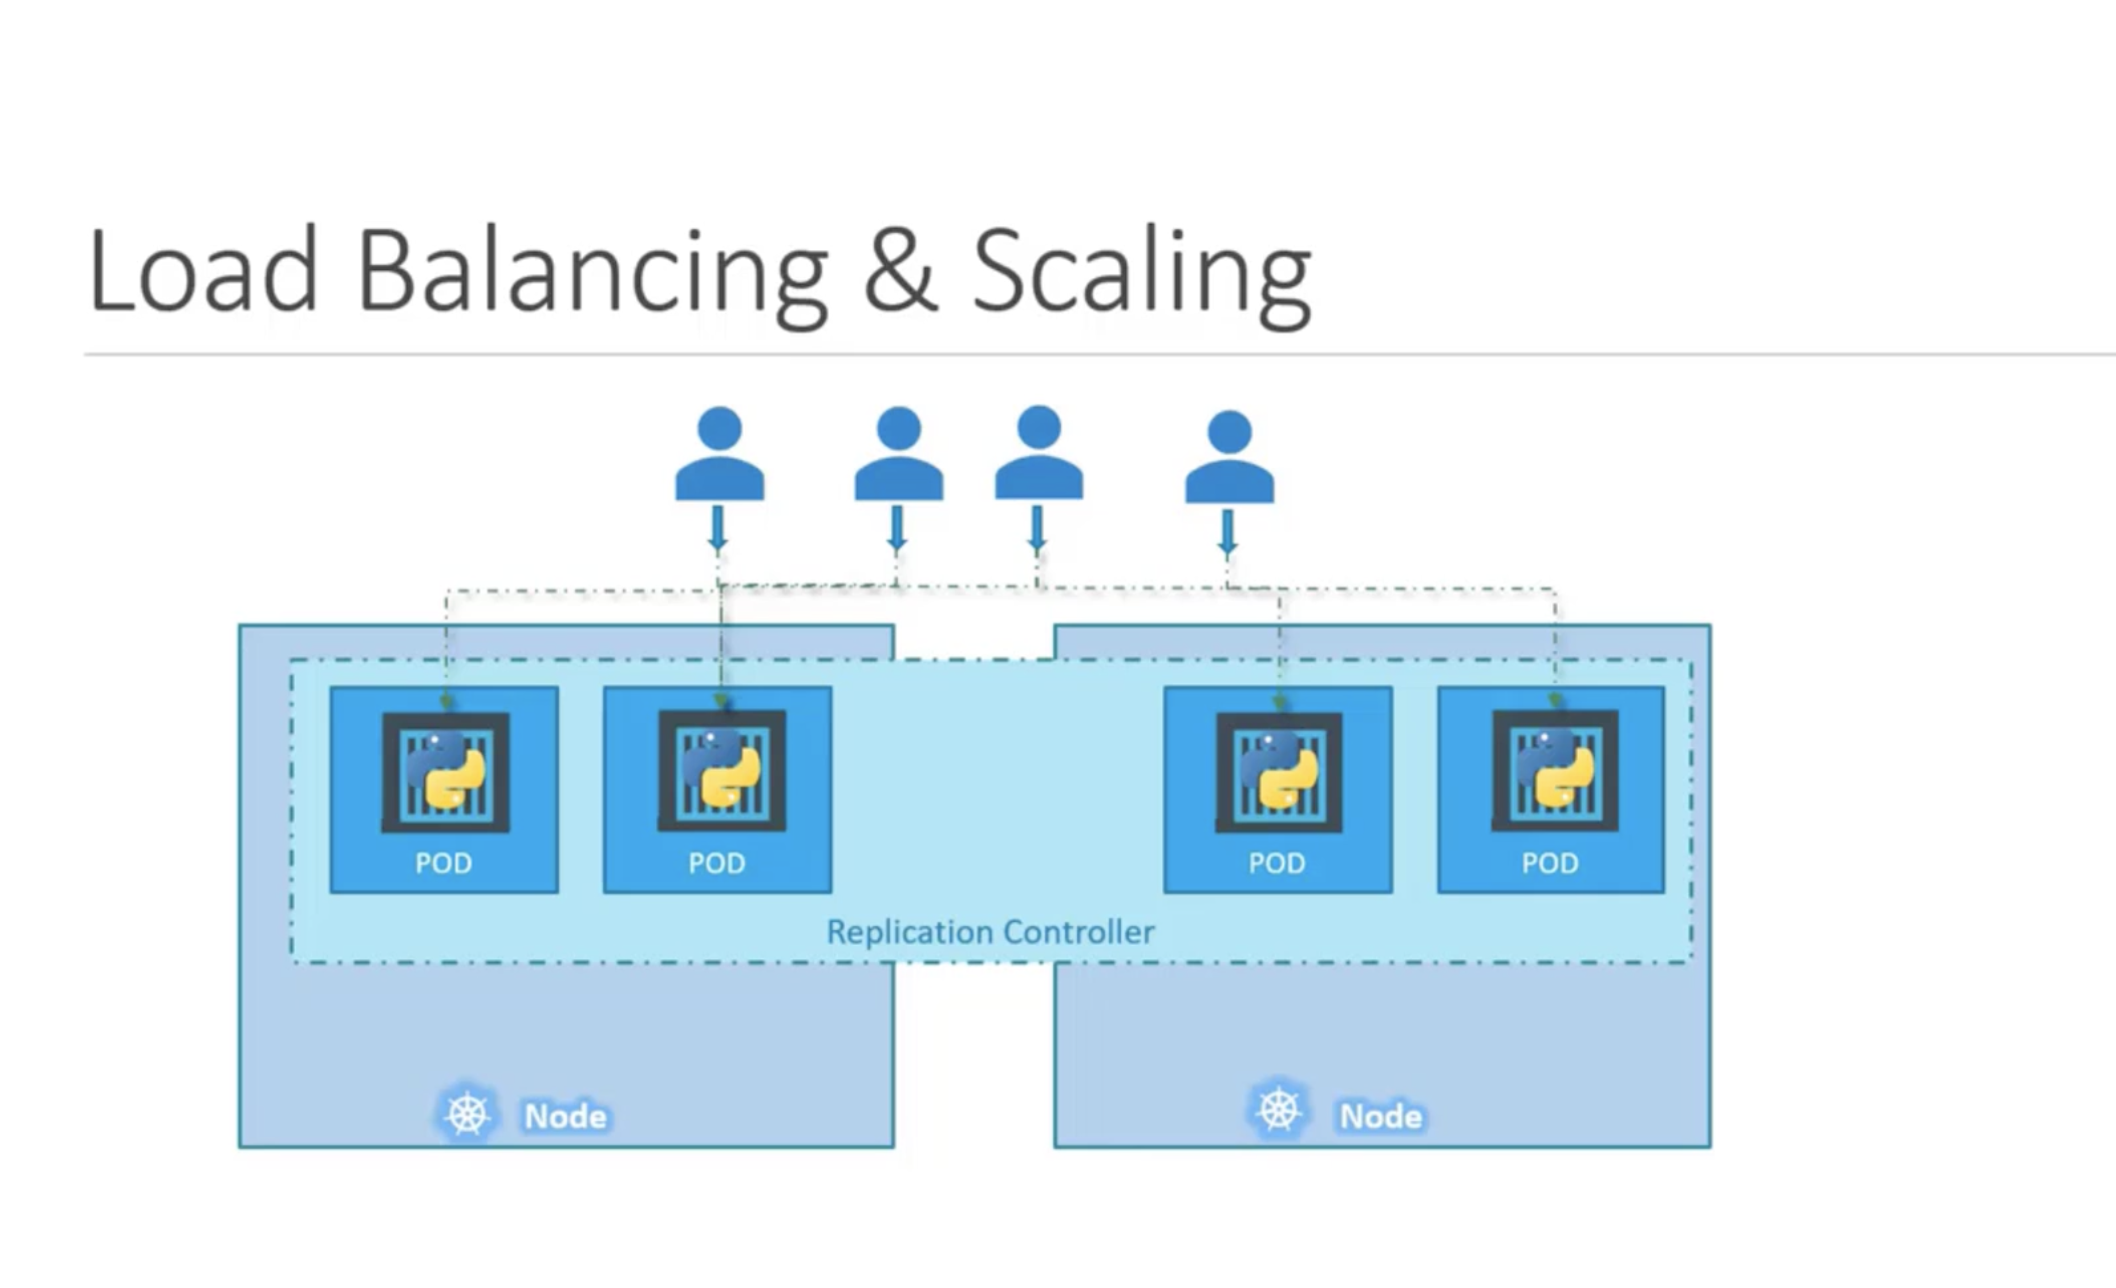
There are two types: Replication Controller and Replica Set, and it is important to distinguish between them. The Replication Controller is an older technology and is being replaced by Replica Sets.
Replication Controller
Specify the desired number of Pods in the replicas field under spec.
apiVersion: v1
kind: ReplicationController
metadata:
  name: nginx
spec:
  replicas: 3
  selector:
    app: nginx
  template:
    metadata:
      name: nginx
      labels:
        app: nginx
    spec:
      containers:
      - name: nginx
        image: nginx
        ports:
        - containerPort: 80
Running the replication controller with kubectl create -f rc-definition.yml produces the following result:
$ kubectl create -f replication.yaml
replicationcontroller/nginx created

$ kubectl get replicationcontroller
NAME    DESIRED   CURRENT   READY   AGE
nginx   3         3         3       77s

$ kubectl get pods
NAME                     READY   STATUS    RESTARTS   AGE
nginx-77b4fdf86c-vhbhl   1/1     Running   0          69d
nginx-9tq9x              1/1     Running   0          92s
nginx-s6p44              1/1     Running   0          92s
nginx-znx2w              1/1     Running   0          92s
Replica Set
A ReplicaSet is similar to a Replication Controller, but it has a selector field. Another difference is that apiVersion is apps/v1.
apiVersion: apps/v1
kind: ReplicaSet
metadata:
  name: frontend
  labels:
    app: guestbook
    tier: frontend
spec:
  # modify replicas according to your case
  replicas: 3
  selector:
    matchLabels:
      tier: frontend
  template:
    metadata:
      labels:
        tier: frontend
    spec:
      containers:
      - name: php-redis
        image: gcr.io/google-samples/hello-app:2.0
$ kubectl create -f replicaset-definition.yml
replicaset.apps/frontend created

$ kubectl get replicaset
NAME               DESIRED   CURRENT   READY   AGE
frontend           3         3         3       24s
nginx-77b4fdf86c   1         1         1       69d
A ReplicaSet monitors Pods and automatically adjusts the count to match the specified number if it does not match. When there are multiple Pods, labels are used to identify which Pods should be managed. Therefore, when defining the YAML file, the label in the ReplicaSet's selector and the label inside the template must match. If Pods with the same label already exist and the count is already satisfied, no new Pods will be created, so you should verify whether a label name is already in use.
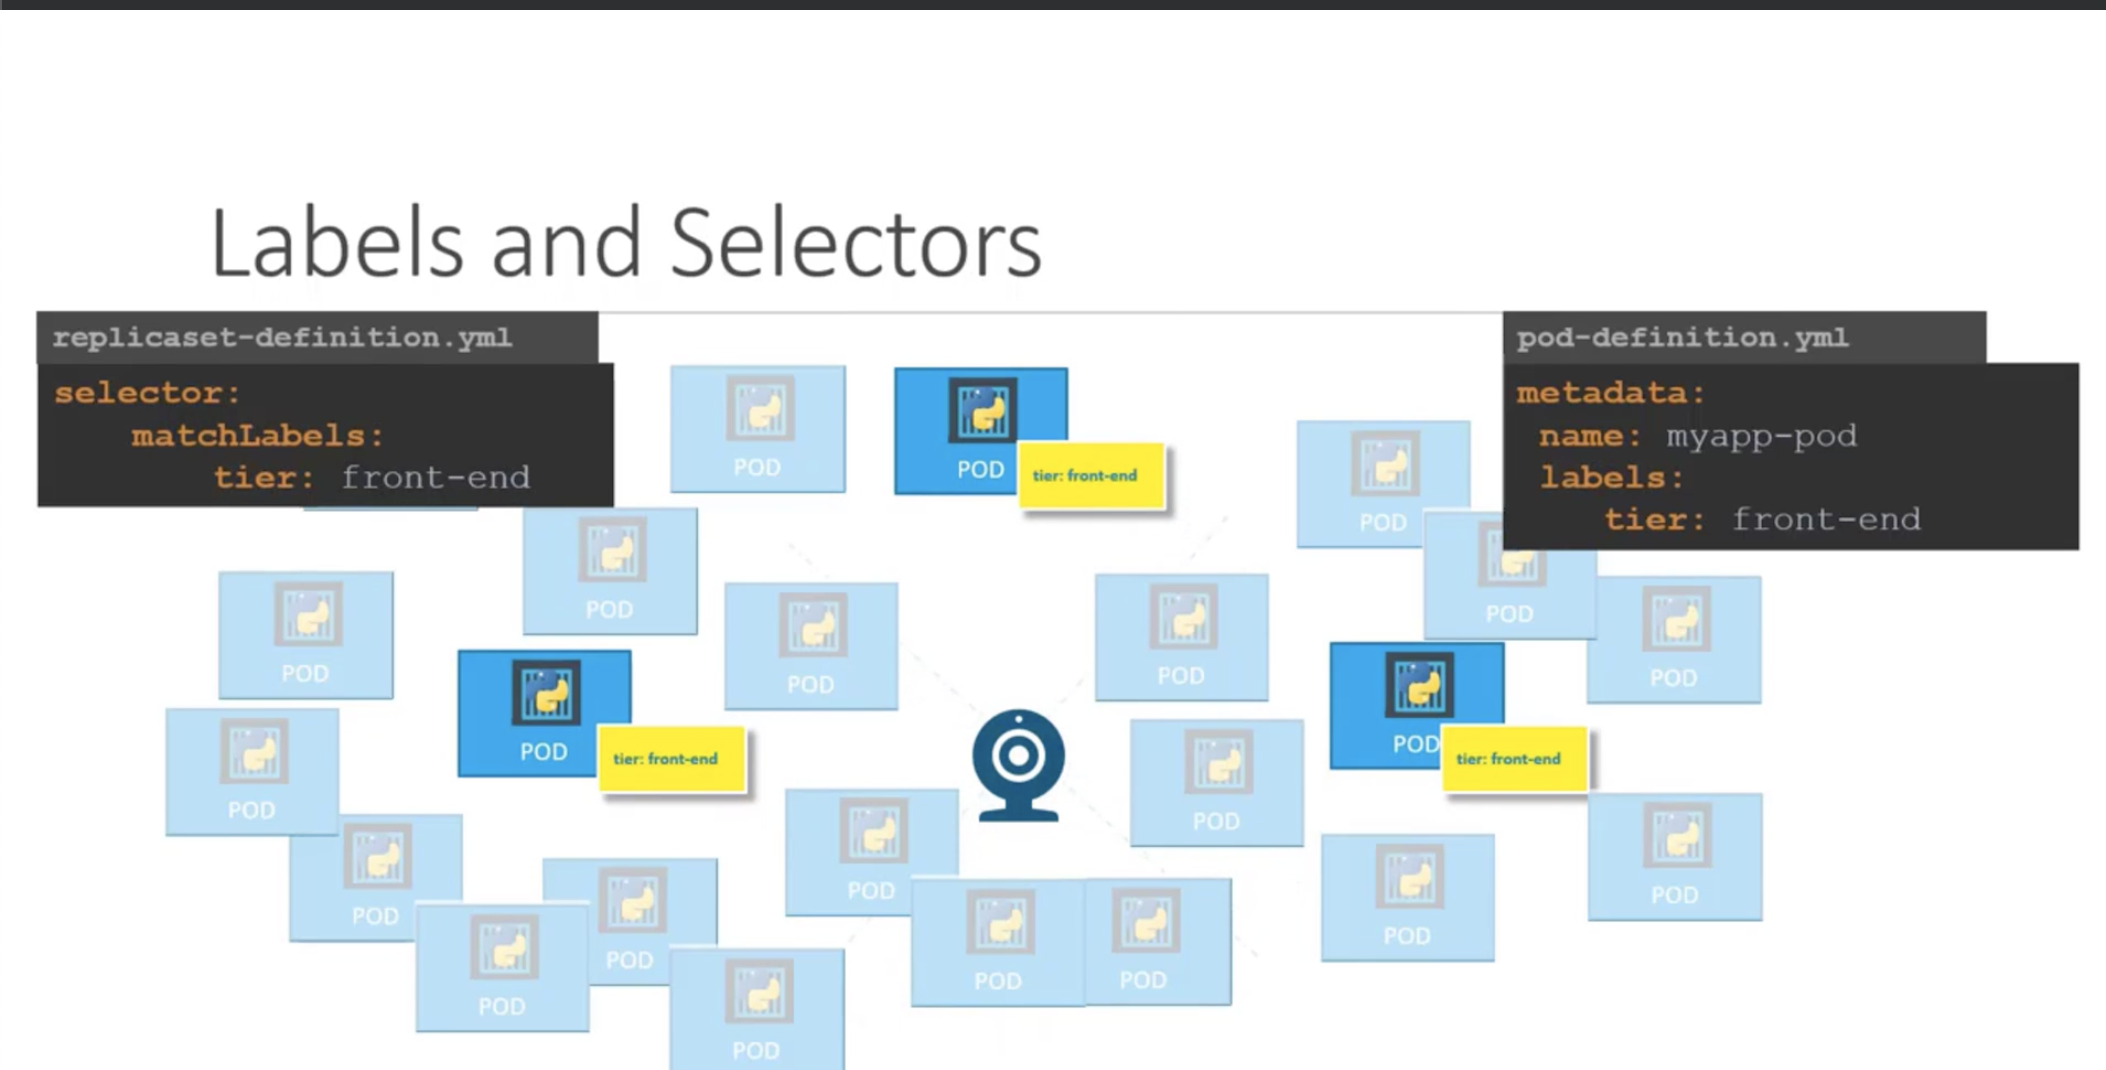
If you want to scale a ReplicaSet from 3 replicas (named "frontend" as created above) to 6, you can do it as follows:
Use kubectl get replicaset frontend -o yaml to retrieve the current YAML configuration of the frontend ReplicaSet, change the replicas to 6, save it, and apply it with kubectl replace -f filename.
The second method is to use the scale command:
$ kubectl scale --replicas=6  -f replicaset-definition.yml
replicaset.apps/frontend scaled

$ kubectl get replicaset
NAME               DESIRED   CURRENT   READY   AGE
frontend           6         6         6       14m
nginx-77b4fdf86c   1         1         1       69d
To scale back down to 3, you can specify the ReplicaSet name directly instead of using a file:
$ kubectl scale --replicas=3 replicaset frontend
replicaset.apps/frontend scaled
$ kubectl get replicaset
NAME               DESIRED   CURRENT   READY   AGE
frontend           3         3         3       15m
nginx-77b4fdf86c   1         1         1       69d
32 Deployments
Deployments are similar to ReplicaSets. The difference is that the kind field uses Deployment instead of ReplicaSet.
Writing YAML files every time to create Pods is tedious. In such cases, using kubectl run is convenient. For example, to generate a YAML file that creates a Deployment running nginx, you can use:
$ kubectl create deployment --image=nginx nginx-deployment --dry-run=client -o yaml
apiVersion: apps/v1
kind: Deployment
metadata:
  creationTimestamp: null
  labels:
    app: nginx-deployment
  name: nginx-deployment
spec:
  replicas: 1
  selector:
    matchLabels:
      app: nginx-deployment
  strategy: {}
  template:
    metadata:
      creationTimestamp: null
      labels:
        app: nginx-deployment
    spec:
      containers:
      - image: nginx
        name: nginx
        resources: {}
status: {}
Create a deployment named webapp using the image kodekloud/webapp-color with 3 replicas.
$ kubectl create deployment webapp --image=kodekloud/webapp-color --replicas=3
$ kubectl create deployment redis-deploy --image=redis --replicas=2  --namespace=dev-ns
36 Services
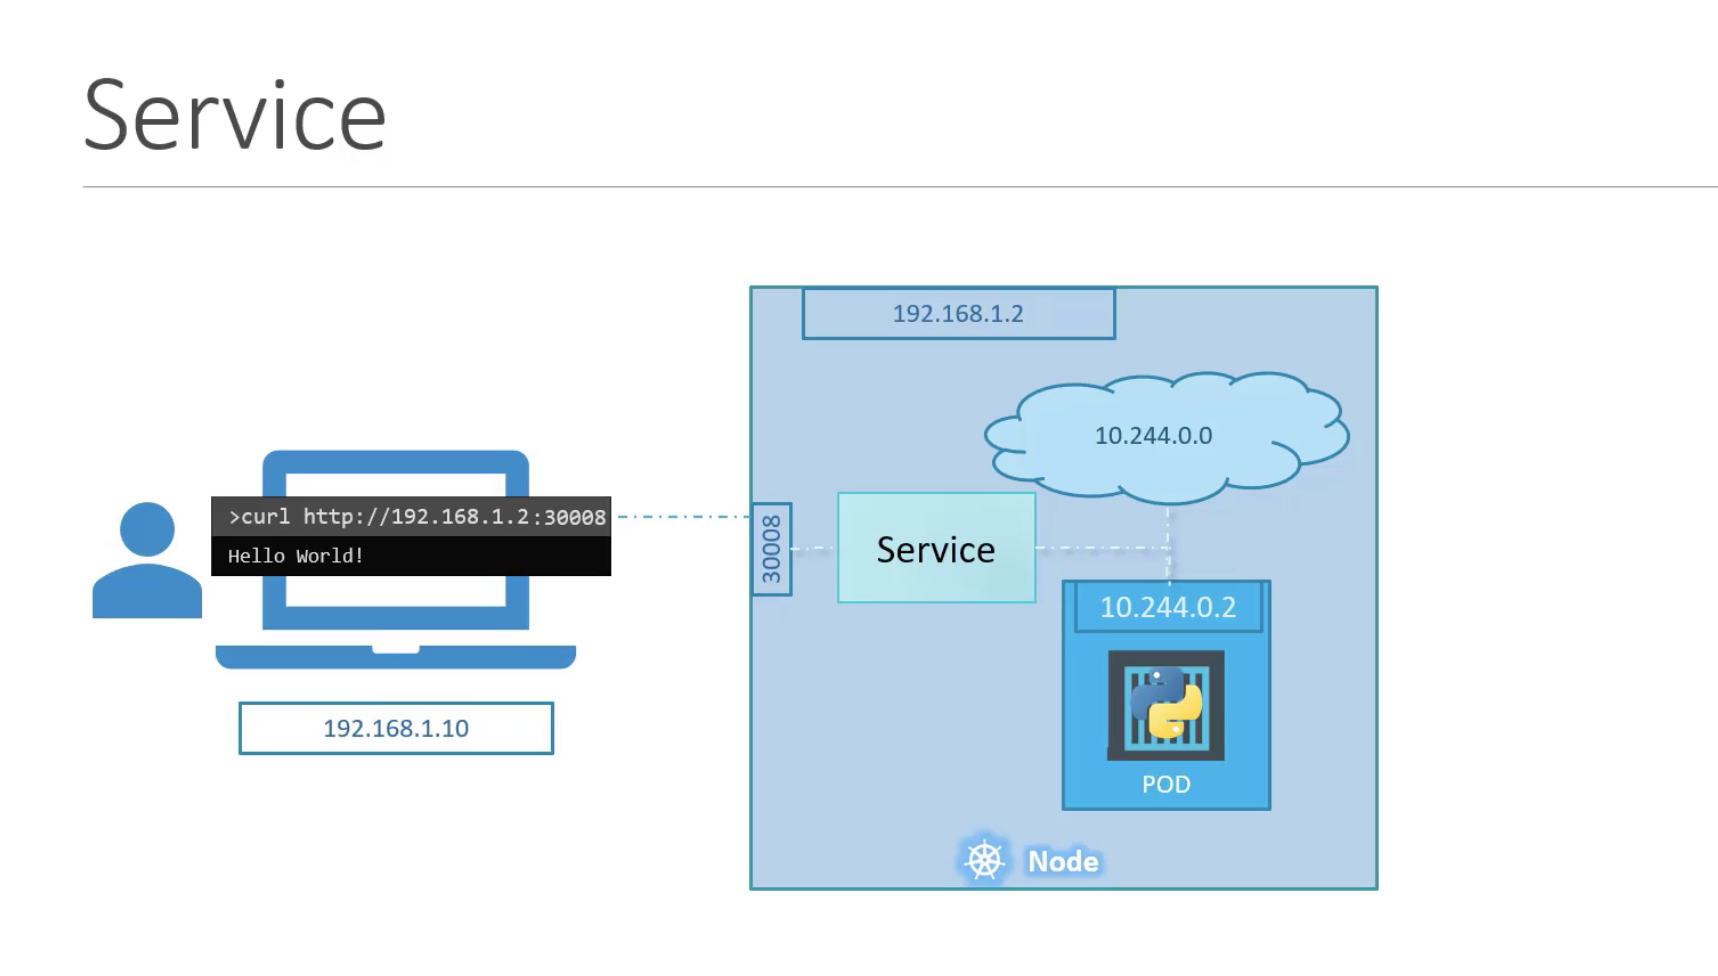
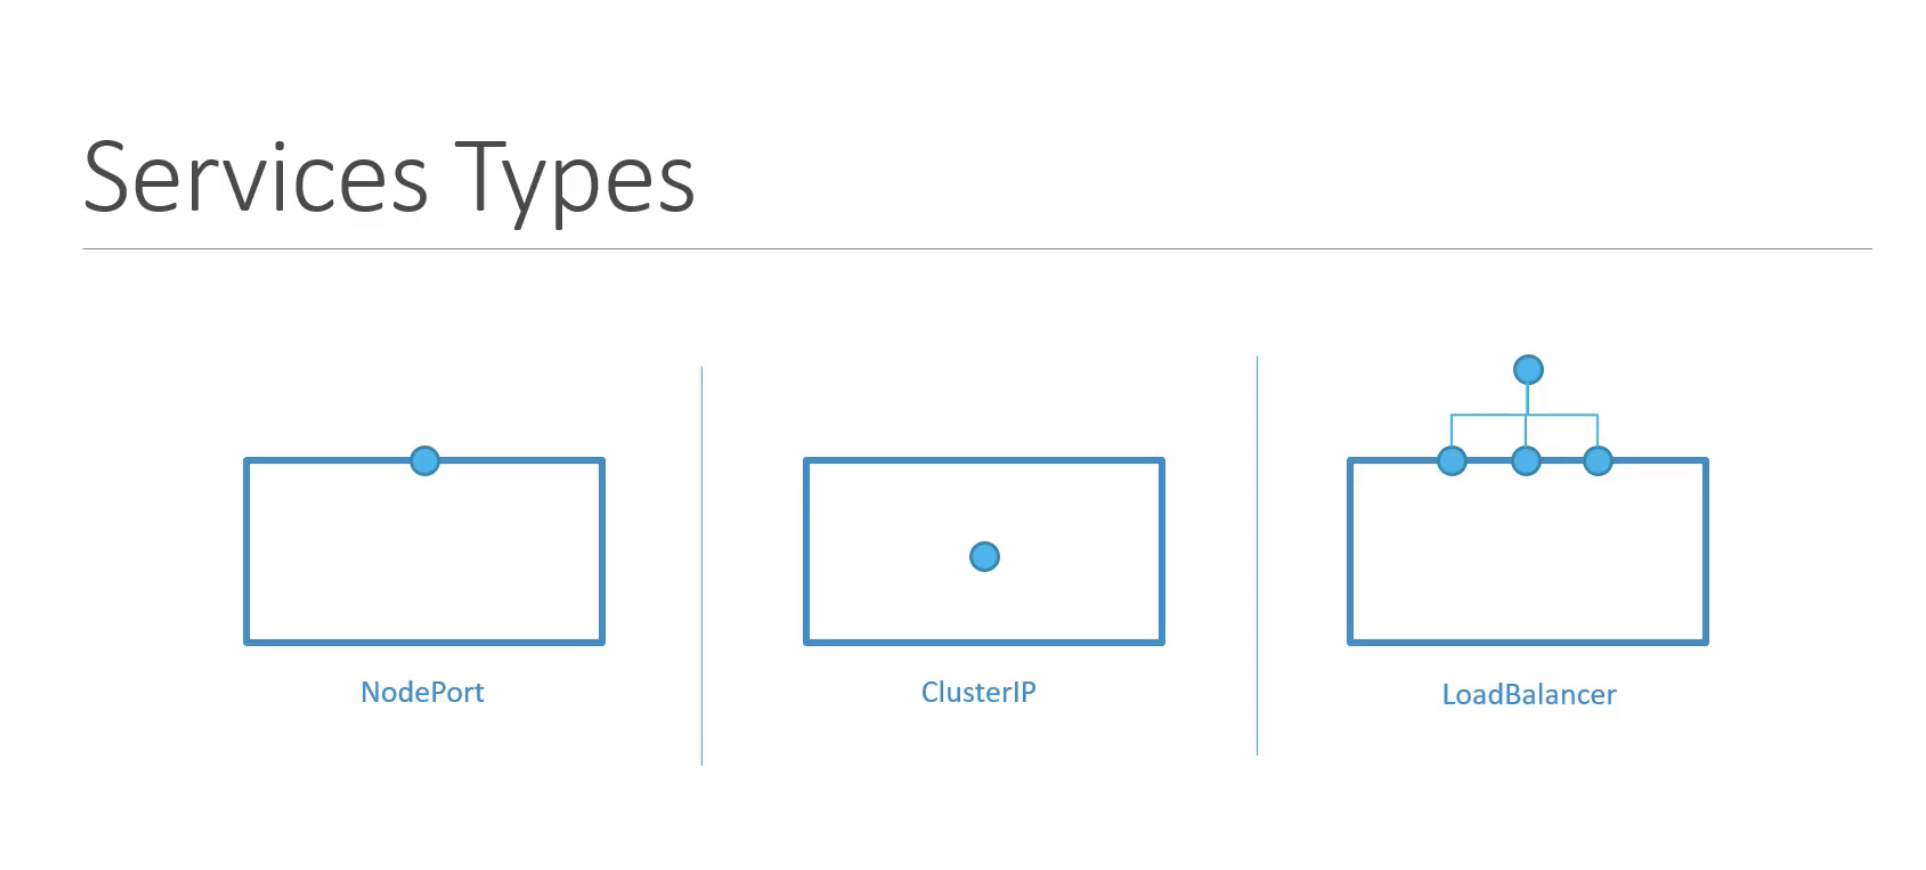
How can an external user access a web service running in a Pod? By default, external networks cannot directly access the internal network. This is where Services come in. The concept of a Service in Kubernetes is not fundamentally different from Pods, ReplicaSets, or Deployments. The key feature of a Service is that it forwards external requests to a specific resource's port (NodePort Service).
Node Ports
NodePort can only use ports in the range 30000-32767.
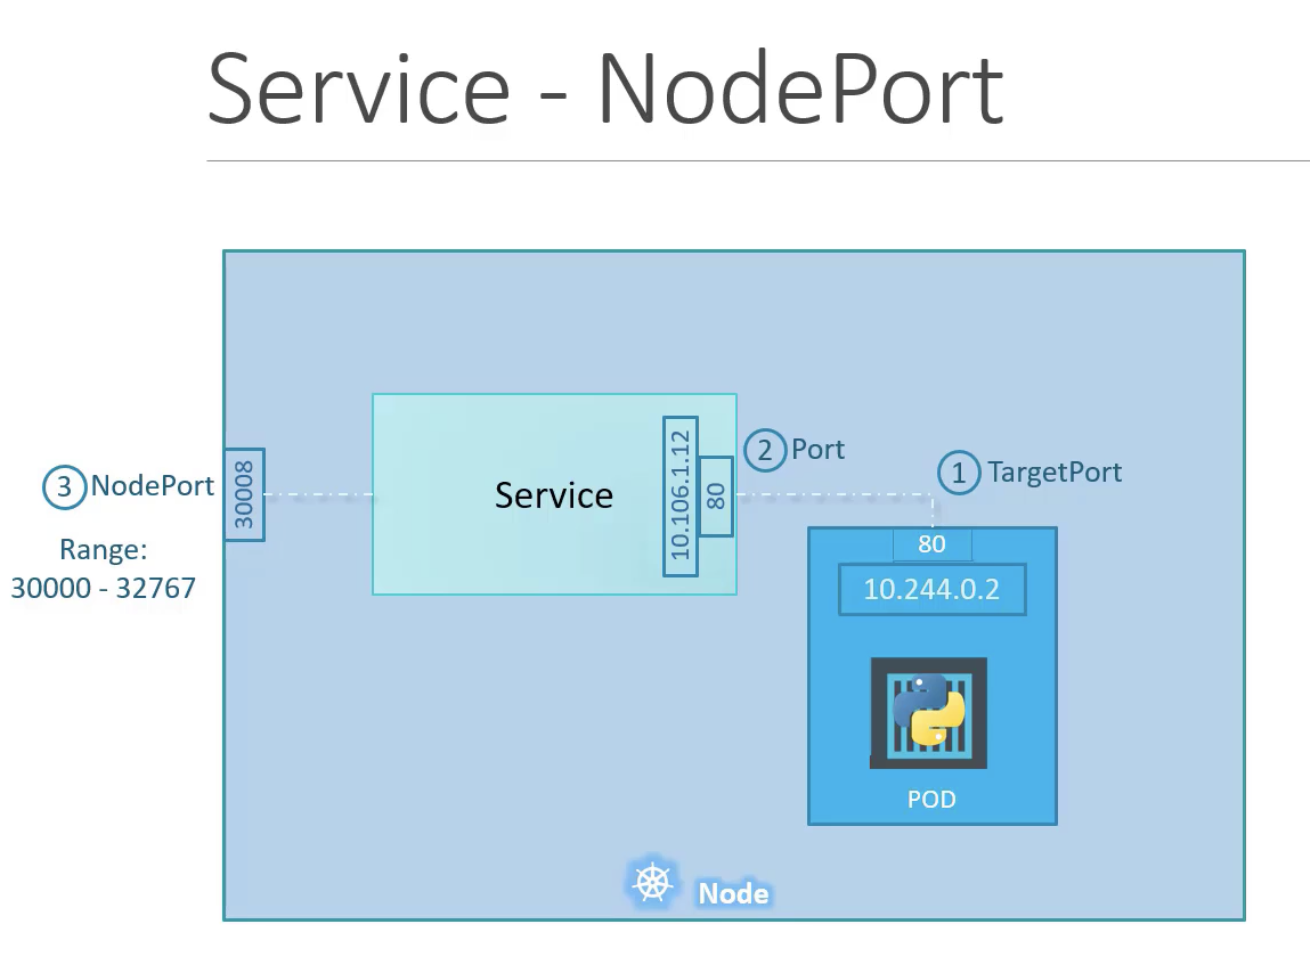
apiVersion: v1
kind: Service
metadata:
  name: nodeport-service
spec:
  type: NodePort
  ports:
    - targetPort: 80
      port: 80
      nodePort: 30008
  selector:
      app: guestbook
      tier: frontend
$ kubectl create -f node-port-definition.yml
service/nodeport-service created

$ kubectl get services
NAME               TYPE        CLUSTER-IP     EXTERNAL-IP   PORT(S)        AGE
kubernetes         ClusterIP   10.96.0.1      <none>        443/TCP        127d
nginx              NodePort    10.110.82.18   <none>        80:32381/TCP   70d
nodeport-service   NodePort    10.98.44.253   <none>        80:30008/TCP   40s


$ get pods -o wide
NAME                     READY   STATUS    RESTARTS   AGE   IP           NODE     NOMINATED NODE   READINESS GATES
frontend-759fr           1/1     Running   0          39h   10.244.0.5   cubi04   <none>           <none>
frontend-98dvd           1/1     Running   0          39h   10.244.0.5   cubi02   <none>           <none>
frontend-xpwc5           1/1     Running   0          39h   10.244.0.6   cubi03   <none>           <none>
nginx-77b4fdf86c-wwbrb   1/1     Running   0          39h   10.244.0.3   cubi04   <none>           <none>

$ curl http://192.168.219.114:32381
<!DOCTYPE html>
<html>
<head>
<title>Welcome to nginx!</title>
<style>
html { color-scheme: light dark; }
body { width: 35em; margin: 0 auto;
font-family: Tahoma, Verdana, Arial, sans-serif; }
</style>
</head>
<body>
Services Cluster IP
In Kubernetes, Pods can be moved or recreated at any time, so you cannot rely on Pod IP addresses. For communication between services, you should use a Cluster IP, which is assigned one per service (called ClusterIP).
Creating a ClusterIP Service for a single Pod:
$ kubectl expose pod redis --type=ClusterIP --port=6379 --name=redis-service
Create a pod called httpd using the image httpd:alpine in the default namespace. Next, create a service of type ClusterIP by the same name (httpd). The target port for the service should be 80.
$ kubectl run httpd --image httpd:alpine --port=80 --expose=true
service/httpd created
pod/httpd created
Service LoadBalancer
Using a NodePort Service allows external access to Pods through a specific port, but if Pods are spread across 10 nodes, you end up with 10 IP:port pairs. Which one should you access?
A Load Balancer solves this problem.
41 Namespaces
Kubernetes automatically creates three Namespaces: kube-system, default, and kube-public. In production environments where multiple people are working, it is better to use multiple namespaces.
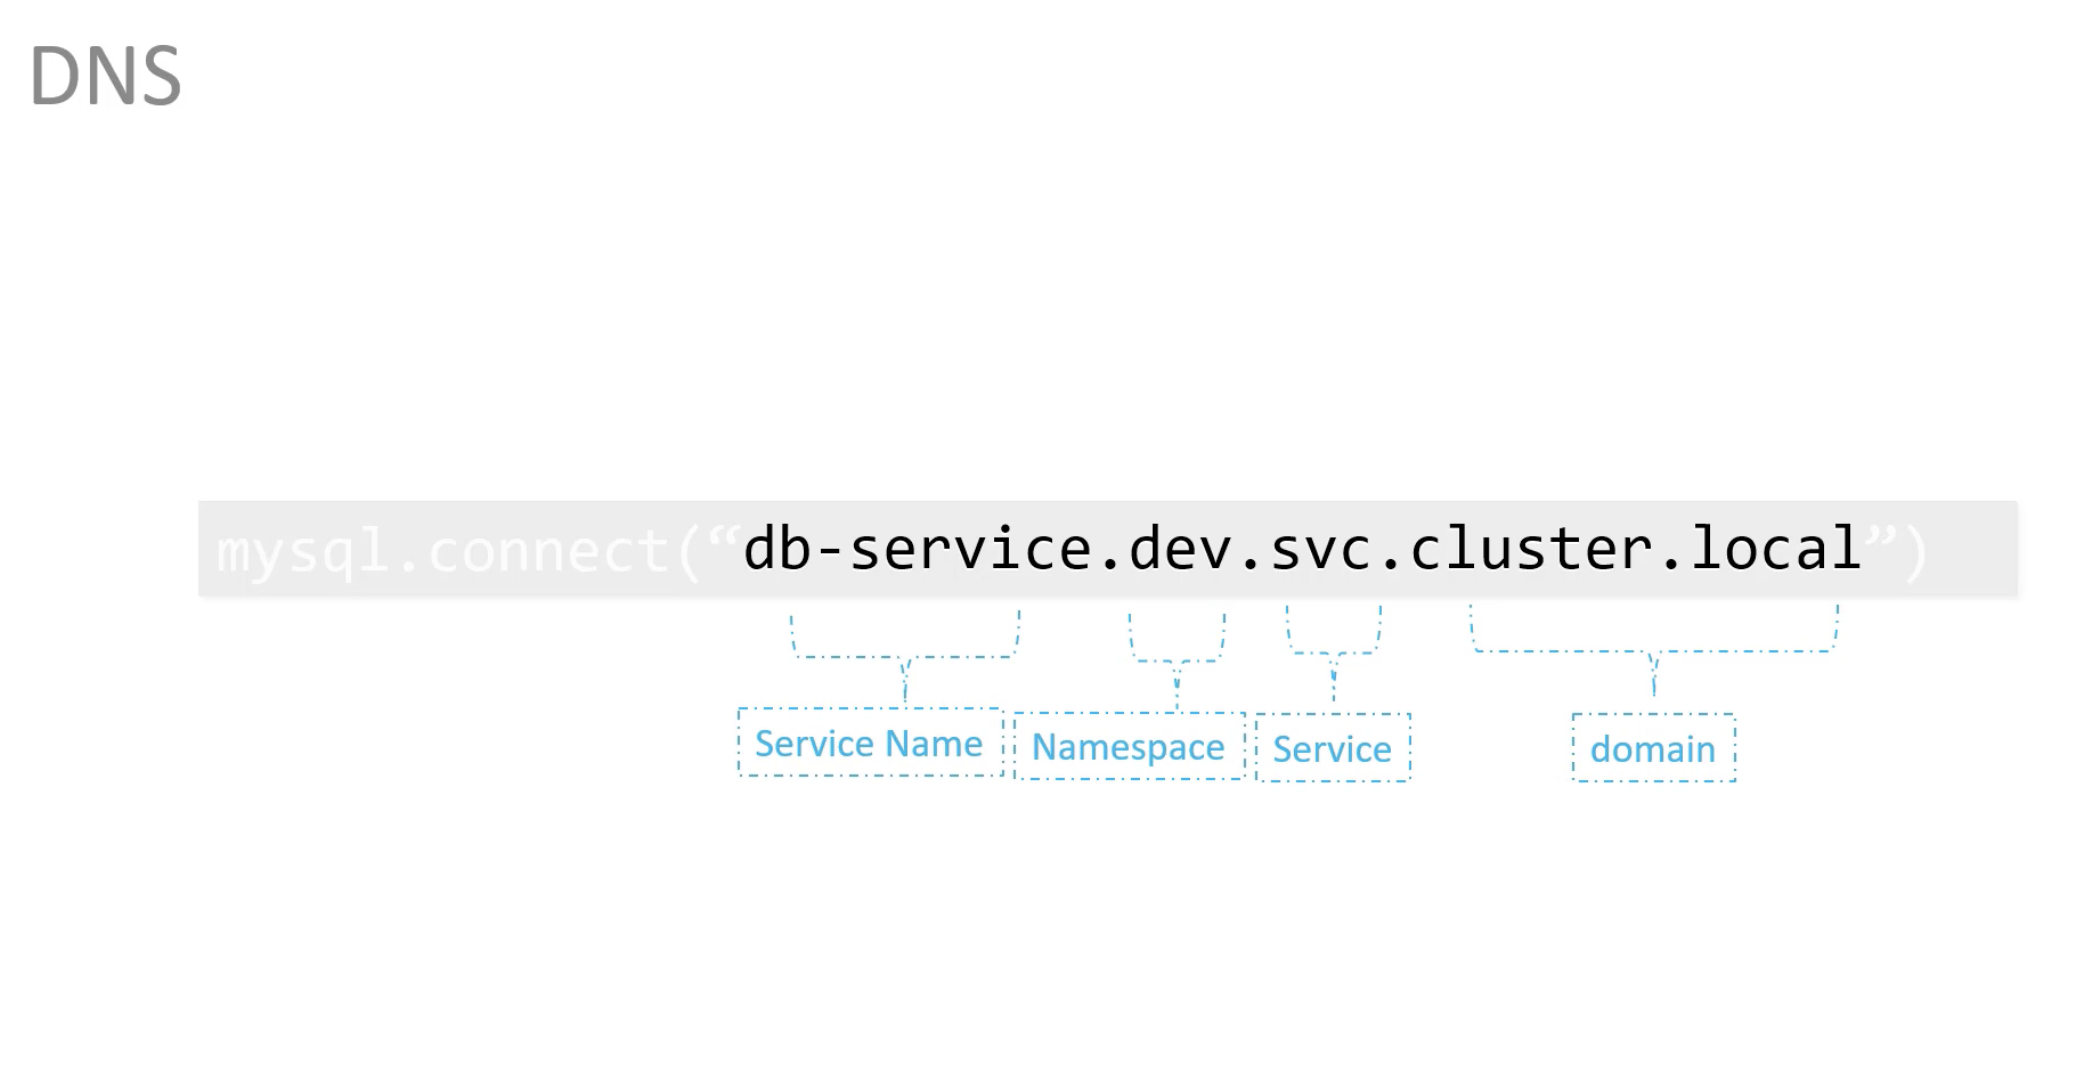
Within the same namespace, services can be looked up by service name. However, to access a service in a different namespace, an additional postfix is required.
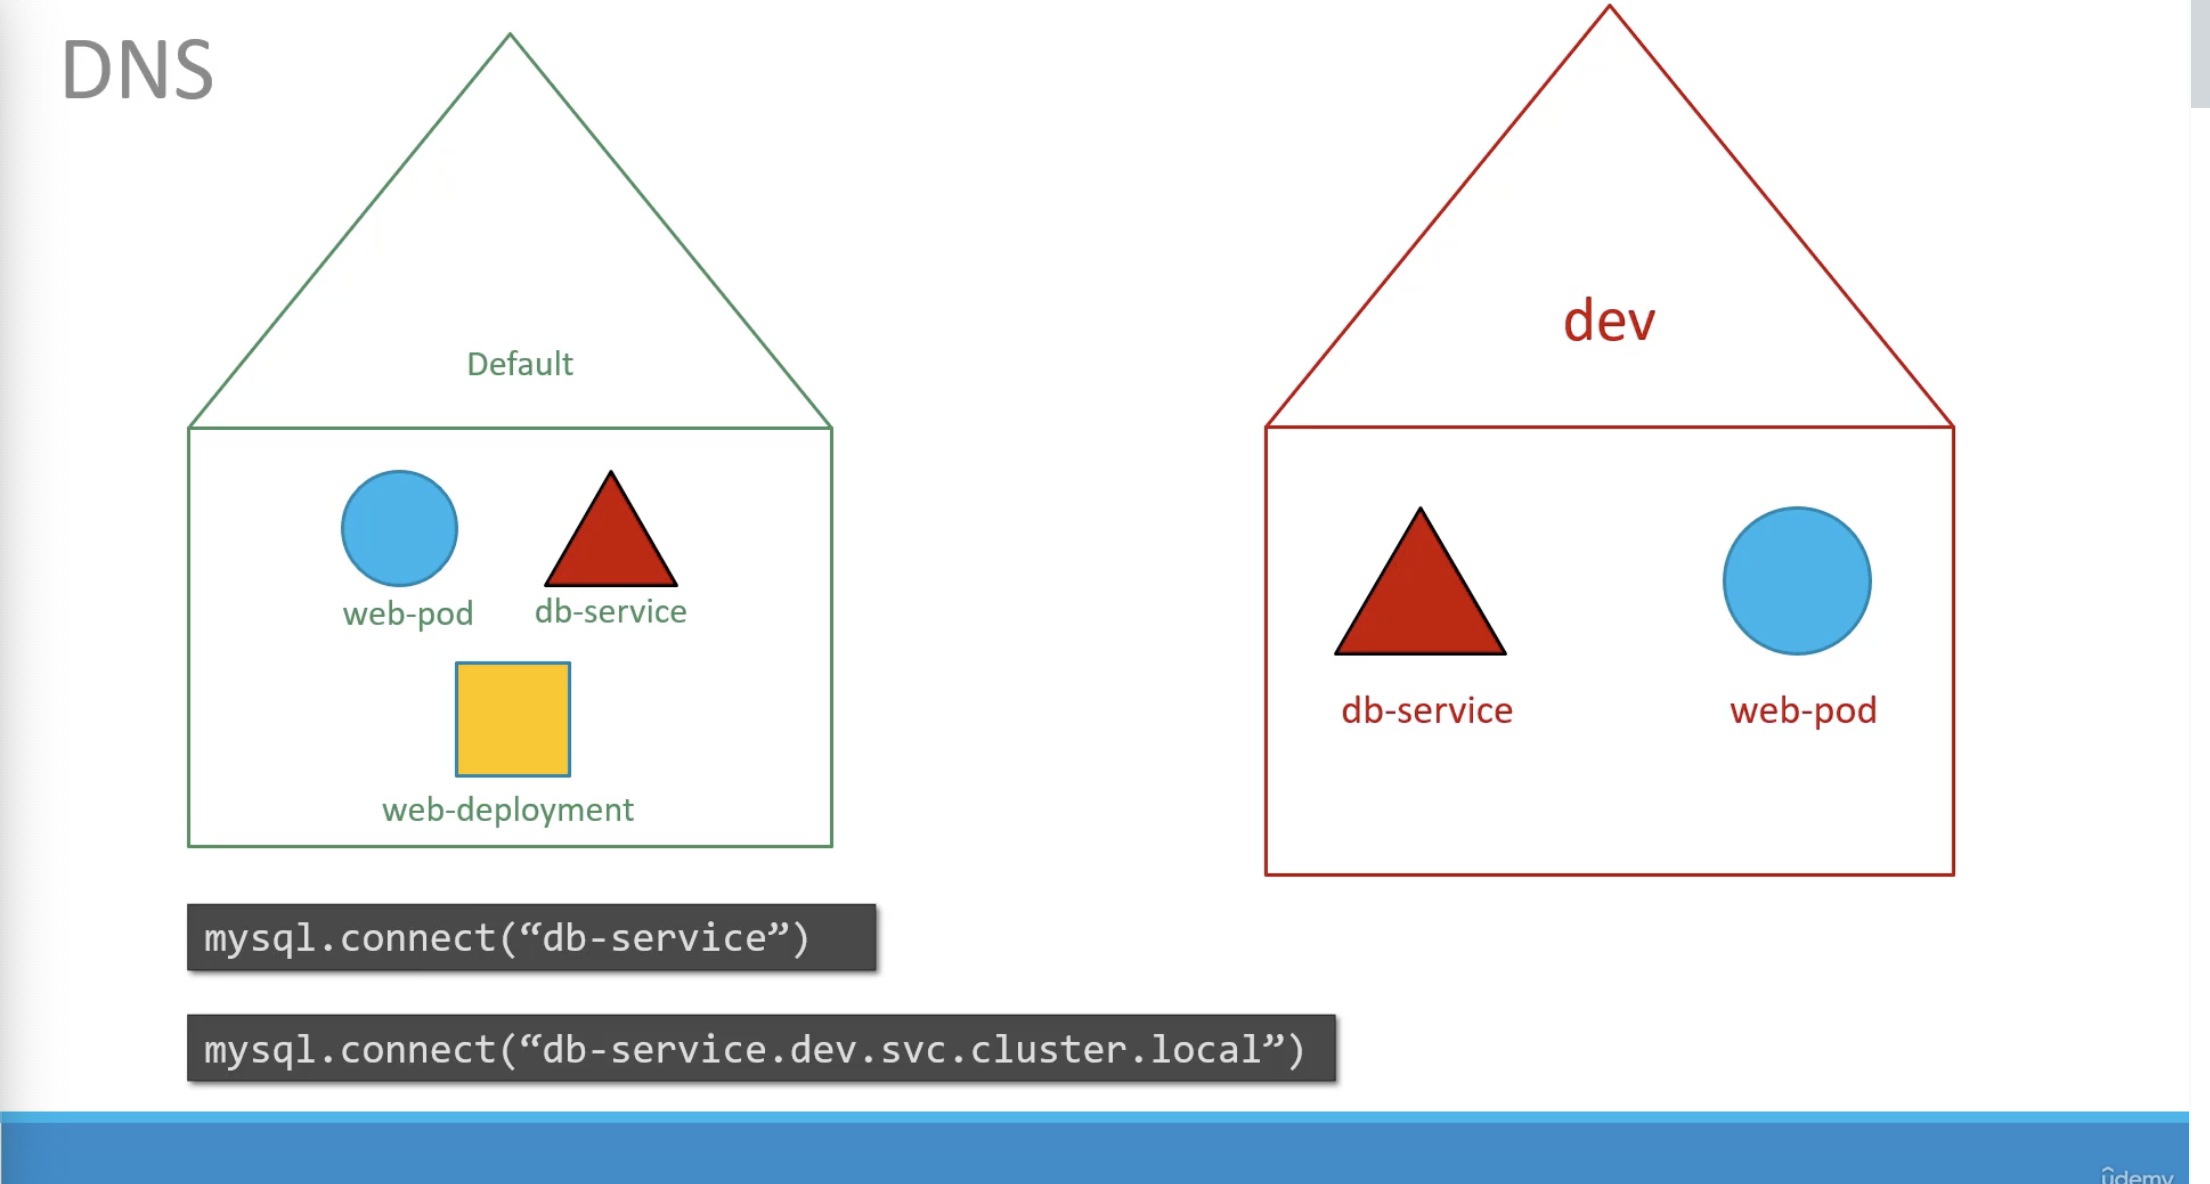
This is because a DNS entry is added when a namespace is created.
$ kubects get pods --namespace=kube-system

# You can specify a namespace when creating a Pod with --namespace=dev.
$ kubectl create -f pod-definition.yml --namespace=dev


# Alternatively,
# you can add namespace: dev under the metadata: section in the YAML file.
Create Namespace
apiVersion: v1
kind: Namespace
metadata:
  mame: dev
$ kubectl create -f namespace-dev.yml
$ kubectl create namespace dev
Switch Namespace Permanently
kubectl uses the default Namespace by default, and adding --namespace=dev every time is cumbersome.
You can permanently switch by setting the context to the desired namespace as shown below.
$ kubectl config set-context $(kubectl config current-context) --namespace=dev
$ kubectl get pods

# If you want to view Pods in another namespace (e.g., default), do the following:
$ kubectl get pods --namespace=default

# To view Pods across all namespaces:
$ kubectl get pods --all-namespaces
NAMESPACE      NAME                             READY   STATUS             RESTARTS            AGE
default        frontend-759fr                   1/1     Running            0                   37h
default        frontend-98dvd                   1/1     Running            0                   37h
default        frontend-xpwc5                   1/1     Running            0                   37h
default        nginx-77b4fdf86c-wwbrb           1/1     Running            0                   37h
kube-flannel   kube-flannel-ds-fg8lc            0/1     CrashLoopBackOff   20310 (2m2s ago)    126d
kube-flannel   kube-flannel-ds-fvlfs            0/1     CrashLoopBackOff   20310 (66s ago)     126d
kube-flannel   kube-flannel-ds-q72cc            0/1     CrashLoopBackOff   20308 (4m29s ago)   126d
kube-flannel   kube-flannel-ds-smwgc            0/1     CrashLoopBackOff   20310 (98s ago)     126d
kube-system    coredns-5d78c9869d-fd4rg         1/1     Running            1 (125d ago)        126d
kube-system    coredns-5d78c9869d-zl7kh         1/1     Running            1 (125d ago)        126d
kube-system    etcd-cubi01                      1/1     Running            1 (125d ago)        126d
kube-system    kube-apiserver-cubi01            1/1     Running            1 (125d ago)        126d
kube-system    kube-controller-manager-cubi01   1/1     Running            1 (125d ago)        126d
kube-system    kube-proxy-f852g                 1/1     Running            1 (125d ago)        126d
kube-system    kube-proxy-ngt5z                 1/1     Running            1 (125d ago)        126d
kube-system    kube-proxy-tjtm6                 1/1     Running            1 (125d ago)        126d
kube-system    kube-proxy-wfldv                 1/1     Running            1 (125d ago)        126d
kube-system    kube-scheduler-cubi01            1/1     Running            1 (125d ago)        126d
You can also set resource quotas on a namespace.
apiVersion: v1
kind: ResourceQuota
metadata:
  name: compute-quota
  namespace: dev
spec:
  hard:
    pods: "10"
    requests.cpu: "4"
    requests.memory: 5Gi
    limits.cpu: "10"
    limits.memory: 10Gi
Imperative vs Declarative
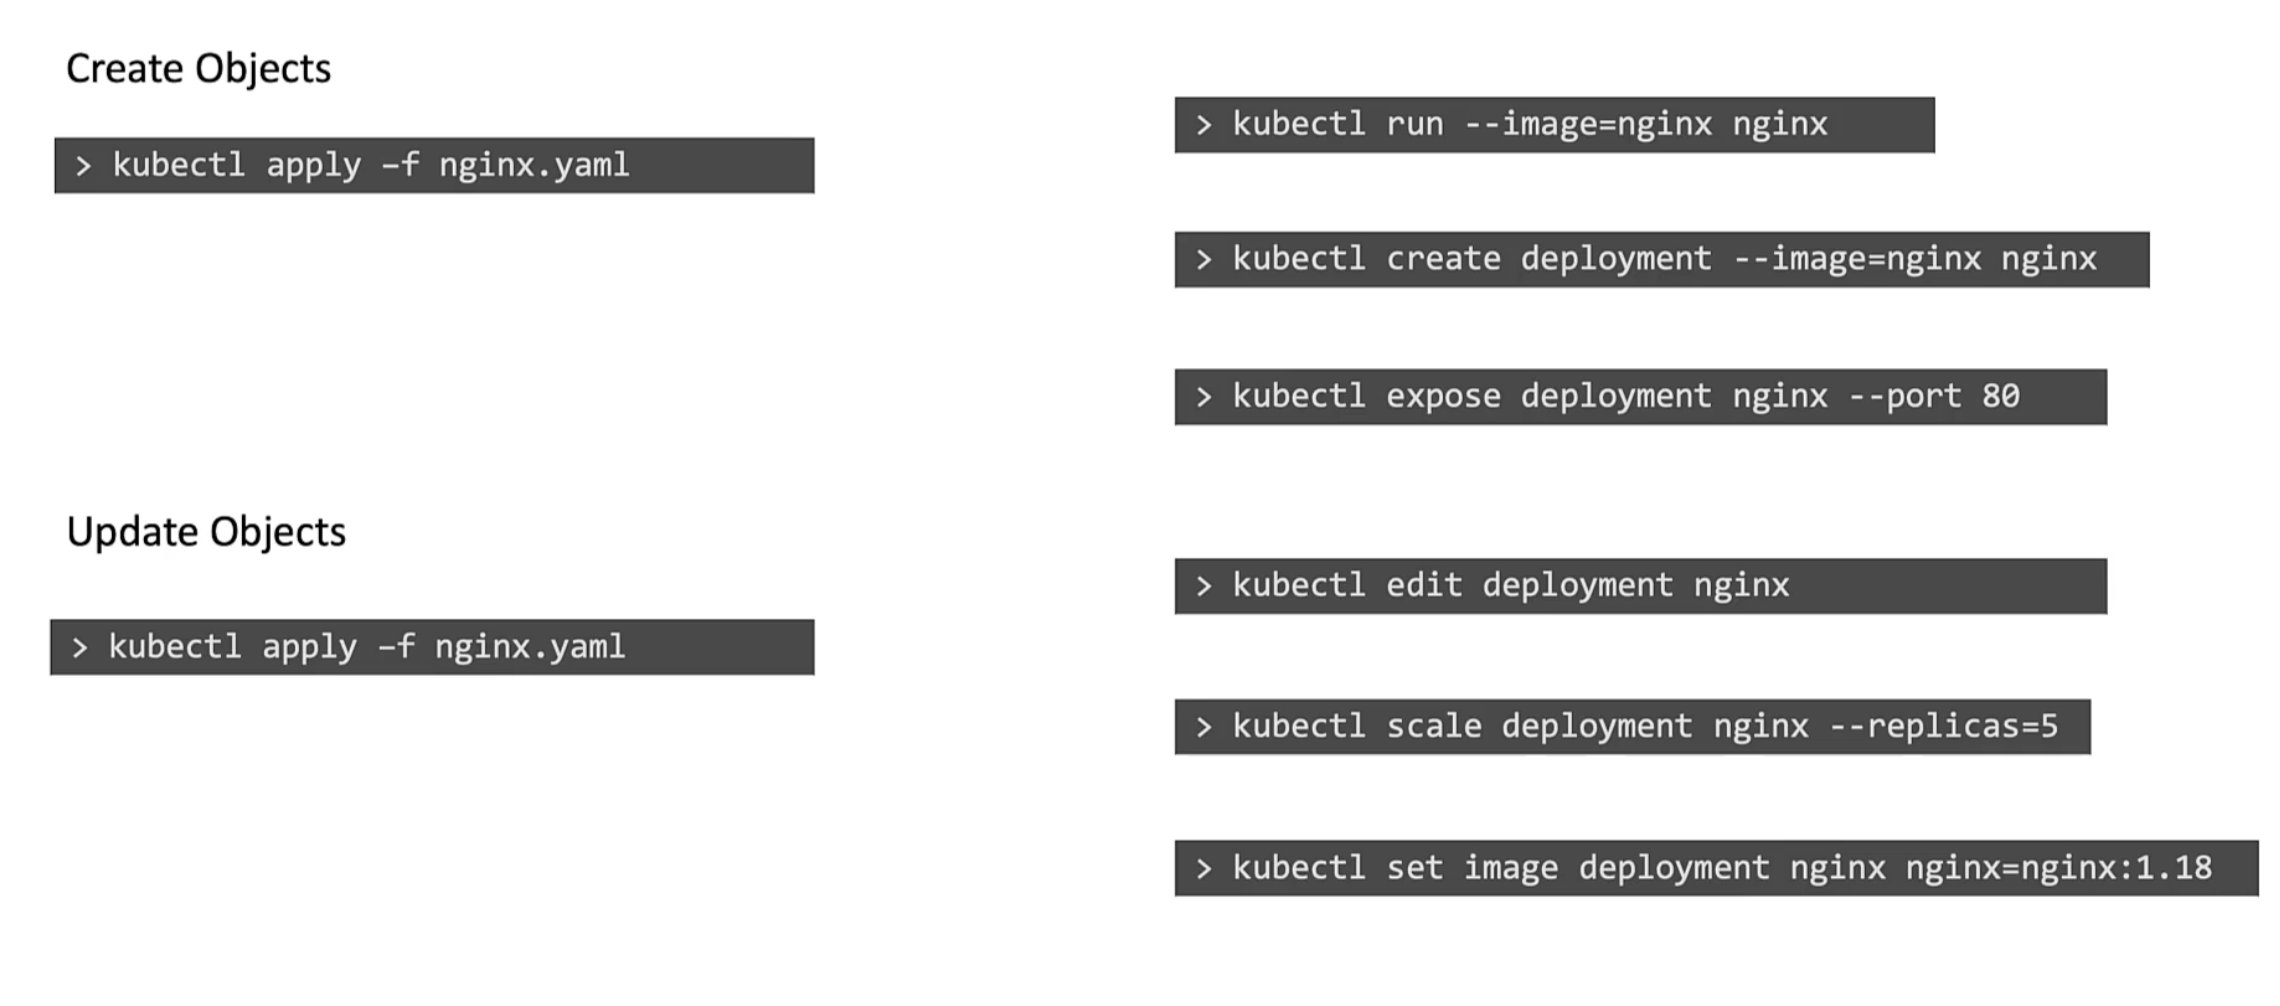
There are two approaches: defining each step procedurally (Imperative) or declaring the desired outcome (Declarative). Kubernetes supports both, but the latter is far more convenient and reduces mistakes since it makes tracking history easier. With the Imperative approach, the operator must always keep track of the current state.
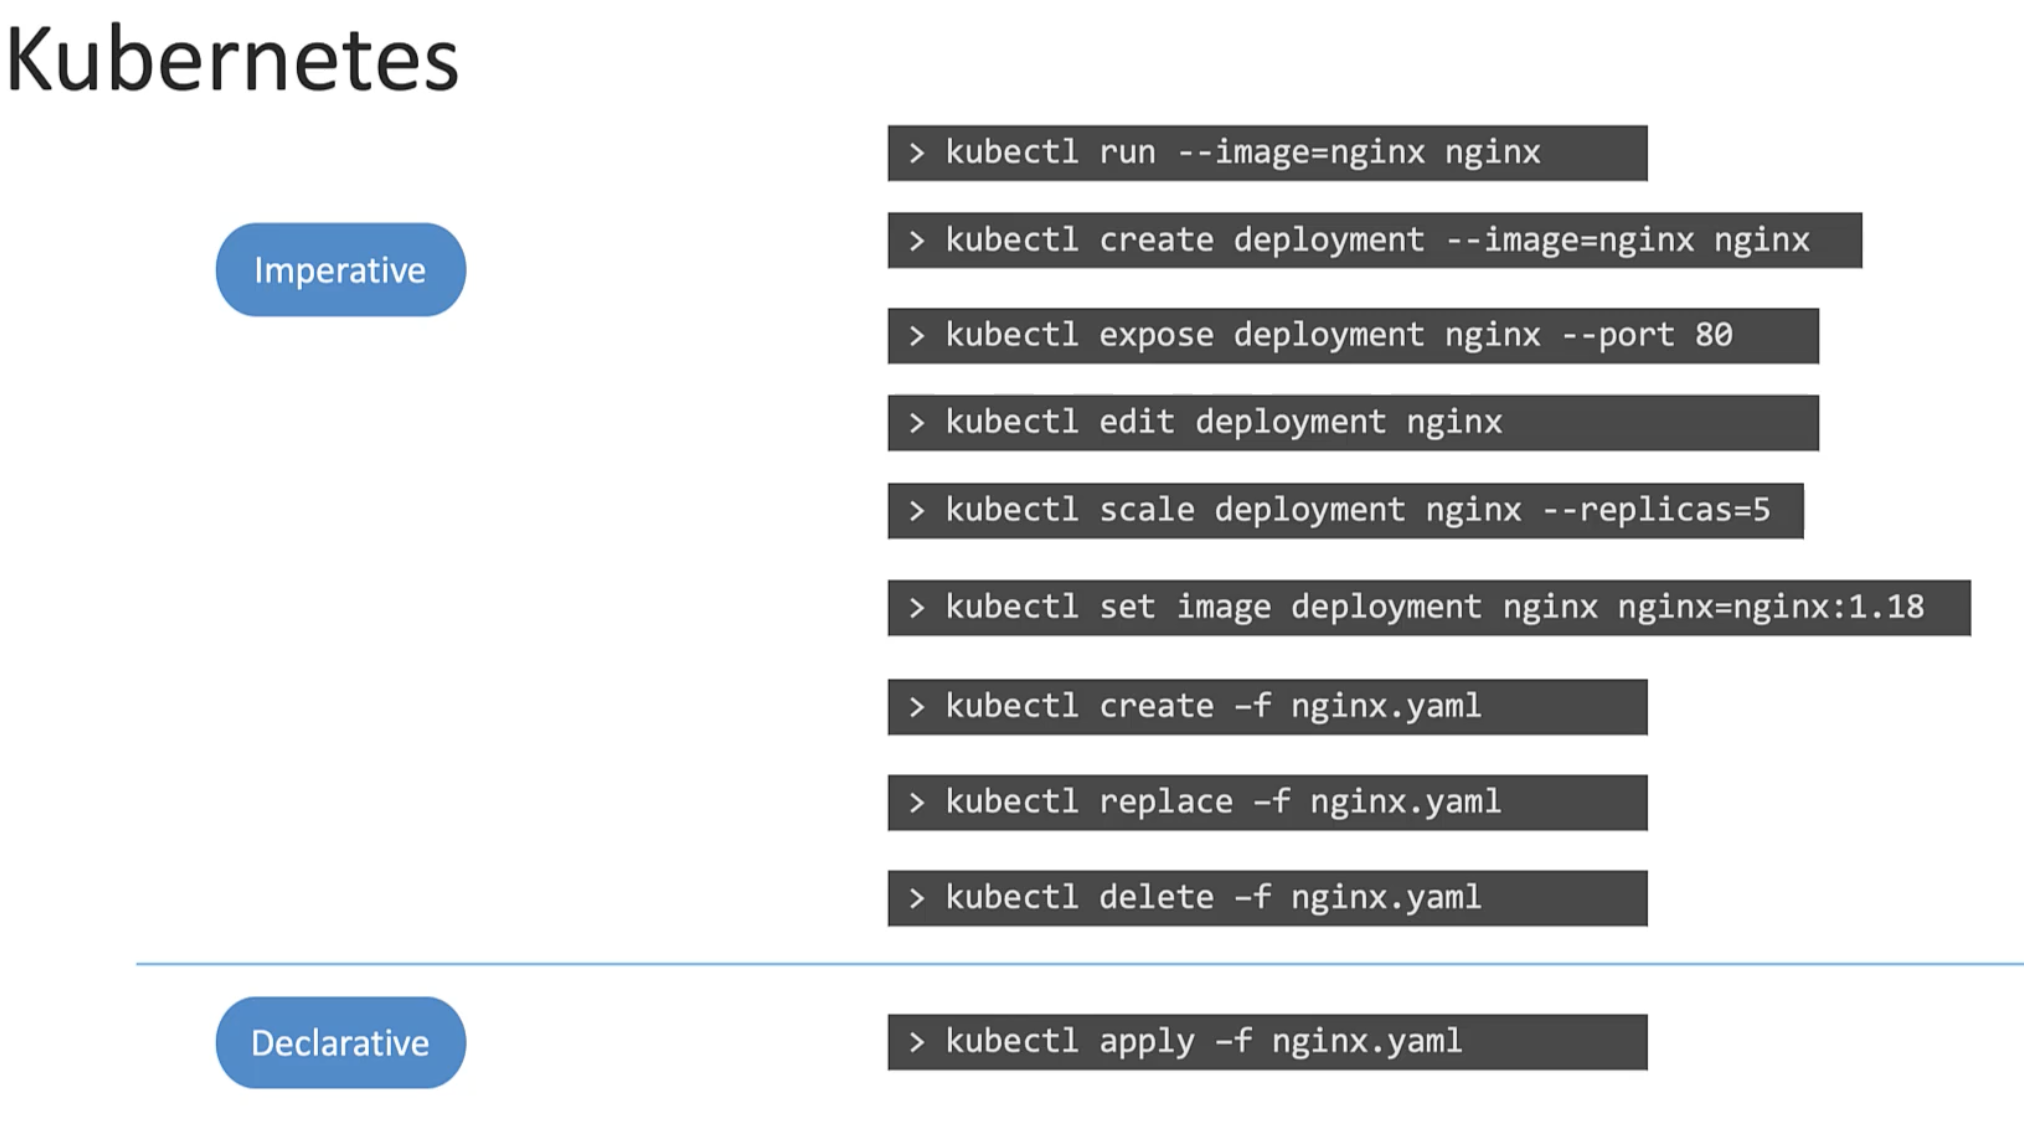
However, in the CKA exam, the Imperative approach can be faster and more intuitive.
Quiz
Q1: What is the main topic covered in "CKA_2_core_concepts"?
CKA_2_core_concepts
Q2: What is Replication Controller?
Specify the desired number of Pods in the replicas field under spec. Running the replication
controller with kubectl create -f rc-definition.yml produces the following result:
Q3: Explain the core concept of Replica Set.
A ReplicaSet is similar to a
Replication Controller, but it has a selector field. Another difference is that apiVersion is
apps/v1. A ReplicaSet monitors Pods and automatically adjusts the count to match the specified
number if it does not match.
Q4: What are the key aspects of Node Ports?
NodePort can only use ports in the range 30000-32767.
Q5: How does Services Cluster IP work?
In Kubernetes, Pods can be moved or recreated at any time, so you cannot rely on Pod IP addresses.
For communication between services, you should use a Cluster IP, which is assigned one per service
(called ClusterIP).