본 포스팅은 https://www.udemy.com/course/certified-kubernetes-administrator-with-practice-tests 강의와 https://kodekloud.com/의 내용을 공부하며 기록한 내용입니다.
- 11 Cluter Architecture
- 12 Docker-vs-ContainerD
- 13 ETCD for Beginners
- 14 ETCD in kubernetes
- 16 Kube API Server
- 17 Kube Controller manager
- 18 Kube scheduler
- 19 Kubelet
- 20 Kube proxy
- 21 Recap - Pods
- 22 Pods with yaml
- 29 Replica Secrets
- 32 Deployments
- 36 Services
- 41 Namespaces
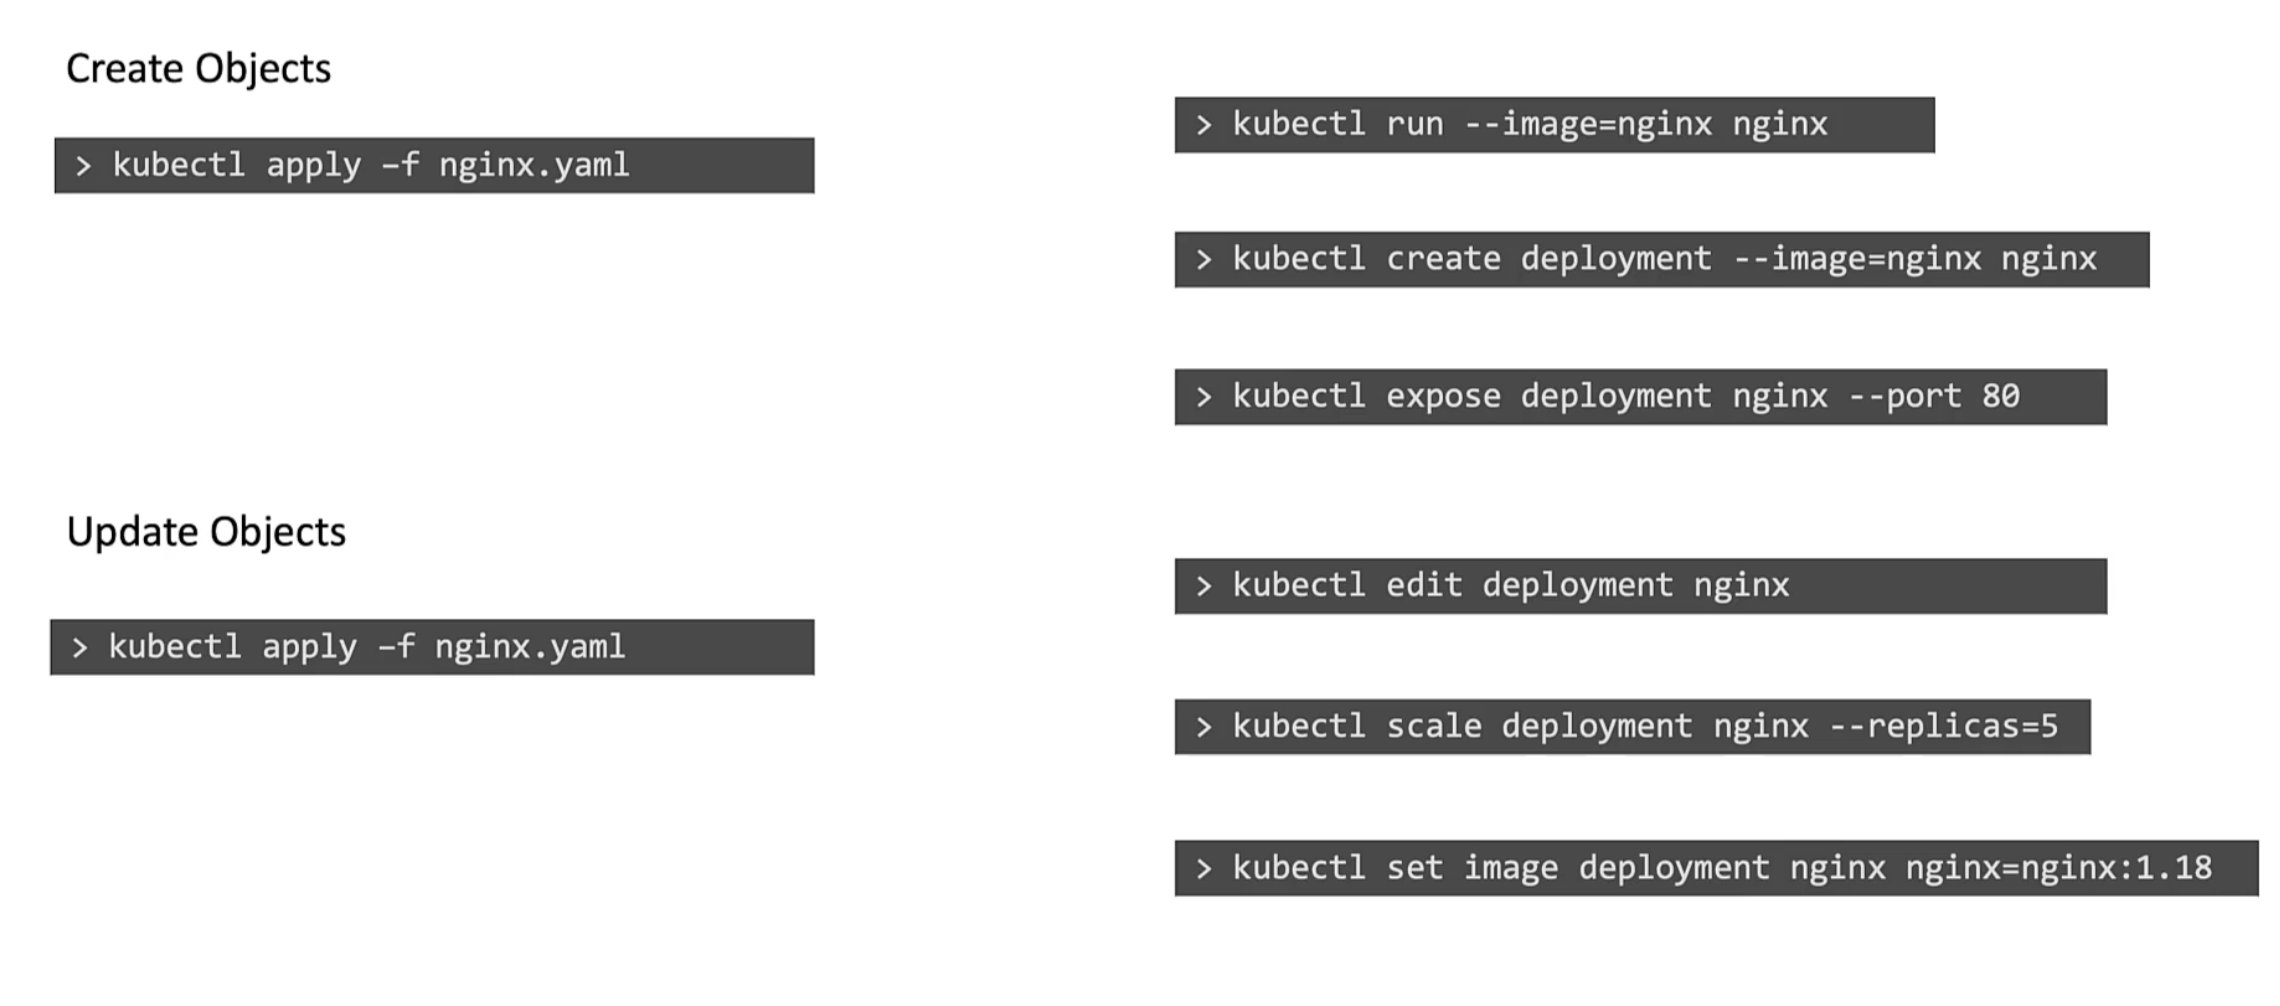
- Imperative vs Declarative
11 Cluter Architecture
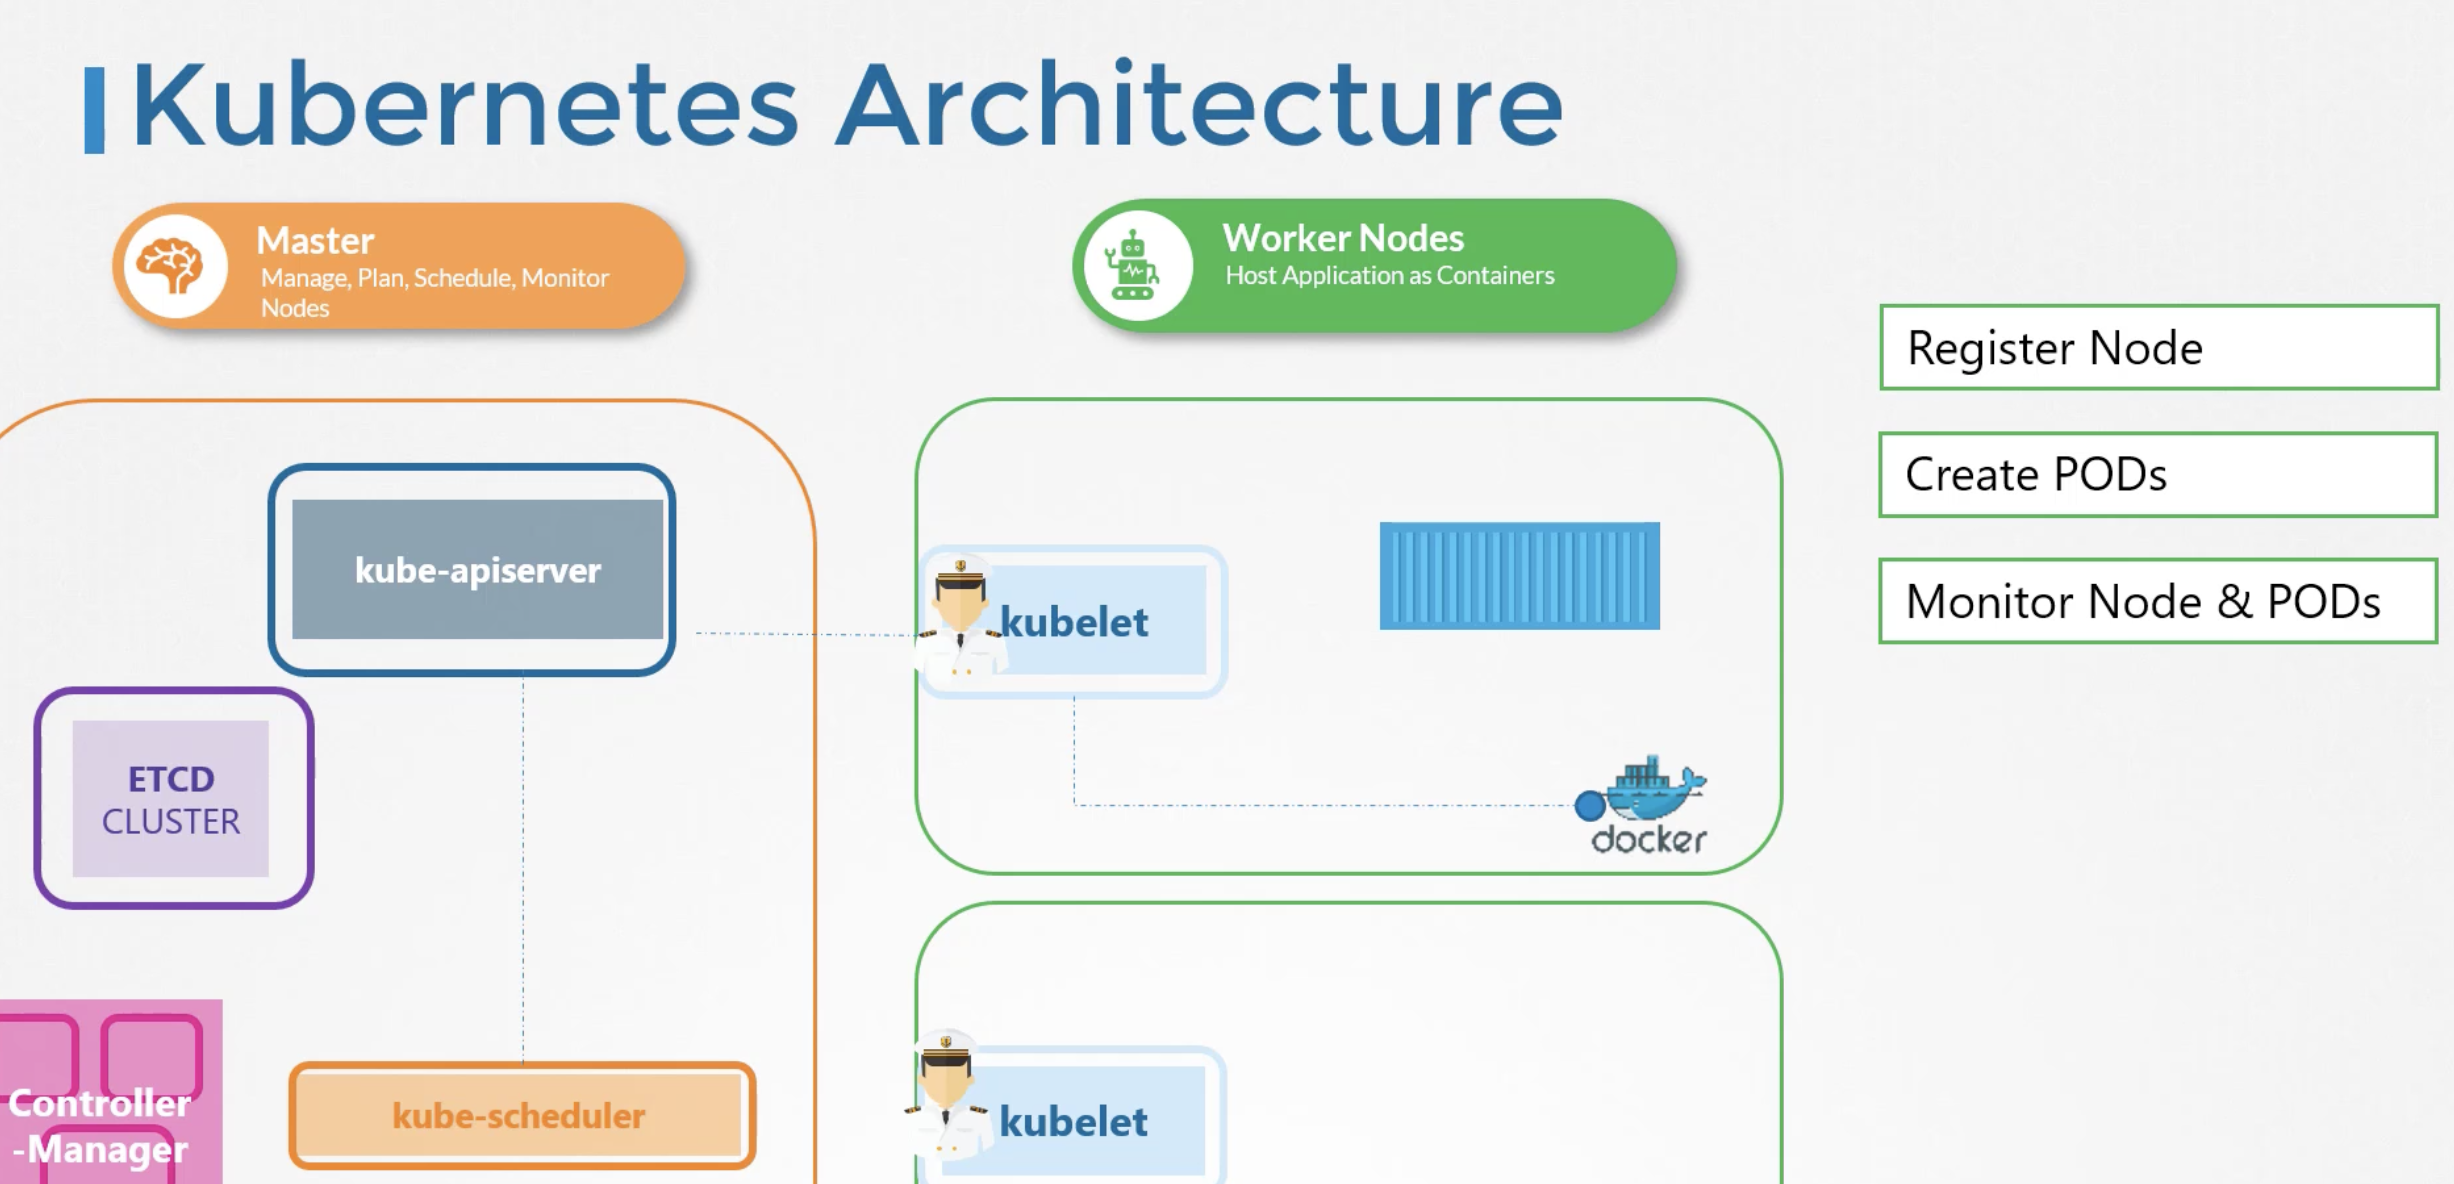
Master node, Worker node가 있다. 어떤 container가 있고, 어떻게 실행되고 있는지는 ETCD라는 데이터 저장소에 저장된다.
Master Node와 Worker node의 관계는 아래 그림처럼 표현할 수 있다.
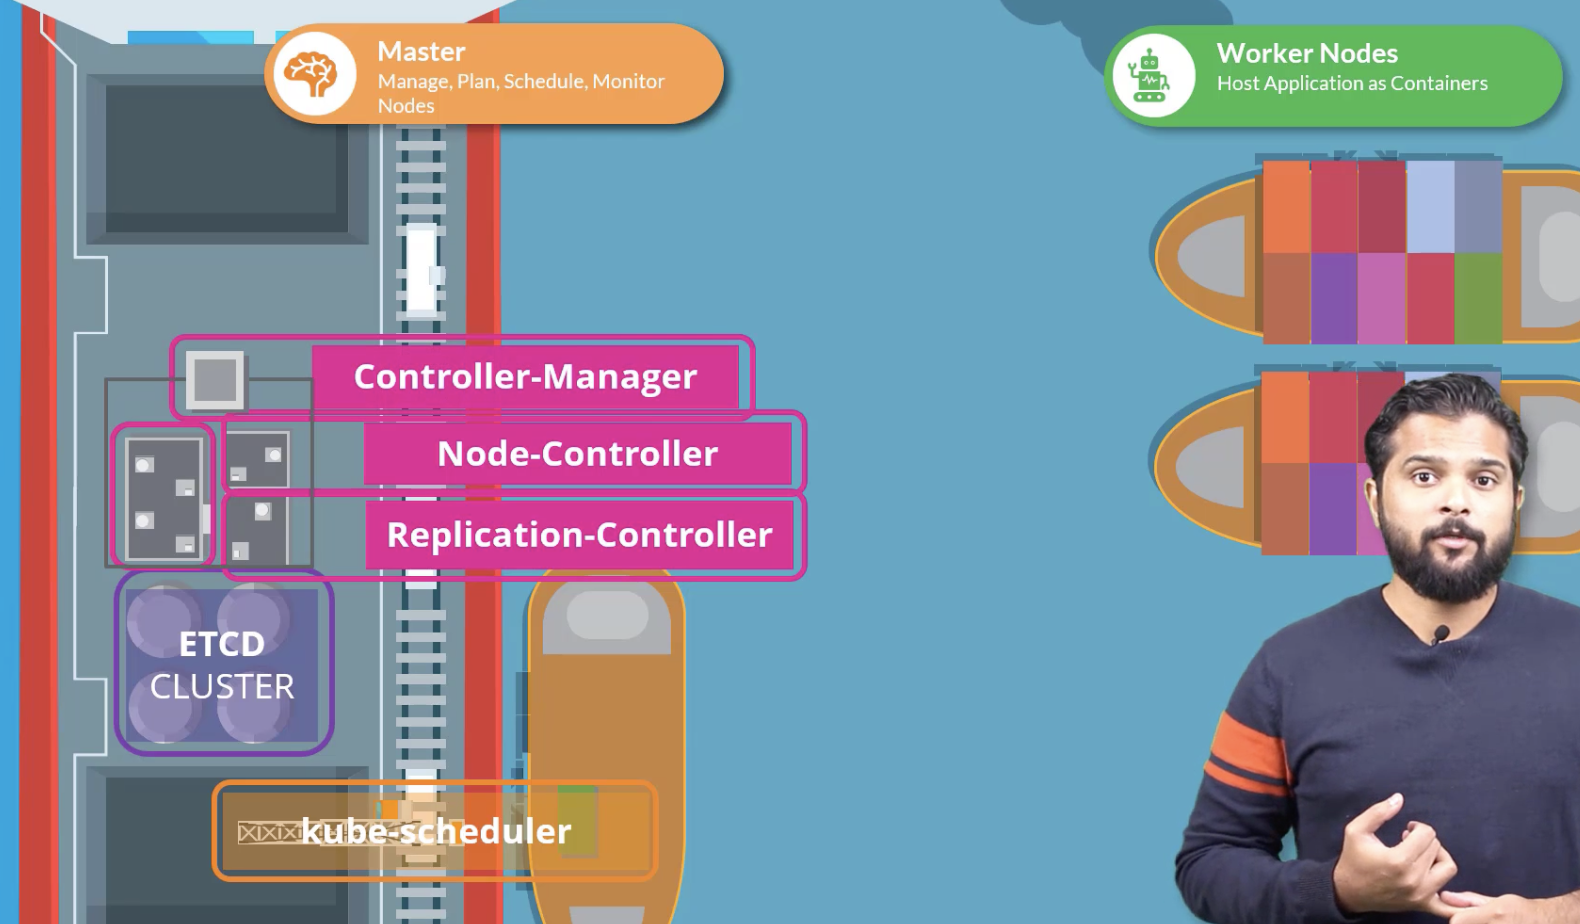
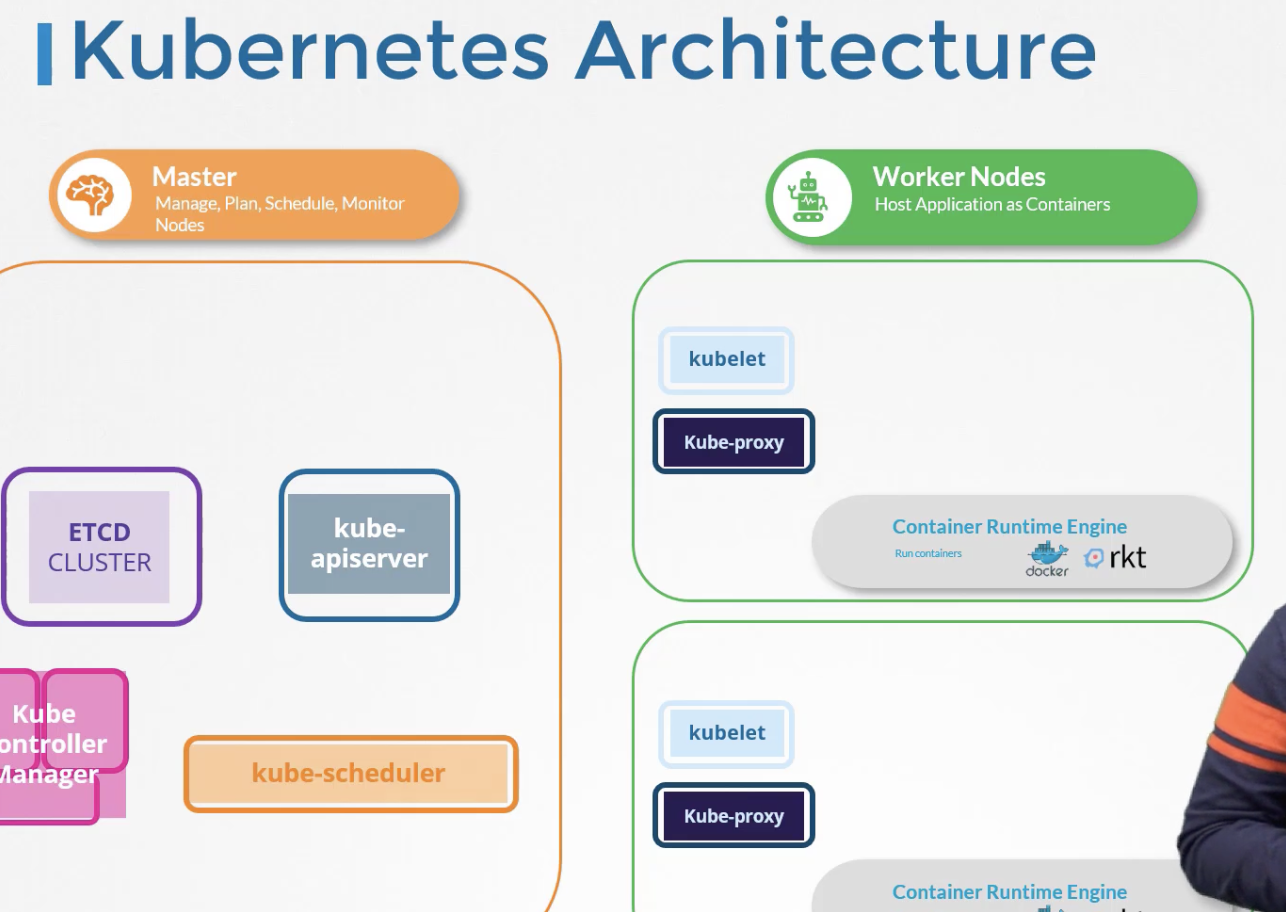
Kube API server는 모든 작업을 ochestration 하고, 모든 것을 모니터링 한다.
application은 container 형태이다. DNS또한 container이다. Docker는 가장 유명한 container Runtime 엔진이다. Runtime Engine이 무조건 Docker일 필요는 없다.
Kubeleet은 Worker Node의 선장이다.
kube proxy server는 내부 서비스간 통신을 도와준다.
12 Docker-vs-ContainerD
version 1에서 지원되던 dockershim을 2에서 제공하지 않기로 결정. containerd가 설치되면 ctl이 설치된다 (Not userfriendly, only limited feaure)
ctr images pull docker.io/library/redis:alpine
ctr run ...
nerdctl은 ctr과 다르게 docker-like CLI 툴을 제공해준다.
nerdctl run --name redis redis:alpine
crictl 도 존재하는데, kubernetes에서 개발되고있다. 직접 사용하는 경우는 없고, 대부분 디버깅 툴로 사용된다. kubelet은 자신이 만들지 않은 container를 강제로 삭제할 수 있기 때문에 단독으로사용하려면 신경써야한다.
13 ETCD for Beginners
ecdctl --version을 통해서 version 확인 가능하다. 보통 2 or 3 이다. key value store이다.
14 ETCD in kubernetes
Nodes, PODs, COnfigs, Secrets, Accounts, Roles, Bindings, Others에 대한 모든 정보가 ETCD에 저장된다. Kubernetes를 manual설치하면 etcd를 수동설치해야한다. advertise-client-urls 는 2379가 기본포트이고 kubeAPI가 etcd에 접속하는데 필요하다. kubeadmin 으로 설치하면 etcd 데몬이 Conainer로 떠있는 것을 확인할 수 있다.
sudo kubectl get pods -n kube-system
NAME                                     READY   STATUS    RESTARTS   AGE
coredns-5d78c9869d-2f2qt                 1/1     Running   0          38s
coredns-5d78c9869d-dn7b6                 1/1     Running   0          38s
etcd-docker-desktop                      1/1     Running   0          38s
kube-apiserver-docker-desktop            1/1     Running   0          38s
kube-controller-manager-docker-desktop   1/1     Running   0          39s
kube-proxy-24tjf                         1/1     Running   0          39s
kube-scheduler-docker-desktop            1/1     Running   0          42s
storage-provisioner                      1/1     Running   0          37s
vpnkit-controller                        1/1     Running   0          37s
H/A를 구성하면 multiple master etcd가 존재하도록 할 수 있다.
version 2에서 제공하는 commands
etcdctl backup
etcdctl cluster-health
etcdctl mk
etcdctl mkdir
etcdctl set
16 Kube API Server
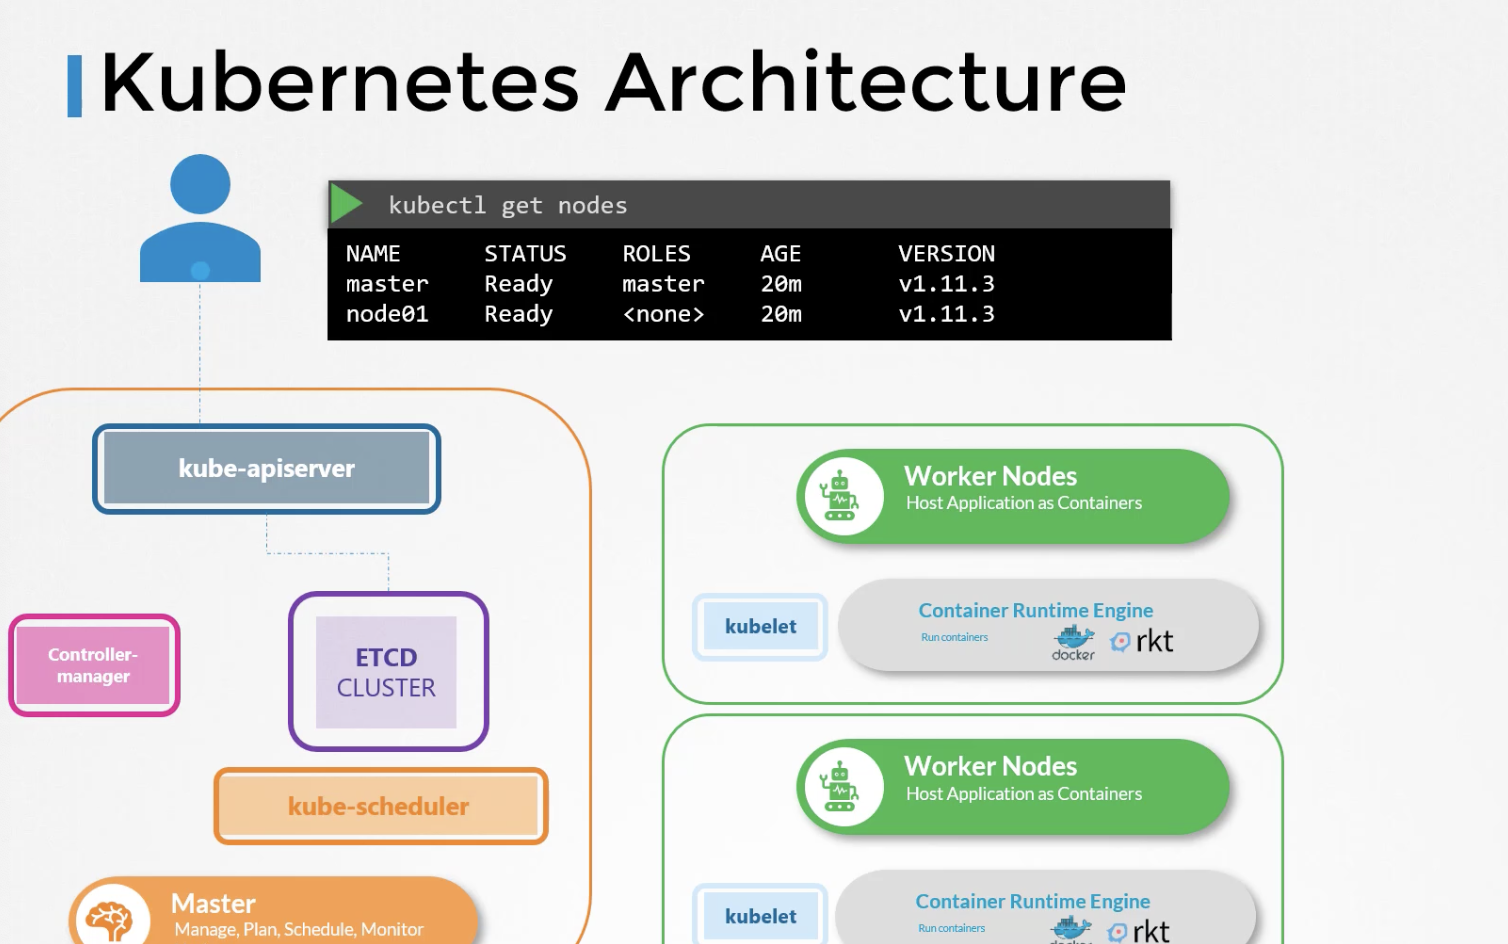
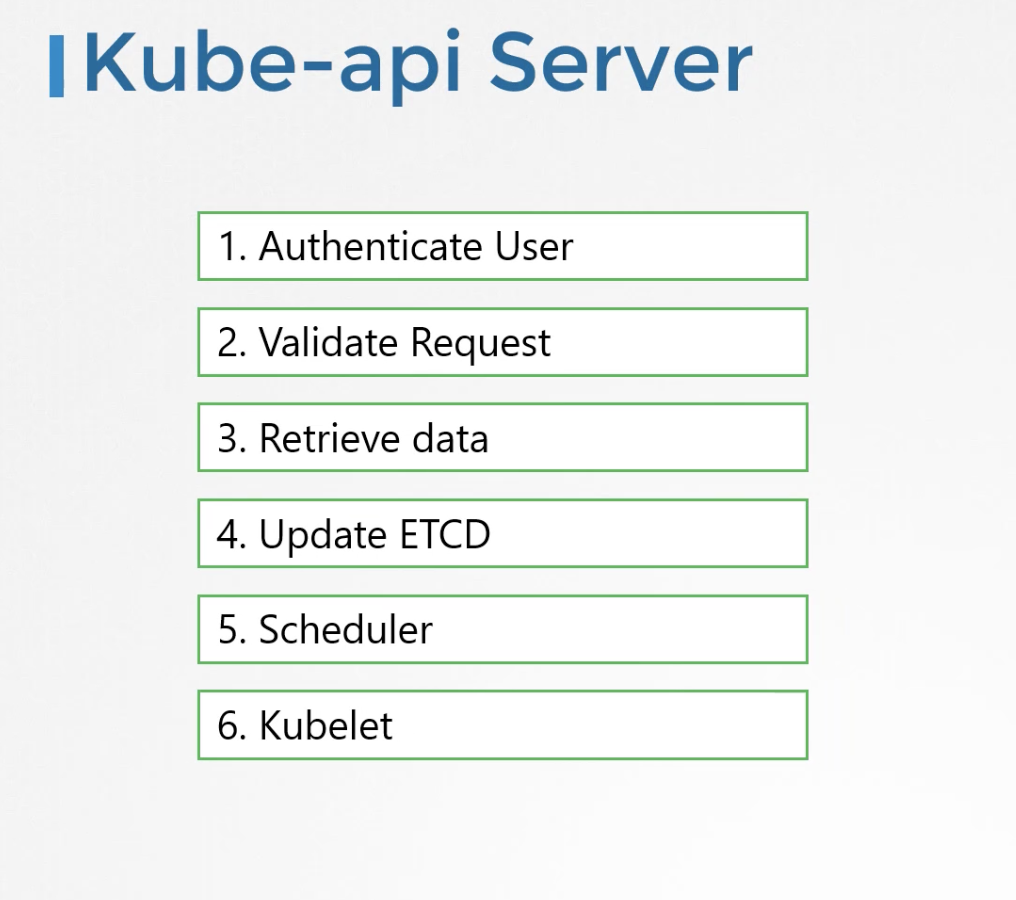
kube api server는 다양한 Parmeter로 실행된다.
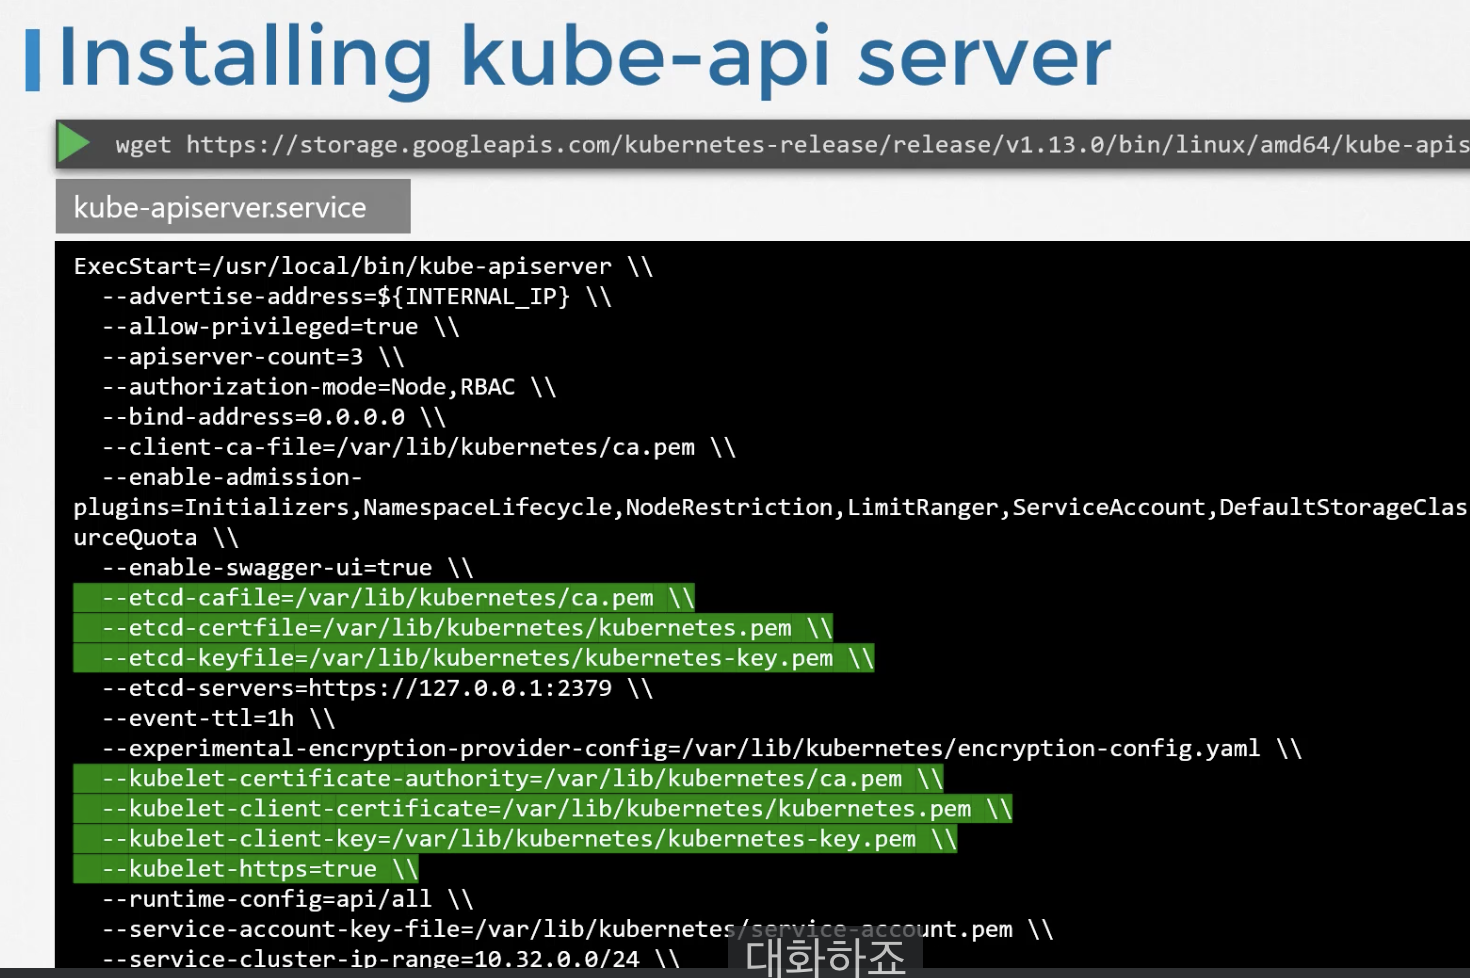
kube admin으로 설치한 경우 /etc/kubernetes/manifests/kube-apiserver.yaml 경로에서 api server 옵션을 살펴볼 수 있다.
17 Kube Controller manager
Contoller manager는 status를 노드를 지속적으로 모니터링 하고, 이 이슈를 해결한다. 5초마다 heart beat를 날린다.
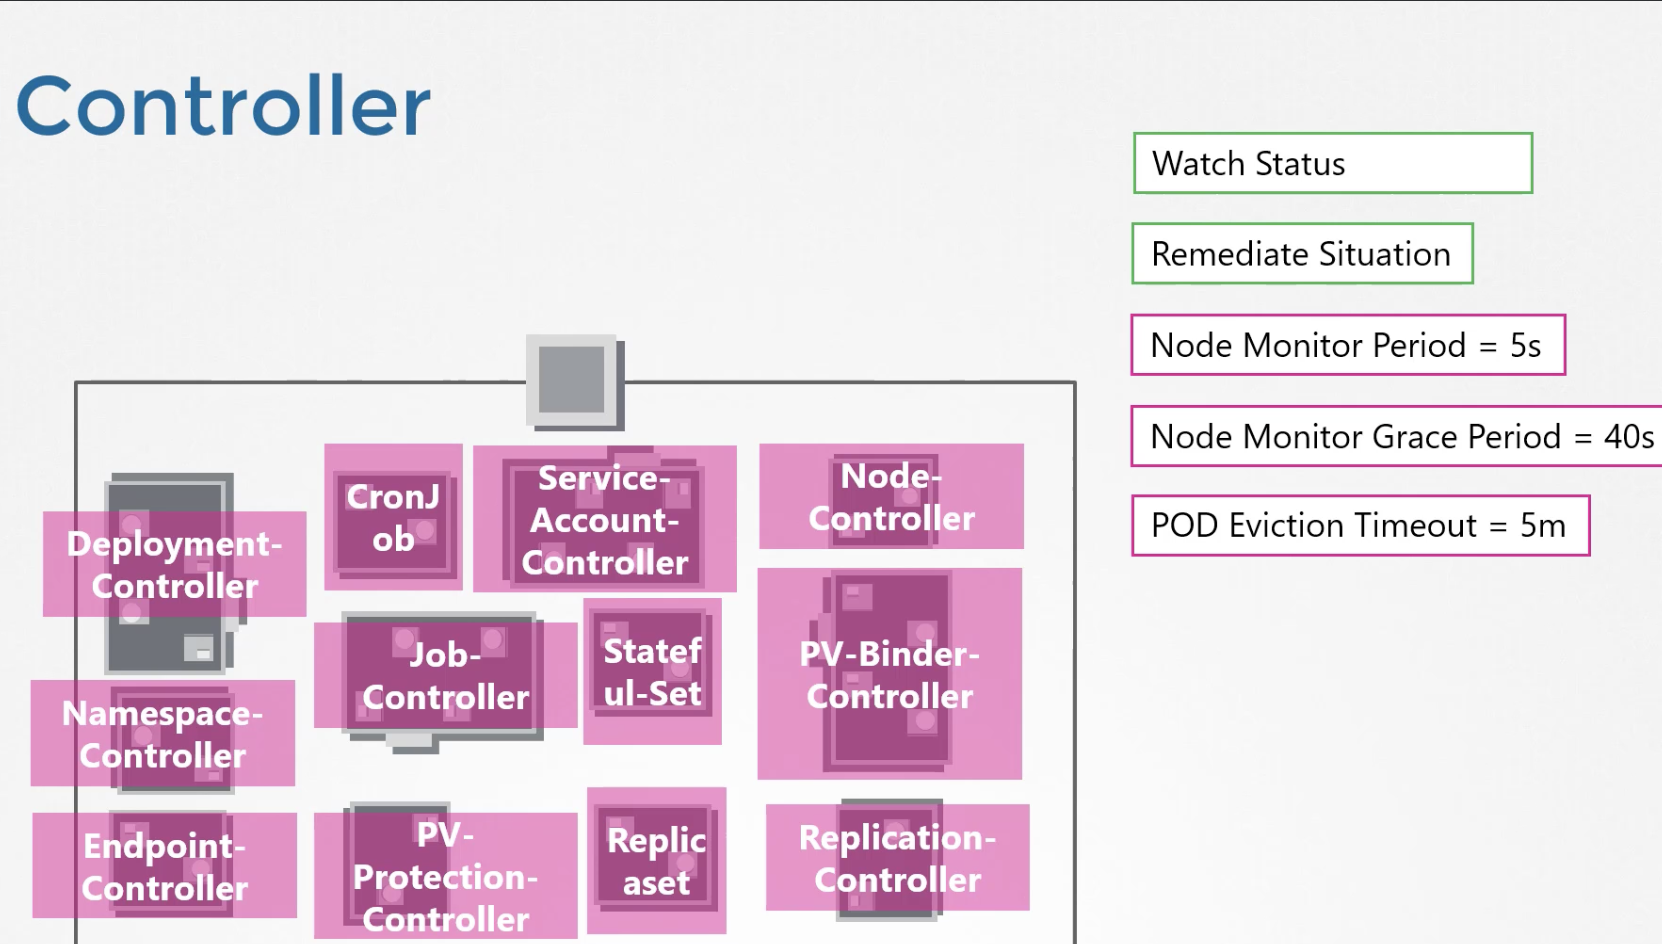
Kuber-Controller-Manager에 다양한 manager가 들어있다.
Kubeadmin으로 설치한 경우 /etc/kubernetes/manifests/kube-controller-manager.yaml 에서 Kube-contraller-manager의 설정값을 확인할 수 있다.
18 Kube scheduler
- Filter Nodes
- Rank Nodes
스캐쥴려를 직접 작성할 수 있다.
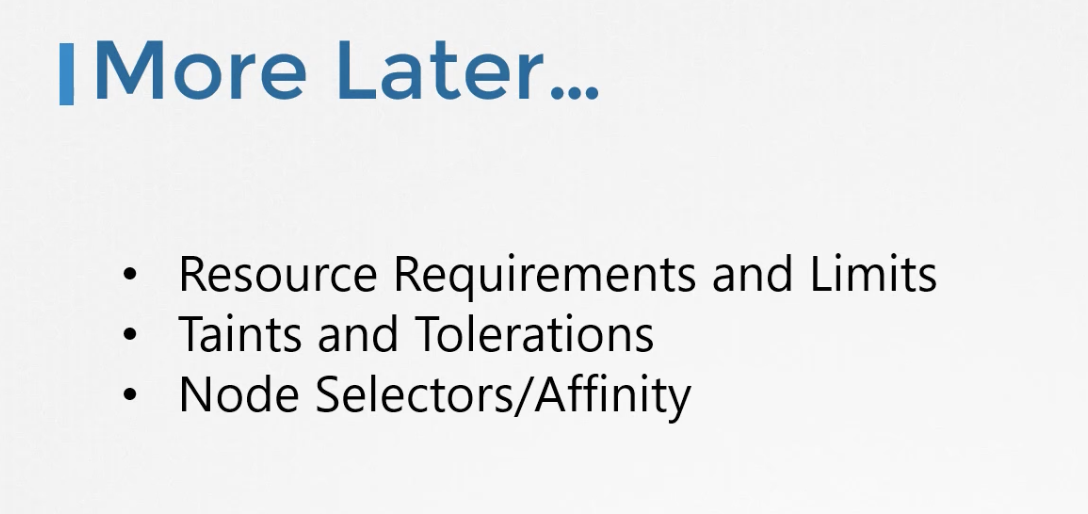
/etc/kubernetes/manifests/kube-scheduler.yaml 에서 설정값을 확인할 수 있다.
19 Kubelet
Kubelet은 Workernode의 선장과 같다.
20 Kube proxy
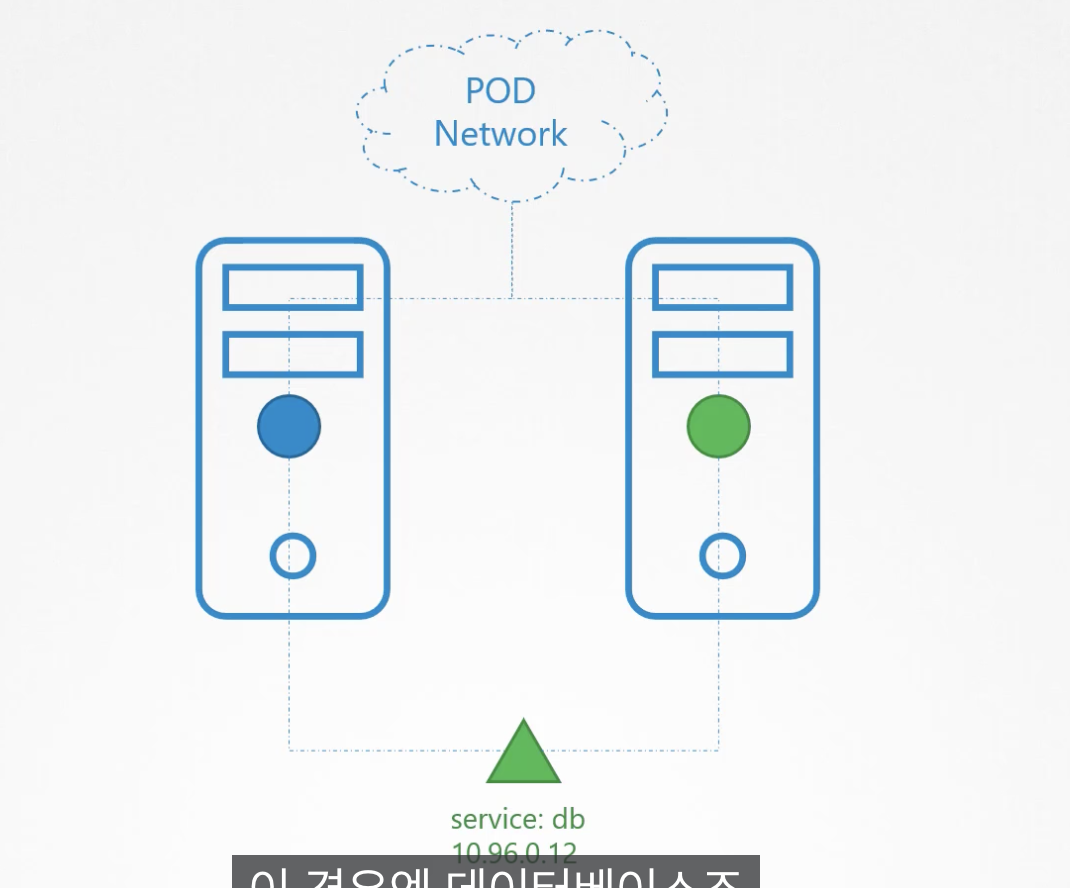
노드마다 1개씩 실행되며 데몬셋으로 실행된다. 서비스명으로 ip를 찾아준다.
kubectl get daemonset -n kube-system
21 Recap - Pods
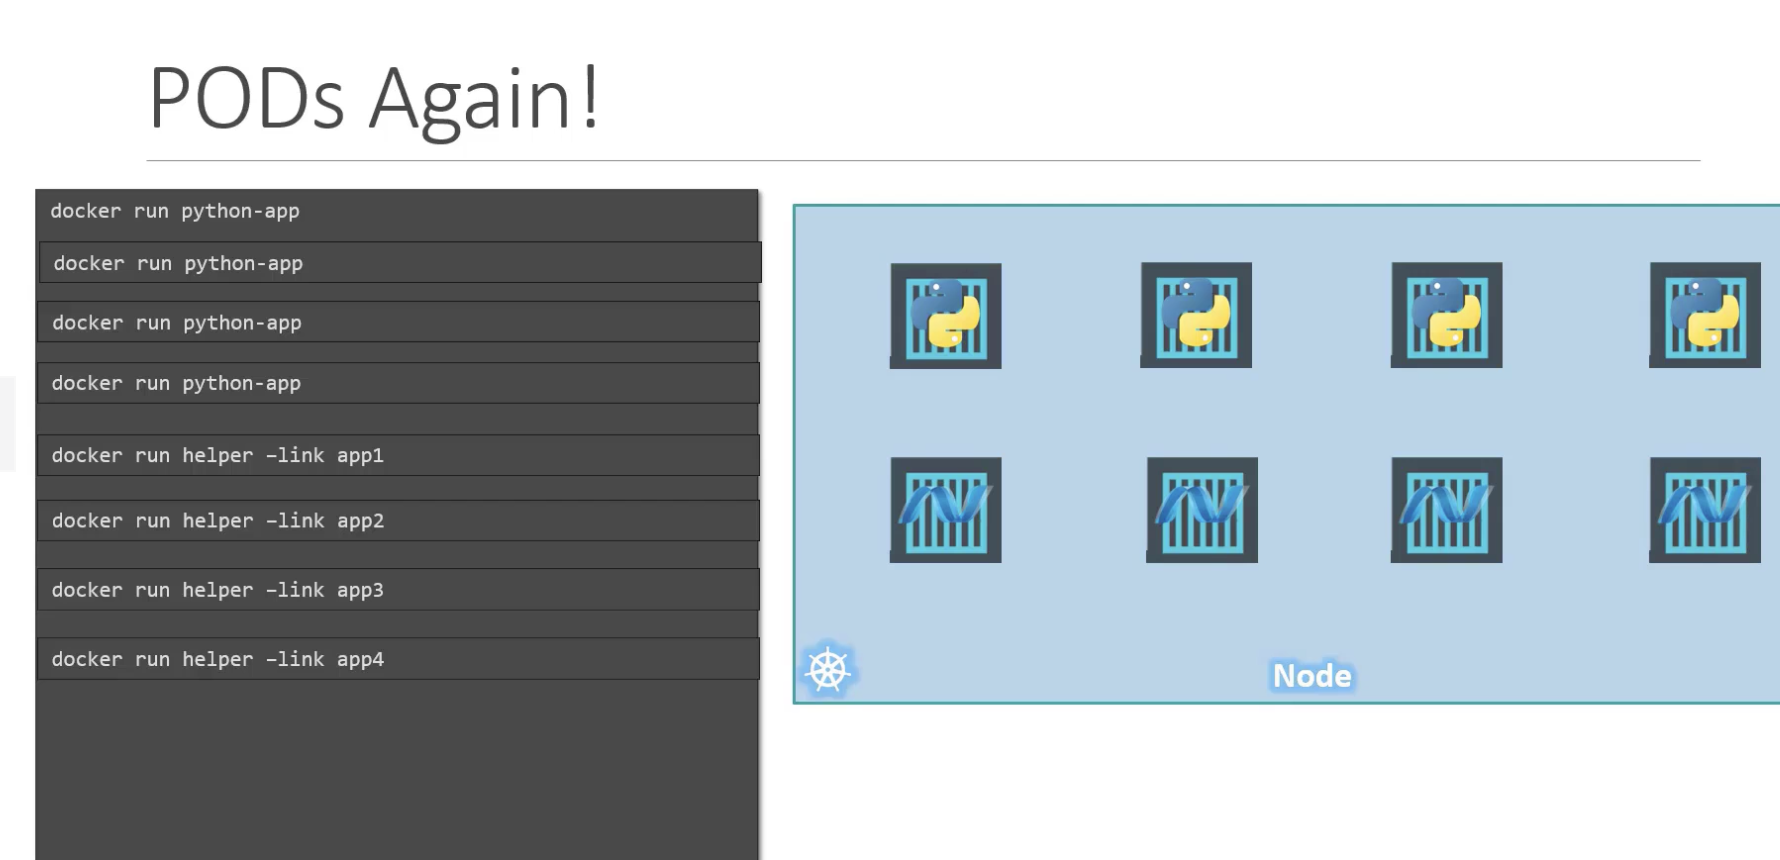
어플리케이션은 Container로 배포되지 않고 Pod라는 추상화된 단위로 배포된다.
docker로 아래와 같이 python-app과 helper를 관리하면 매우 수고스럽다.
아래 명령어를 통해 docker-hub에서 이미지를 가져올 수 있다.
$ kubectl run nginx --image nginx
$ kubectl run custom-nginx --image nginx --port=8080
22 Pods with yaml
Kubernetes는 yaml 파일을 통해 어플리케이션을 배포한다.
apiVersion: v1 | v1 | apps/v1 | apps/v1
kind: POD | Service | ReplicaSet | Deployment
metadata:
    name: myapp-pods
    labels:
        app: myapp
spec:
29 Replica Secrets
Pod의 High Availability를 위해 Replication Controller를 활용할 수 있다. Replication Controller는 항상 지정한 갯수 이상의 pod이 동작하는 것을 보장한다. 또한 User가 늘어남에 증가하는 Request를 처리하기 위해 Pod개수를 늘리는 데에도 사용된다.
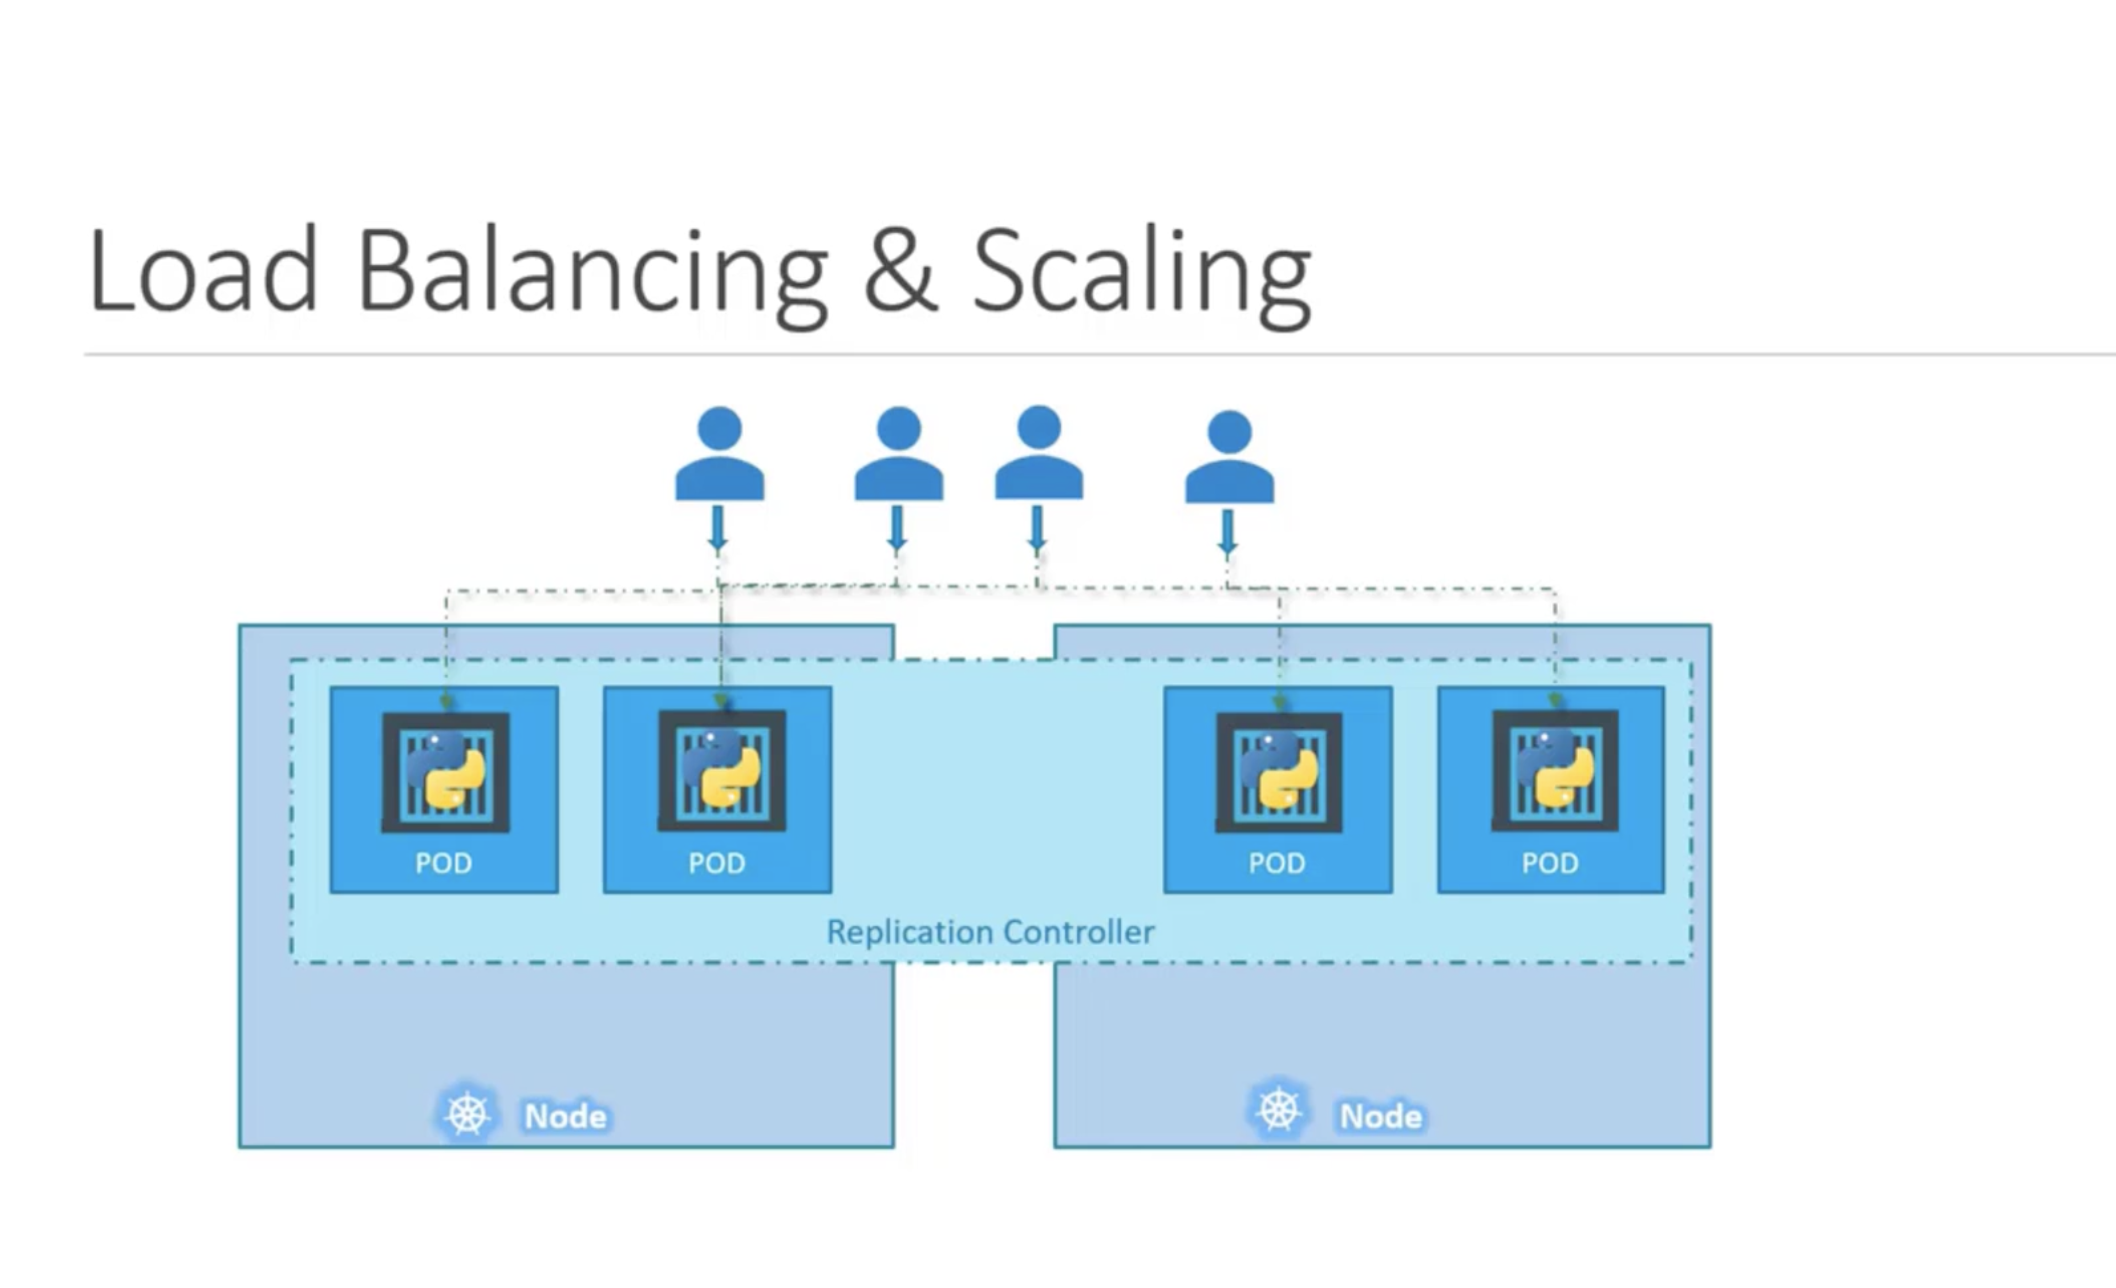
Replication Controller와 Replica Set 두가지가 있는데 구분할 필요가 있다. Replication Controller는 예전 기술이라 Replica Set에 의해서 대체되고 있다.
Replication Controller
spec 하위의 replicas 에 띄우고 싶은 pod의 갯수를 명시해준다.
apiVersion: v1
kind: ReplicationController
metadata:
  name: nginx
spec:
  replicas: 3
  selector:
    app: nginx
  template:
    metadata:
      name: nginx
      labels:
        app: nginx
    spec:
      containers:
      - name: nginx
        image: nginx
        ports:
        - containerPort: 80
kubectl create -f rc-definition.yml 명령어로 replication controller를 실행하면, 아래와 같은 애러가 발생한다.
$ kubectl create -f replication.yaml
replicationcontroller/nginx created

$ kubectl get replicationcontroller
NAME    DESIRED   CURRENT   READY   AGE
nginx   3         3         3       77s

$ kubectl get pods
NAME                     READY   STATUS    RESTARTS   AGE
nginx-77b4fdf86c-vhbhl   1/1     Running   0          69d
nginx-9tq9x              1/1     Running   0          92s
nginx-s6p44              1/1     Running   0          92s
nginx-znx2w              1/1     Running   0          92s
Replica Set
ReplicaSet 은 replication controller와 유사하지만 selector 라는 것이 있다. apiVersion이 apps/v1 인 것도 차이점이다.
apiVersion: apps/v1
kind: ReplicaSet
metadata:
  name: frontend
  labels:
    app: guestbook
    tier: frontend
spec:
  # modify replicas according to your case
  replicas: 3
  selector:
    matchLabels:
      tier: frontend
  template:
    metadata:
      labels:
        tier: frontend
    spec:
      containers:
      - name: php-redis
        image: gcr.io/google-samples/hello-app:2.0
$ kubectl create -f replicaset-definition.yml
replicaset.apps/frontend created

$ kubectl get replicaset
NAME               DESIRED   CURRENT   READY   AGE
frontend           3         3         3       24s
nginx-77b4fdf86c   1         1         1       69d
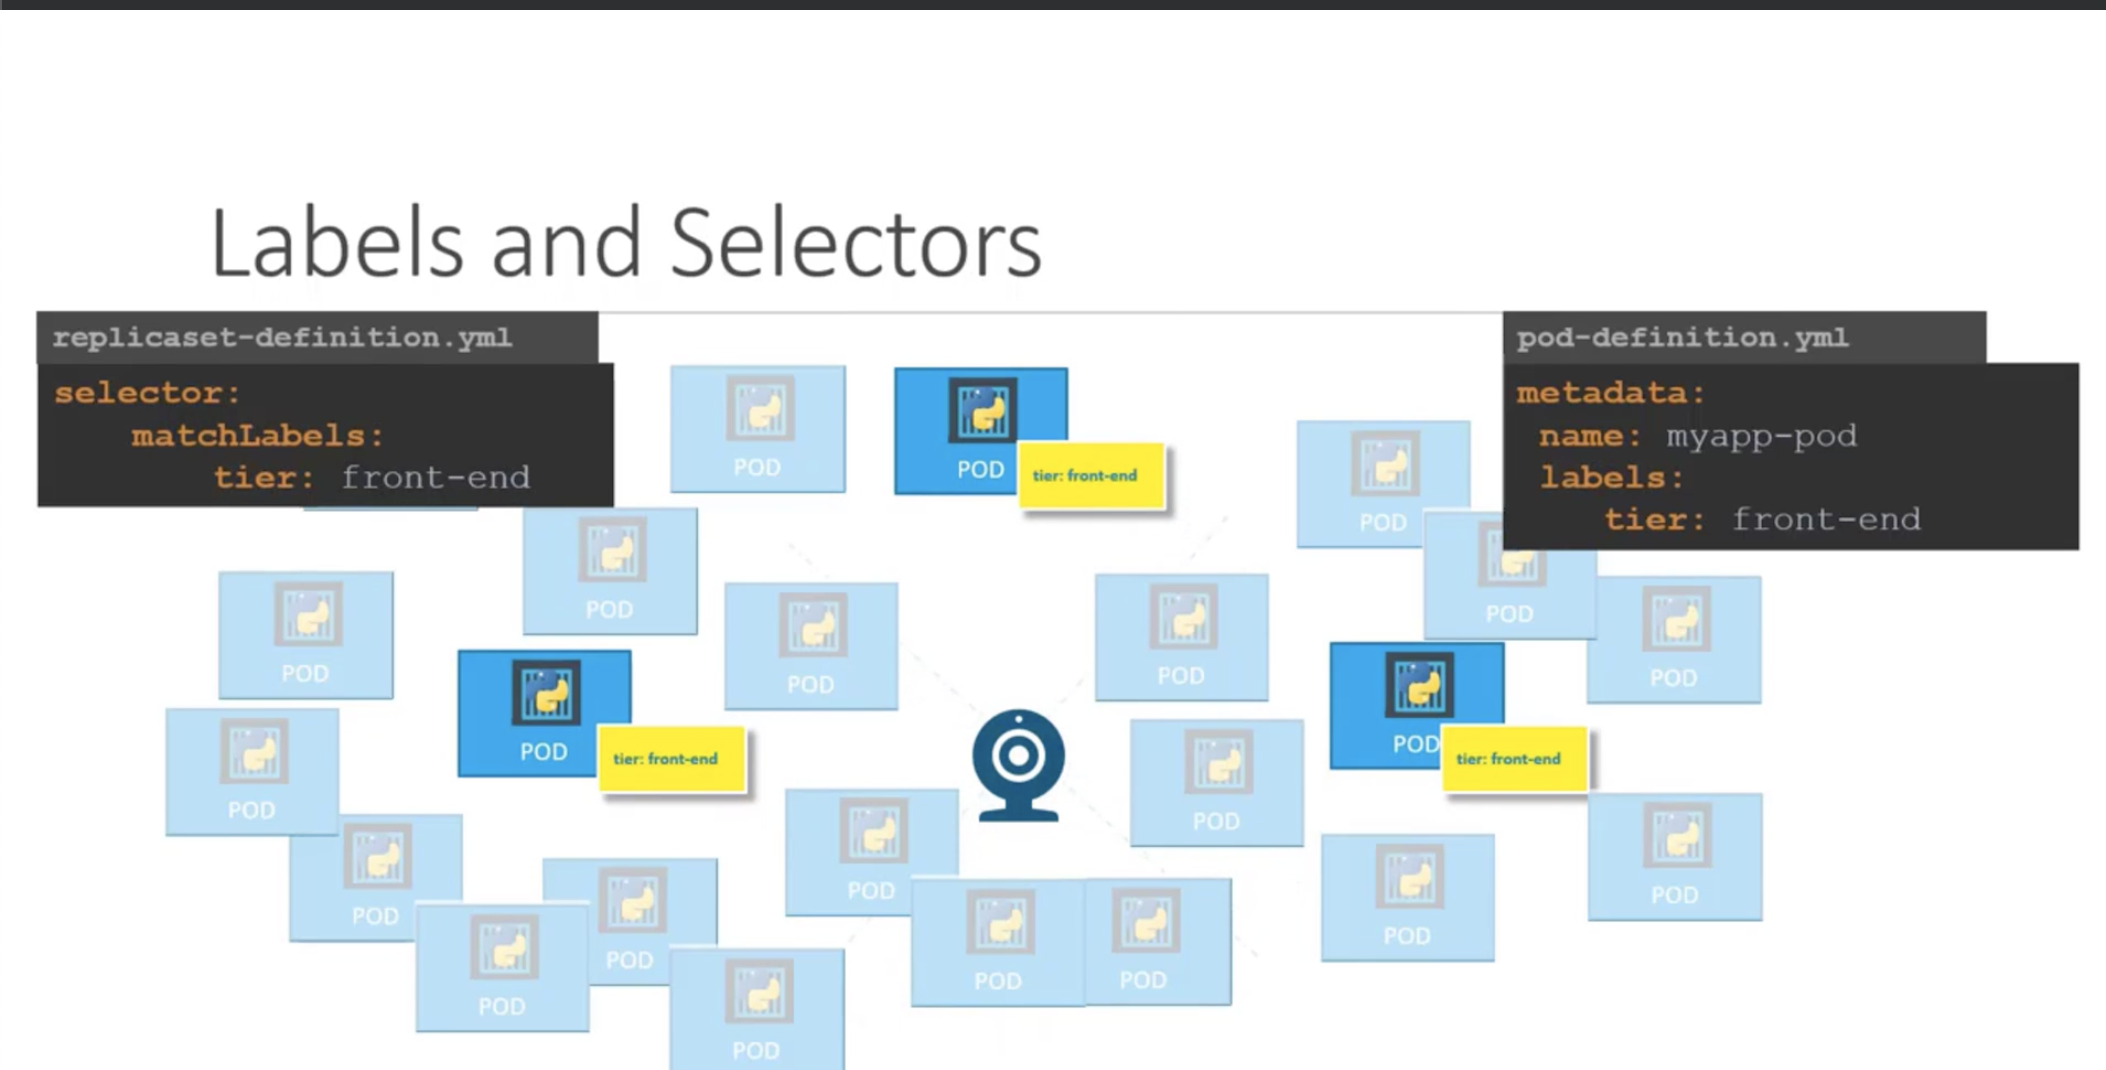
replicaset은 Pods 을 모니터링하다가 갯수가 맞춰지지 않으면 자동으로 pods 수를 정해진 갯수만큼 맞춰준다. 여러개의 Pod가 있을 때 띄워야할 pod들만 식별하기 위해서 label을 붙여서 관리하게 된다. 따라서 yml파일에 정의할 때 동일한 replicaset의 label과 template 내부의 label의 이름이 동일해야한다. 만약 동일한 label의 이름의 pod가 이미 생성되어있는 상태이고 pod 숫자도 만족할 경우 새로운 pod를 더이상 생성하지 않으니, label이름을 지정할 때 이미 사용된 label인지를 검사해야한다.
만약 3개의 replicas를 가진 ReplicaSet(name 은 위에서 생성한 frontend)을 6개로 늘리고싶다면 아래와 같이 하면 된다.
kubectl get replicaset frontend -o yaml 을 통해 현재 frontend ReplicaSet의 yaml설정파일을 알아낸 뒤, replicas 부분을 6으로 바꾸어 저장한 뒤 kubectl replica -f filename 로 적용해줄 수 있다.
두번 째 방법은 scale을 이용하는 방법이다.
$ kubectl scale --replicas=6  -f replicaset-definition.yml
replicaset.apps/frontend scaled

$ kubectl get replicaset
NAME               DESIRED   CURRENT   READY   AGE
frontend           6         6         6       14m
nginx-77b4fdf86c   1         1         1       69d
다시 3으로 줄이는 방법은 아래와 파일이 아닌, replicaset 이름을 지정하여 아래와 같이 실행할 수 있다.
$ kubectl scale --replicas=3 replicaset frontend
replicaset.apps/frontend scaled
$ kubectl get replicaset
NAME               DESIRED   CURRENT   READY   AGE
frontend           3         3         3       15m
nginx-77b4fdf86c   1         1         1       69d
32 Deployments
Deployments는 Replicaset과 비슷하다. 다른 점은 kind 부분에 ReplicaSet 대신 Deployment 가 들어간다는 점이다.
pod를 생성하기 위해서 yaml를 매번 작성하는 것은 귀찮은 일이다. 이럴때 kubectl run을 사용하면 편리하다. 예를들어 nginx를 구동시키는 deployment를 생성하는 Yaml파일을 생성하기 위해서는 아래와 같이 입력하면 된다.
$ kubectl create deployment --image=nginx nginx-deployment --dry-run=client -o yaml
apiVersion: apps/v1
kind: Deployment
metadata:
  creationTimestamp: null
  labels:
    app: nginx-deployment
  name: nginx-deployment
spec:
  replicas: 1
  selector:
    matchLabels:
      app: nginx-deployment
  strategy: {}
  template:
    metadata:
      creationTimestamp: null
      labels:
        app: nginx-deployment
    spec:
      containers:
      - image: nginx
        name: nginx
        resources: {}
status: {}
Create a deployment named webapp using the image kodekloud/webapp-color with 3 replicas.
$ kubectl create deployment webapp --image=kodekloud/webapp-color --replicas=3
$ kubectl create deployment redis-deploy --image=redis --replicas=2  --namespace=dev-ns
36 Services
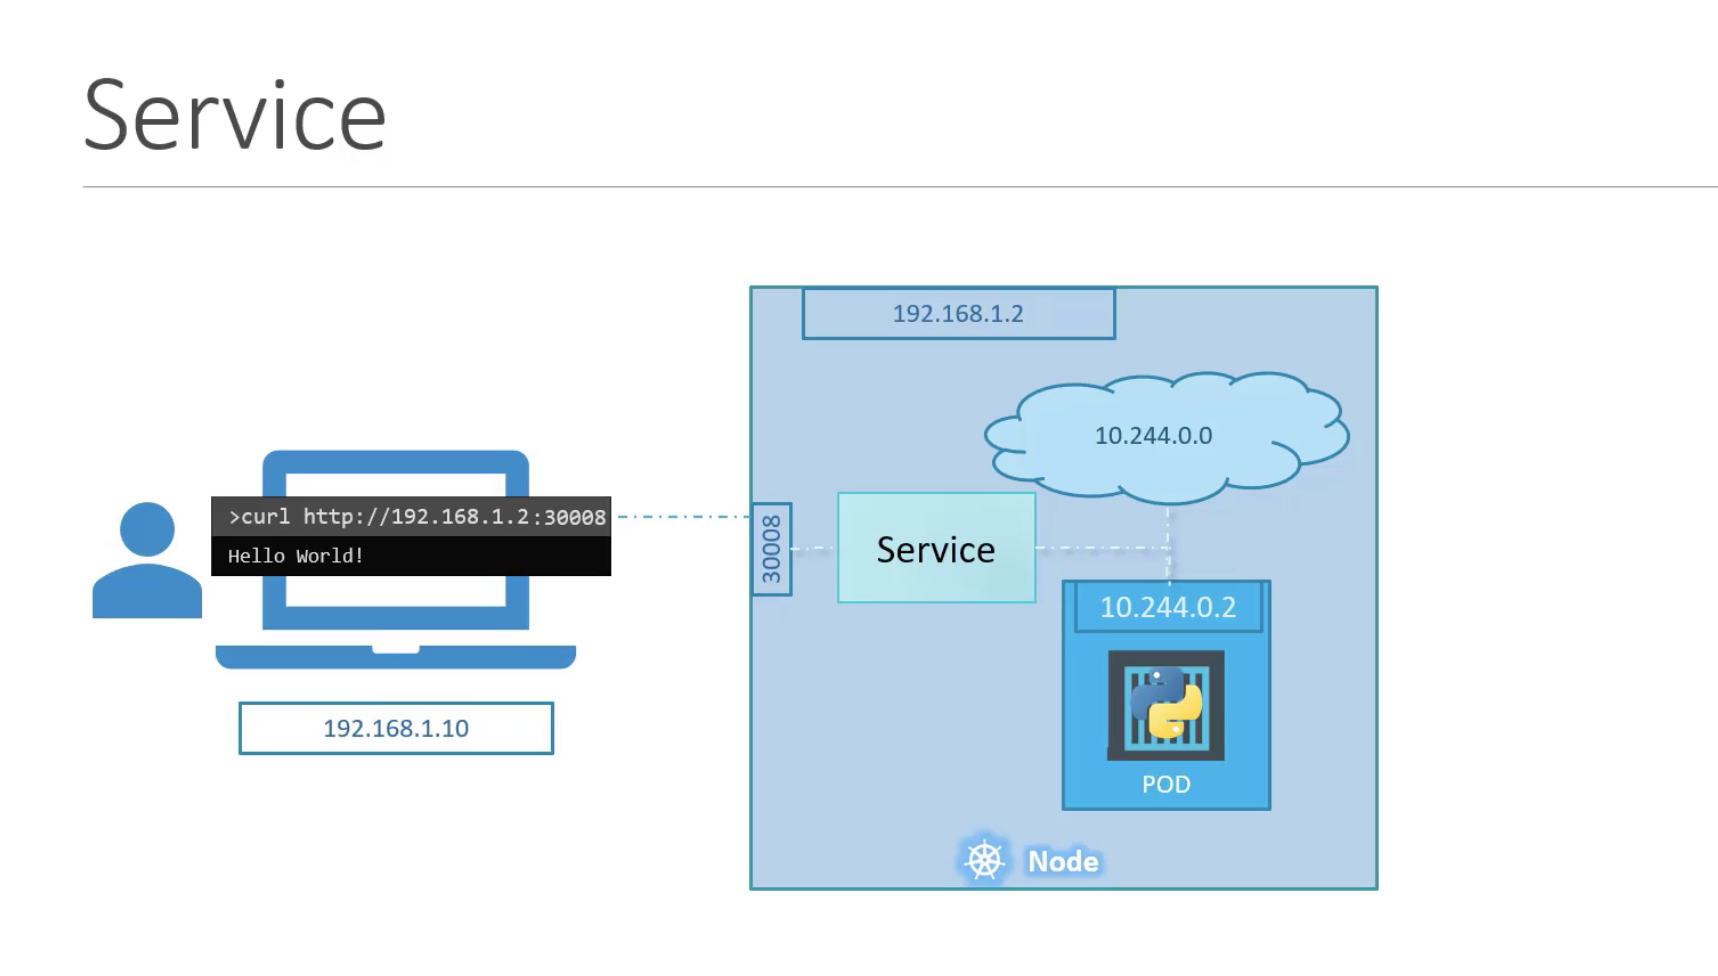
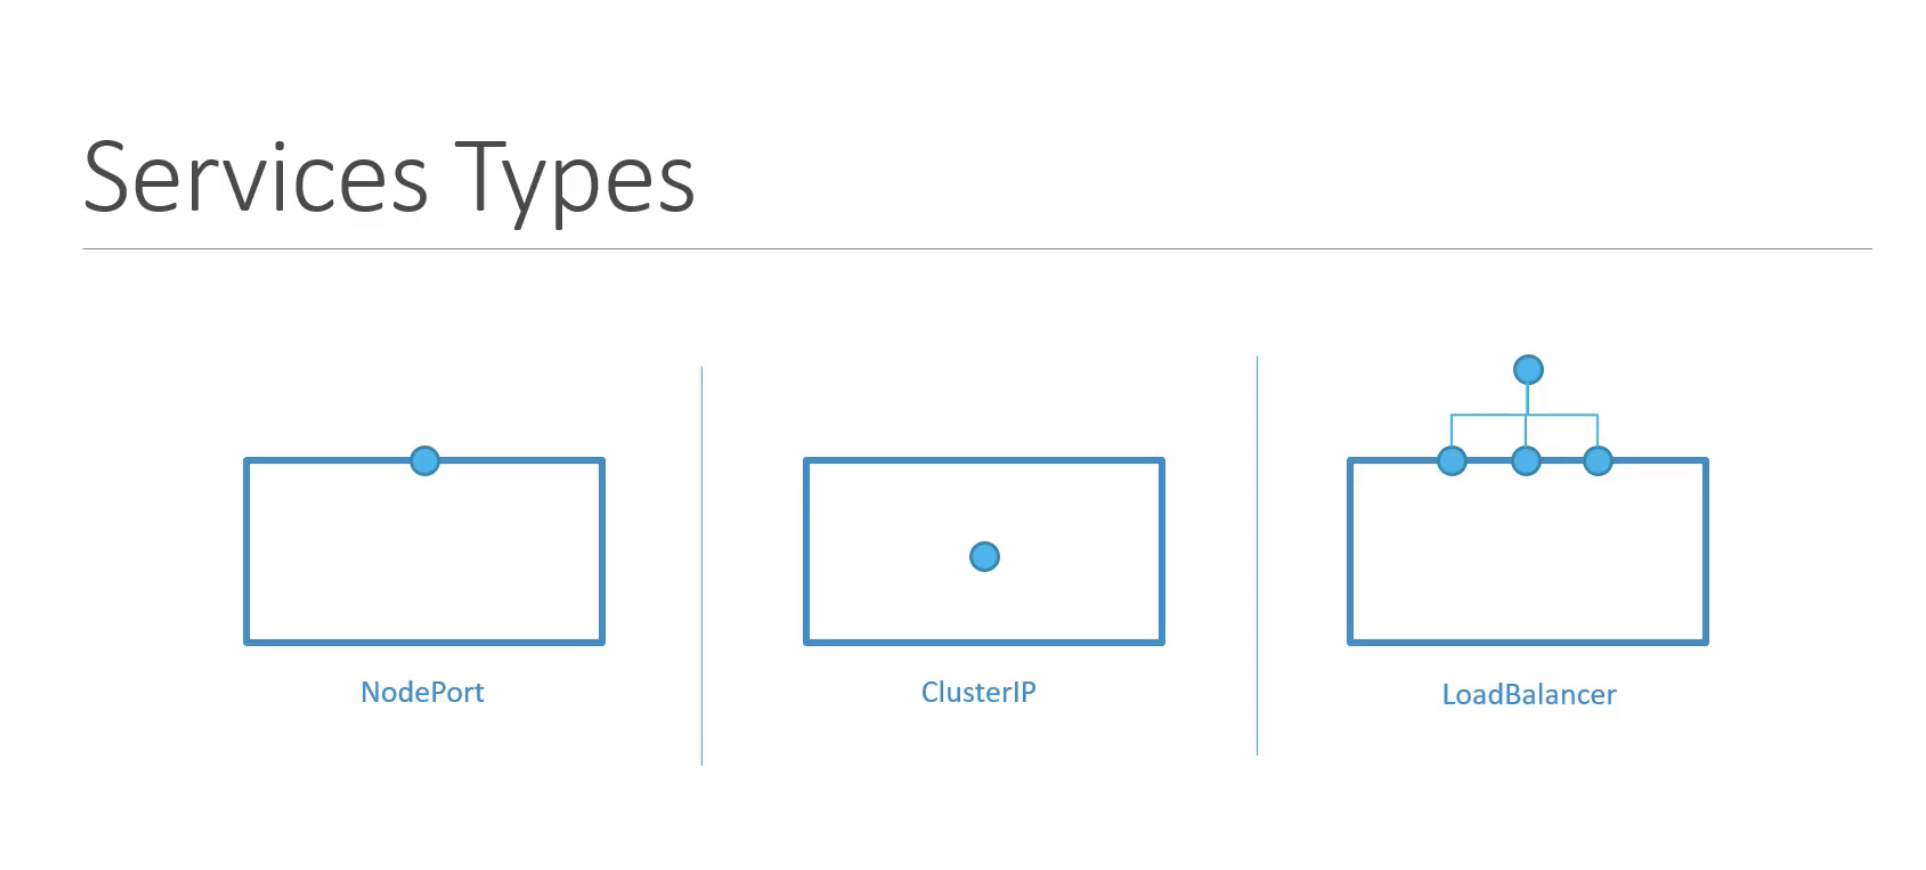
External User가 pod가 실행한 web 서비스에 접근하려면 어떻게 해야할까? 기본적으로 External 에서 Internal Network에 직접적으로 접근할 수 없다. 이때 필요한 것이 Service이다. Kubernetes의 Service라는 개념은 Pods, Replicaset 또는 Deployments랑 크게 다르지 않다. Service의 특징은 외부에서의 requests를 특정 resource의 port로 forward해주는 기능을 제공해준다. (NodePort 서비스)
Node ports
node port는 30000~32726 번의 port만 사용가능하다.
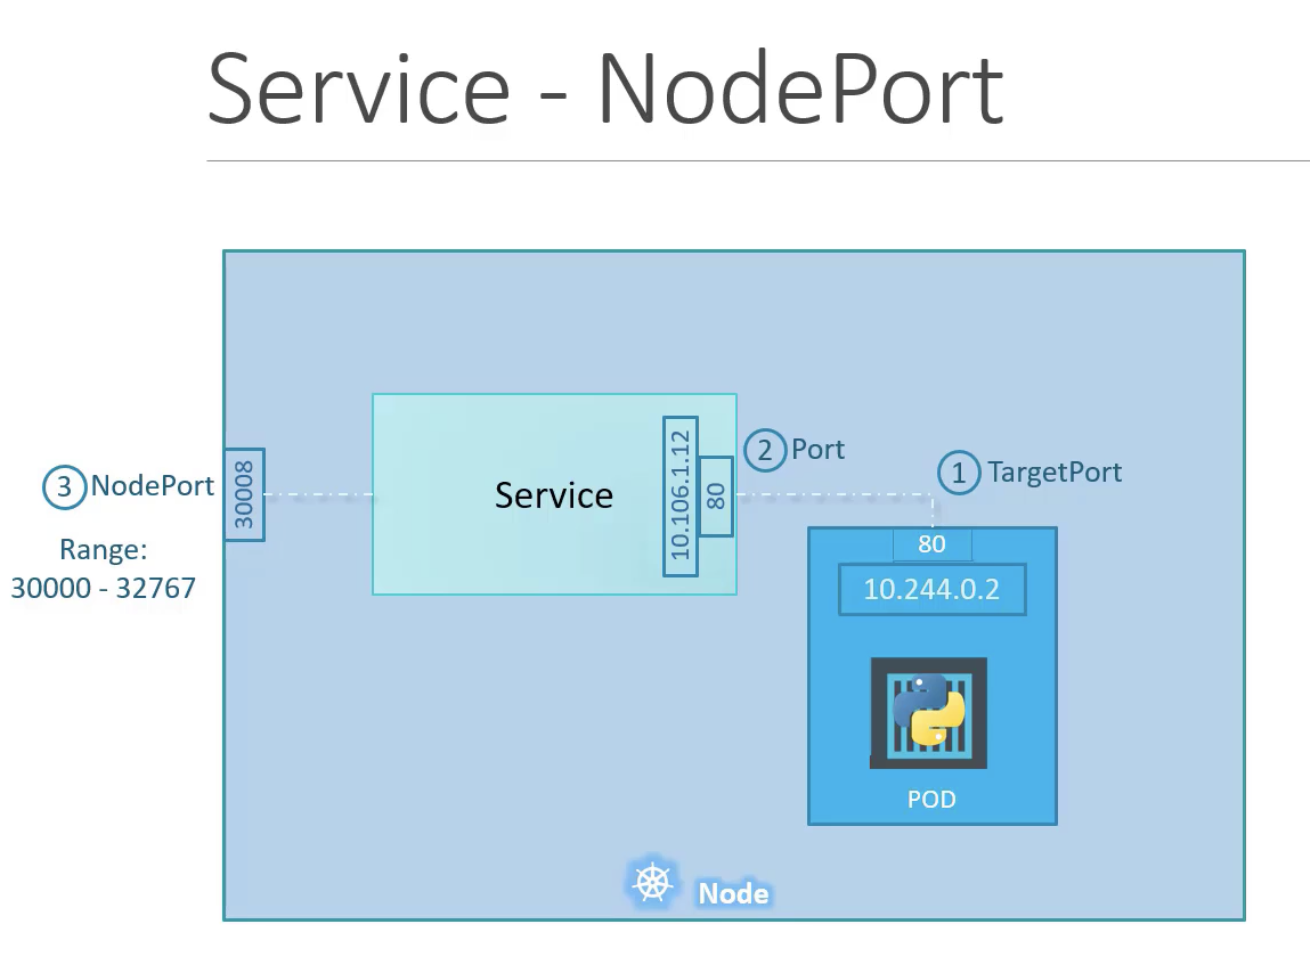
apiVersion: v1
kind: Service
metadata:
  name: nodeport-service
spec:
  type: NodePort
  ports:
    - targetPort: 80
      port: 80
      nodePort: 30008
  selector:
      app: guestbook
      tier: frontend
$ kubectl create -f node-port-definition.yml
service/nodeport-service created

$ kubectl get services
NAME               TYPE        CLUSTER-IP     EXTERNAL-IP   PORT(S)        AGE
kubernetes         ClusterIP   10.96.0.1      <none>        443/TCP        127d
nginx              NodePort    10.110.82.18   <none>        80:32381/TCP   70d
nodeport-service   NodePort    10.98.44.253   <none>        80:30008/TCP   40s


$ get pods -o wide
NAME                     READY   STATUS    RESTARTS   AGE   IP           NODE     NOMINATED NODE   READINESS GATES
frontend-759fr           1/1     Running   0          39h   10.244.0.5   cubi04   <none>           <none>
frontend-98dvd           1/1     Running   0          39h   10.244.0.5   cubi02   <none>           <none>
frontend-xpwc5           1/1     Running   0          39h   10.244.0.6   cubi03   <none>           <none>
nginx-77b4fdf86c-wwbrb   1/1     Running   0          39h   10.244.0.3   cubi04   <none>           <none>

$ curl http://192.168.219.114:32381
<!DOCTYPE html>
<html>
<head>
<title>Welcome to nginx!</title>
<style>
html { color-scheme: light dark; }
body { width: 35em; margin: 0 auto;
font-family: Tahoma, Verdana, Arial, sans-serif; }
</style>
</head>
<body>
Services Cluster IP
Kubernetes 상에서는 pod가 언제든 다른 곳으로 옮겨지고 생성될 수 있는 가능성이 있기 때문에 pod IP address에 의존할 수 없다. 서비스 간의 통신을 위해서는 CluterIP라고 불리는 서비스마다 하나씩 배정되는 Cluster IP를 사용해야한다.
하나의 pod에 대해서 ClusterIP Service 생성방법
$ kubectl expose pod redis --type=ClusterIP --port=6379 --name=redis-service
Create a pod called httpd using the image httpd:alpine in the default namespace. Next, create a service of type ClusterIP by the same name (httpd). The target port for the service should be 80.
$ kubectl run httpd --image httpd:alpine --port=80 --expose=true
service/httpd created
pod/httpd created
Service LoadBalancer
Node Port Service를 사용하면 외부에서 특정 Port를 사용하여 pod에 접근할 수 있지만 node가 10대에 걸쳐서 pod가 생성되어있다면 10개의 IP:port 쌍이 생기고, 이 때 10개중에 어디에 접근해야 하는가?
Load Balancer를 사용하면 이러한 고민을 해결해준다.
41 Namespaces
쿠버네티스는 kube-system ,default, kube-pulic 3개의 Namespaces를 자동으로 생성한다. Production purpose에서 다양한 사람들이 사용하는 환경에서는 여러개의 namespaces를 사용하는 편이 좋다.
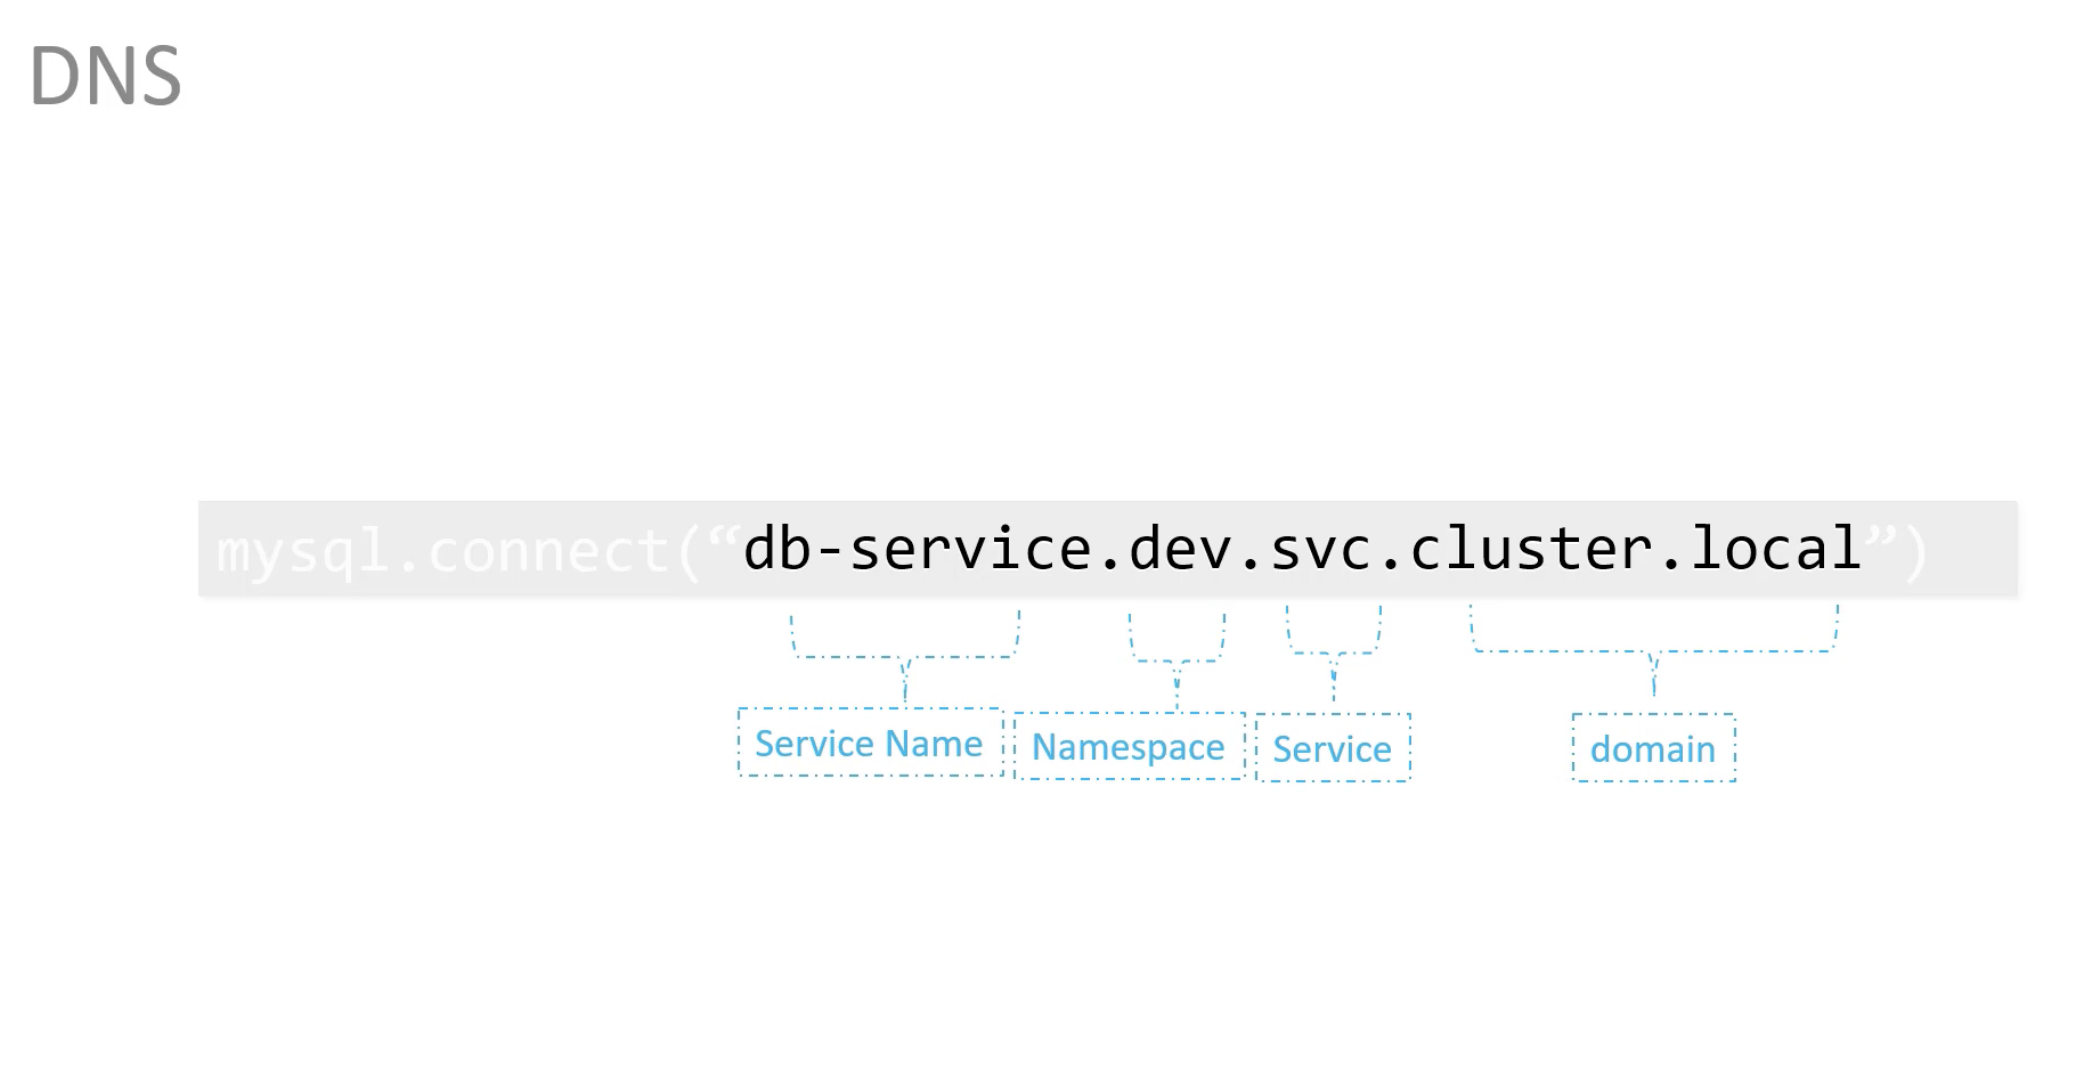
같은 namespace 내에서는 service name으로 조회가 가능하지만 서로 다른 namespace의 service를 조회하기 위해서는 추가적인 postfix가 필요하다.
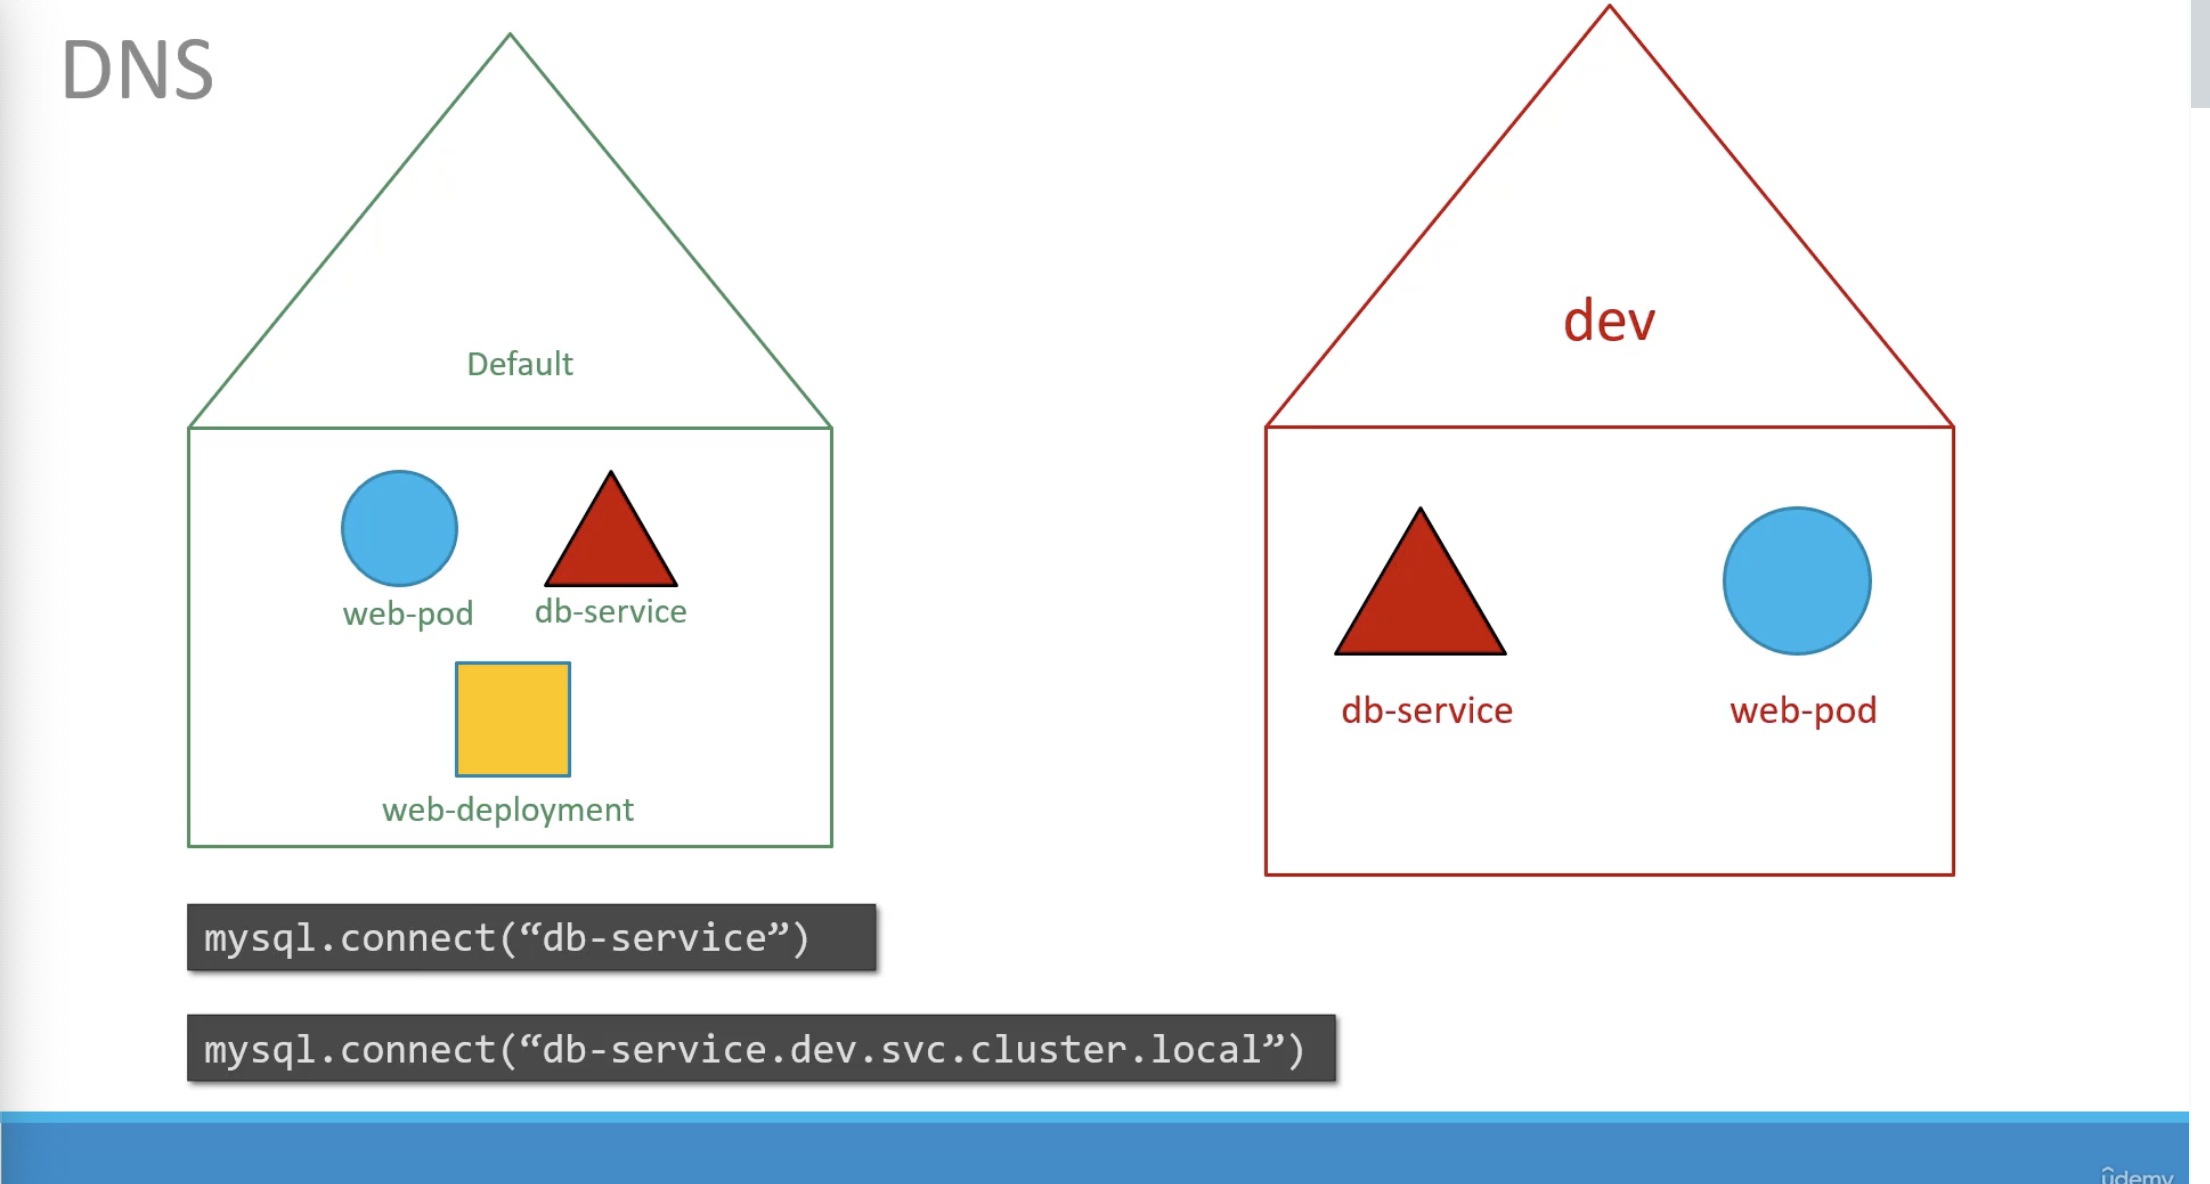
그 이유는 namespace가 추가될 때 DNS entry가 추가되기 때문이다.
$ kubects get pods --namespace=kube-system

# pod 생성시 --namespace=dev 를 주어 namespace를 지정할 수 있다.
$ kubectl create -f pod-definition.yml --namespace=dev


# 또는
# yaml 파일 내에 metadata: 아래에 namespace: dev 를 추가하는 방법도 있다.
crete namespace
apiVersion: v1
kind: Namespace
metadata:
  mame: dev
$ kubectl create -f namespace-dev.yml
$ kubectl create namespace dev
switch namespace permanently
kubectl은 기본적으로 default Namespace를 사용하고 매번 --namespace=dev를 붙이는 것은 귀찮은 일이다.
아래처럼 context를 원하는 namespace로 설정하면 영구적으로 변경할 수 있다.
$ kubectl config set-context $(kubectl config current-context) --namespace=dev
$ kubectl get pods

# 만약 다른 namespace(ex default) 의 pods를 조회하고 싶다면, 아래처럼 하면 된다.
$ kubectl get pods --namespace=default

# 전체 namespace의 pods를 보고싶다면 아래처럼 한다.
$ kubectl get pods --all-namespaces
NAMESPACE      NAME                             READY   STATUS             RESTARTS            AGE
default        frontend-759fr                   1/1     Running            0                   37h
default        frontend-98dvd                   1/1     Running            0                   37h
default        frontend-xpwc5                   1/1     Running            0                   37h
default        nginx-77b4fdf86c-wwbrb           1/1     Running            0                   37h
kube-flannel   kube-flannel-ds-fg8lc            0/1     CrashLoopBackOff   20310 (2m2s ago)    126d
kube-flannel   kube-flannel-ds-fvlfs            0/1     CrashLoopBackOff   20310 (66s ago)     126d
kube-flannel   kube-flannel-ds-q72cc            0/1     CrashLoopBackOff   20308 (4m29s ago)   126d
kube-flannel   kube-flannel-ds-smwgc            0/1     CrashLoopBackOff   20310 (98s ago)     126d
kube-system    coredns-5d78c9869d-fd4rg         1/1     Running            1 (125d ago)        126d
kube-system    coredns-5d78c9869d-zl7kh         1/1     Running            1 (125d ago)        126d
kube-system    etcd-cubi01                      1/1     Running            1 (125d ago)        126d
kube-system    kube-apiserver-cubi01            1/1     Running            1 (125d ago)        126d
kube-system    kube-controller-manager-cubi01   1/1     Running            1 (125d ago)        126d
kube-system    kube-proxy-f852g                 1/1     Running            1 (125d ago)        126d
kube-system    kube-proxy-ngt5z                 1/1     Running            1 (125d ago)        126d
kube-system    kube-proxy-tjtm6                 1/1     Running            1 (125d ago)        126d
kube-system    kube-proxy-wfldv                 1/1     Running            1 (125d ago)        126d
kube-system    kube-scheduler-cubi01            1/1     Running            1 (125d ago)        126d
namespace에 resource quota를 제한할 수도 있다.
apiVersion: v1
kind: ResourceQuota
metadata:
  name: compute-quota
  namespace: dev
spec:
  hard:
    pods: "10"
    requests.cpu: "4"
    requests.memory: 5Gi
    limits.cpu: "10"
    limits.memory: 10Gi
Imperative vs Declarative
목표를 위해 한 단계씩 절차적(Imperative)으로 정의하는 방법이 있고, 결과를 선언적(Declarative)하게 정의하는 방법이 있다. Kubernetes는 두 가지 모두 제공하는데, 후자가 훨씬 간편한 방법이고, 이력보관이 편리해 실수가 줄어든다. Imperative한 방법은 운영자가 현재 상태를 항상 followup 하고 있어야한다.
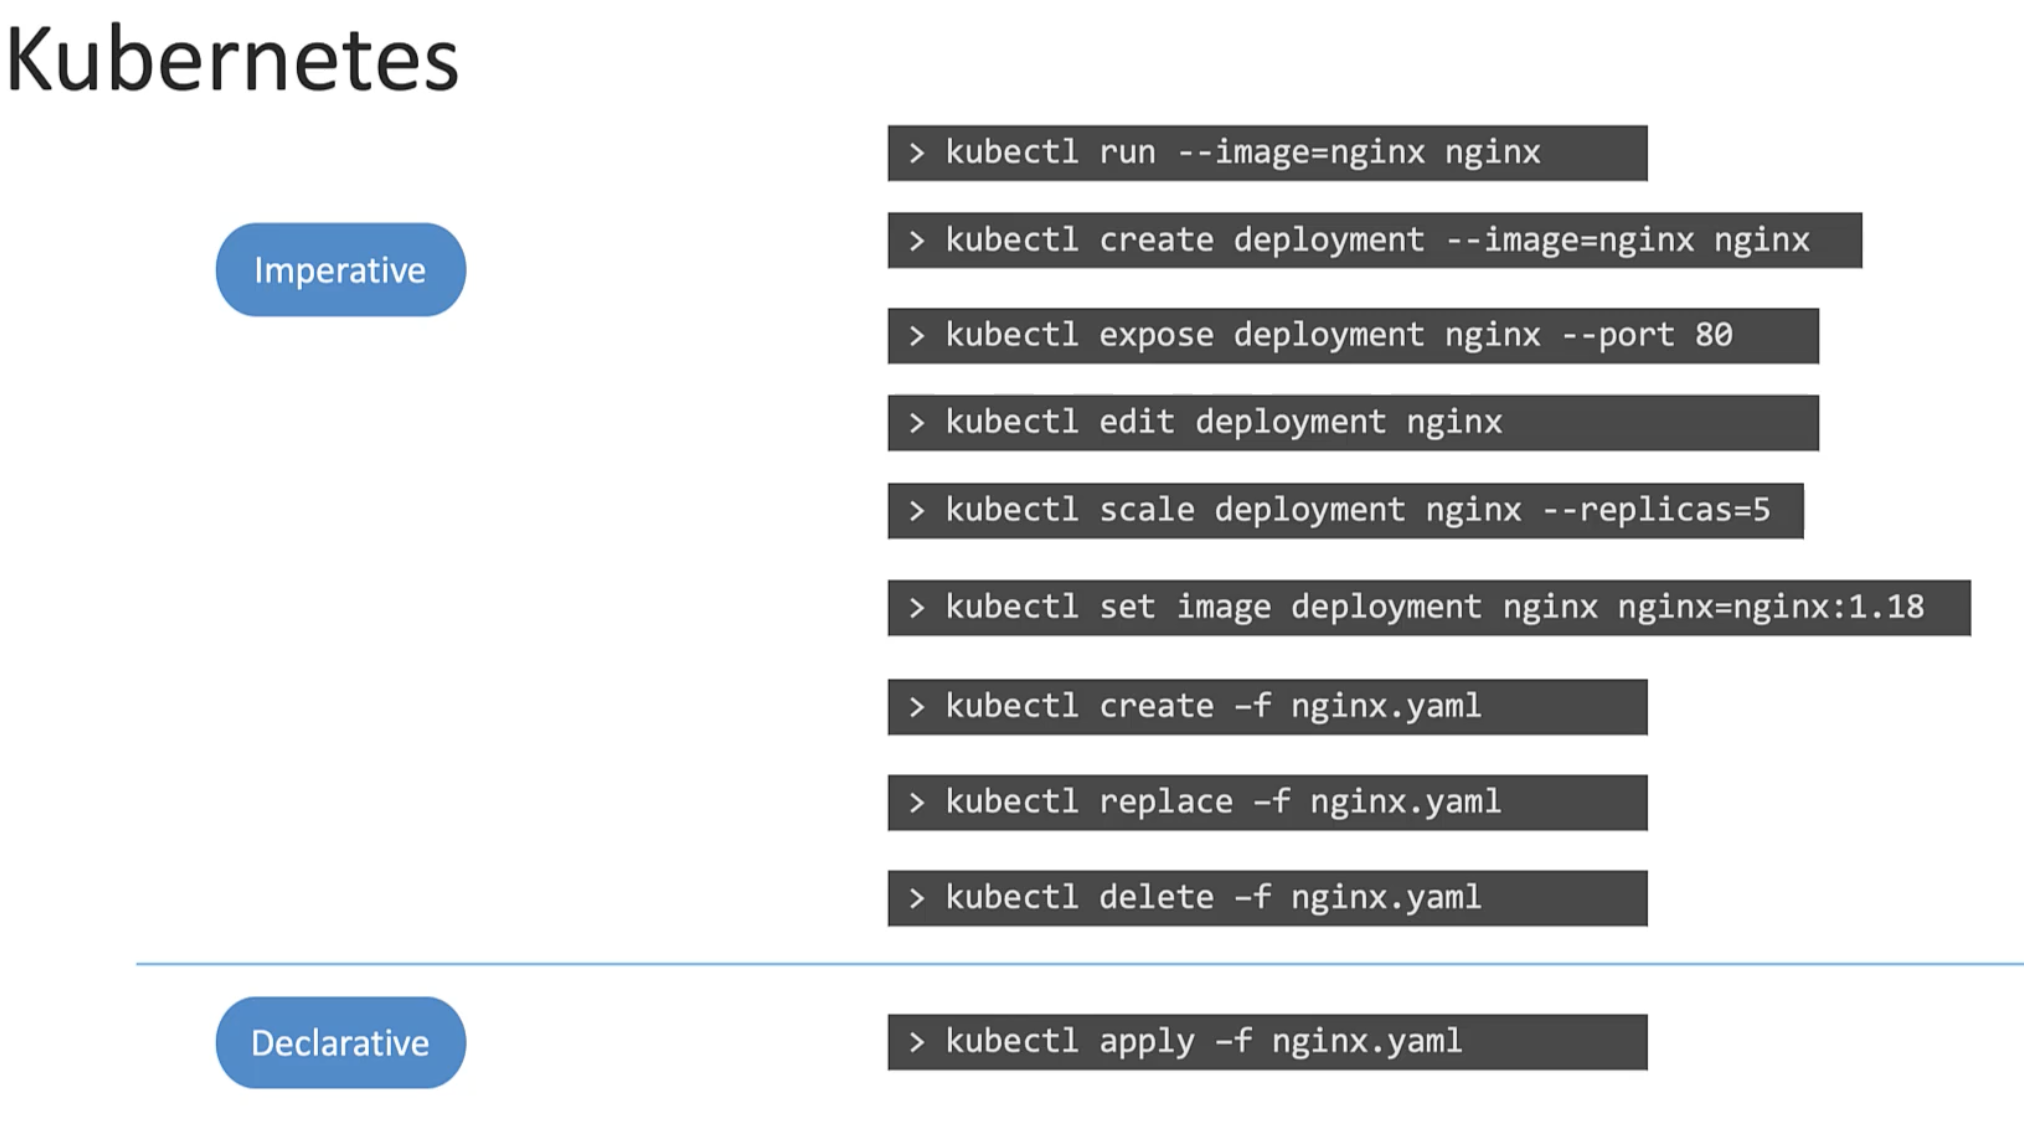
다만 CKA exam에서는 Imperative한 방법으로 적용하는 편이 빠르고 직관적일 수 있다.