
This post is a study note based on the Udemy course https://www.udemy.com/course/certified-kubernetes-administrator-with-practice-tests and content from https://kodekloud.com/.
- 141 Authentication
- 146 TLS in Kubernetes
- 147 TLS in Kubernetes - Certification Creation
- 152 Certificates API
- 155 KubeConfig
- 159 API Groups
- 160 Authorization
- 161 Role Based Access Controls
- 164 Cluster Roles and Roles Bindings
- 167 Service Account
- 170 Image Security
- 173 Security in docker
- 174 Security Contexts
- 177 Network Policy
- 178 Developing network policies
141 Authentication
Kubernetes does not have the ability to create User Accounts, but it does have the ability to create service accounts.
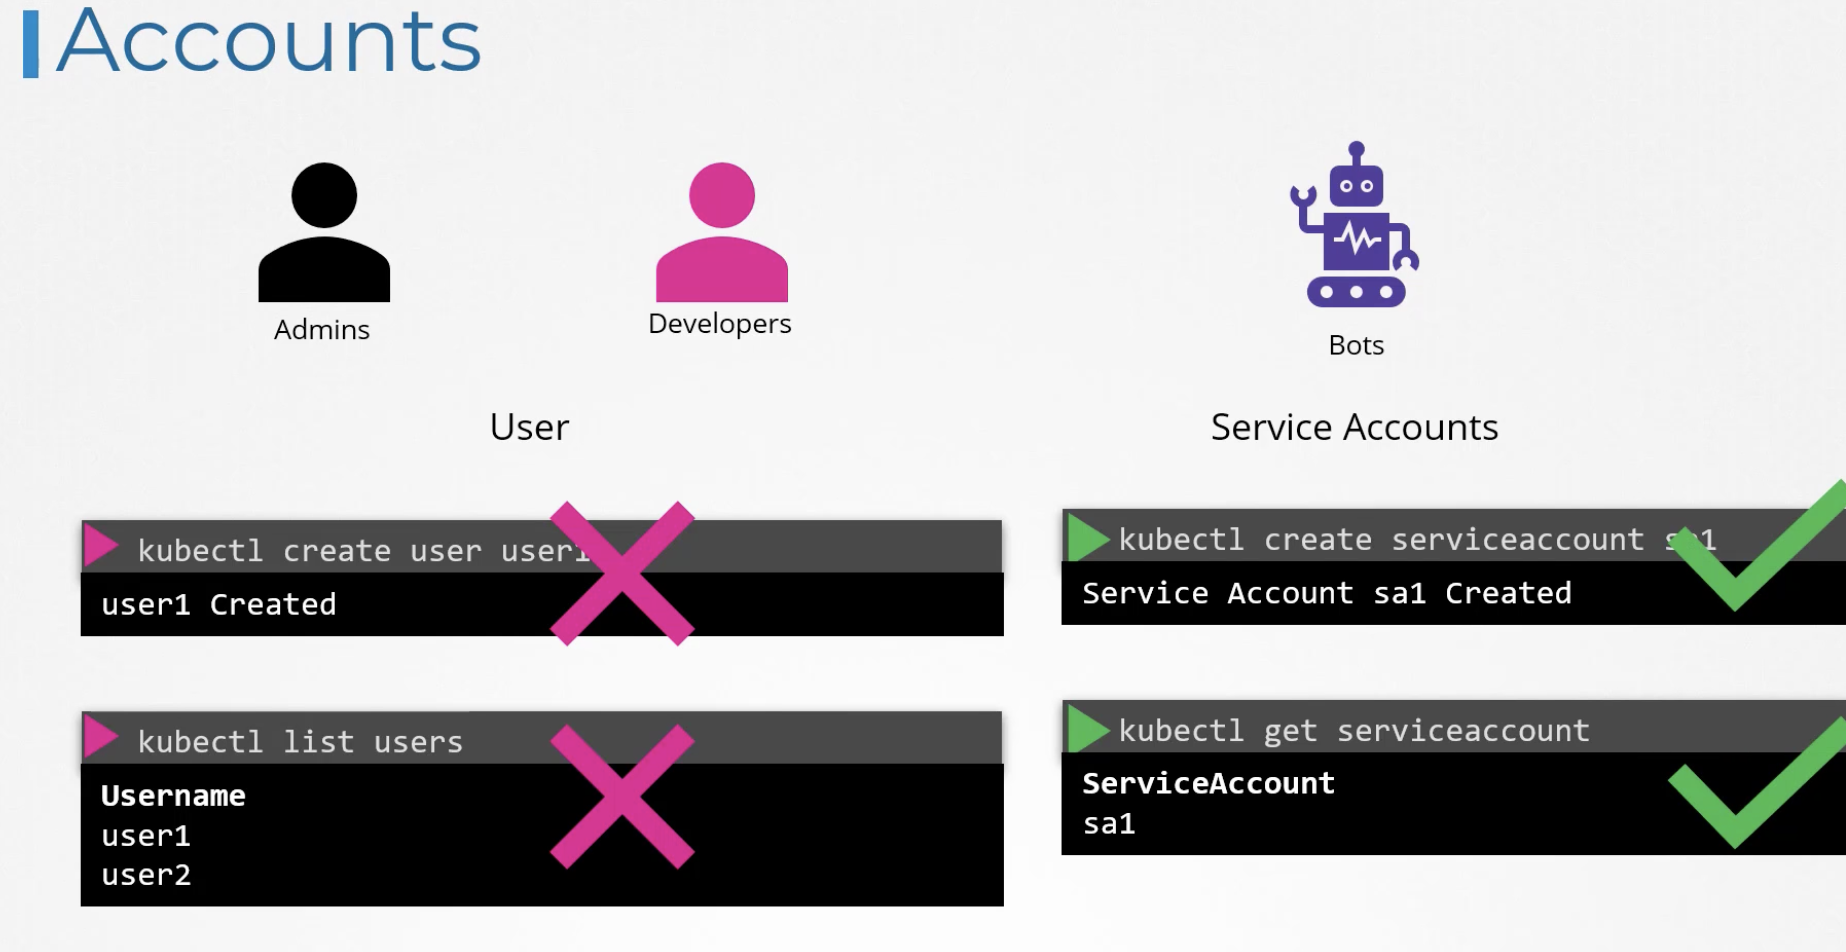
Users can access the Kubernetes cluster via kubectl or the API.
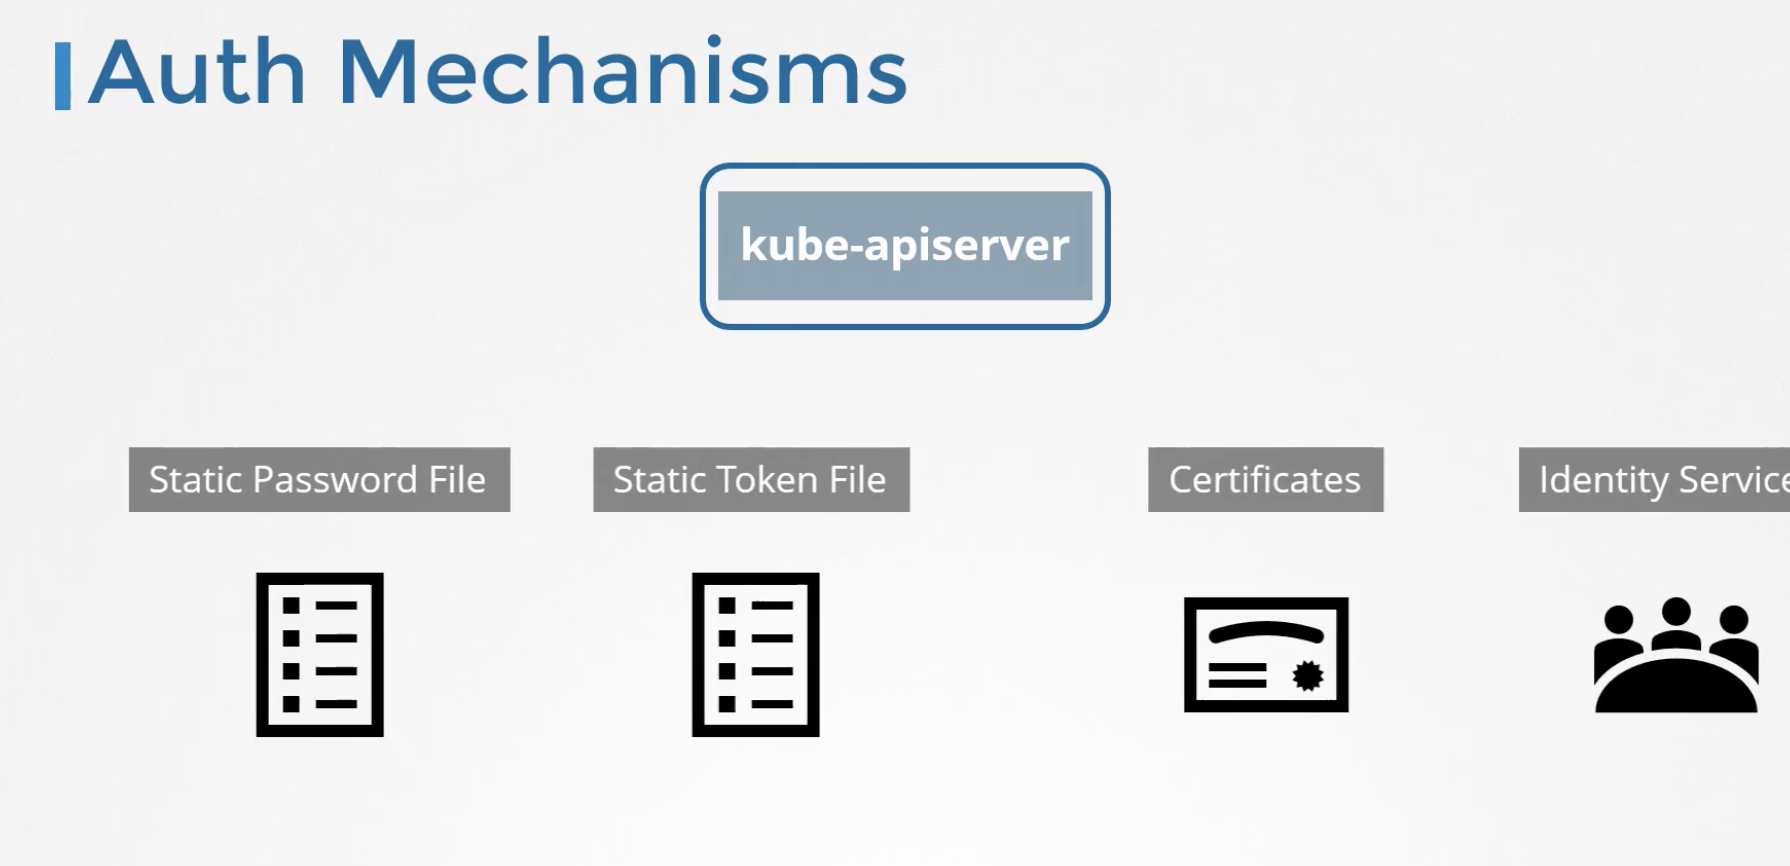
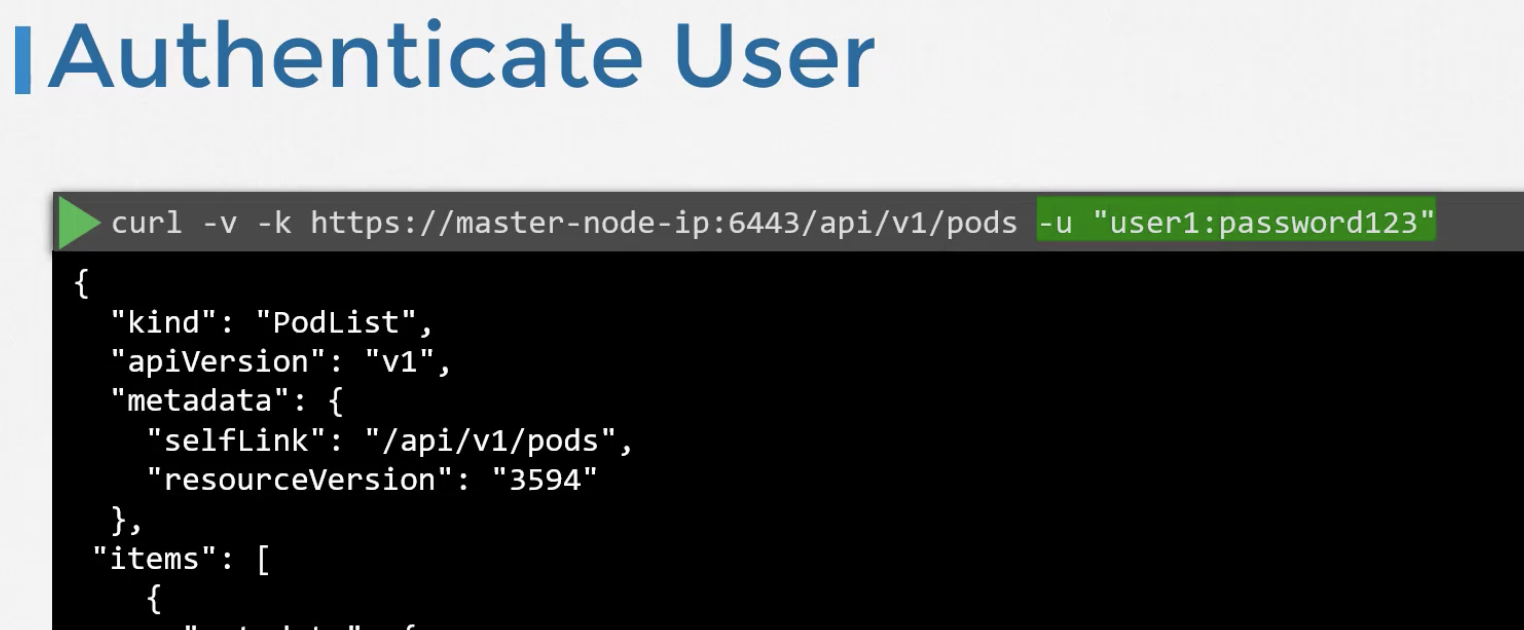
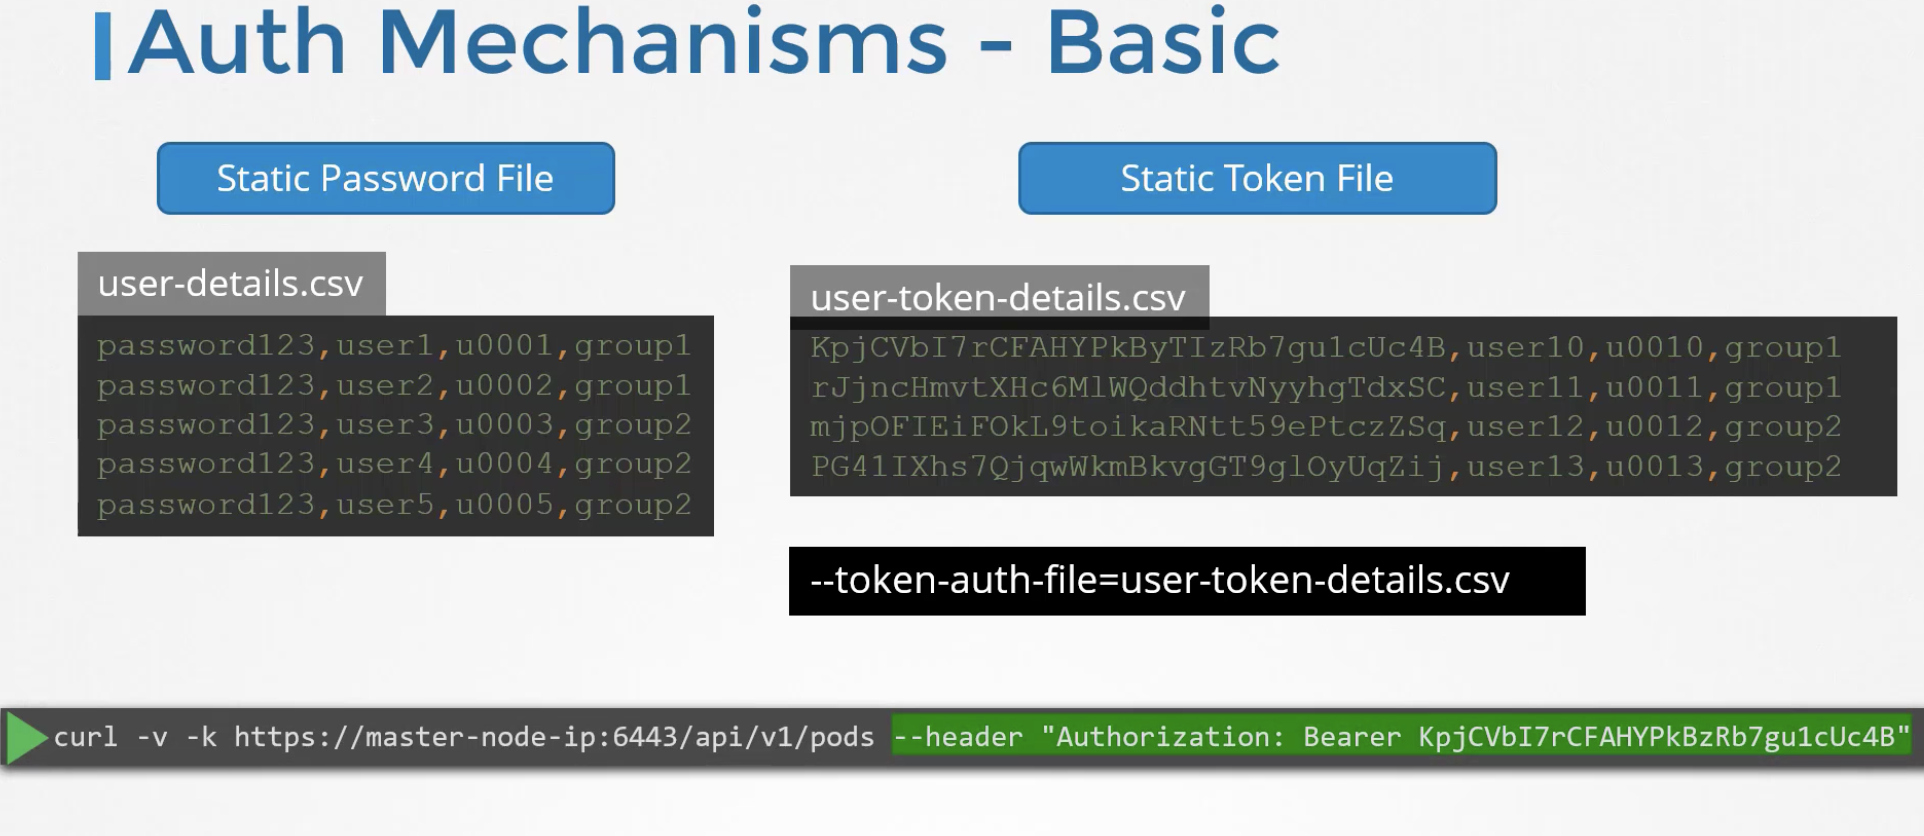
When starting the kube-apiserver, specifying --basic-auth-file=<filename> allows you to register users with password-based authentication. However, this is not a recommended authentication method due to poor security and the need to restart the API server whenever users are changed. Users and passwords created this way are used for authentication in curl commands.
Authentication via tokens instead of passwords is also possible.
146 TLS in Kubernetes
All authentication within Kubernetes operates via TLS. Therefore, every component has a public key ending in .crt and a private key ending in .key.
The following are the server components that run Kubernetes.
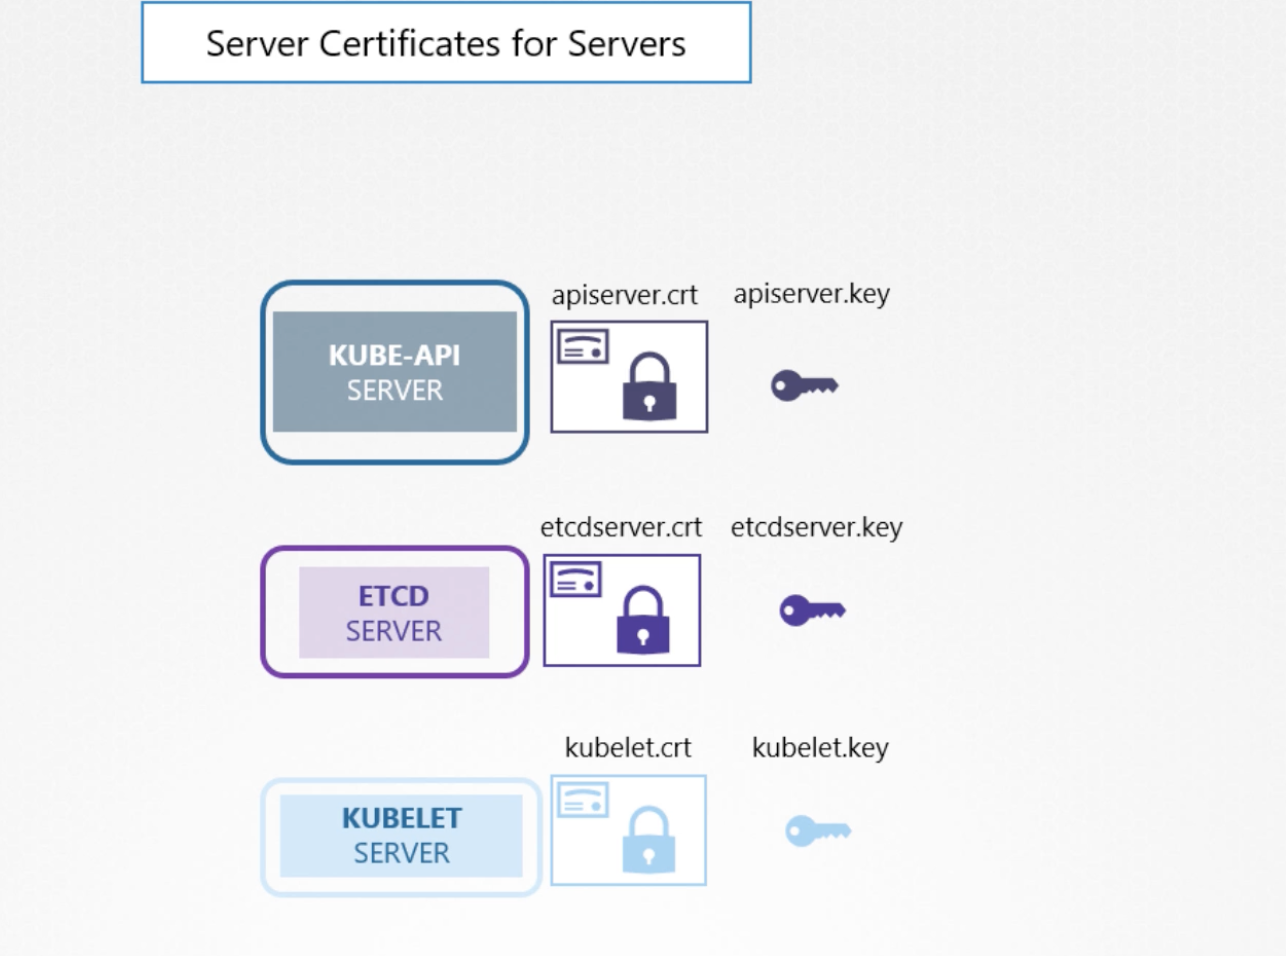
Clients accessing Kubernetes also use TLS authentication.
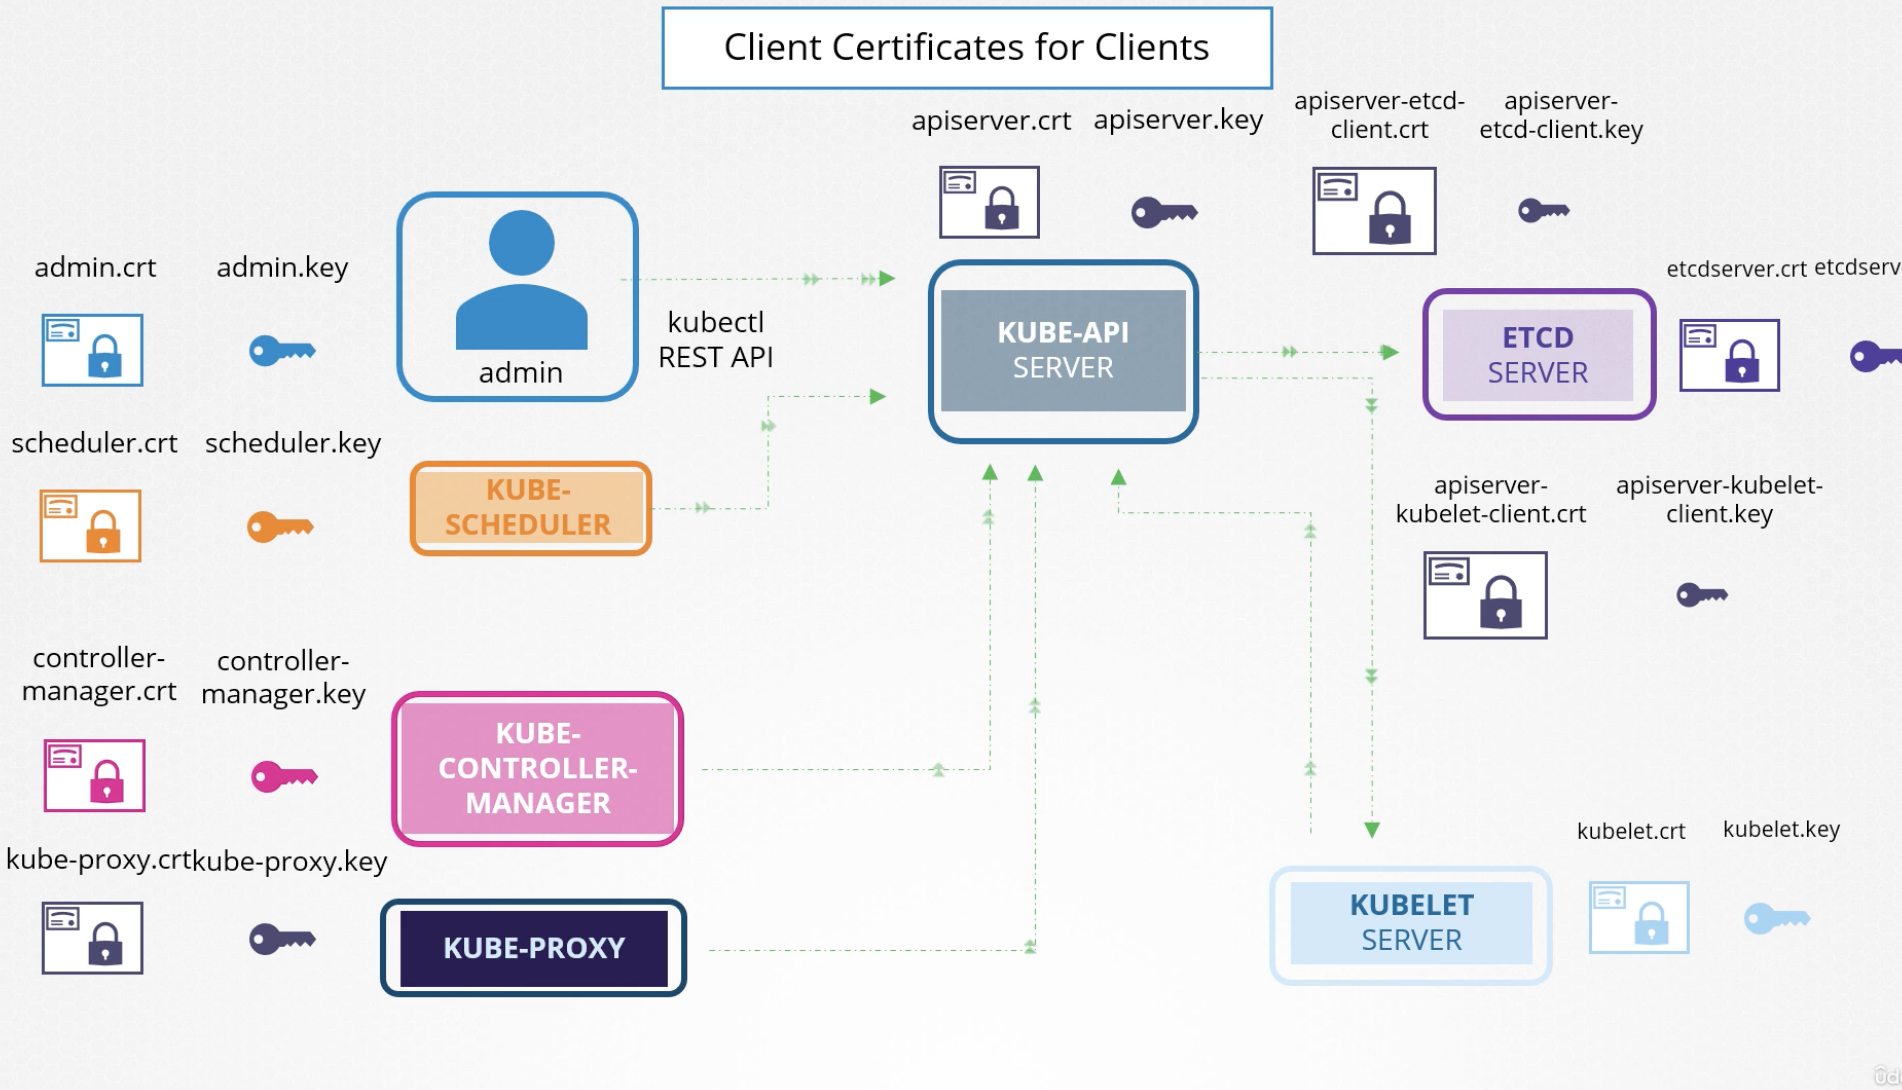
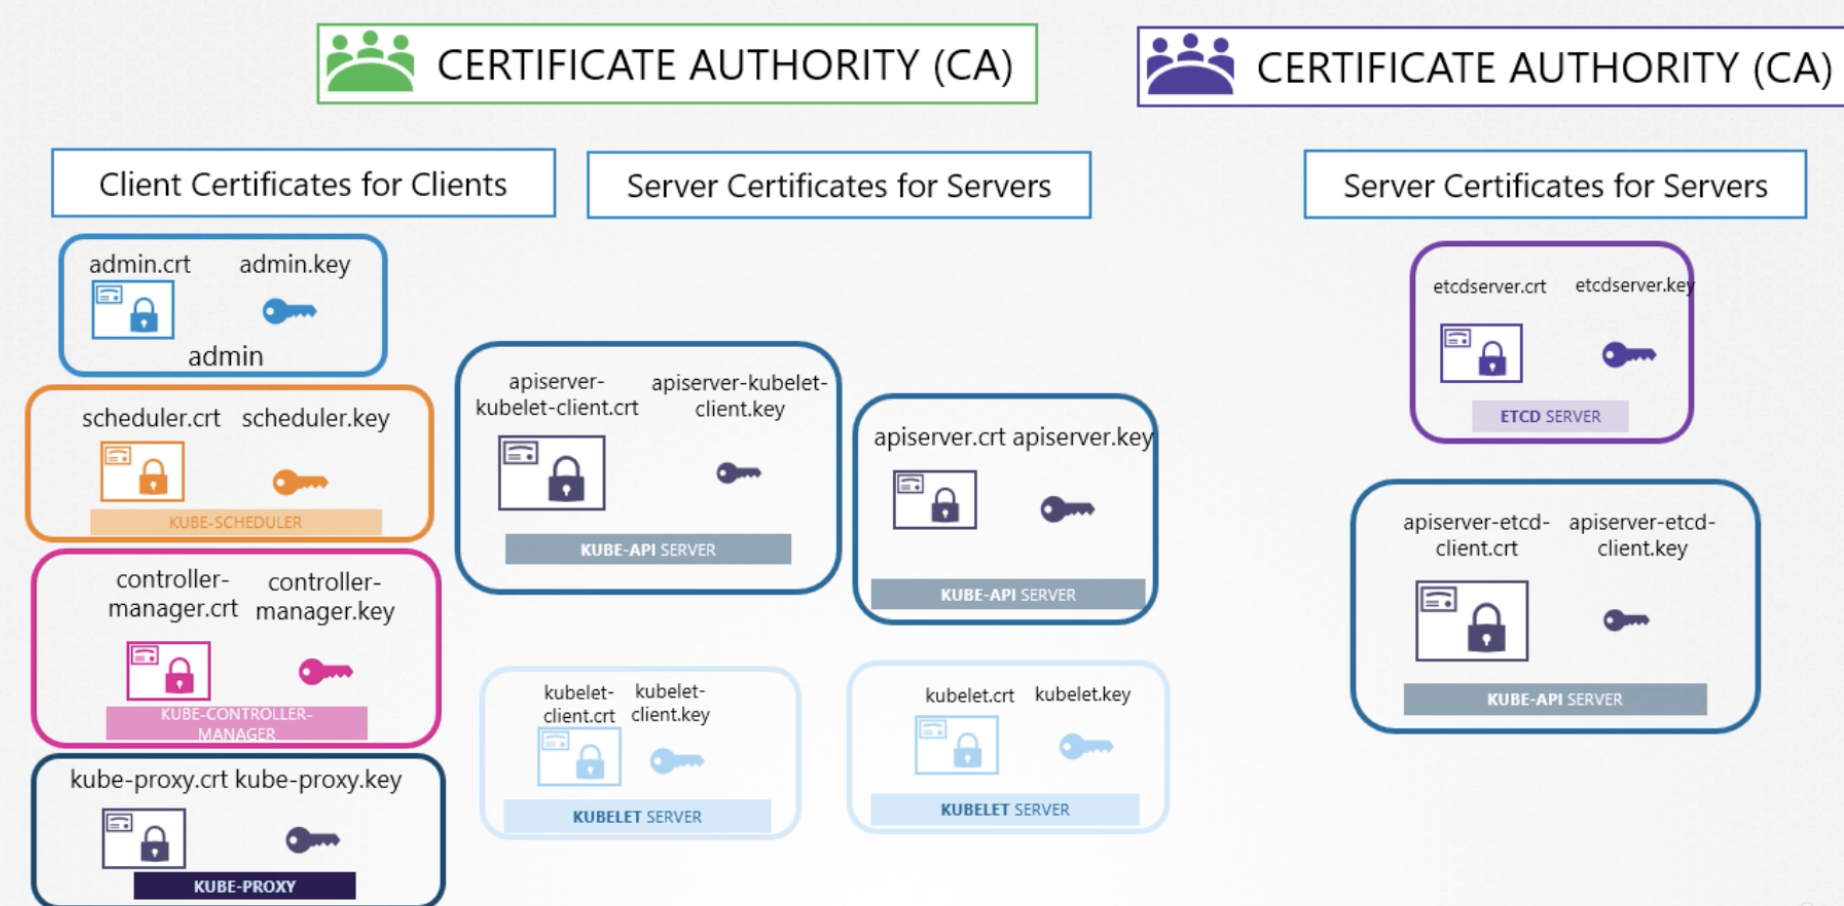
A CA (Certificate Authority) must exist to verify that all the public keys of the generated certificates are authentic.
It is possible to operate a separate CA for ETCD as shown below, but typically a single CA is used. In this case, one pair of ca.crt and ca.key exists for the entire cluster.
147 TLS in Kubernetes - Certification Creation
Well-known tools for creating certificates include EASYRSA, CFSSL, and OPENSSL. Here we focus on OPENSSL.
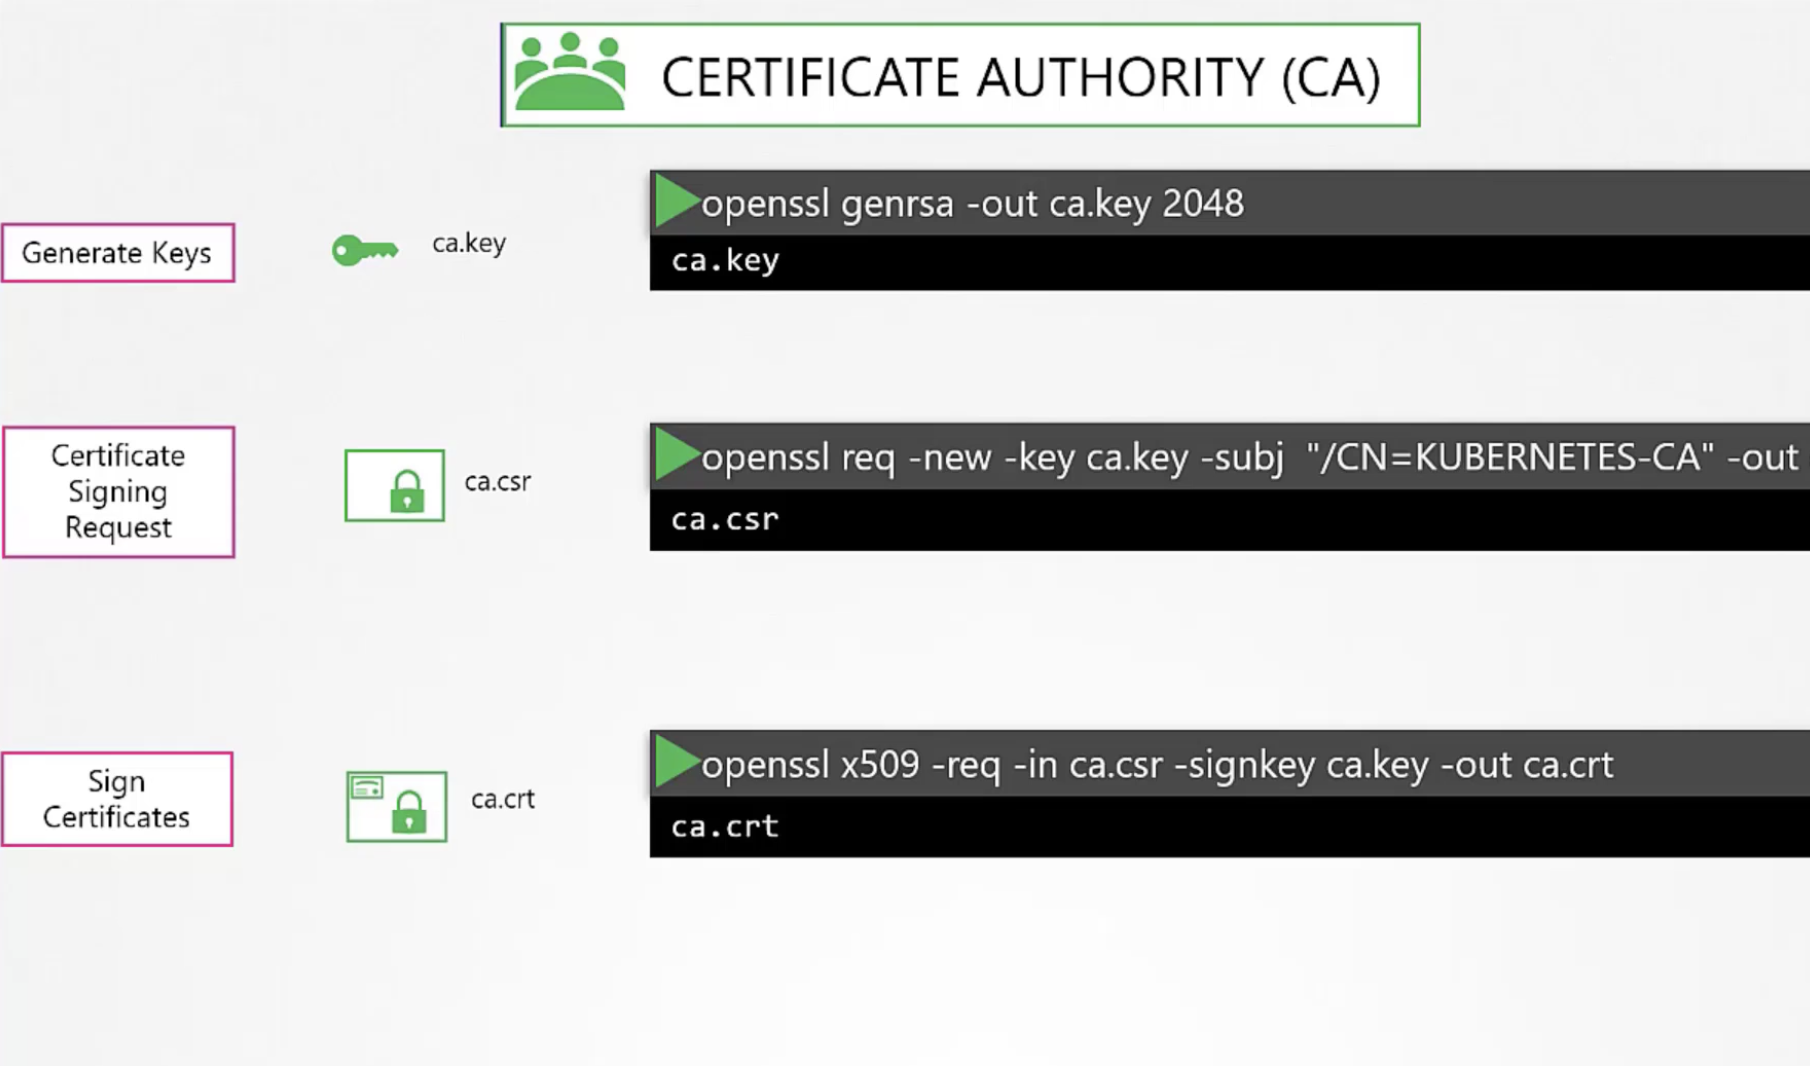
To generate a CA (Certificate Authority) key, you can use the following commands.
openssh genrsa -out ca.key 2048 creates the private key, openssl req -new -key ca.key -subj "/CN=KUBERNETES-CA" -out ca.csr creates the signed public key, and openssl x509 -req -in ca.csr -signkey ca.key -out ca.crt encrypts the signed public key with the private key.
When creating an Admin User, you use ca.crt and ca.key to encrypt (issue a certificate via the CA) admin.csr.
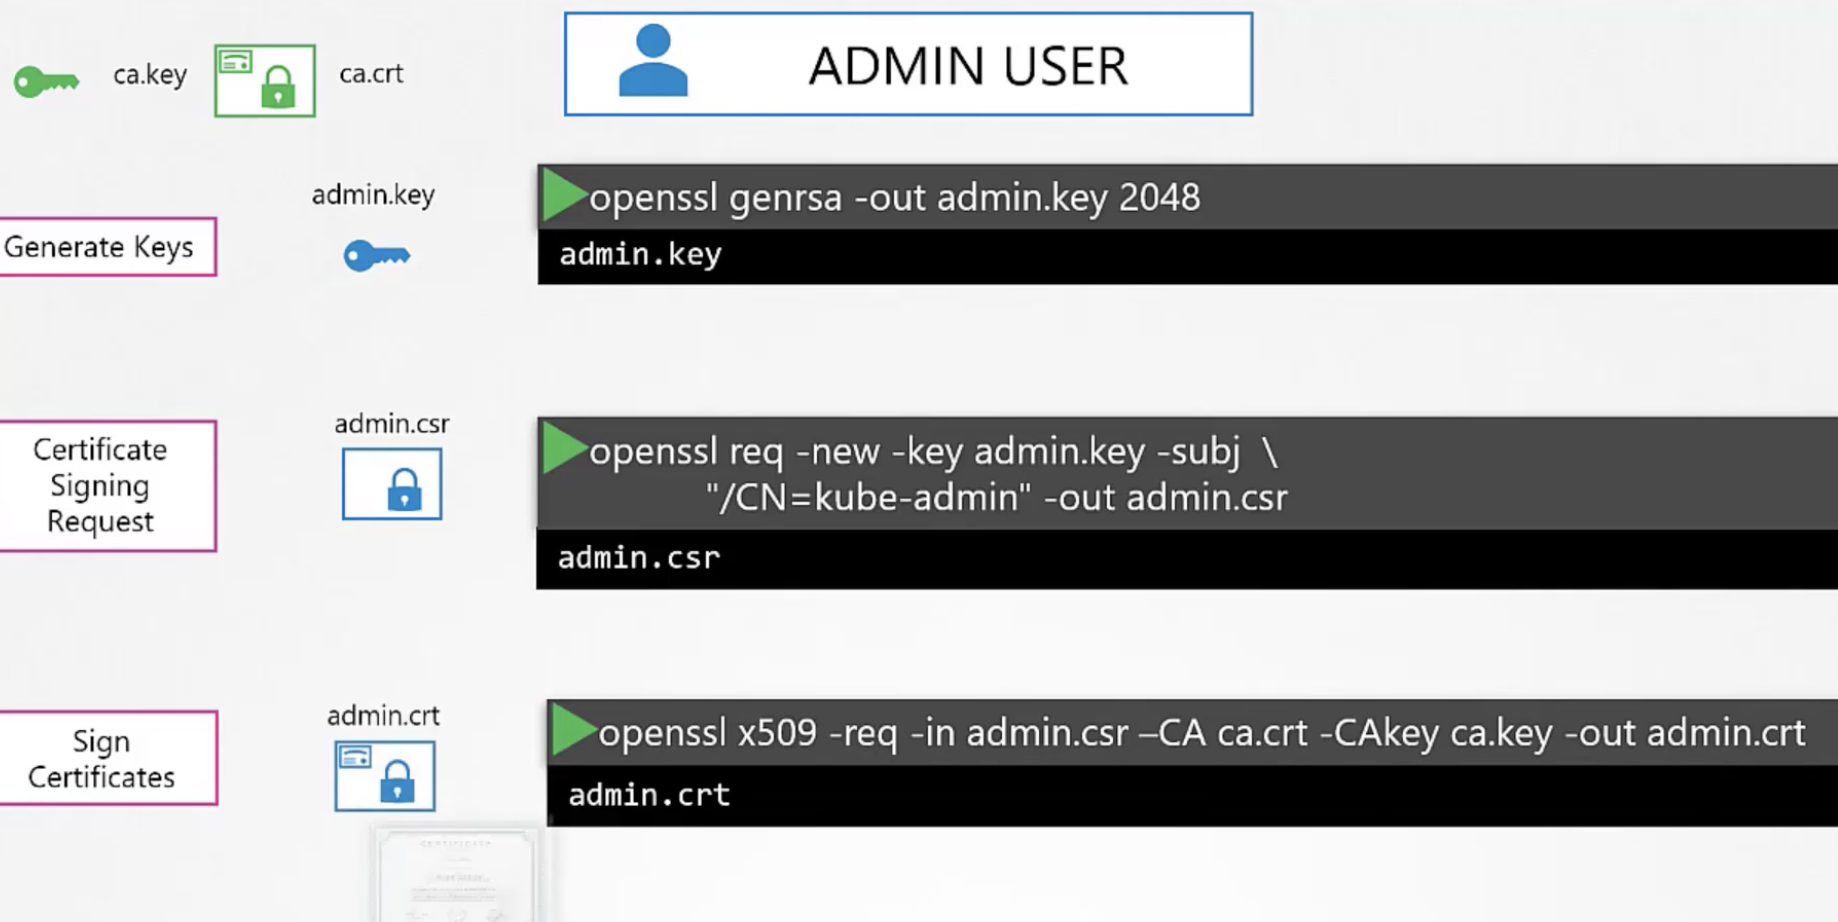
Most of the accounts you need to create afterward follow a similar process. Think of .crt as the ID and .key as the password.
When signing the Certificate Signing Request, adding /CN=kube-admin/O=system:masters differentiates admin accounts from regular accounts. The admin certificate created this way can be used in curl commands or registered in kube-config.yaml.
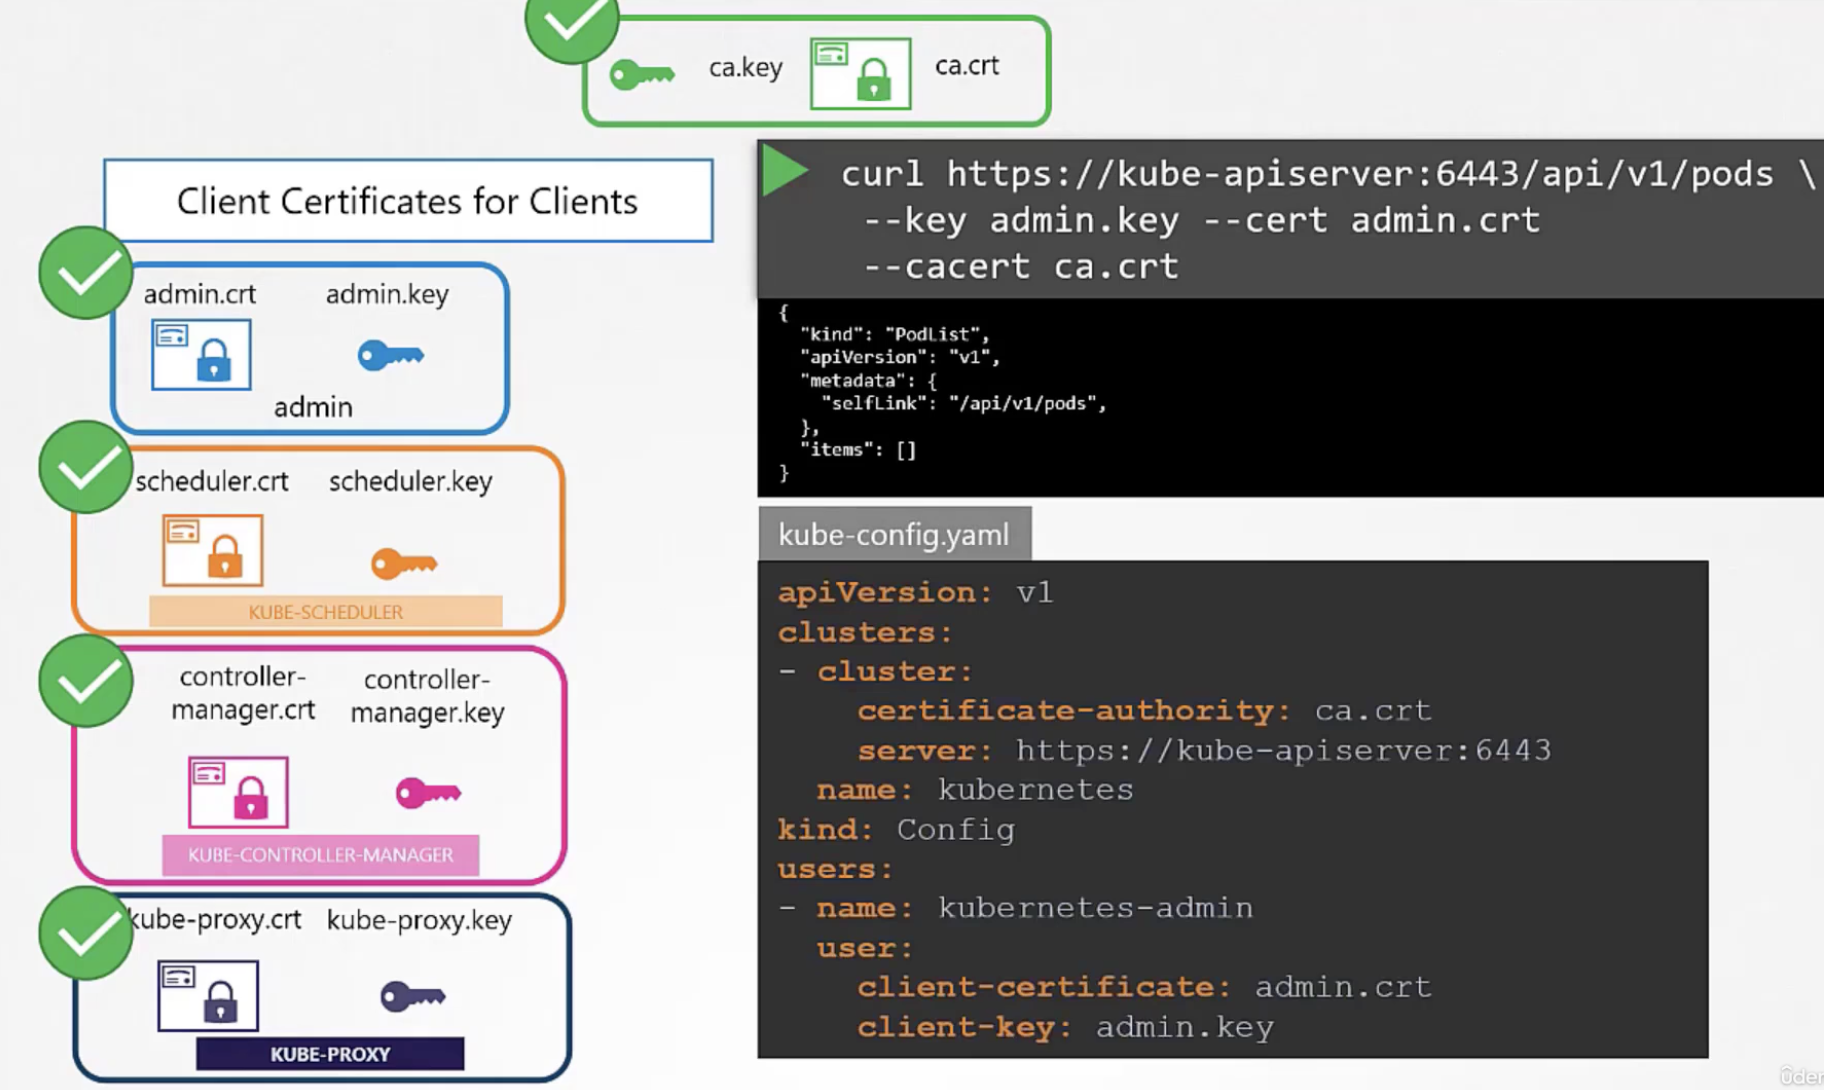
Since the ETCD cluster is configured for High Availability, an additional peer certification is also required.
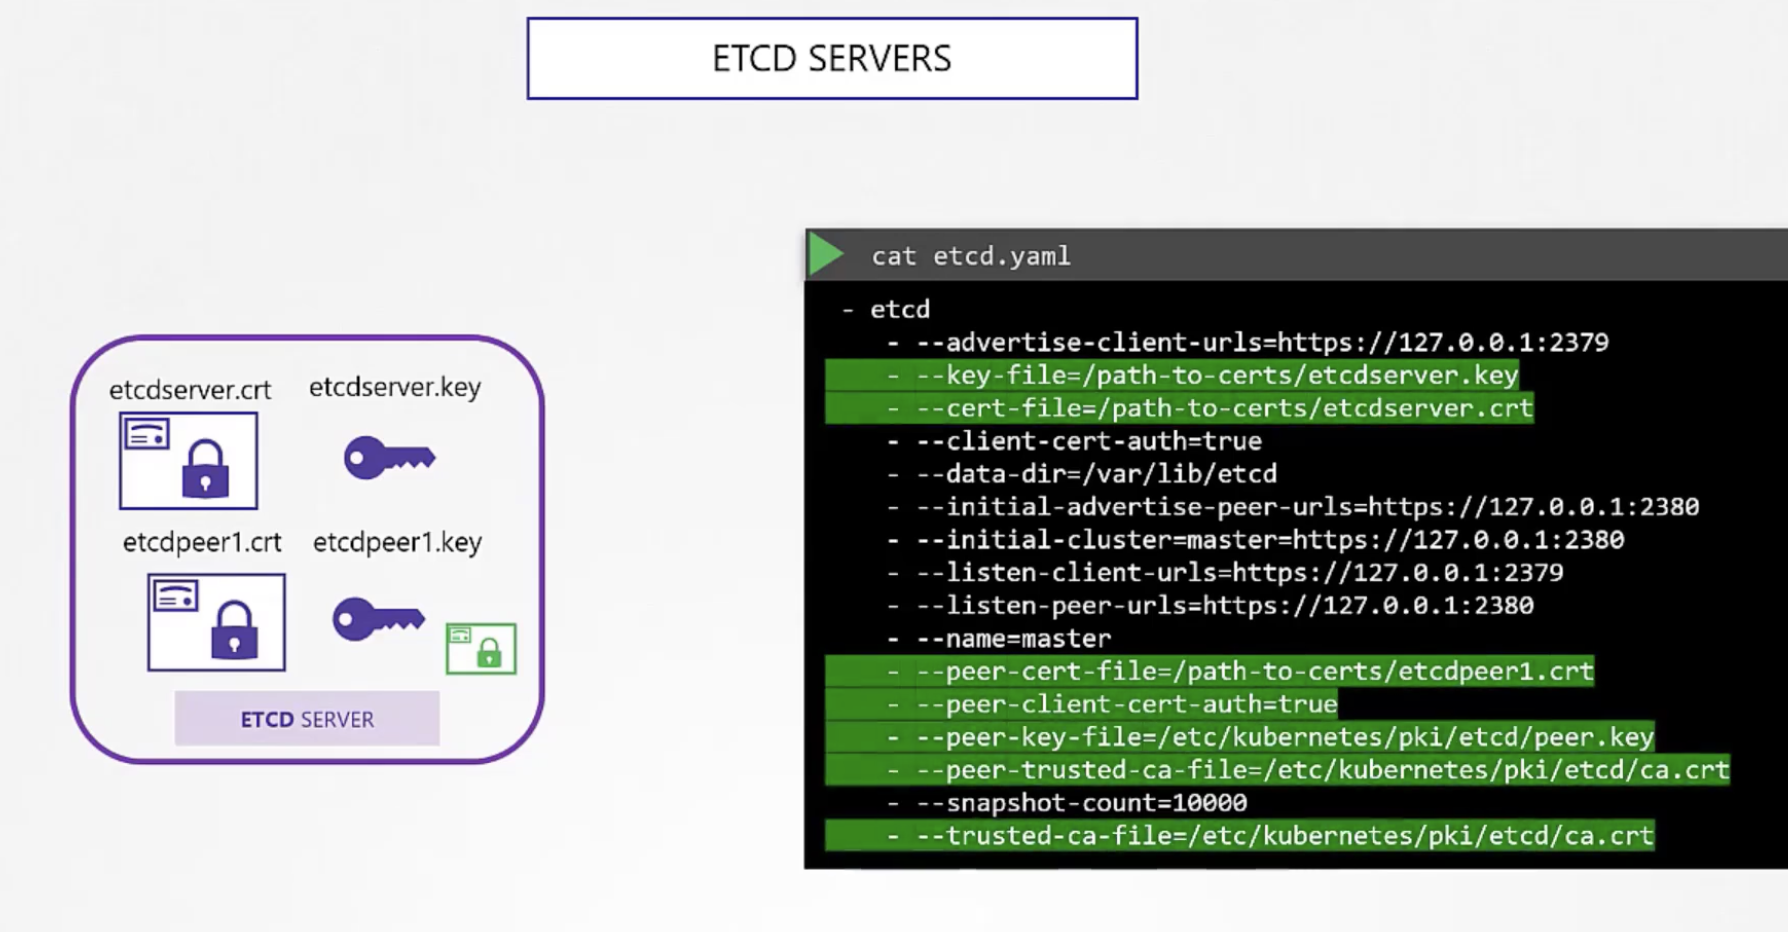
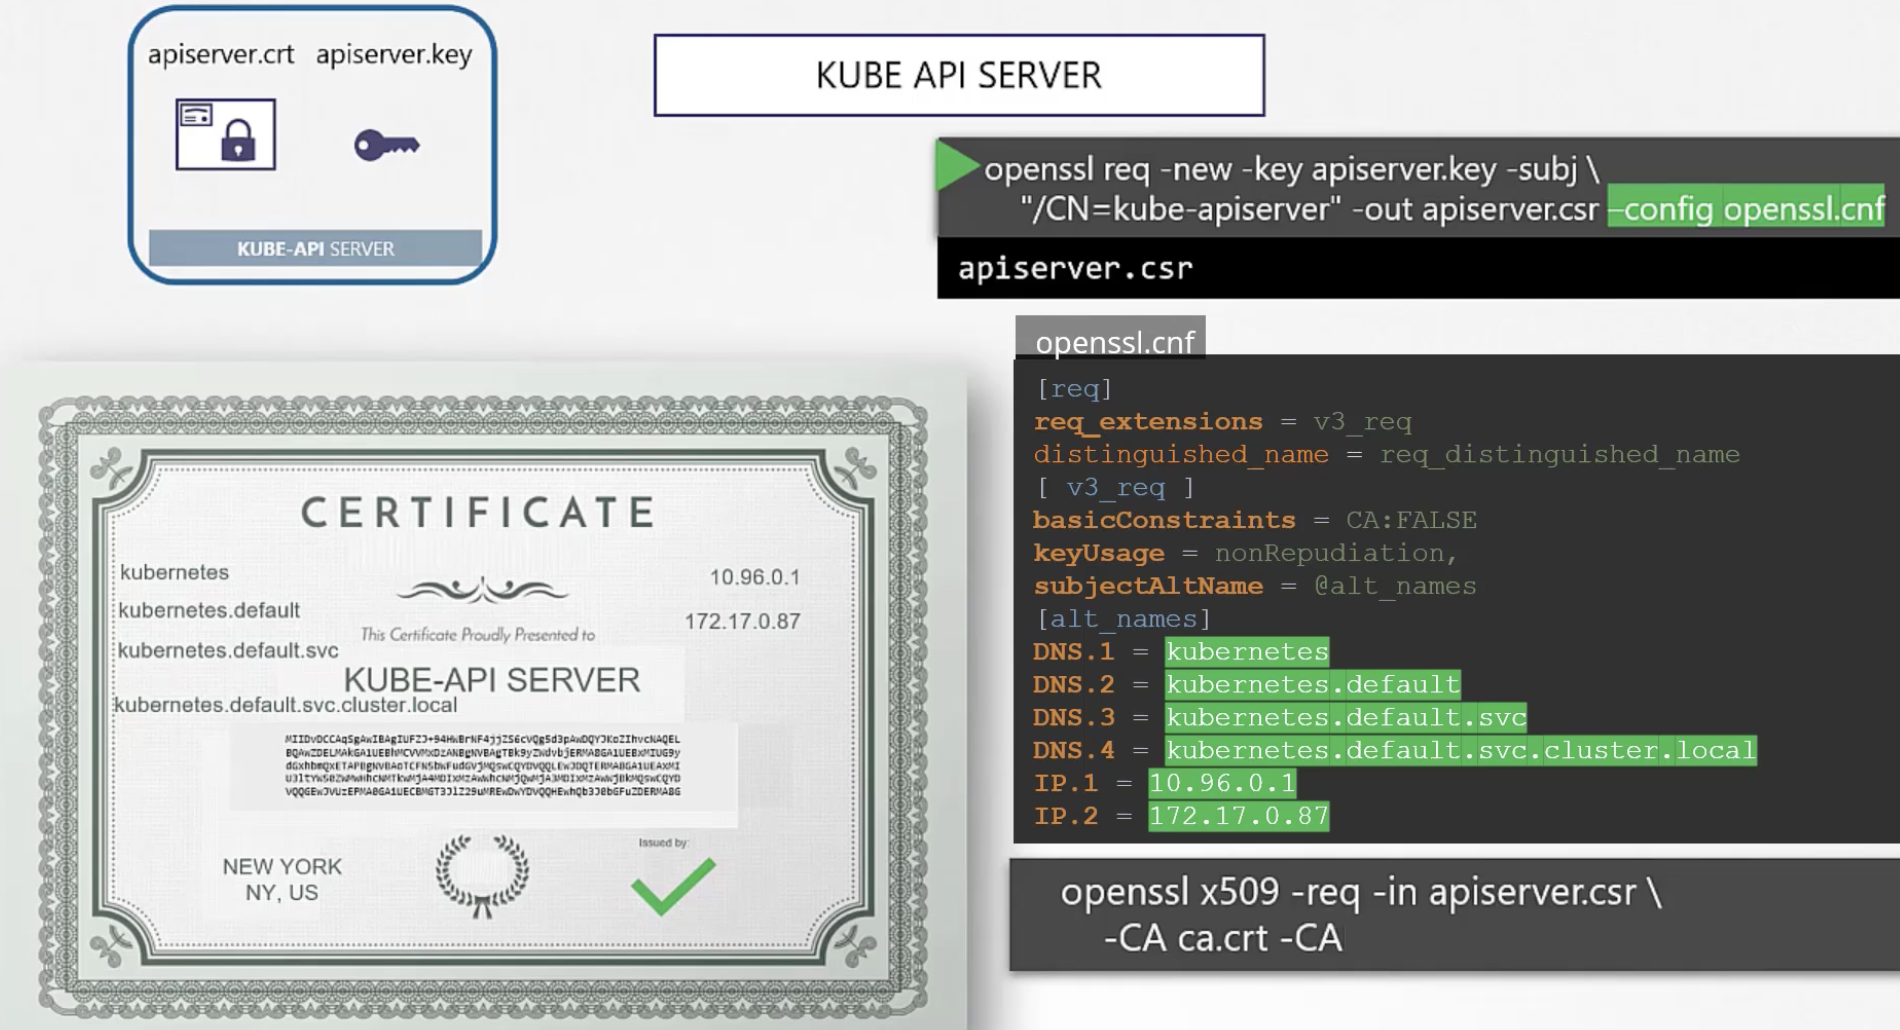
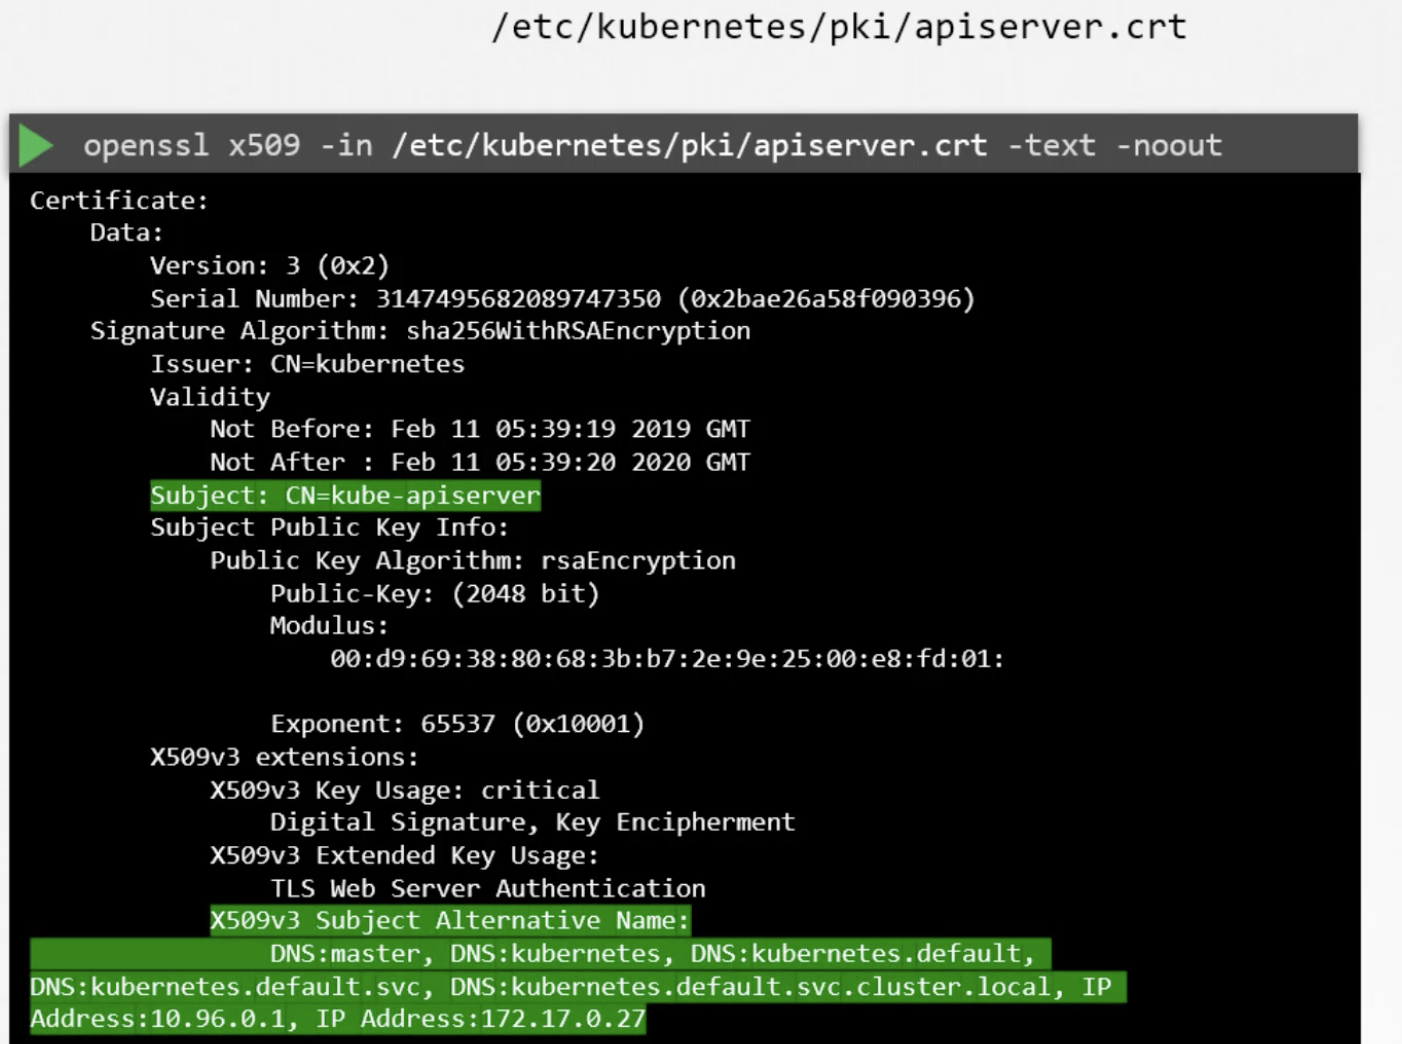
The API server has many names because it is the most frequently used component (kubernetes, kubernetes.default, kubernetes.default.svc, kubernetes.default.svc.cluster.local, IP address). Therefore, when signing through the CA, all alternative names must be specified.
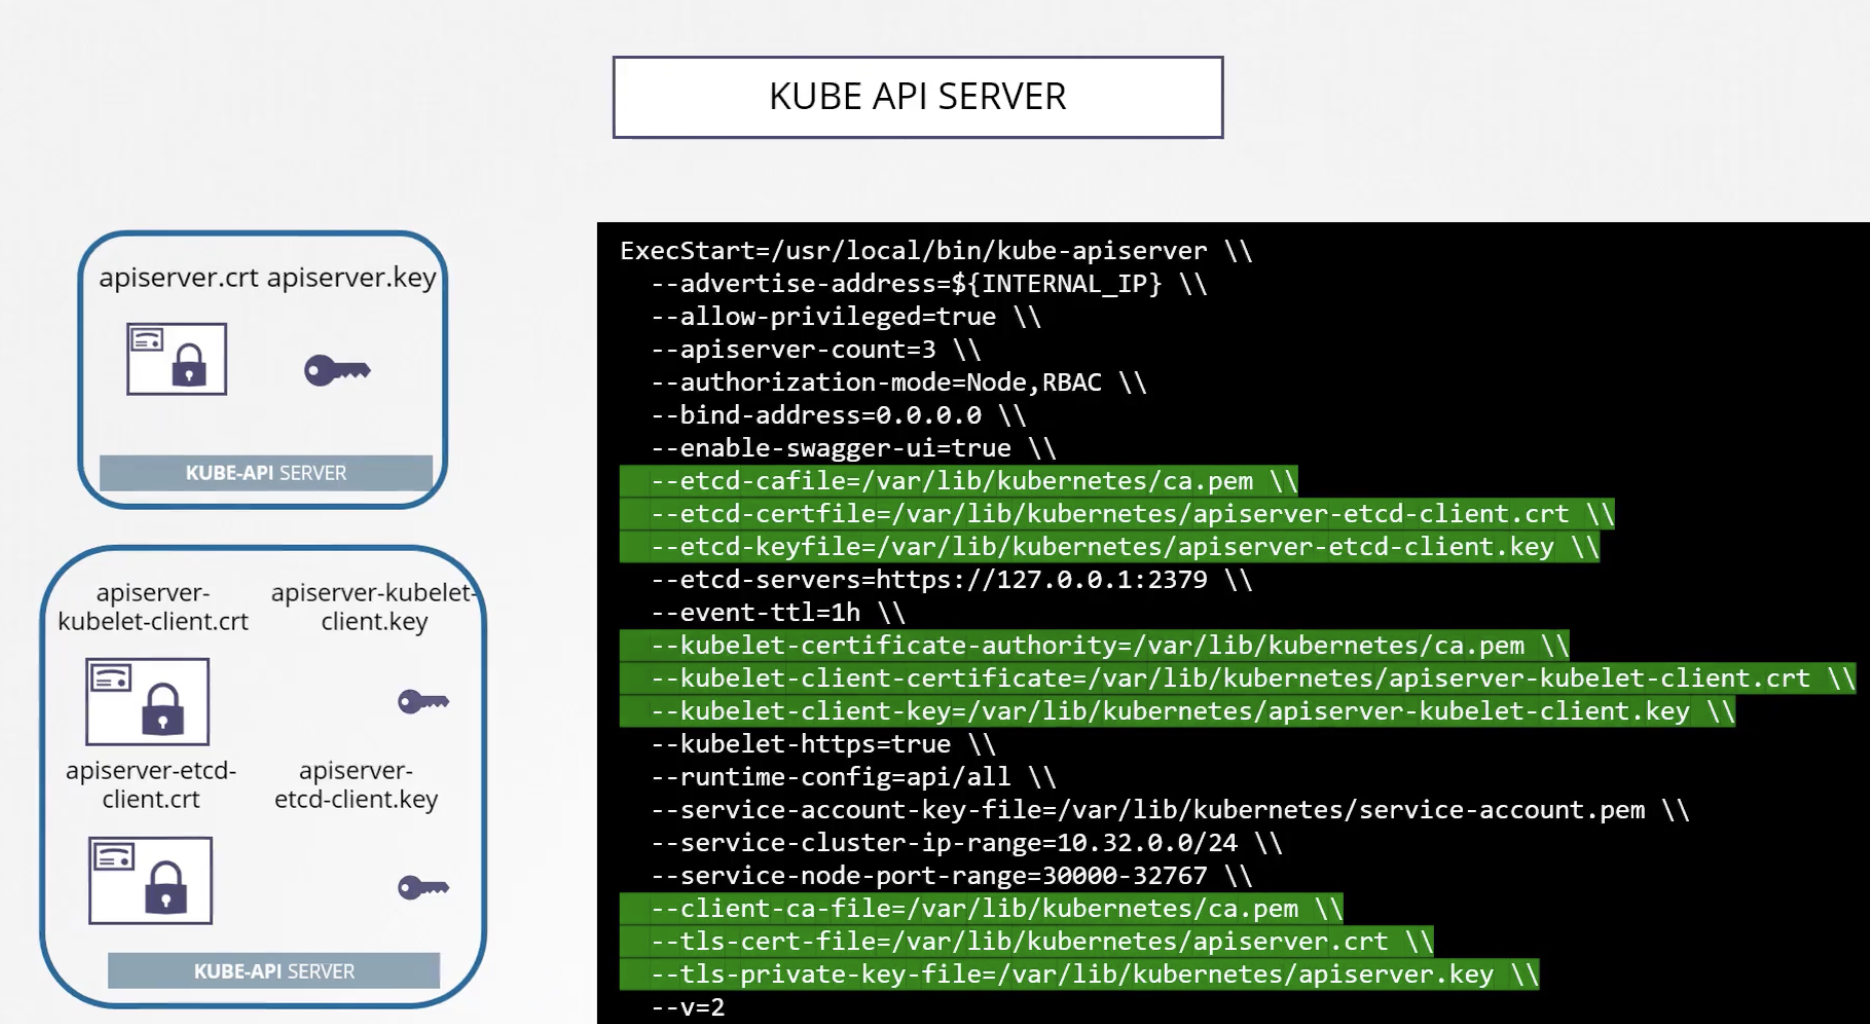
The Kubelet must generate and maintain its own certificate on every node.
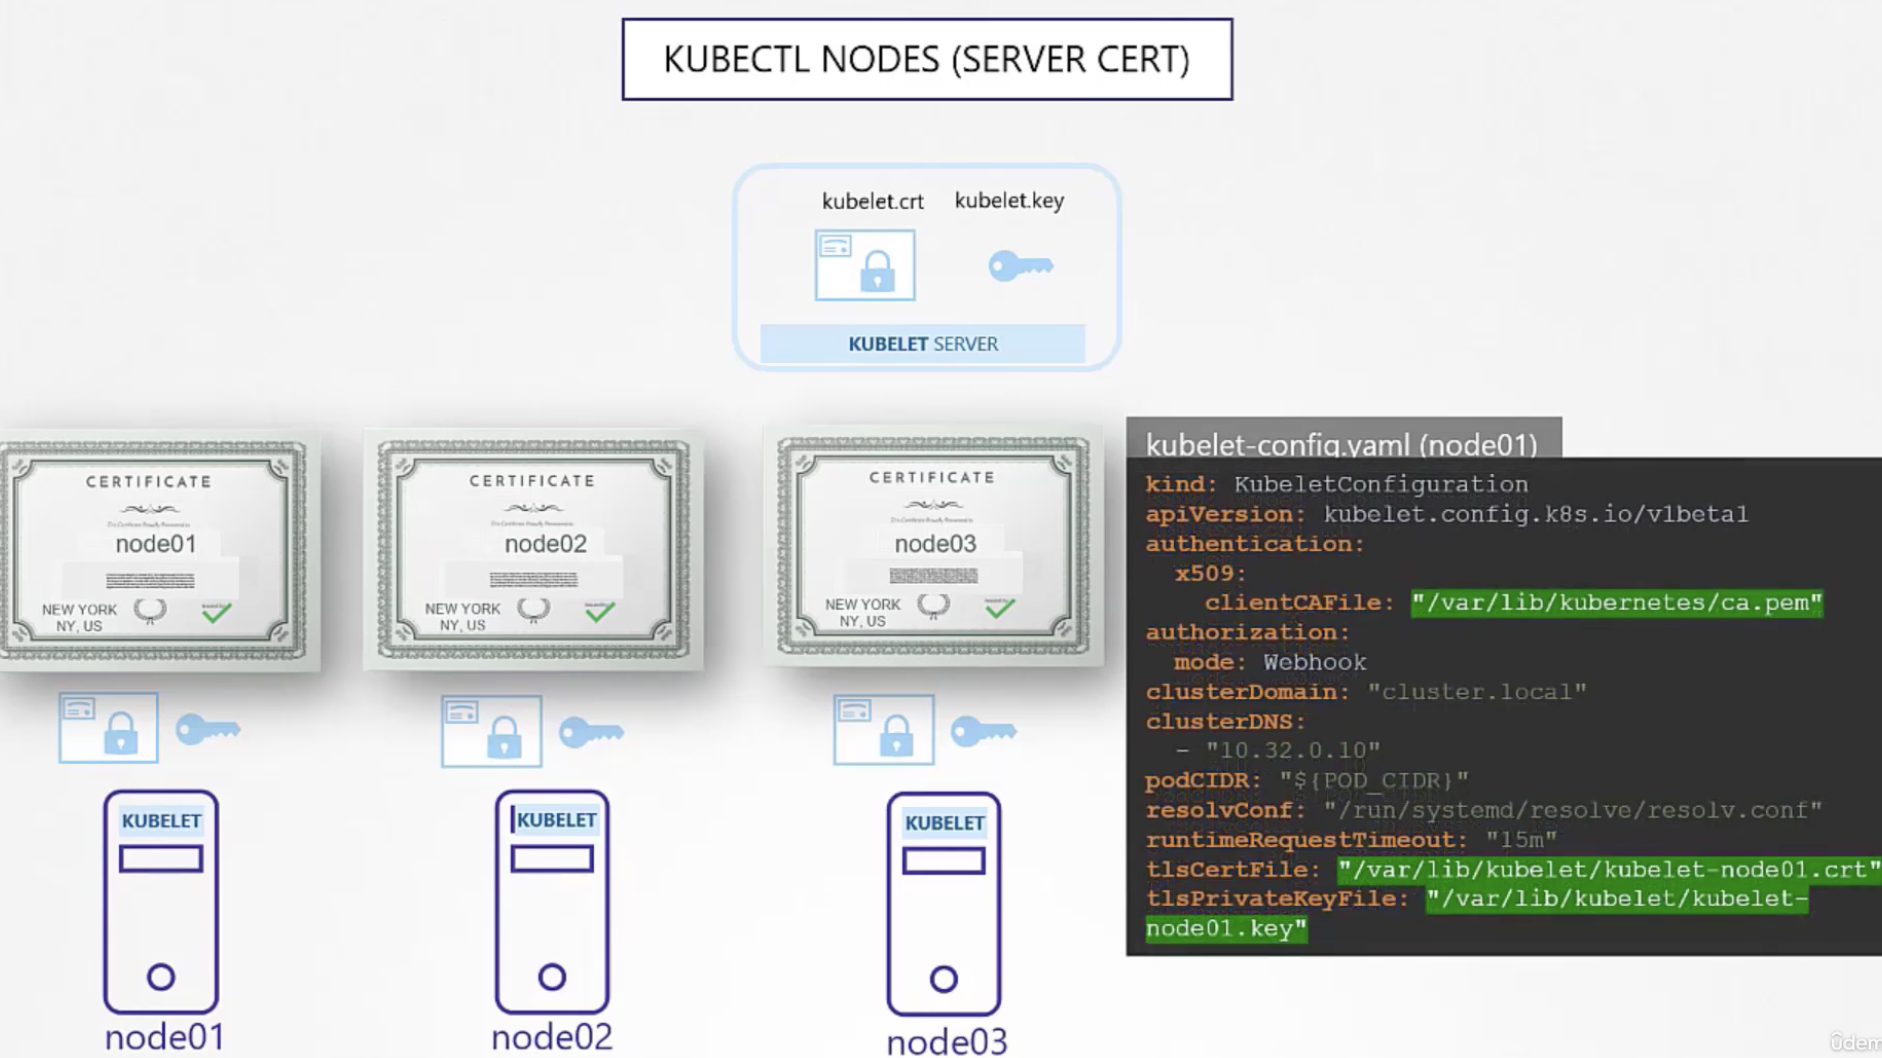
As mentioned above, even a single cluster has numerous certificates. Checking and managing all these certificates to ensure they are properly configured is extremely tedious and difficult. The kubeadm tool helps simplify these tasks.
You can check certificate information using the command openssl x509 -in <.crt file name> -text -noout.
You can analyze logs using kubectl logs etcd-master or docker ps -a followed by docker logs to identify issues.
152 Certificates API
The CA (Certificate Authority) can essentially be viewed as two keys: the CA public key and the CA private key. If these keys are compromised, they could be used to create many users and gain unauthorized access to Kubernetes. Therefore, these two keys must be stored in a secure location. They are typically created and managed on the master node. kubeadm also handles storing and managing these CA key pairs (including key expiration management).
The signing process is also straightforward. You create a user in the kube-apiserver as shown below, encode it in base64, and submit a signing request.
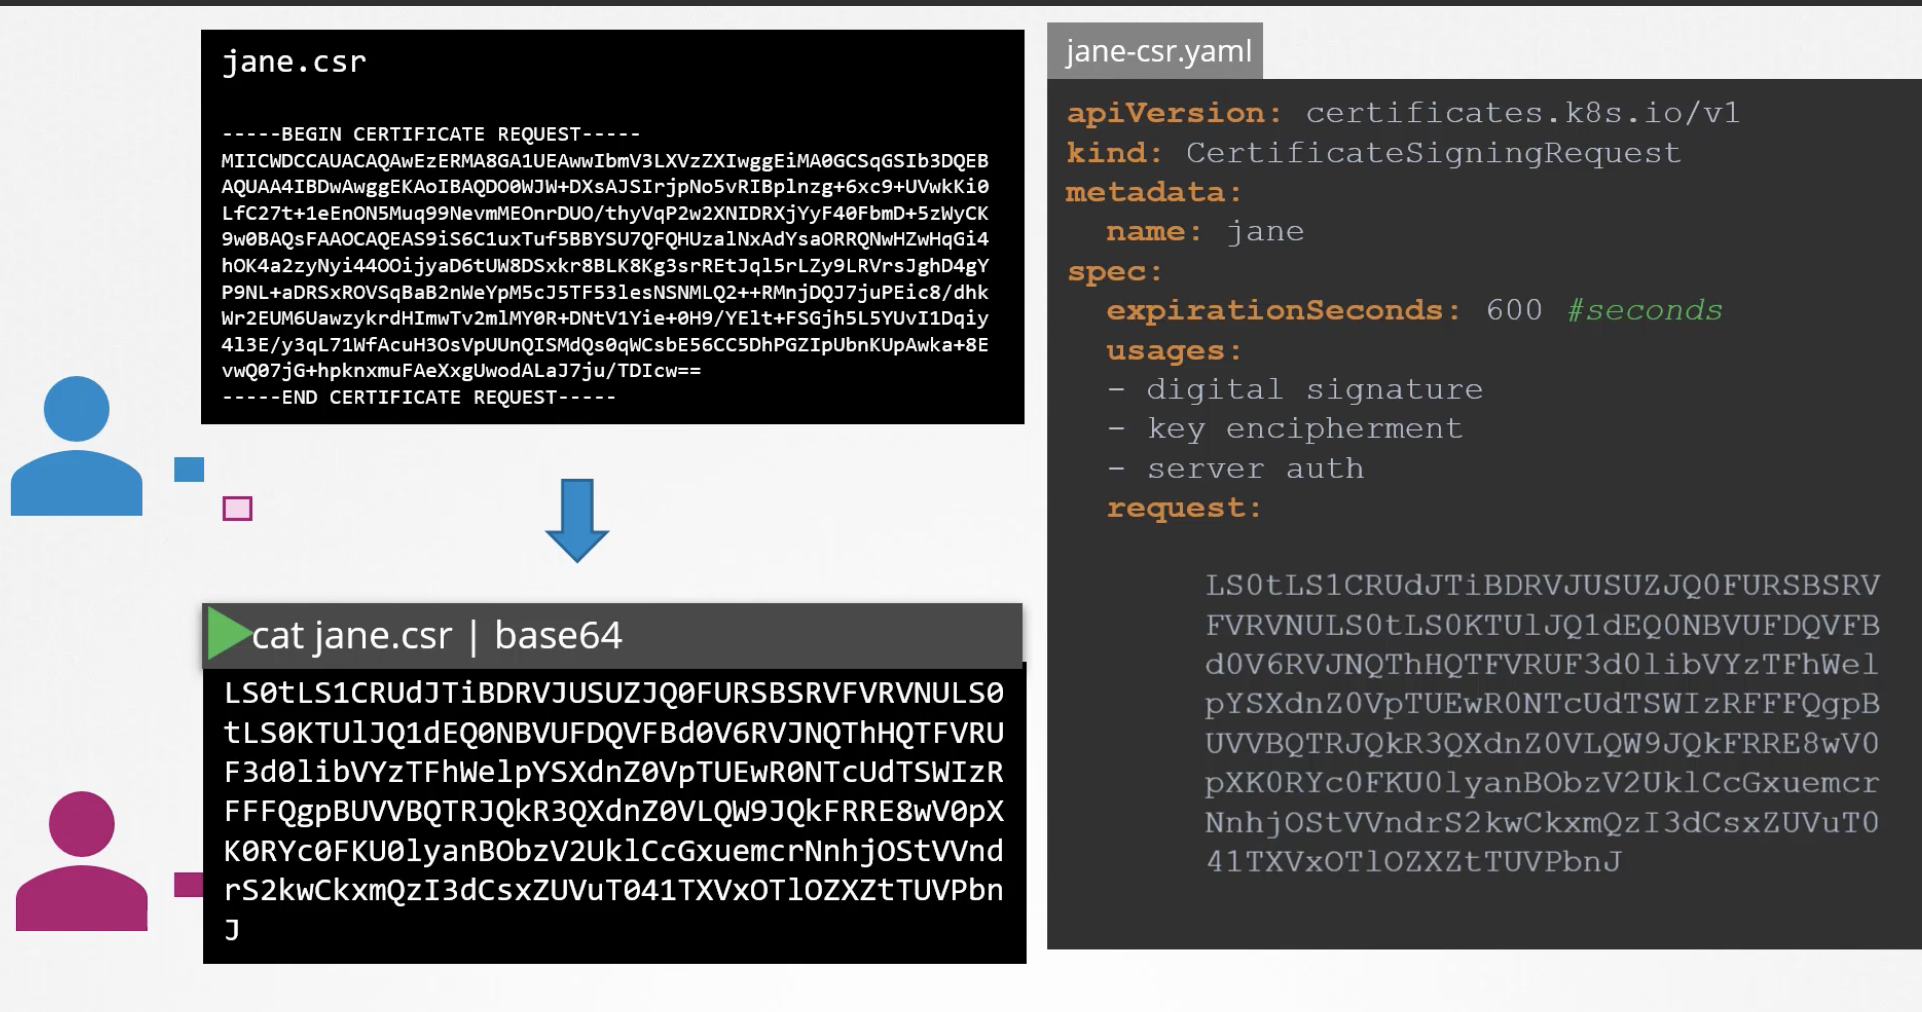
When encoding in base64, the -w 0 option outputs it as a single line, which can then be pasted into the request section.
apiVersion: certificates.k8s.io/v1
kind: CertificateSigningRequest
metadata:
  name: akshay
spec:
  signerName: youngju.dev.com/youngju
  usages:
    - digital signature
    - key encipherment
    - server auth
  request: LS0tLS1CRUdJTiBDRVJUSUZJQ0FURSBSRVFVRVNULS0tLS0KTUlJQ1ZqQ0NBVDRDQVFBd0VURVBNQTBHQTFVRUF3d0dZV3R6YUdGNU1JSUJJakFOQmdrcWhraUc5dzBCQVFFRgpBQU9DQVE4QU1JSUJDZ0tDQVFFQXBkakxiamFRNWZMdklvNlBXTFpYaEwwa25wKzZlaUZHd0ZHUFErdmhrNWFBClpyOURYUVJINE9IZ1JESktvUGVxdTRGeDB6TkJUQndKa0ZpZEl4U01rUWNsc0lVT3VncSsyMUNaaHlkd0hFYzgKK1AzQzk2L0JVN3o1T25nWVBsa0ZyZmdBcHhacWo2WVVyTHJpS2V4Q0JHZ0cybzVBN205Q2xzRUhhalQwYlU2SwowWGxCQW9sc2cyM3NMUE1jR1RSdGZ0bGhDUDJoQkZPdHhyRW9SUHFsSUdFdWxEVitpSjZFeVY2SW9NcDhFVmxKCmJvb2MzaW93UE8zOGx4SmwrcWloVGd0OHMwNlYwTHhML0pVejdJQ3FkdFQzcGkvNHJ6VzBFeE16eVNLcllxZjYKZDVNK1RVZDdMMk1vQjF1aTgxQXFJcVpBQWQybExCR0M5dm9vbWpwZWd3SURBUUFCb0FBd0RRWUpLb1pJaHZjTgpBUUVMQlFBRGdnRUJBQXBpdUl4bU9mcEU2NEhTd0VCc1RsbnRScjVyZUNWMStlSzFKSVEyM0UyUXRiL2FrUGZuClNmRmpaRTB0ZmNaVUFHMzVoL214ZTVleEo3ZGNMN3dNT2wxYkVsTXNoTXlydlMyajVKckJhS3ZOaXFXVXo2VTYKbGRydWFlc0dUZDVoTncwVkNUaGpmaXNMcXBWZDI1TWlPcE11SFM0eXFVWUl4dGR1RGQzb01haFVTaXpyY1kzVwpXM0tycTBjSWxaU2p5L2twSzAwdmduclQ2ZlIzaTN4bE1jSkcrVTYzalBnYUhNUHM2MS9YZGhlL0s0dmRyeDllClc2MU1GalRGa0tpY25qYnBCNGZ1Uno3SmRRNW94TS90RFFveEtEYTNGTFNHcklvSGg1YkZlcDFESlZlaHkyeTcKekJFaXZiYWFjaEpGT2xvWHYrZnlVMVpUcS9JUTRLZEdjeU09Ci0tLS0tRU5EIENFUlRJRklDQVRFIFJFUVVFU1QtLS0tLQo=
$ kubectl create -f akshay-csr.yaml
certificatesigningrequest.certificates.k8s.io/akshay created
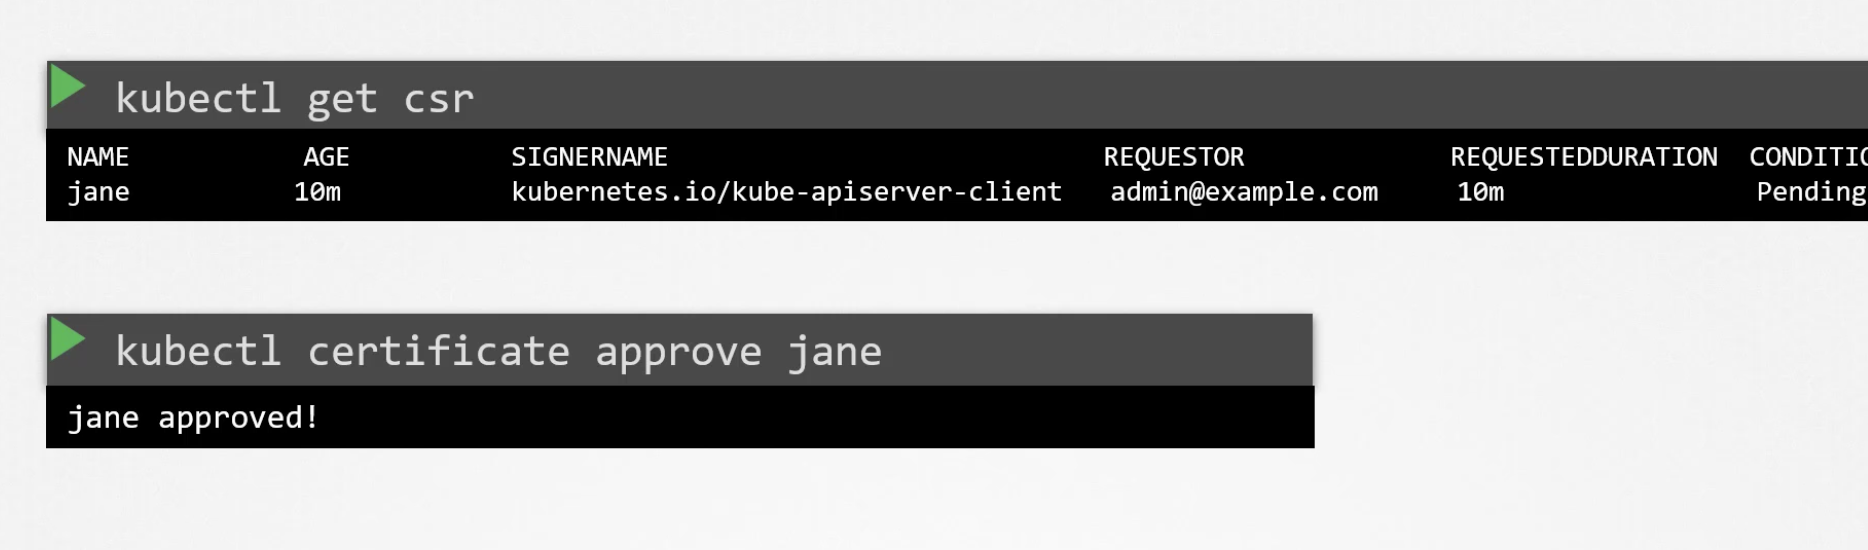
You can check the list of CSR signing requests with kubectl get csr, and approve them using kubectl certificate approve <csr-name>. Afterward, you can view the certificate information with kubectl get csr jane -o yaml.
$ kubectl get csr
NAME        AGE   SIGNERNAME                                    REQUESTOR                  REQUESTEDDURATION   CONDITION
akshay      79s   youngju.dev.com/youngju                       kubernetes-admin           <none>              Pending
csr-xjv6n   36m   kubernetes.io/kube-apiserver-client-kubelet   system:node:controlplane   <none>              Approved,Issued

$ kubectl certificate approve akshay
certificatesigningrequest.certificates.k8s.io/akshay approved

$ kubectl certificate deny agent-smith
certificatesigningrequest.certificates.k8s.io/agent-smith denied

$ kubectl delete csr agent-smith
certificatesigningrequest.certificates.k8s.io "agent-smith" deleted
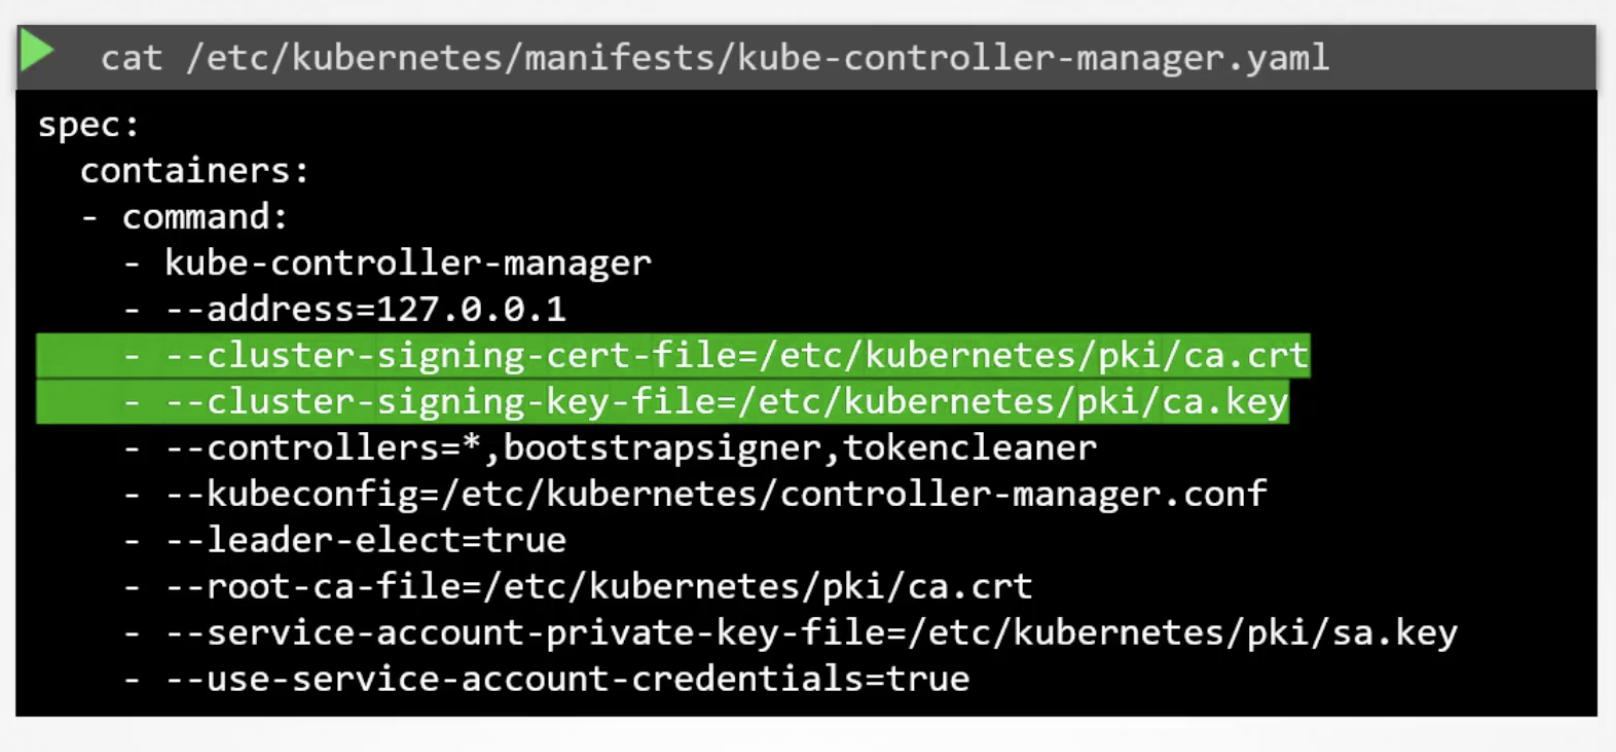
Certificate-related operations are managed by the Controller Manager, specifically the CSR-Approving and CSR-Signing functions. Therefore, ca.key and ca.crt must be registered in kube-controller-manager.yaml.
155 KubeConfig
Having to specify certificates every time you enter a kubectl command is extremely tedious.
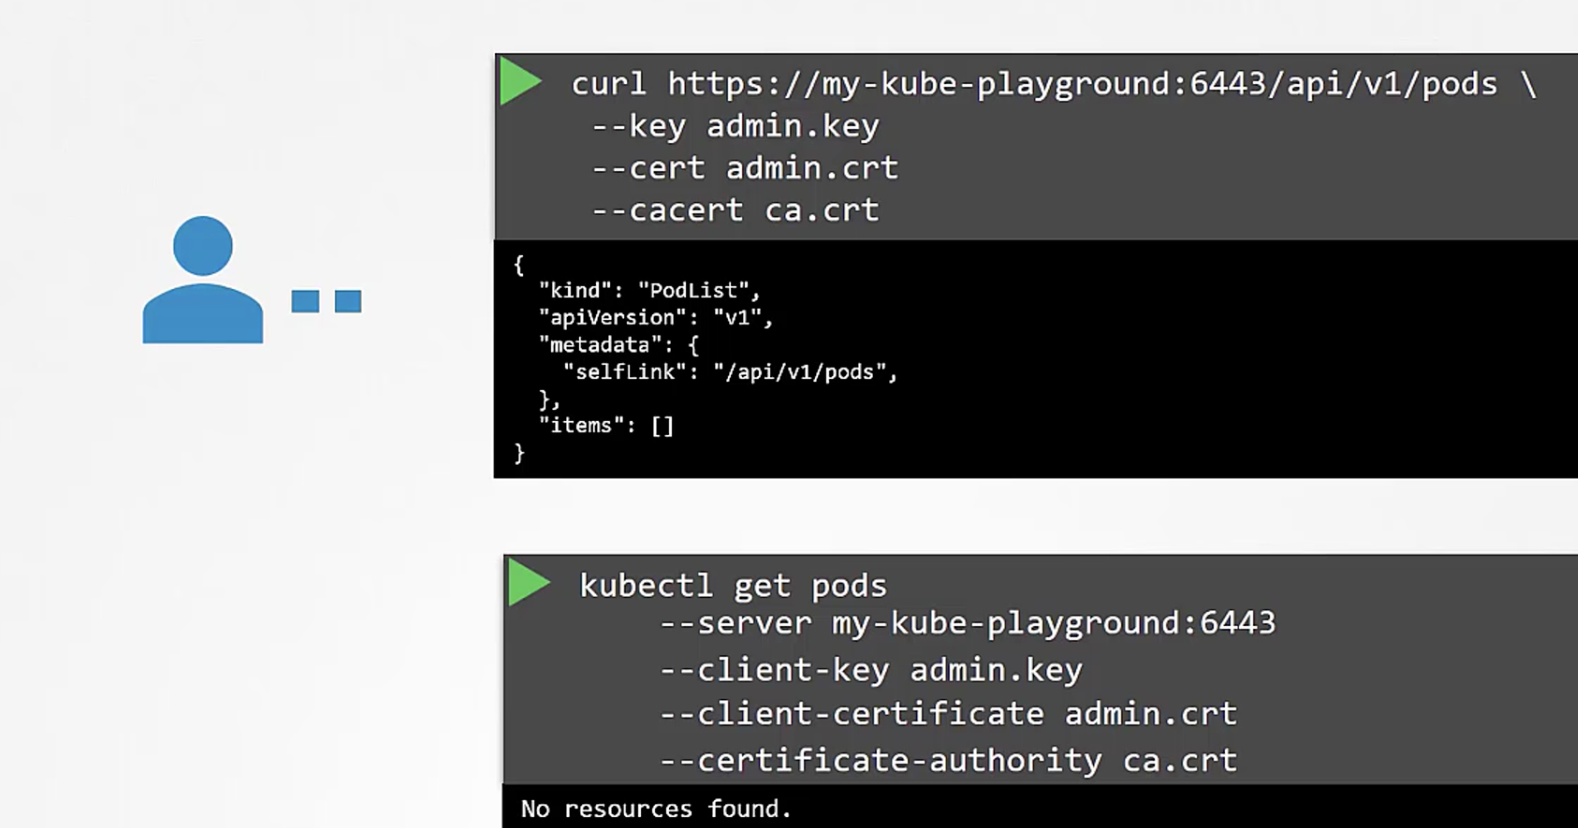
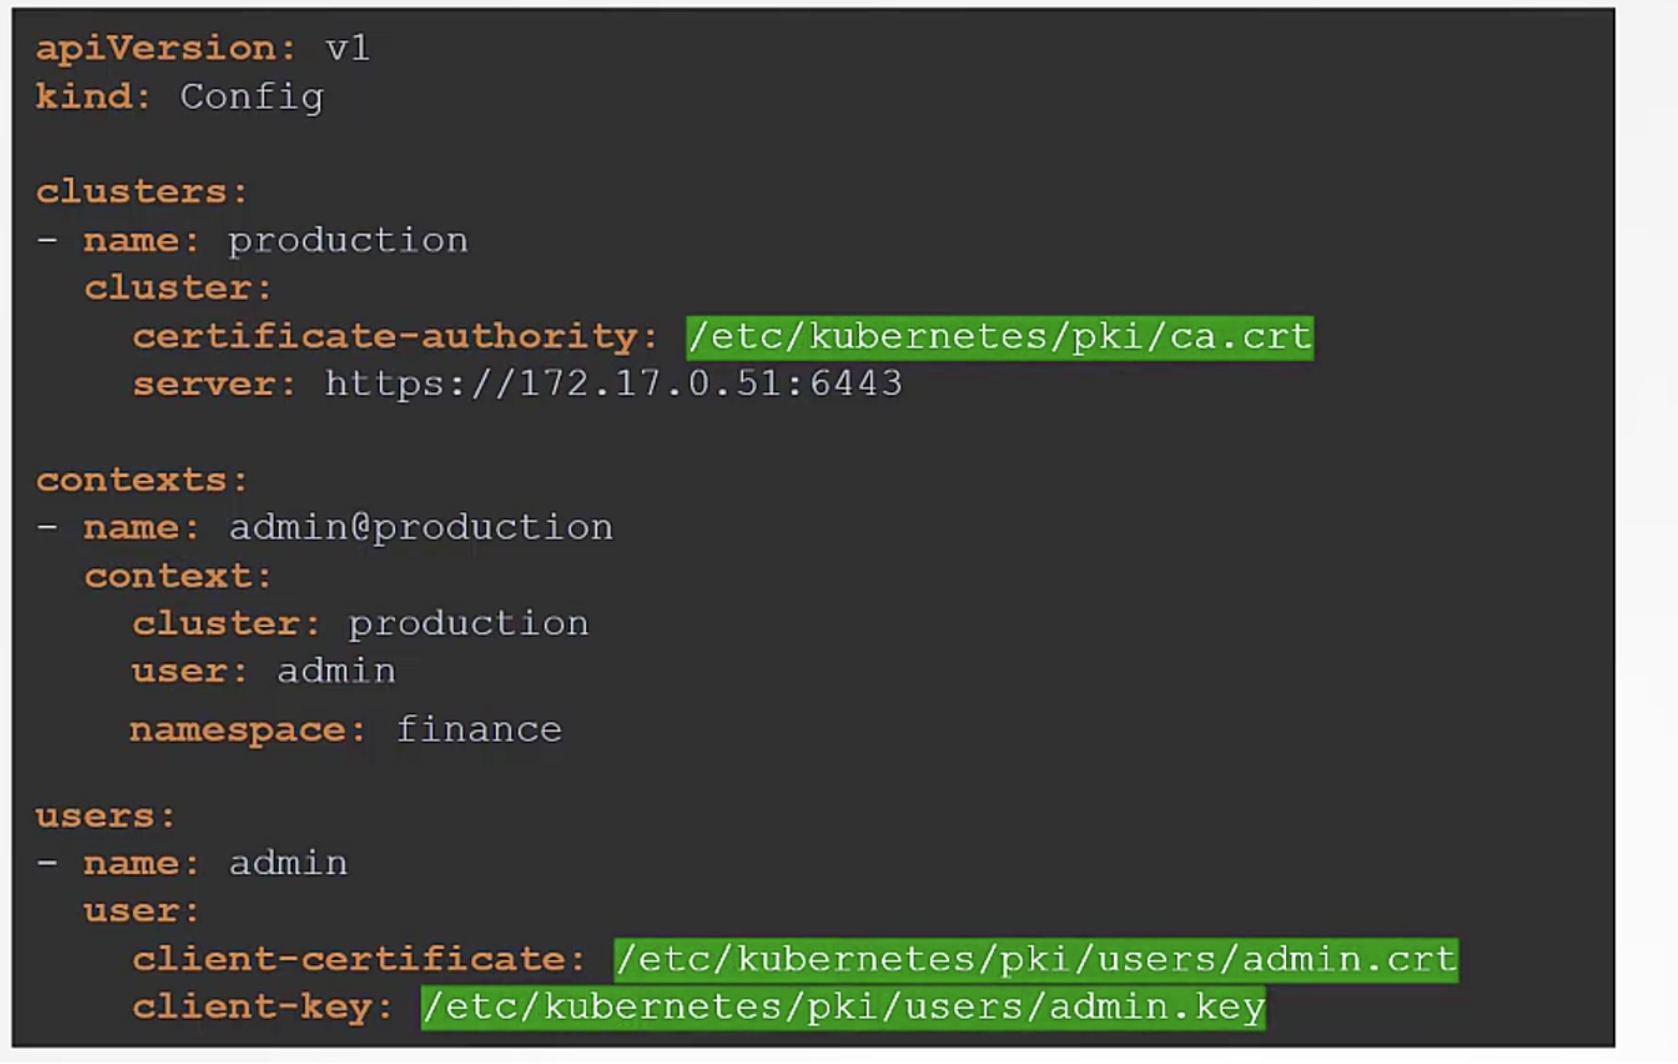
By registering this information in the .kube/config file under the home directory, the data is automatically included when running kubectl commands, making it much more convenient.
The config file must be written in the proper format, defining three elements: Cluster, Context, and User.
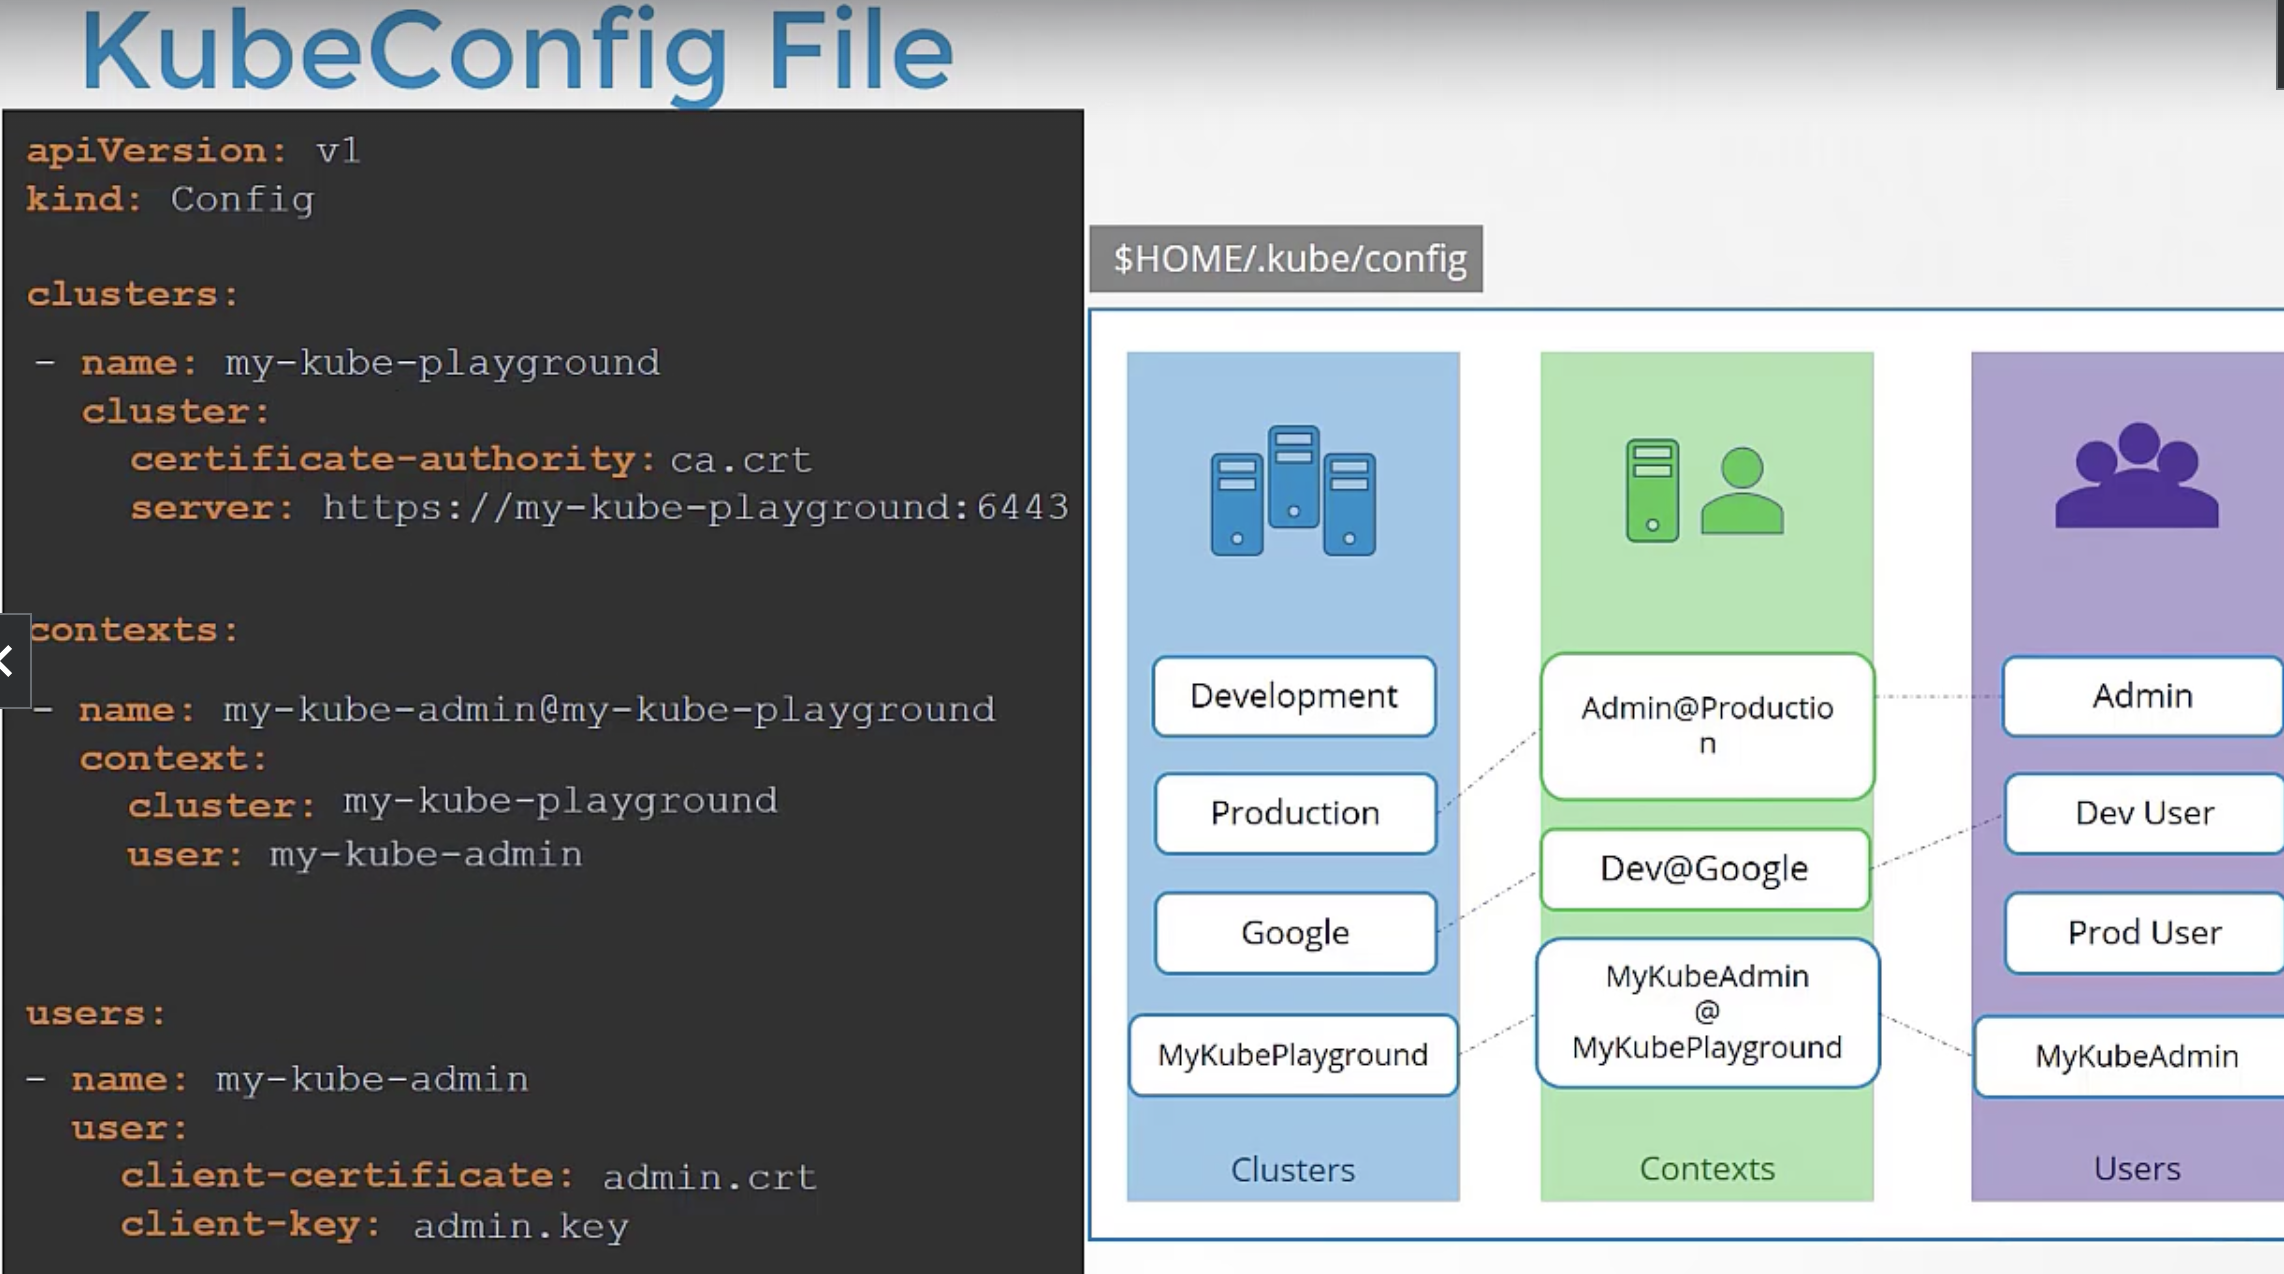
Among multiple contexts, you can define a default context in the current-context field of the .kube/config file.
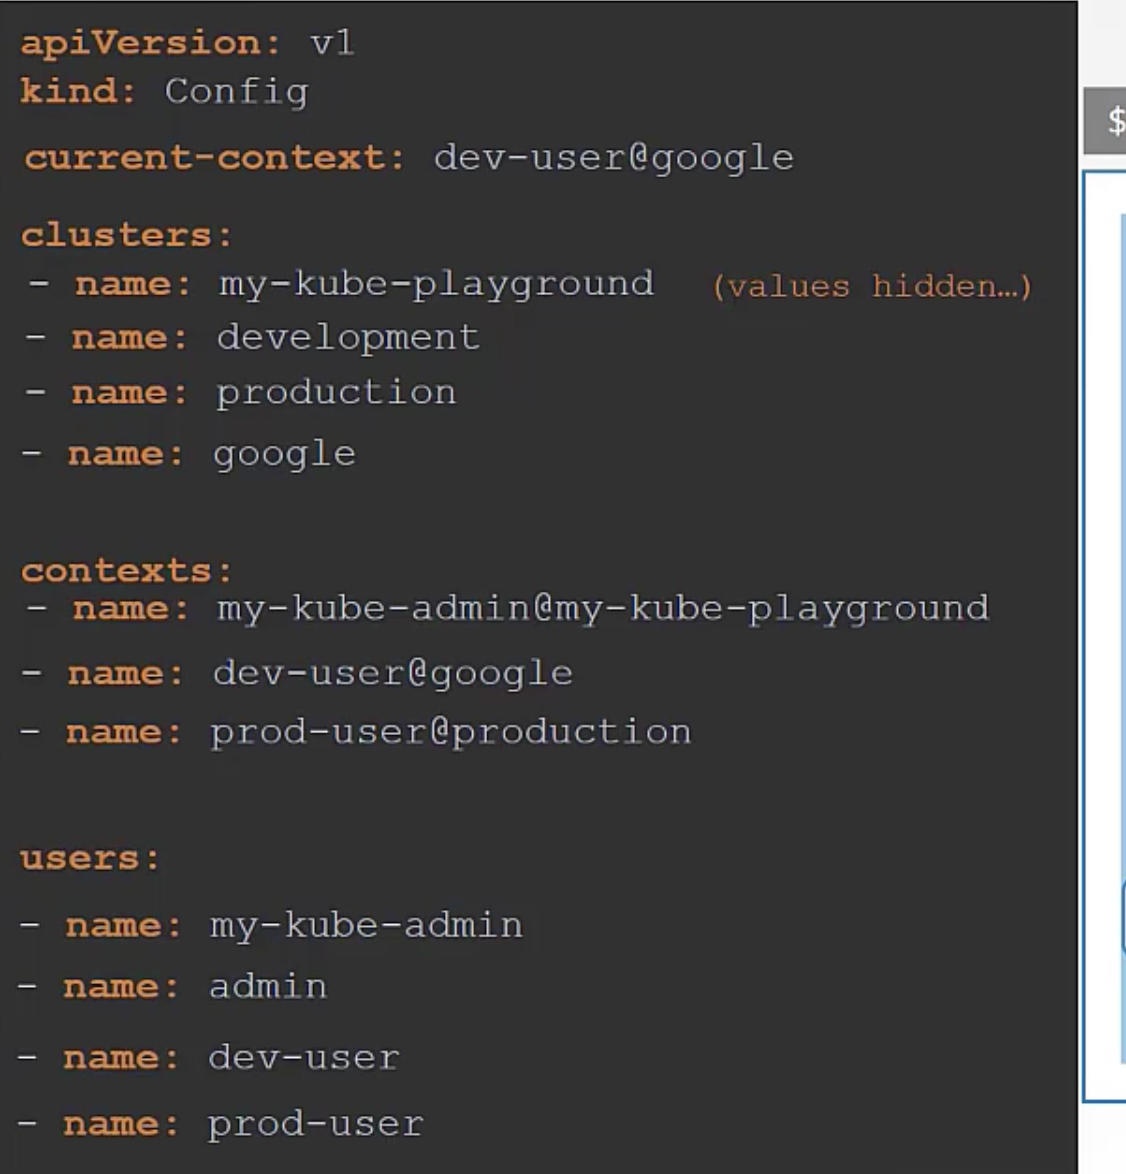
You can view the config file with kubectl config view. Use kubectl config use-context <context> to switch contexts.
Each cluster has multiple namespaces, which can be defined within the context field.
159 API Groups
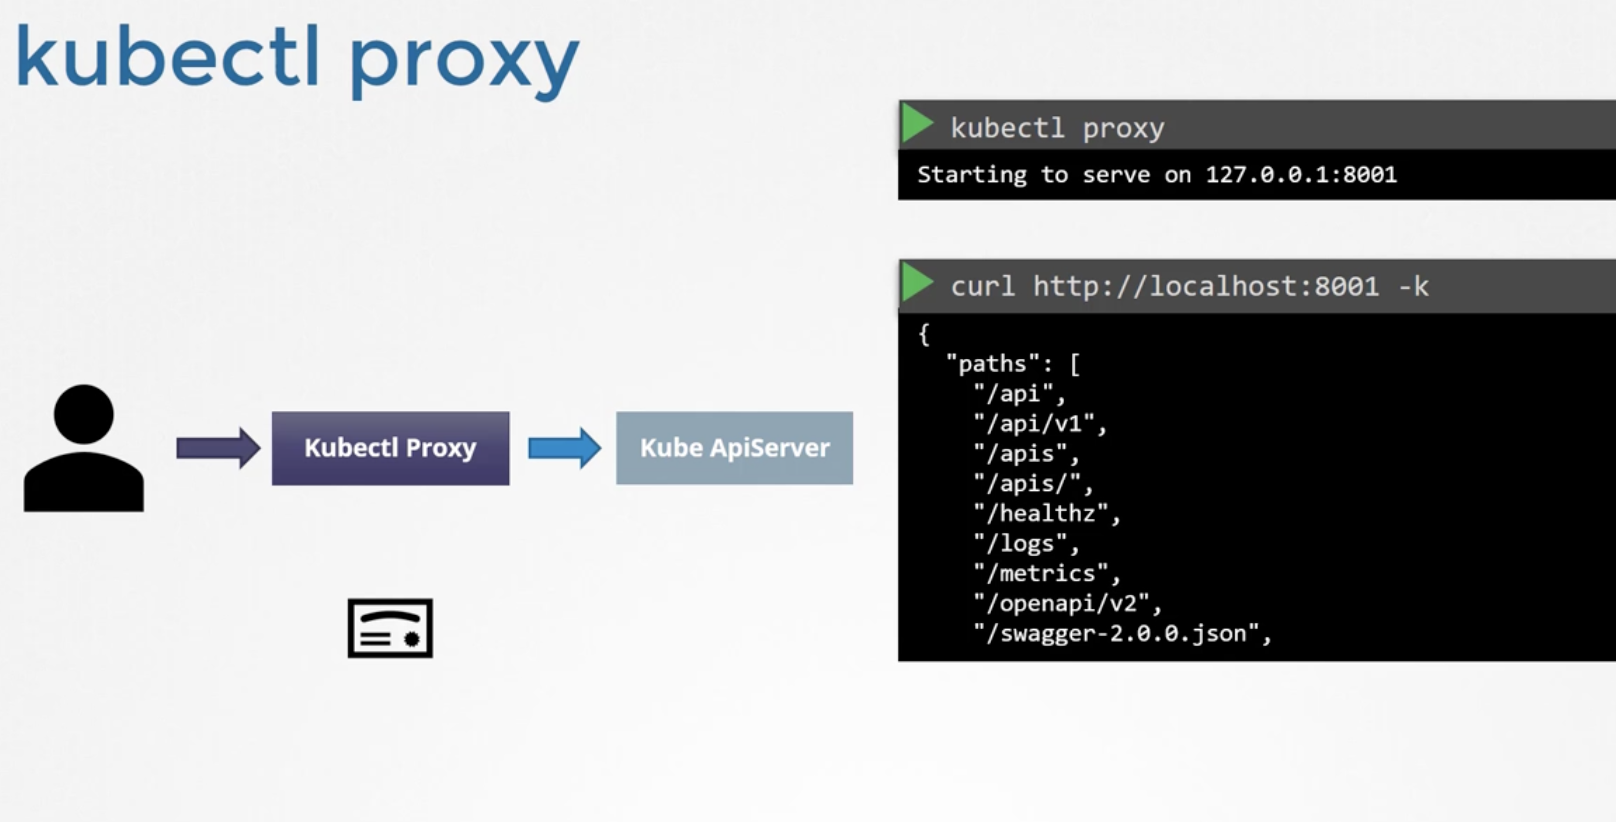
The Kubernetes API is divided into multiple groups. Among them, api and apis provide important API endpoint groups.
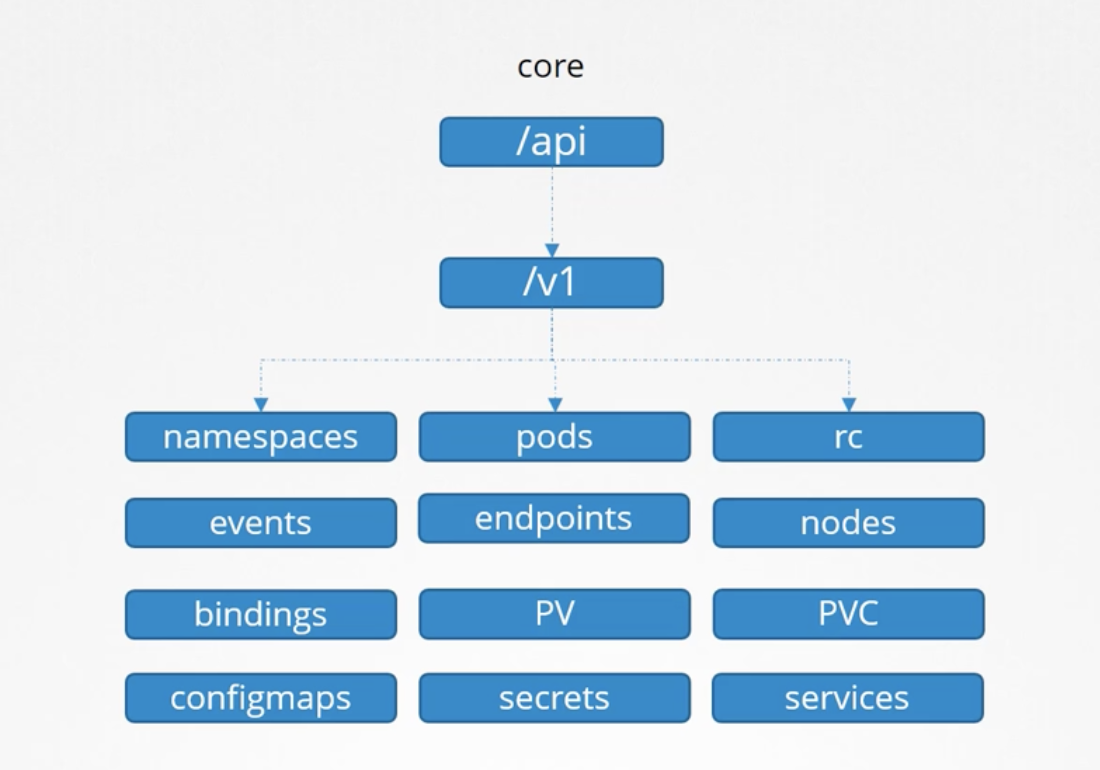
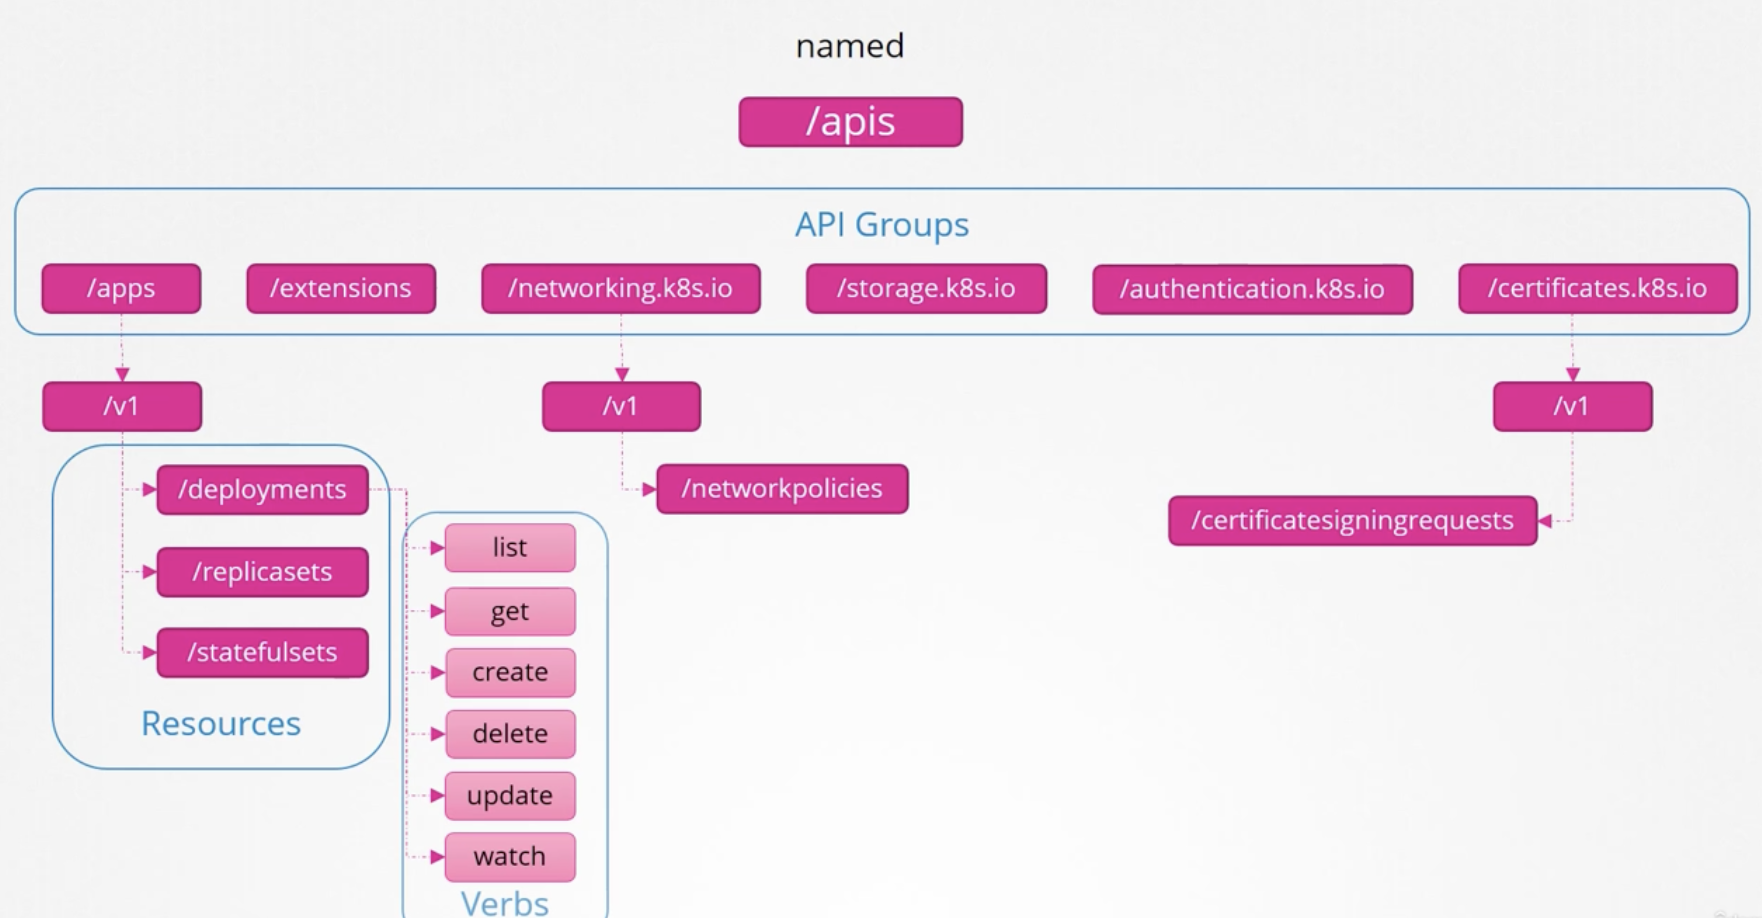
Using kubectl proxy, an authorized kube proxy server mediates requests to the API server, so you do not need to specify certificates.
160 Authorization
Authorization is the permission management that determines what resources can be accessed after authentication is complete.
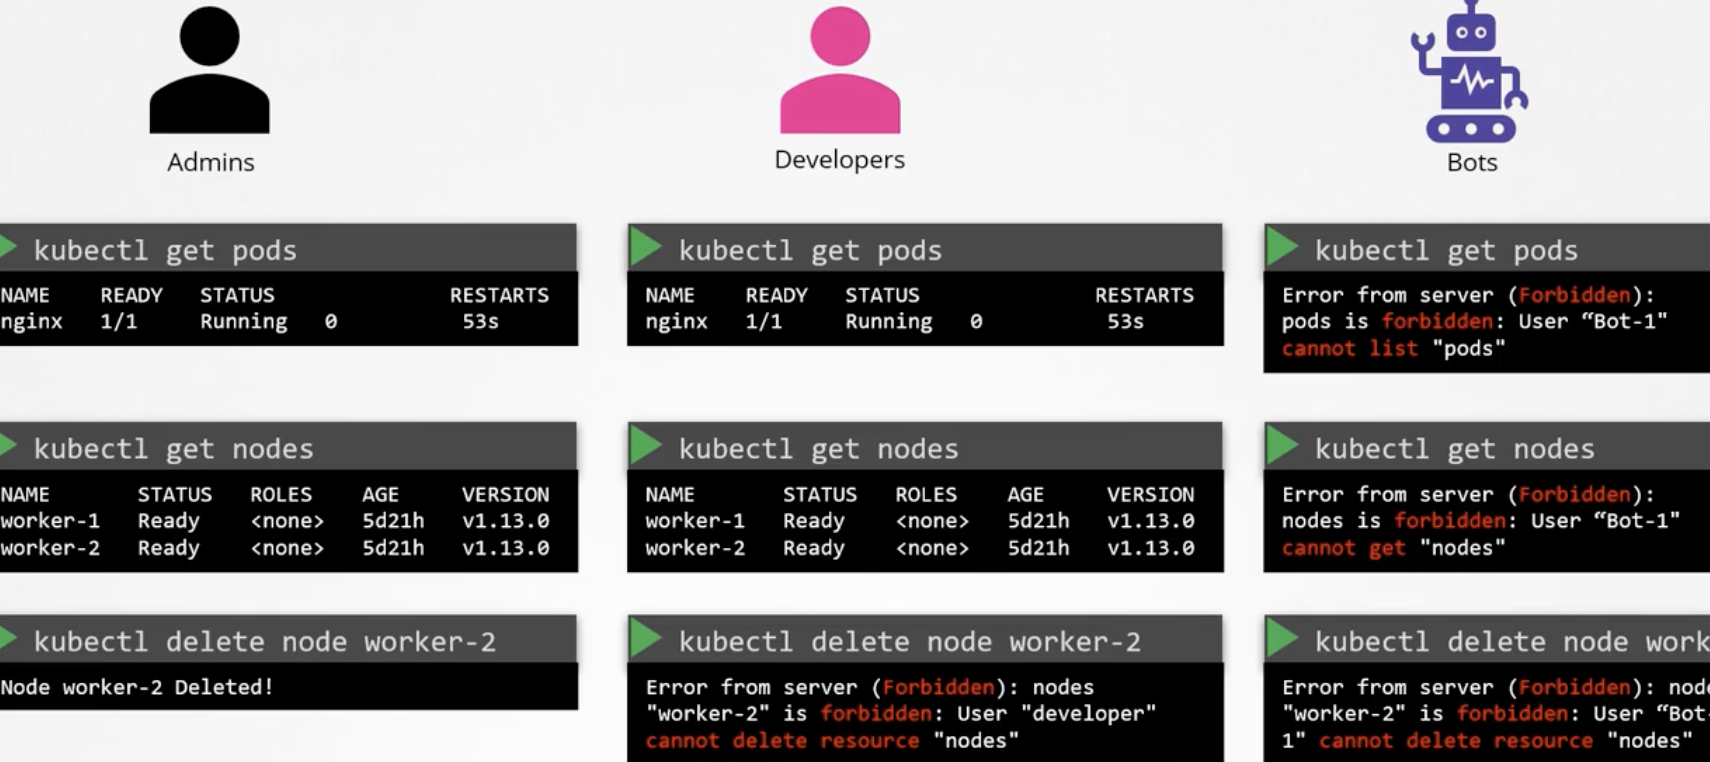
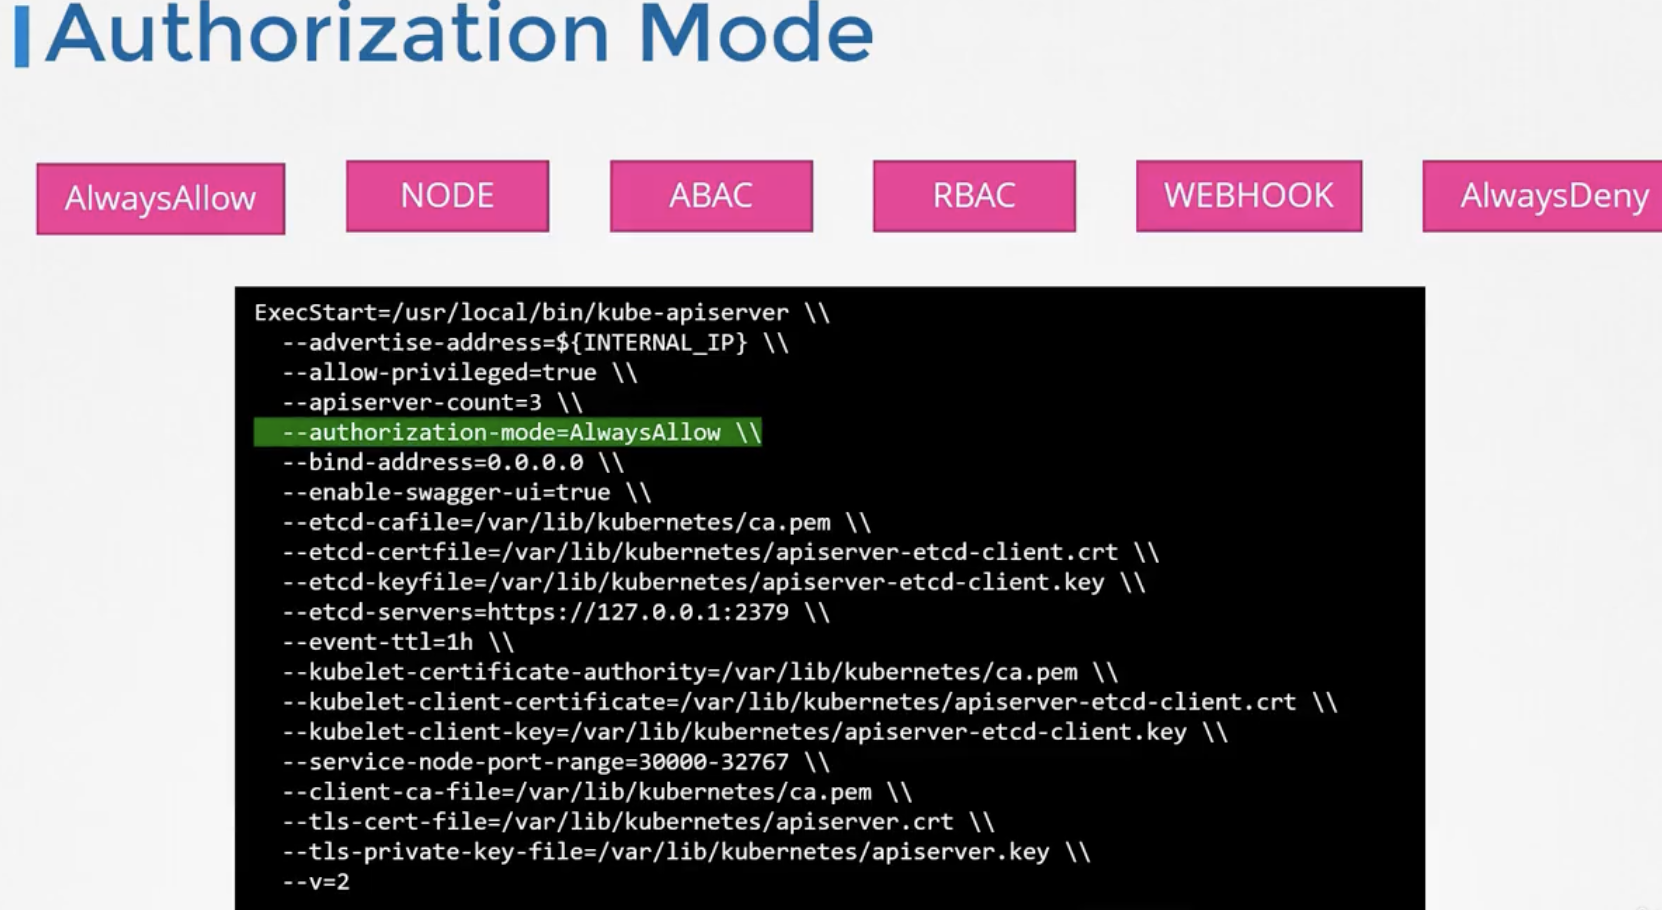
Authorization can be managed in four ways: Node, Attribute-Based, Role-Based, and Webhook.
Node Authorization is the permission used by the Kubelet to access the API server.
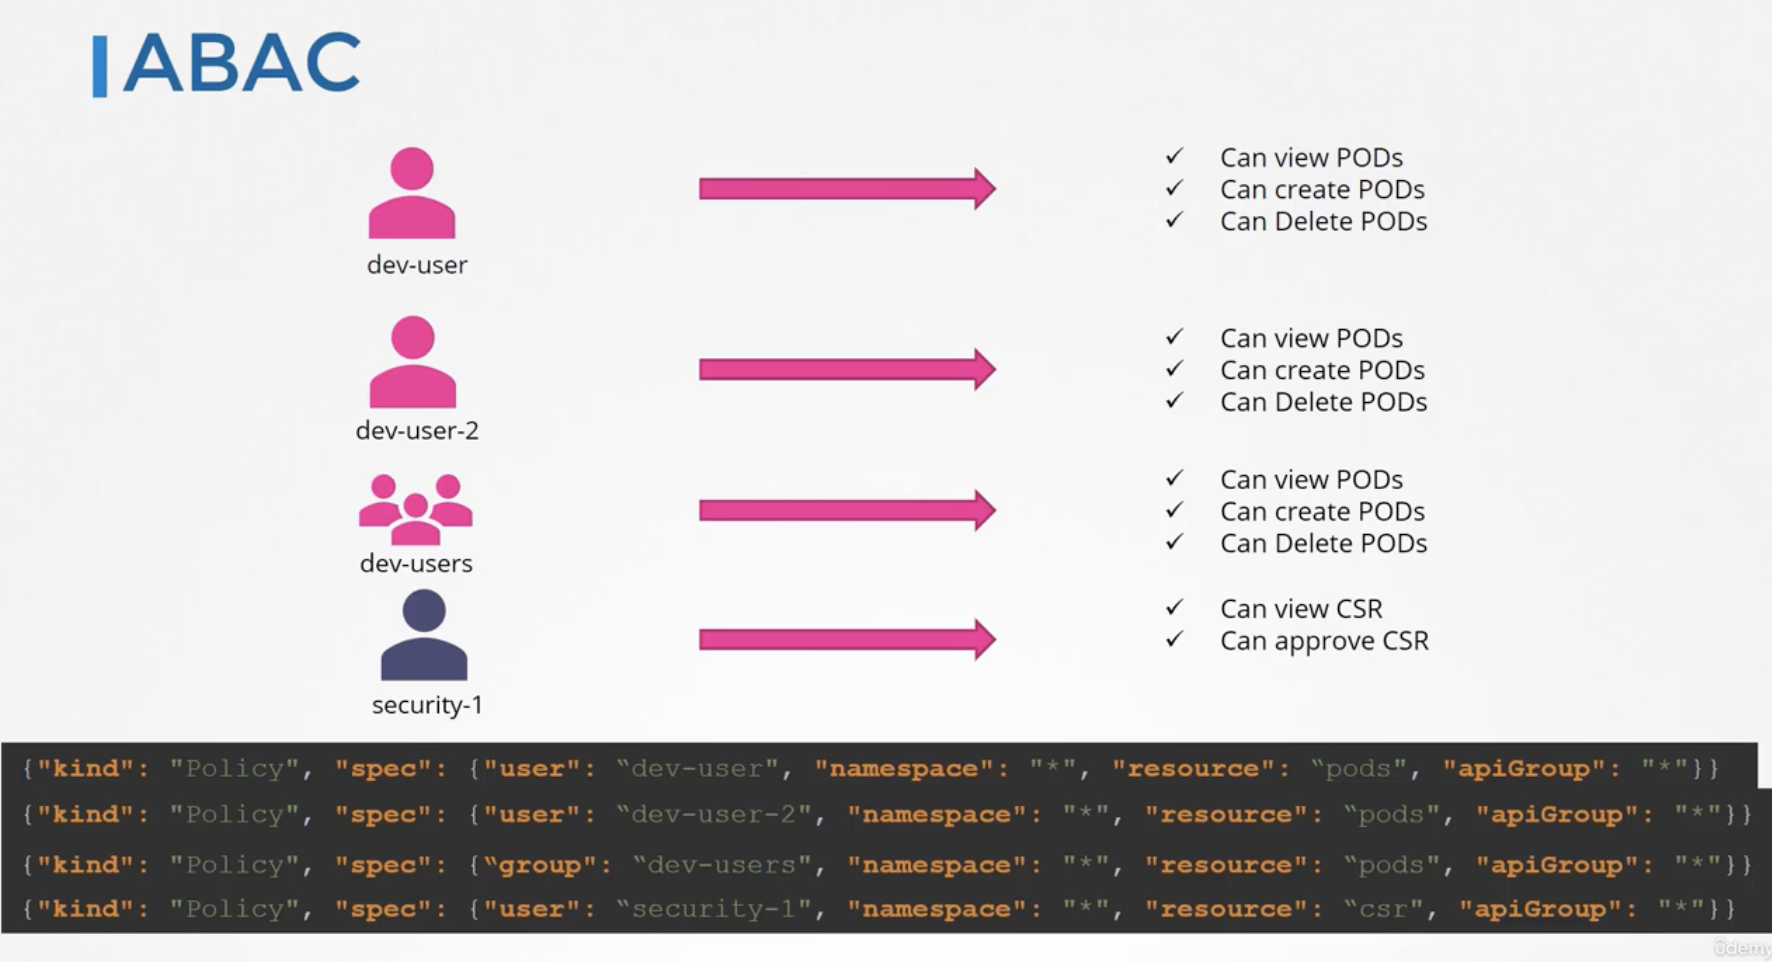
Attribute-Based access control is difficult to manage because you need to update attributes and restart the API server every time a user is added.
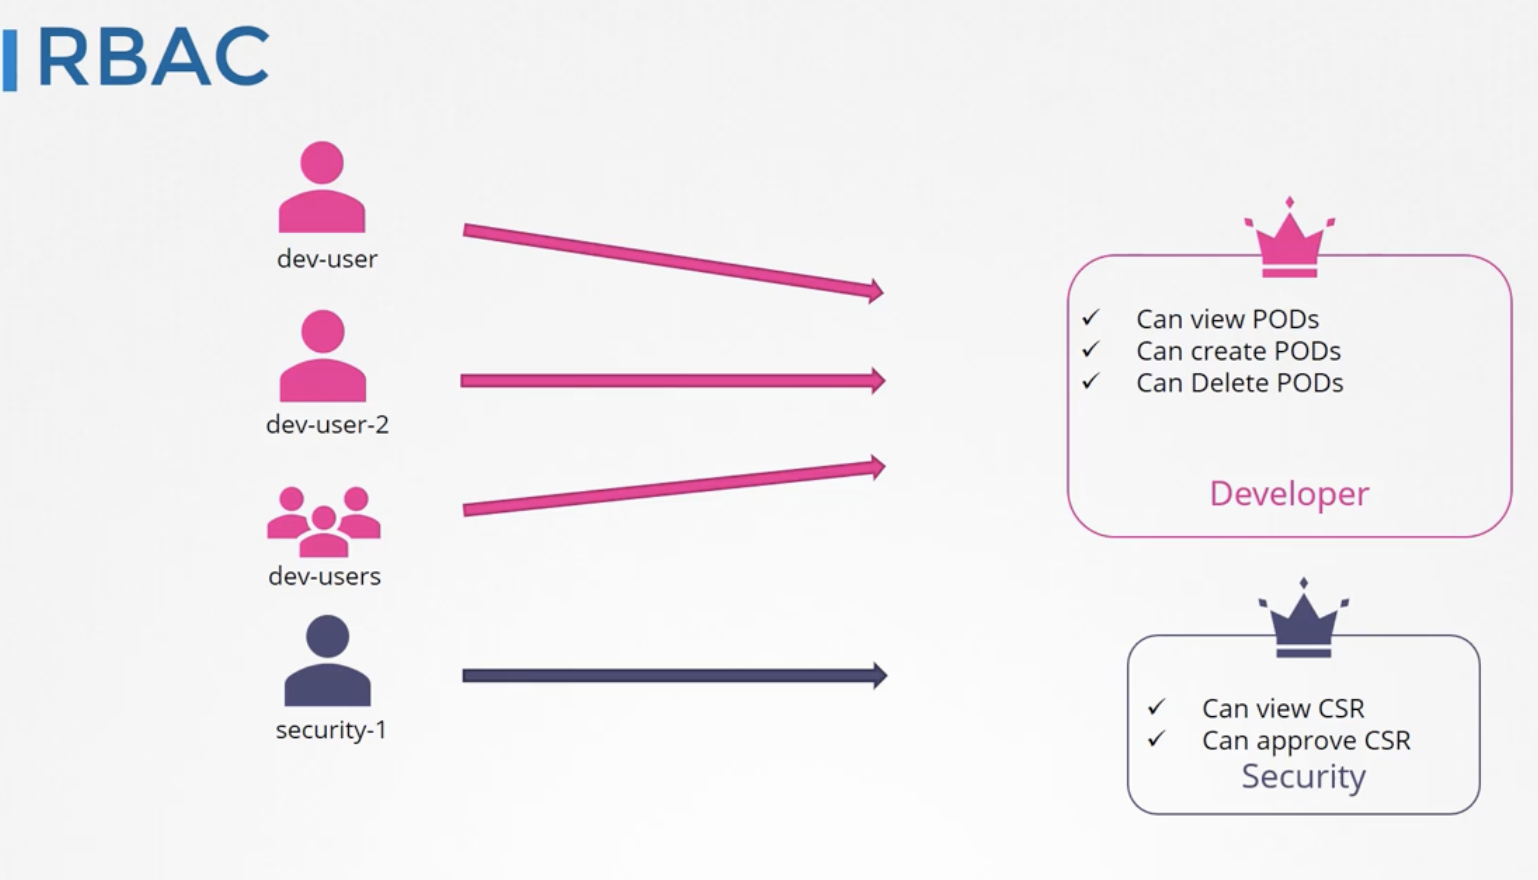
In contrast, Role-Based access control is easier to manage.
Authorization mode can be configured when starting the kube API server. Multiple modes like Node,RBAC,Webhook can be set. When multiple authorization modes are configured, authorization is attempted in the specified order.
161 Role Based Access Controls
How to check the authorization-mode:
$ kubectl describe pod kube-apiserver-controlplane -n kube-system

-- Authorization-mode=Node,RBAC
How to check existing Roles:
$ kubectl get roles --all-namespaces
How to inspect the contents of a role (a role that has get access to configmaps):
$ kubectl describe  role kube-proxy -n kube-system
Name:         kube-proxy
Labels:       <none>
Annotations:  <none>
PolicyRule:
  Resources   Non-Resource URLs  Resource Names  Verbs
  ---------   -----------------  --------------  -----
  configmaps  []                 [kube-proxy]    [get]
Checking Role Bindings:
$  kubectl describe rolebinding kube-proxy -n kube-system
Name:         kube-proxy
Labels:       <none>
Annotations:  <none>
Role:
  Kind:  Role
  Name:  kube-proxy
Subjects:
  Kind   Name                                             Namespace
  ----   ----                                             ---------
  Group  system:bootstrappers:kubeadm:default-node-token
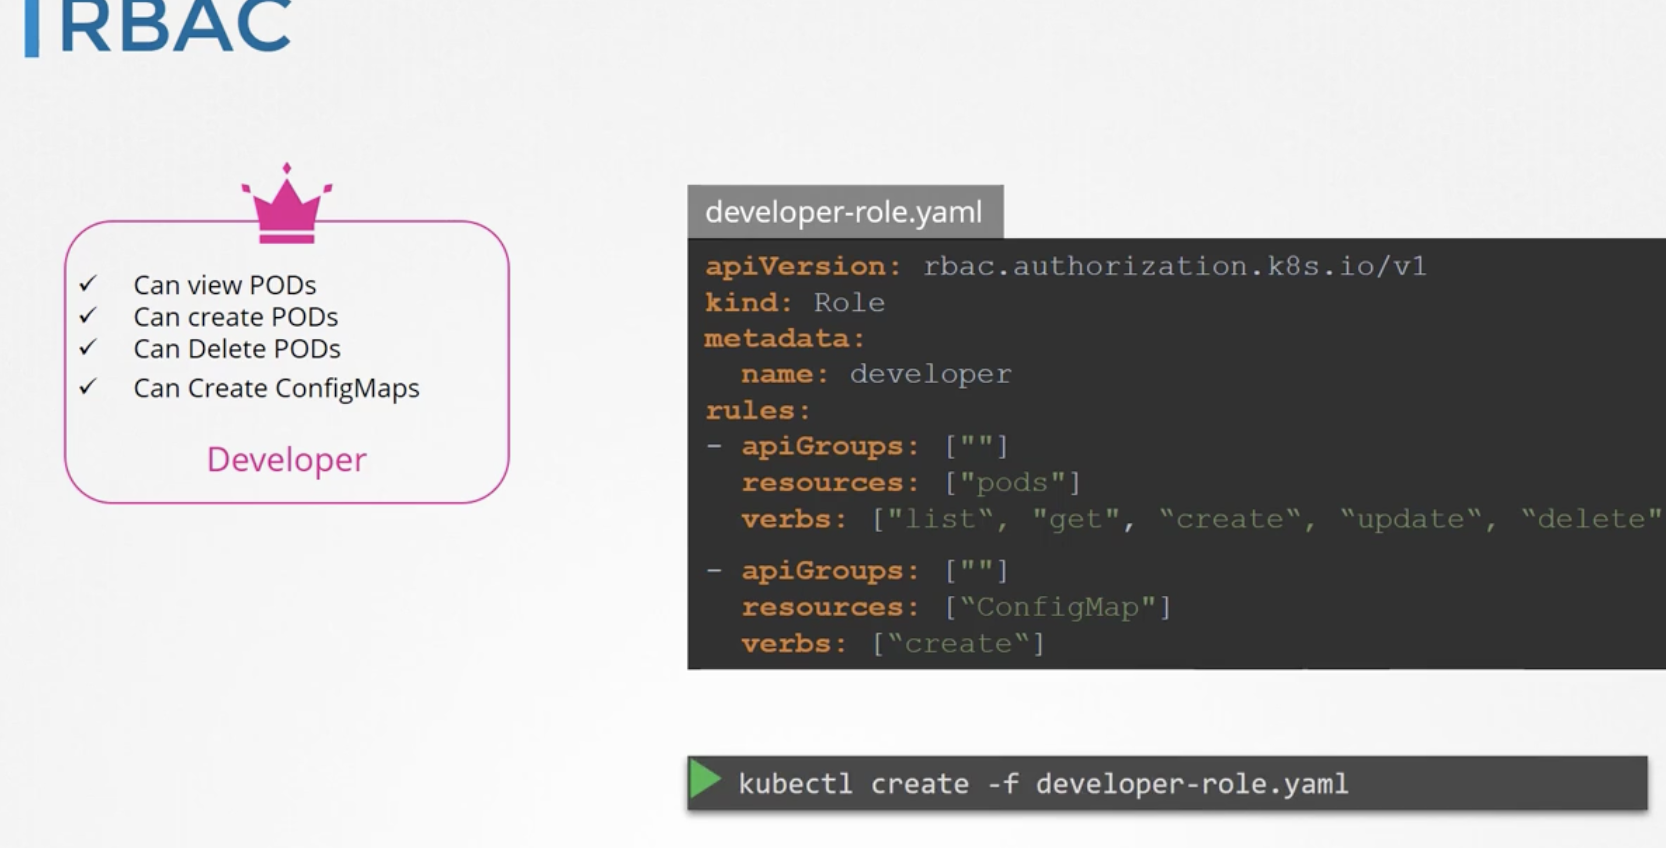
To use Role-Based access control, you need to create a Role, which can be done with a file like the one below.
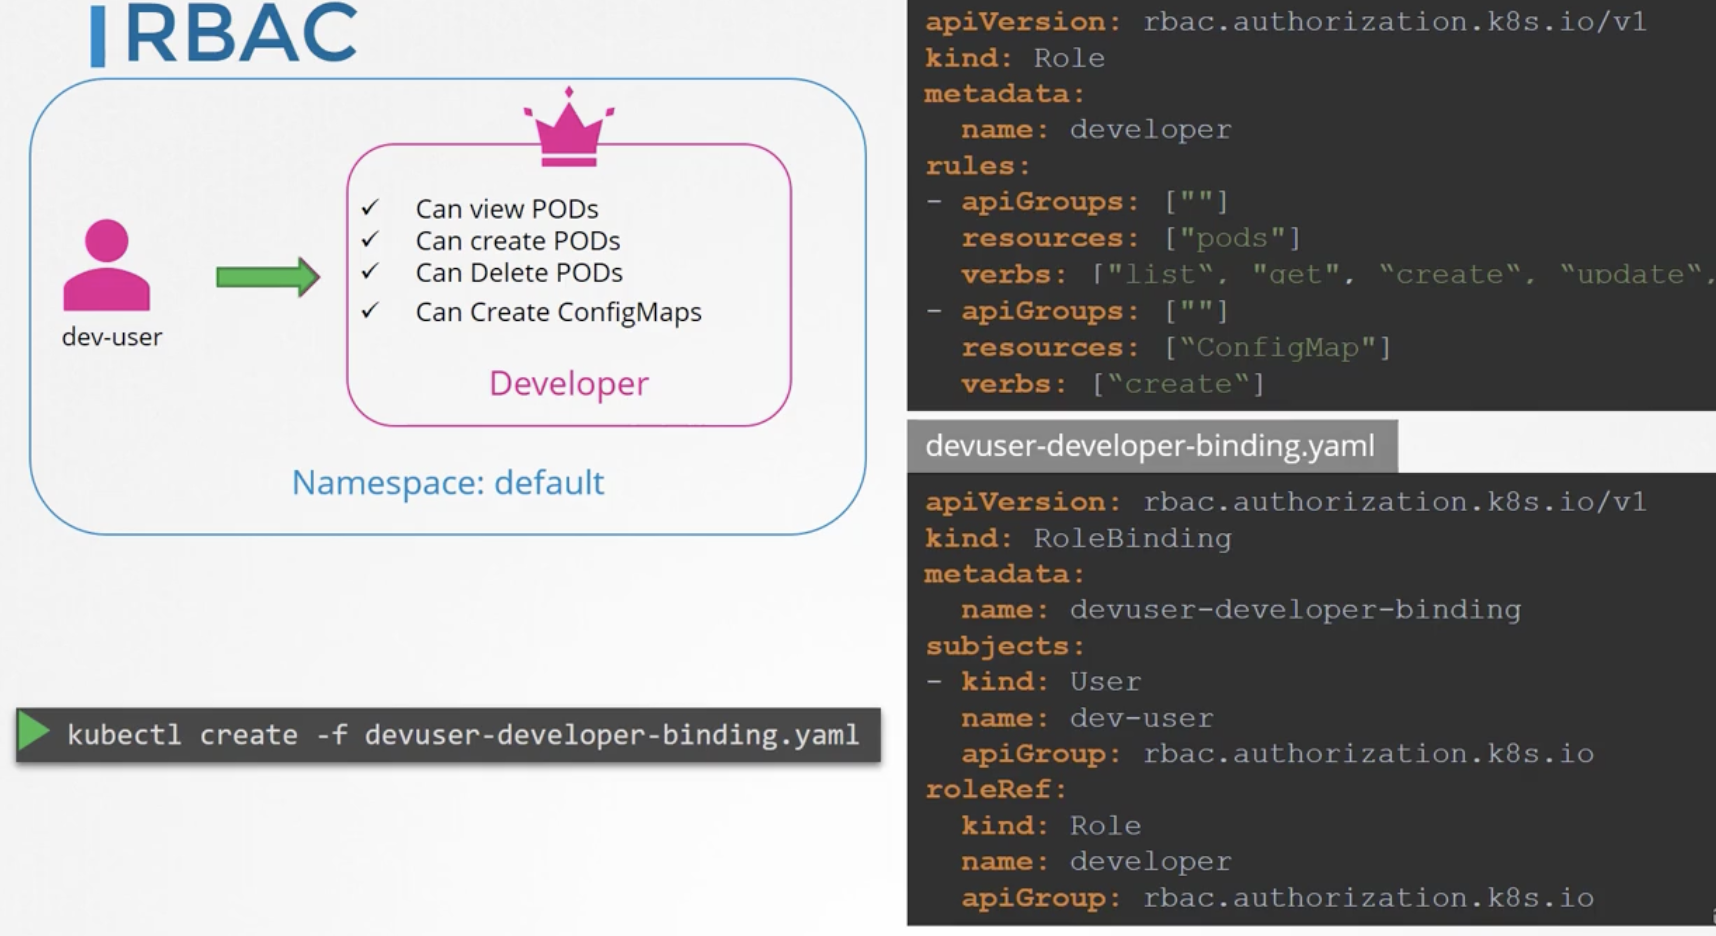
A role binding connects a user with a role.
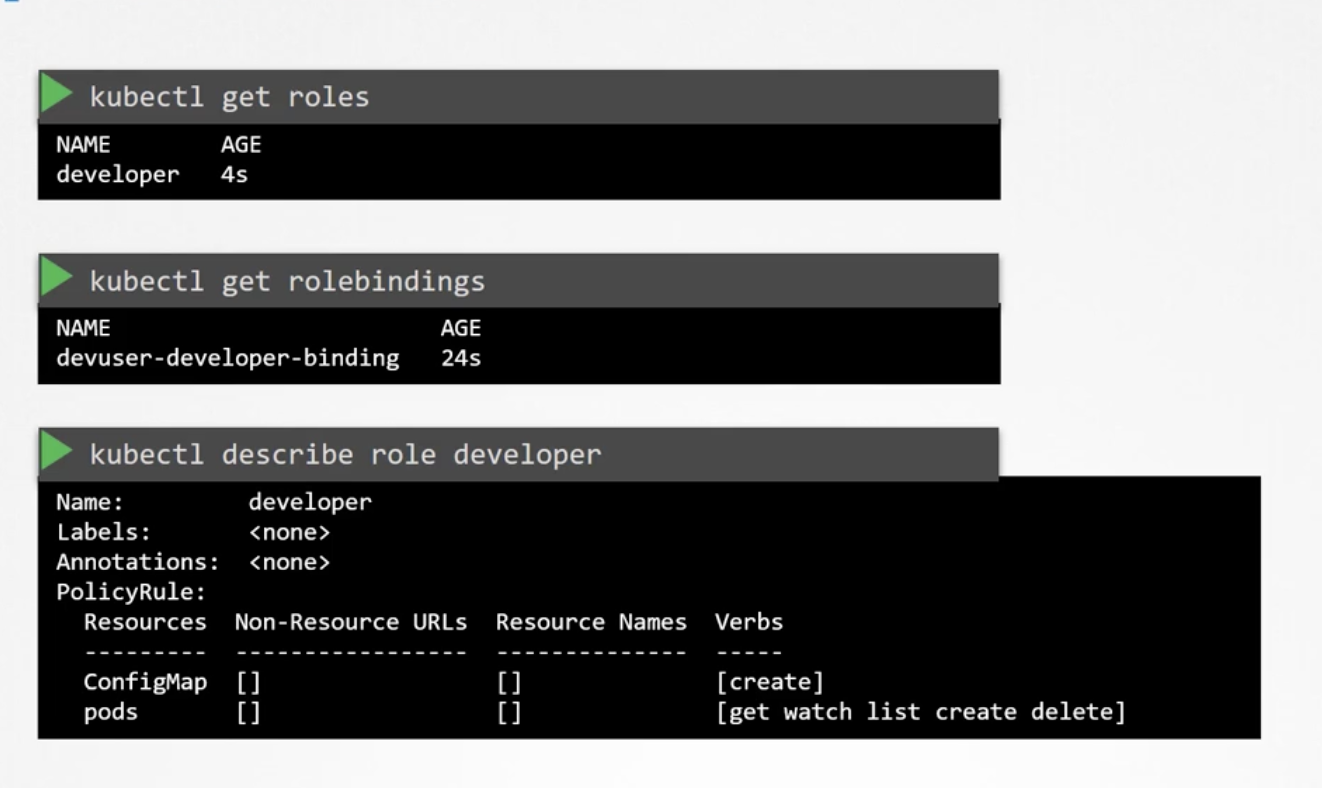
You can check permissions with the can-i command.
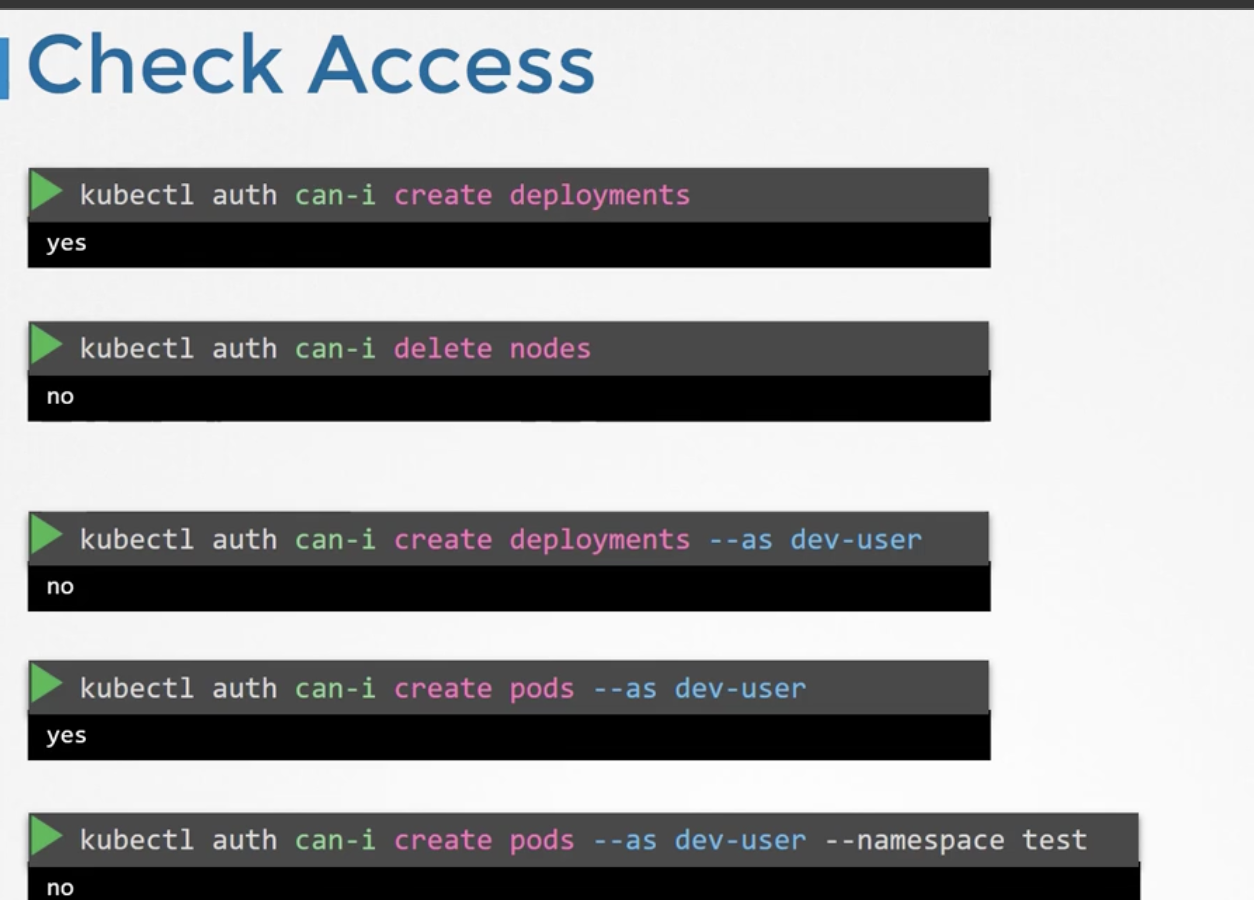
You can also set more granular permissions on accessible resources.
To perform operations as a different user, use --as.
$ kubectl get pods --as dev-user
Error from server (Forbidden): pods is forbidden: User "dev-user" cannot list resource "pods" in API group "" in the namespace "default"
164 Cluster Roles and Roles Bindings
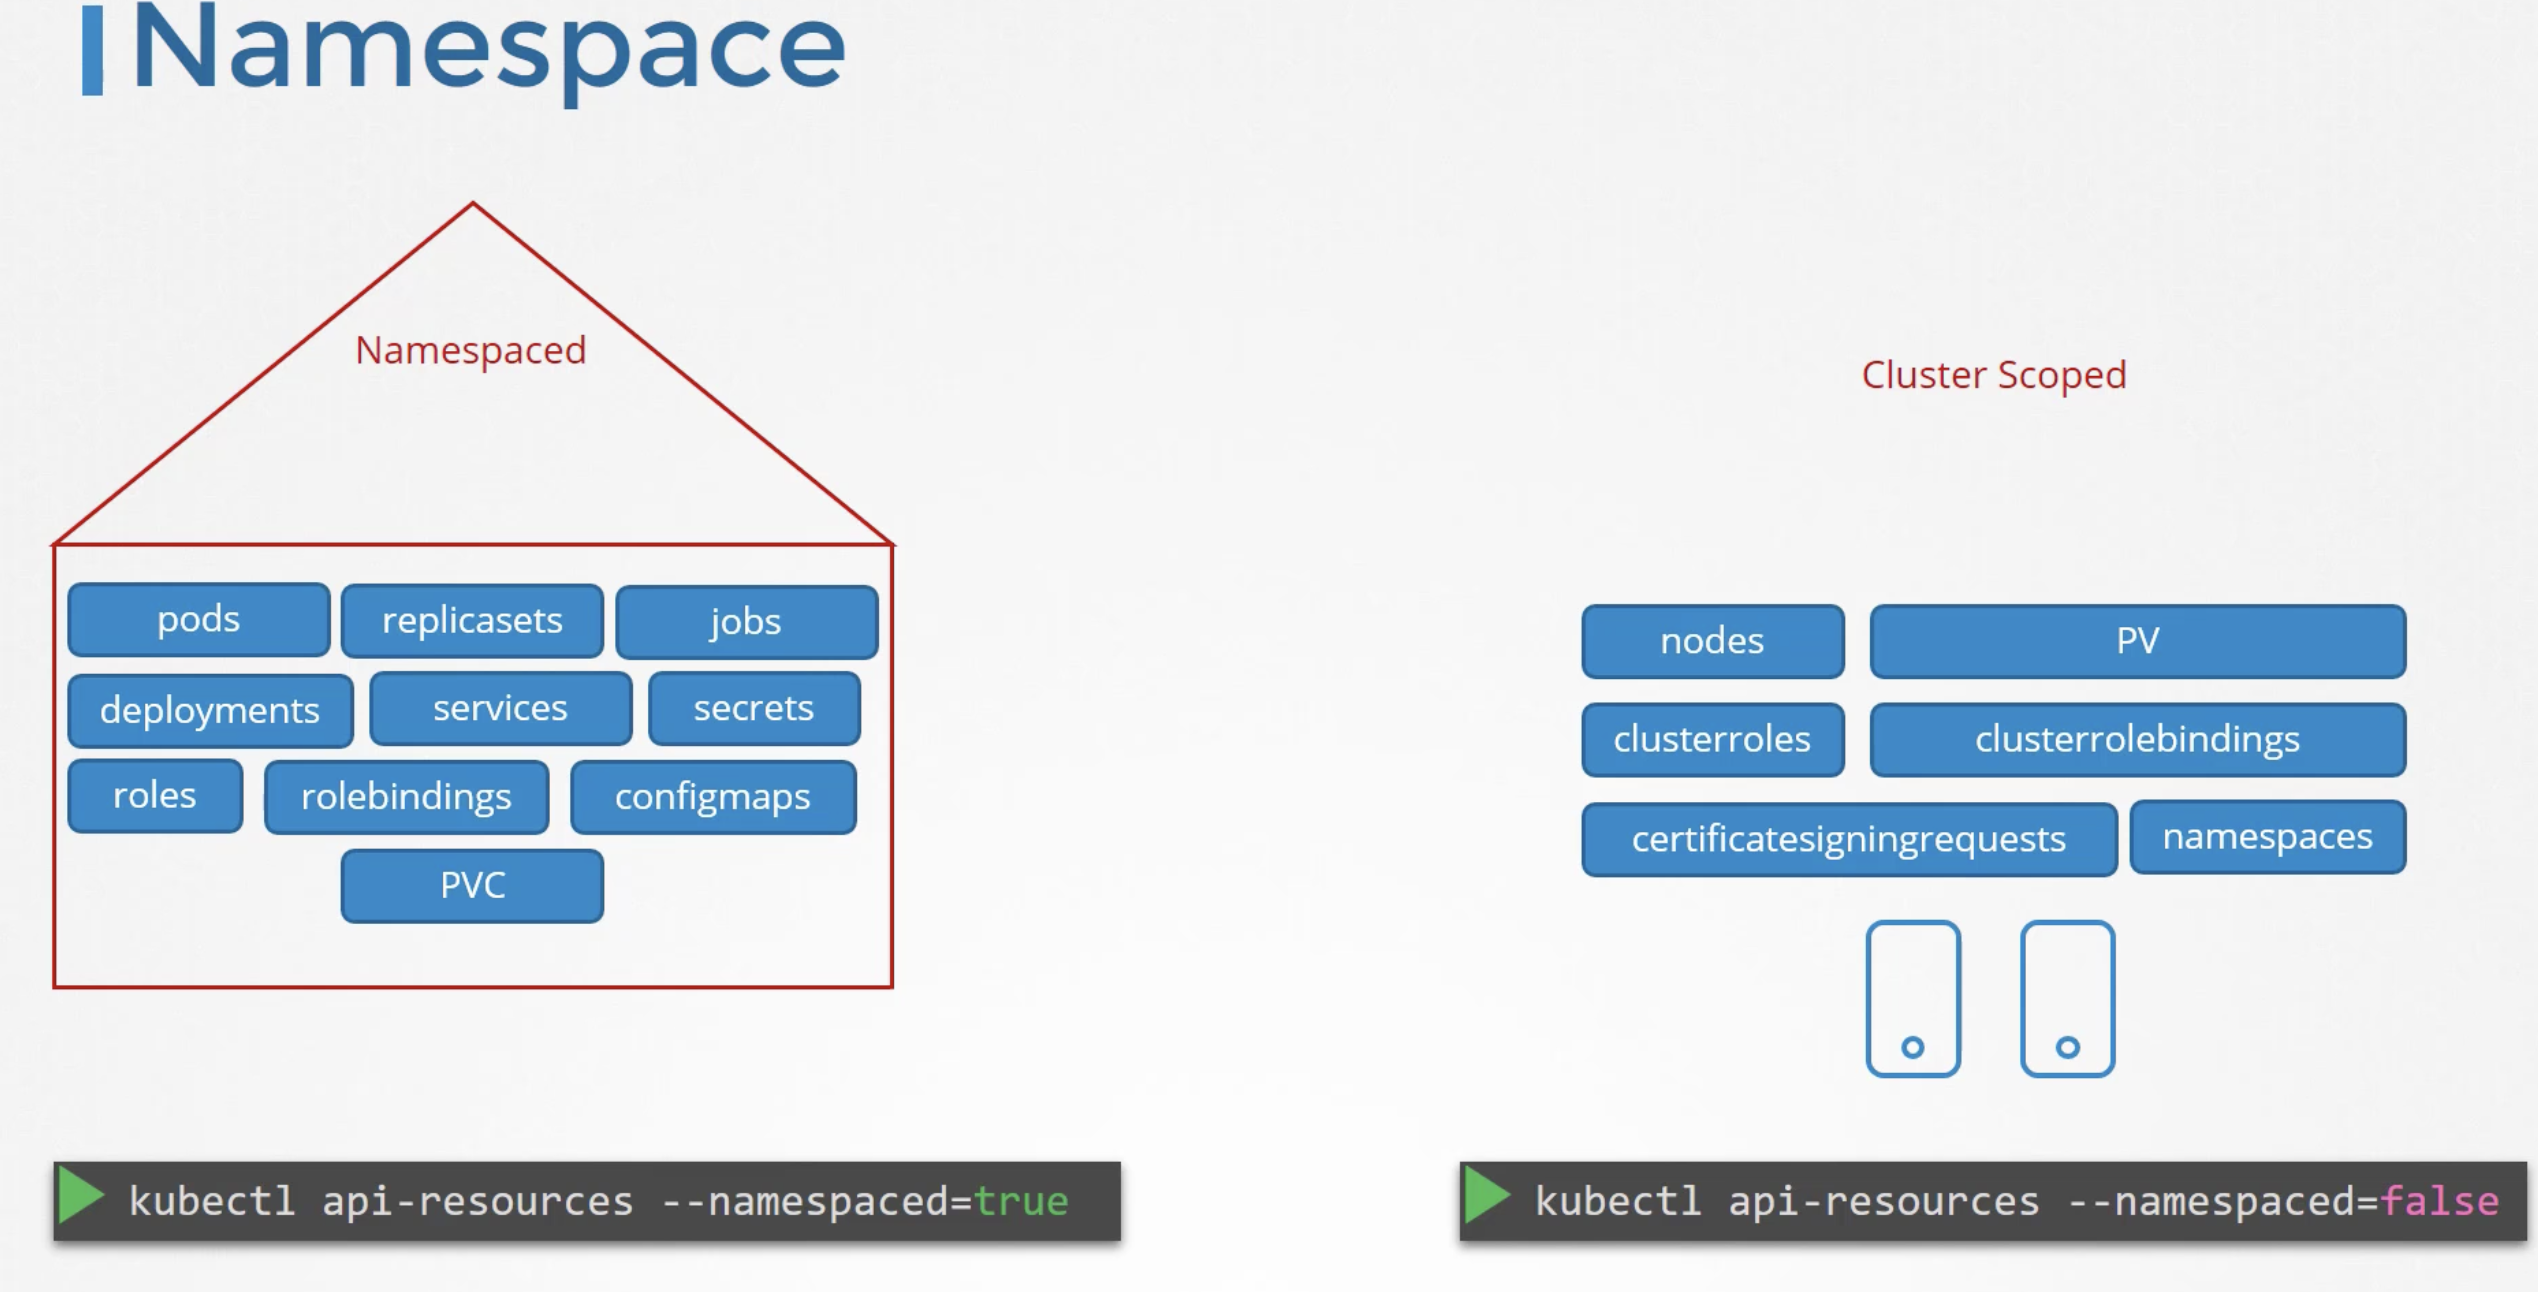
Among API resources, some exist within namespaces, but cluster roles exist outside of them. This is called Cluster Scope. Since these have a kind of super permission, they must be used with caution.
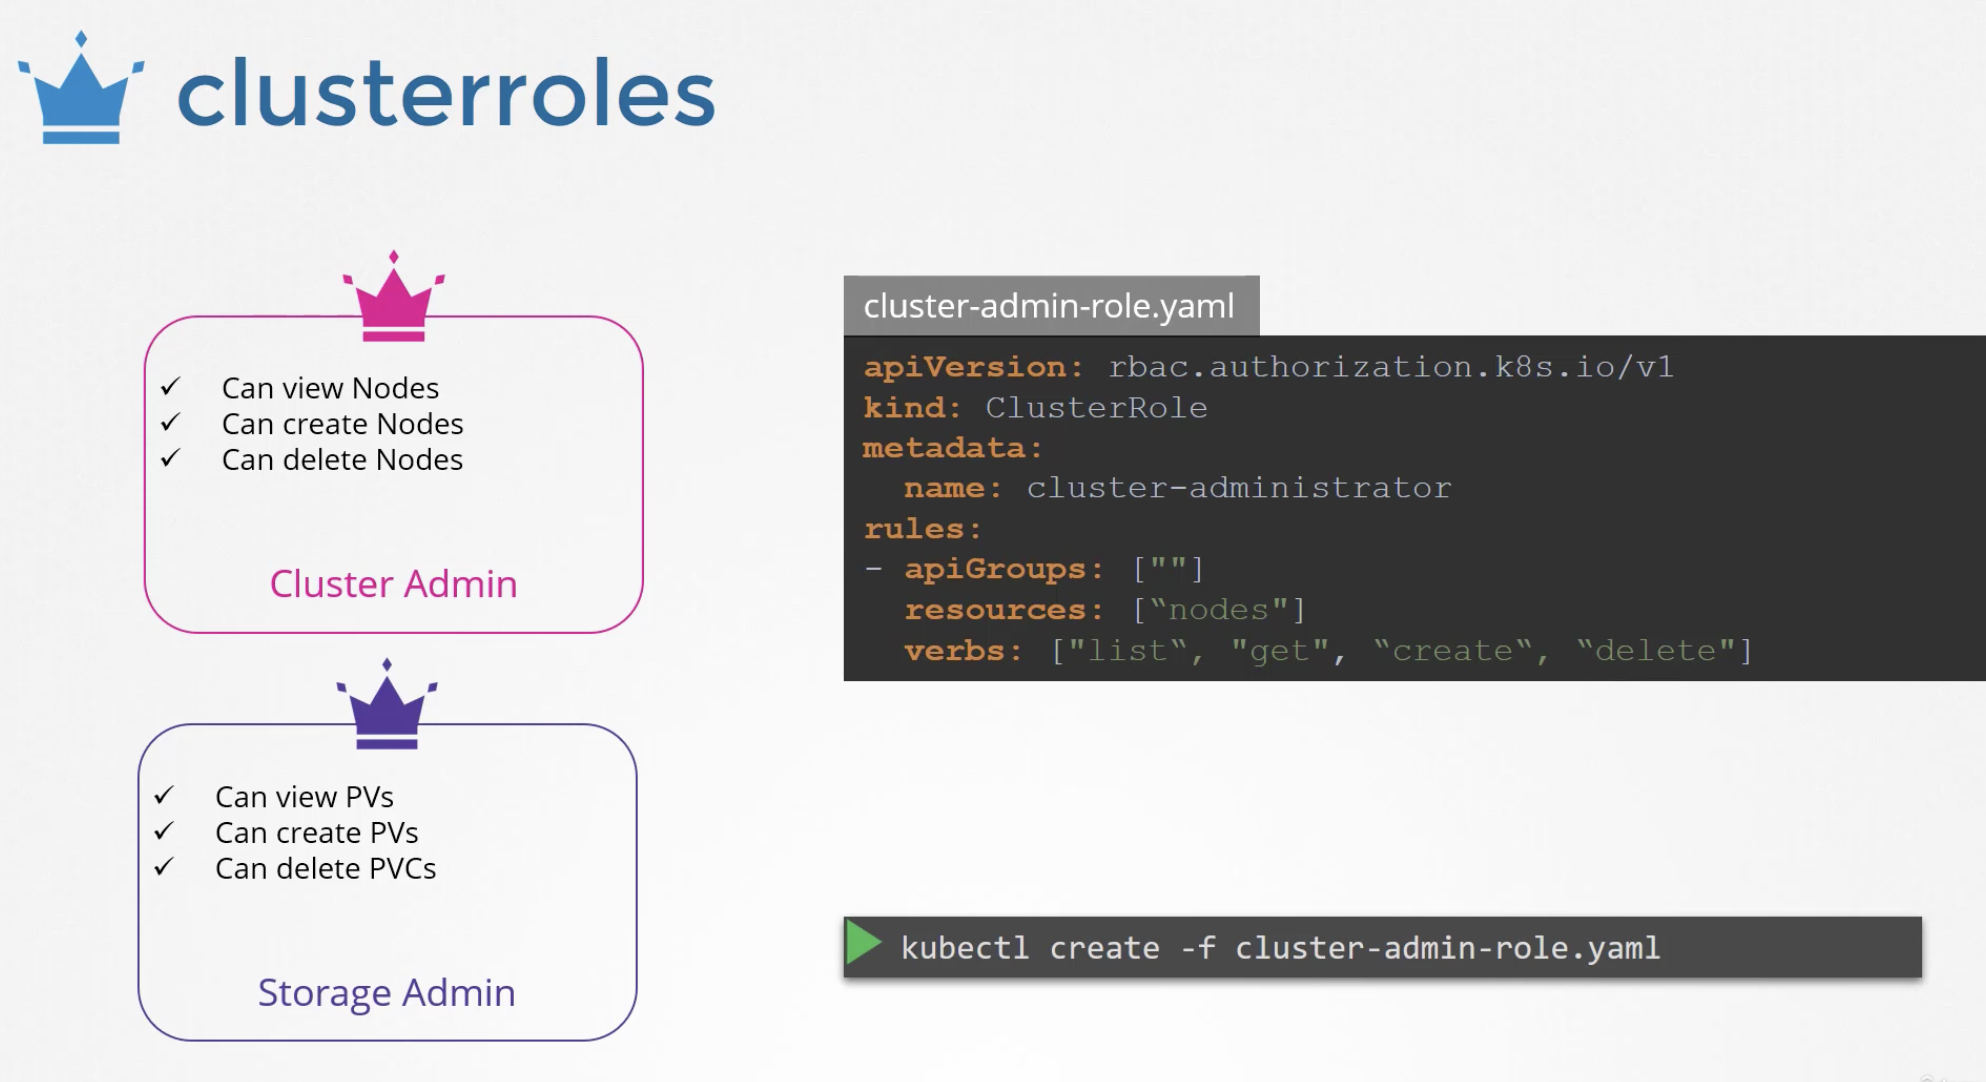
Among these, Cluster Admin and Storage Admin roles have permissions like those below. Roles are created using the ClusterRole kind.
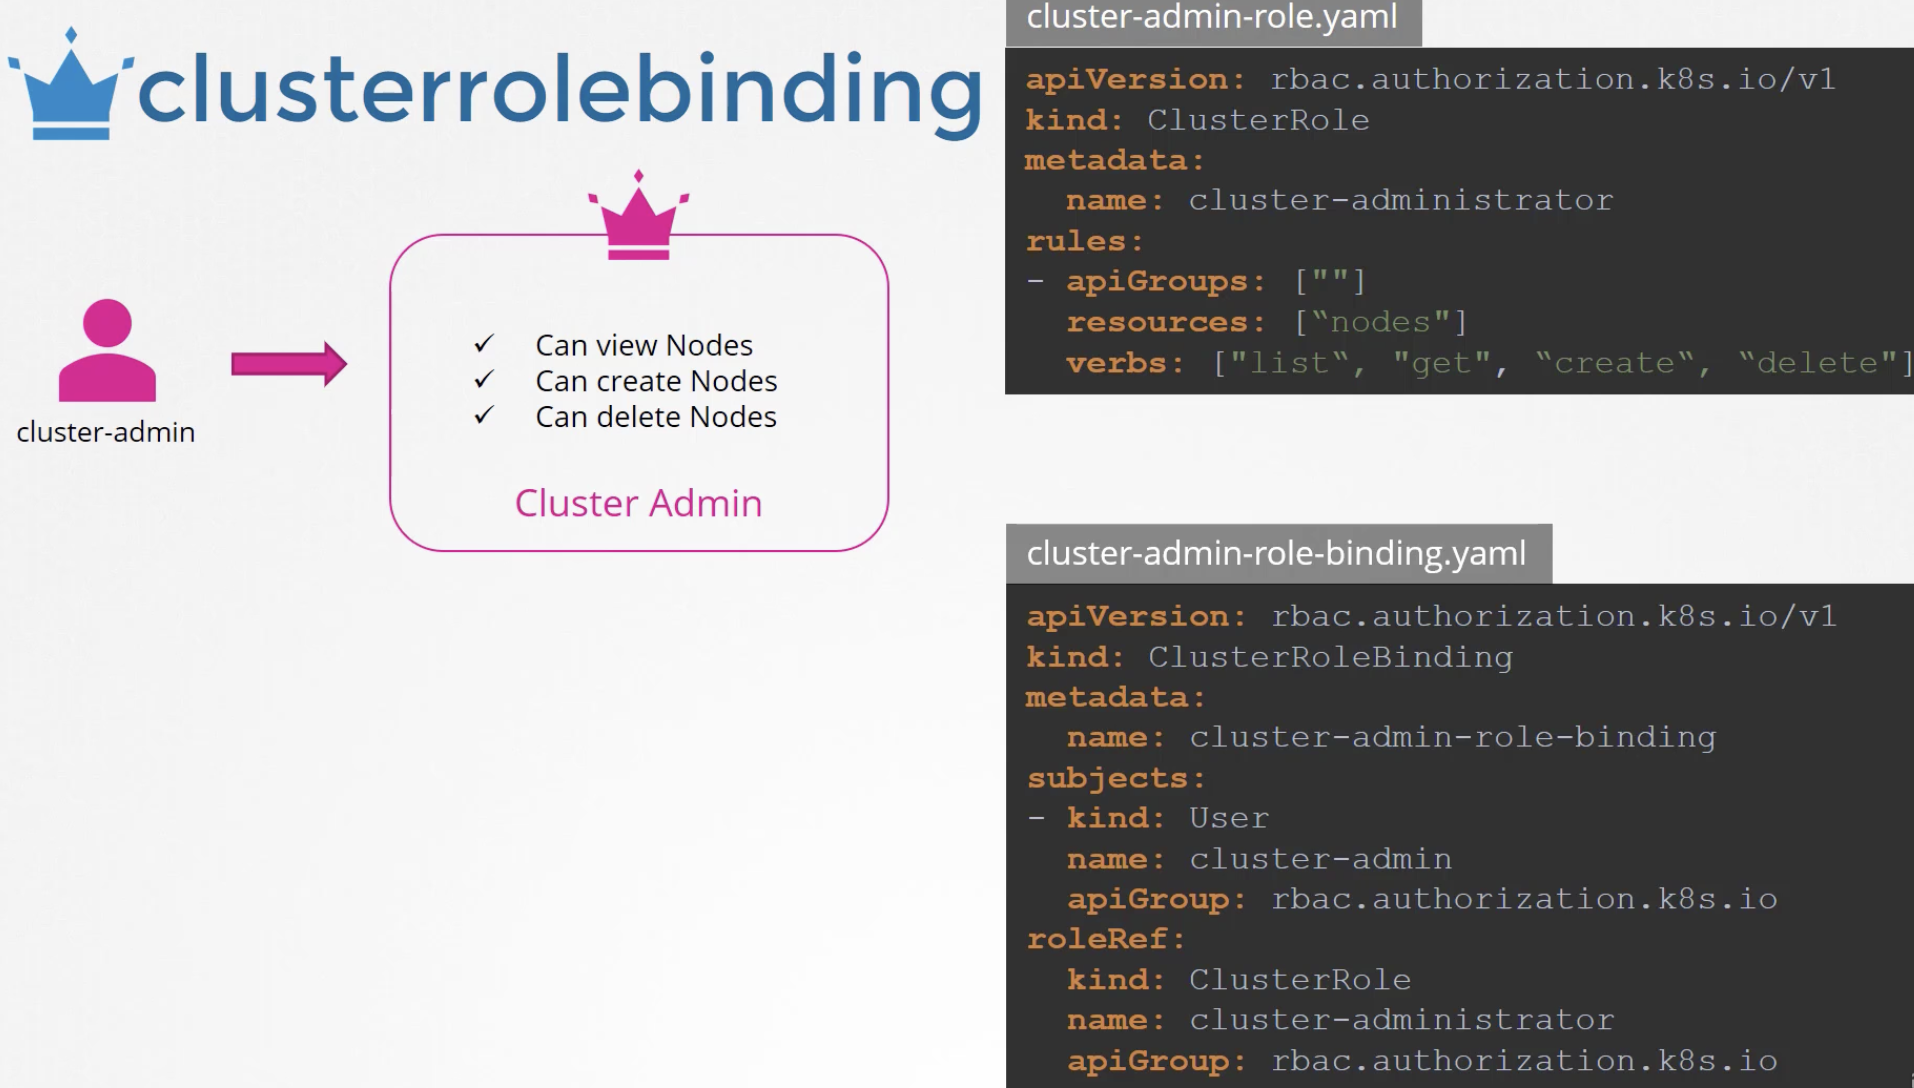
To bind the created role with a user, a binding like the one below is needed.
$ kubectl get clusterroles
$ kubectl get clusterrolebindings
167 Service Account
In Kubernetes, there are two types of accounts: User and Service. As the names suggest, User Accounts are for humans, and Service Accounts are for machines or programs.
kubectl create serviceaccount <account_name>
kubectl create token <account_name>
kubectl get serviceaccount
When a Service Account is created, a token is generated along with it. This token is used by external applications to authenticate with the API, and the information is stored and managed as a Kubernetes secret.
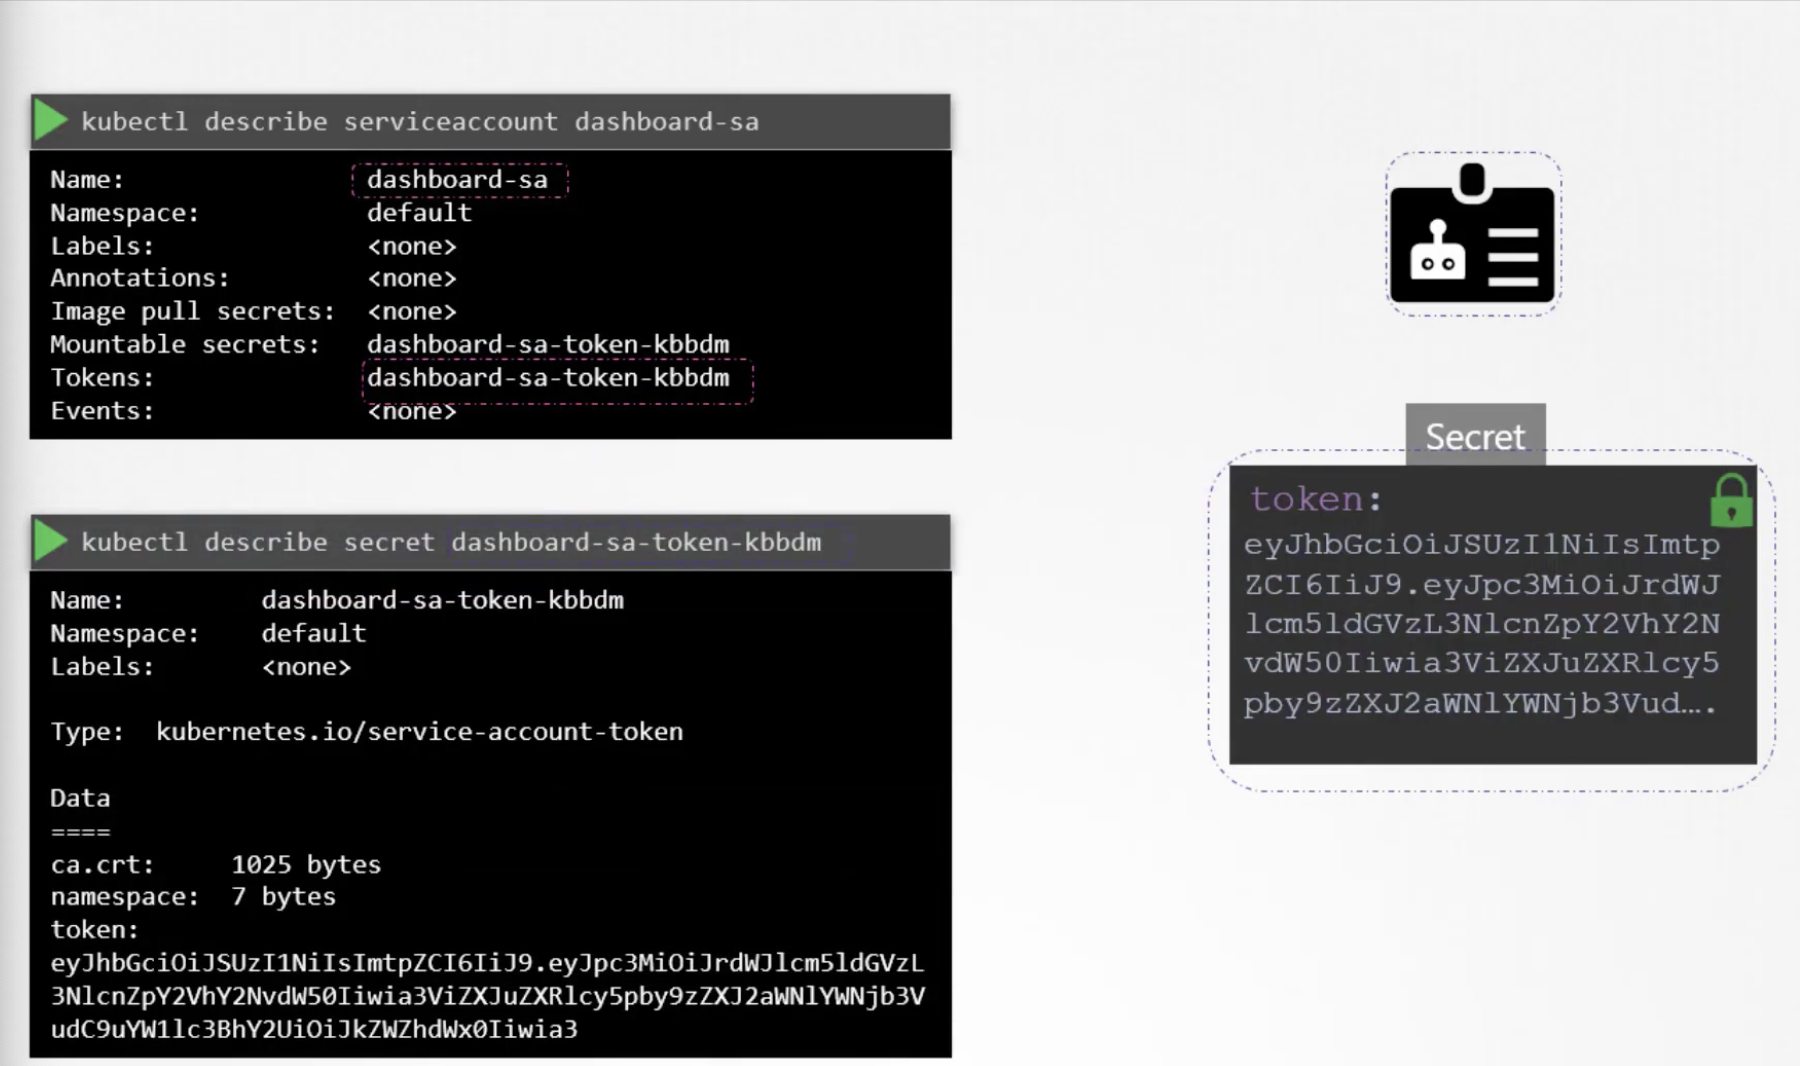
When we create any Pod, a volume from the default service account is created to store this token.
The storage location is under /var/run/secret/kubernetes.io/serviceaccount. If you do not want the service account to be mounted, set automountServiceAccountToken to false in the pod definition.
To access this token stored in the pod, use kubectl exec -it <pod_name> ls /var/run/secret/kubernetes.io/serviceaccount.
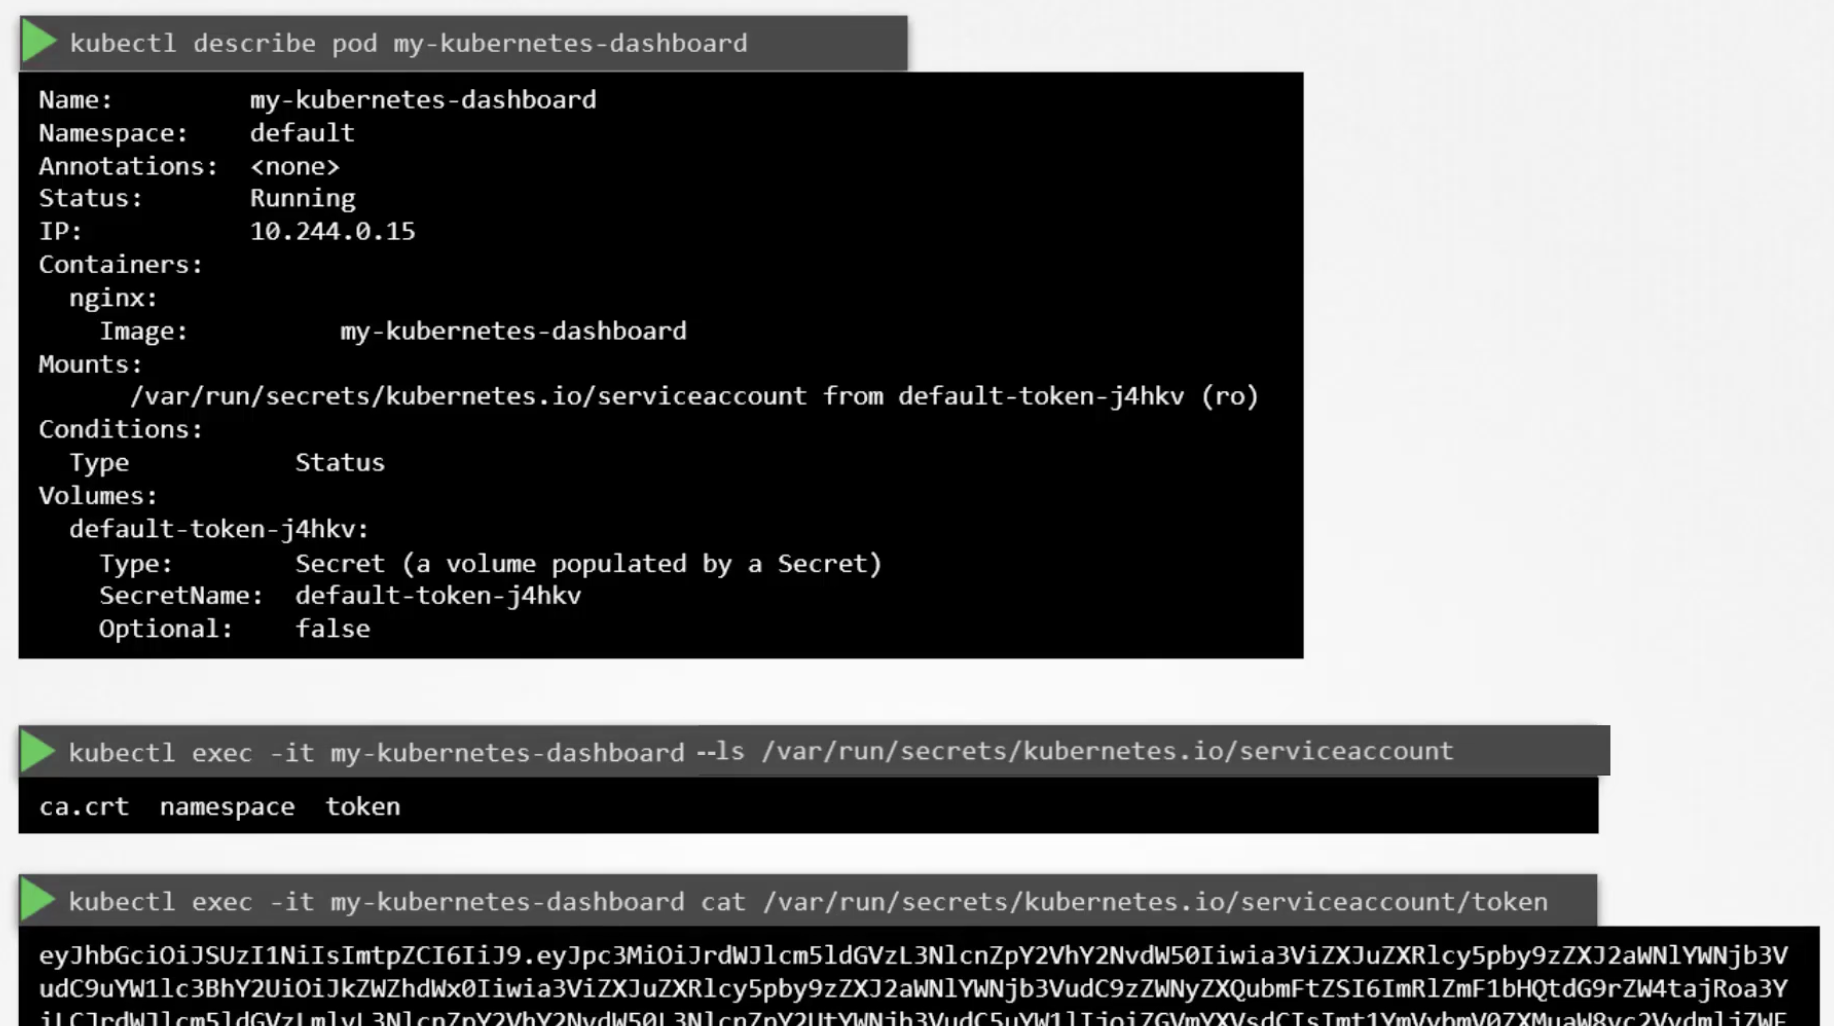
The default service account has very limited permissions. Therefore, specify the service account in spec.serviceAccountName in the pod-definition.yml.
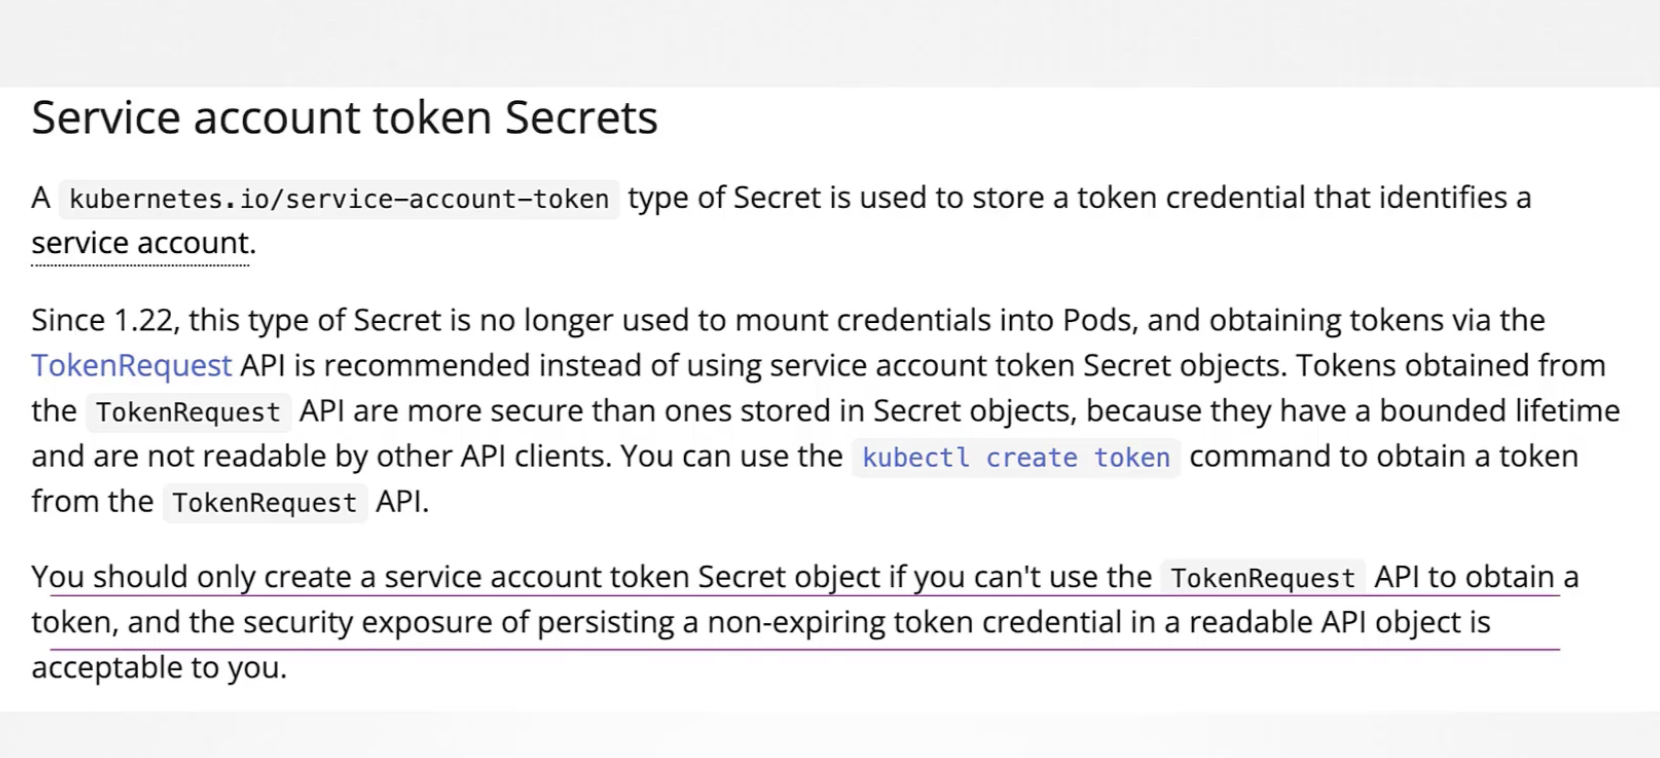
Starting from Kubernetes version 1.22, the Service Account Token API was introduced to address the vulnerability of non-expiring tokens. Using this API issues tokens with an expiration date, making them more secure. It is recommended to create service account token secret objects only when the TokenRequest API cannot be used.
170 Image Security
When pulling an image, if the user is omitted from the image name, 'library' is used as the default user.
Additionally, a registry can be specified before that, with the most popular public registries being docker.io and gcr.io.
If images should not be uploaded to a public registry, a private registry can be used.
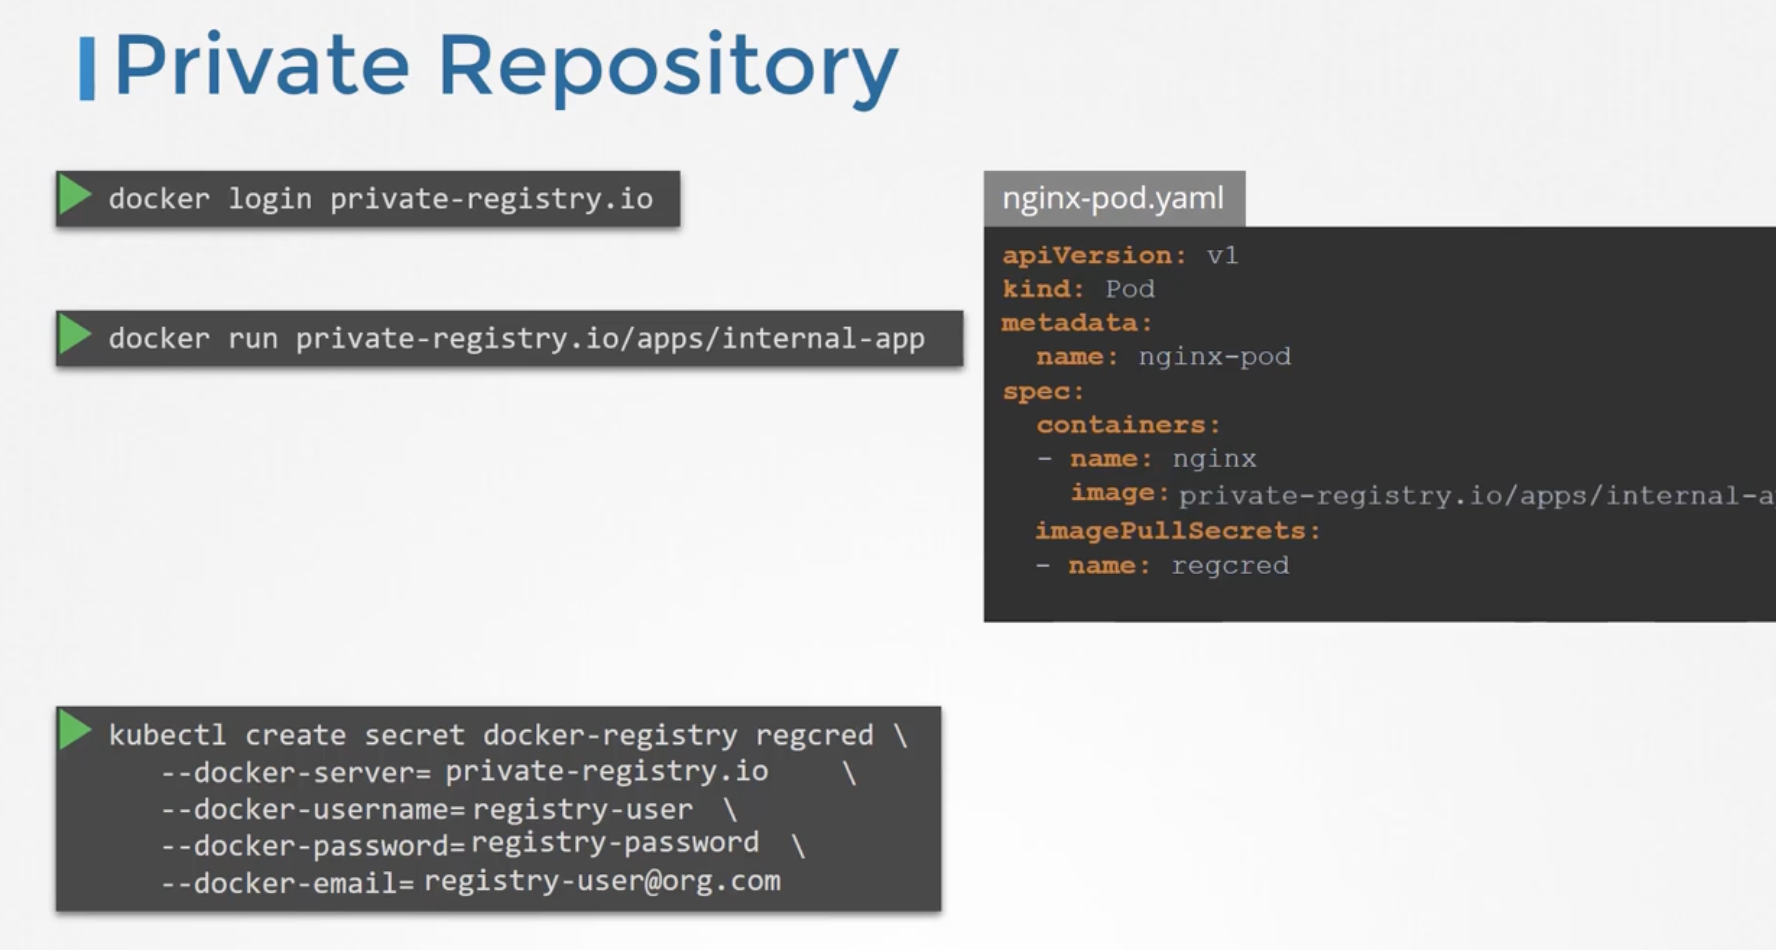
docker login private-registry.io
docker run private-registry.io/apps/internal-app
A private registry requires a username and password. Hard-coding these directly in the pod definition is a security concern. Instead, you create a secret as shown below and enter the secret name in the imagePullSecret section. This allows pods to pull images from the private registry without issues.
173 Security in docker
Docker runs containers, and the concept of namespaces is used to isolate these processes.
The container PID seen from the host machine differs from the PID inside the container. Also, by default, if not explicitly specified, the user running processes inside the container is root.
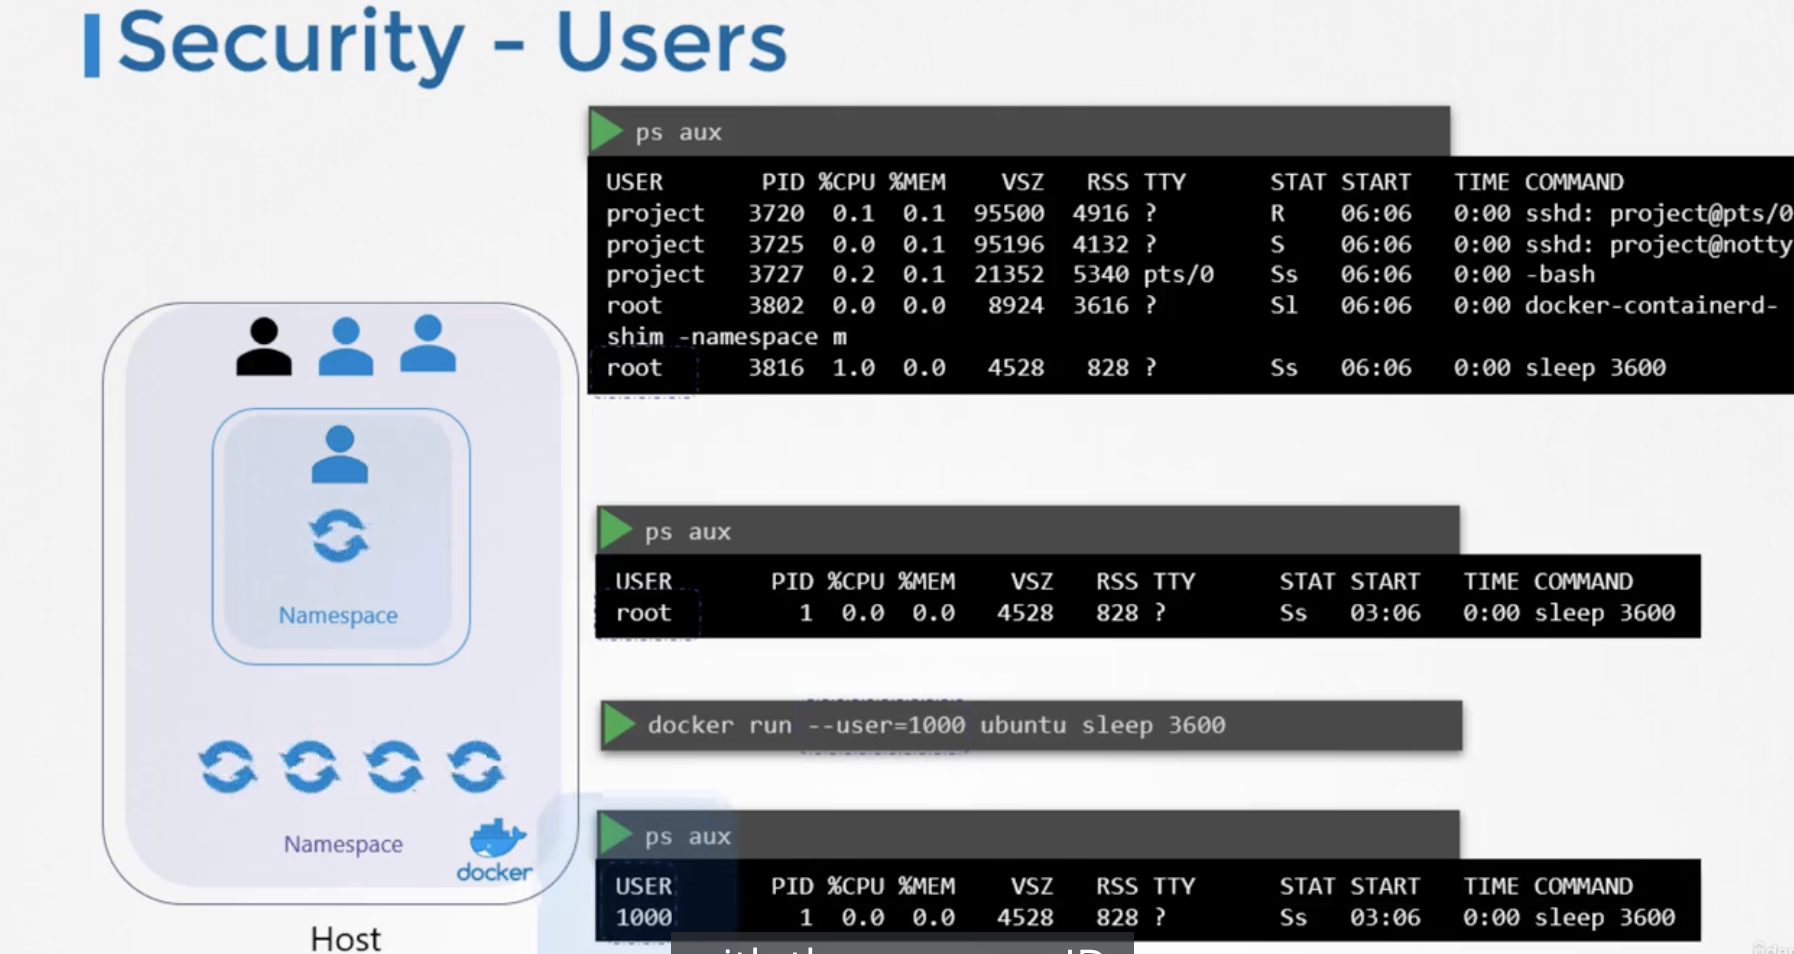
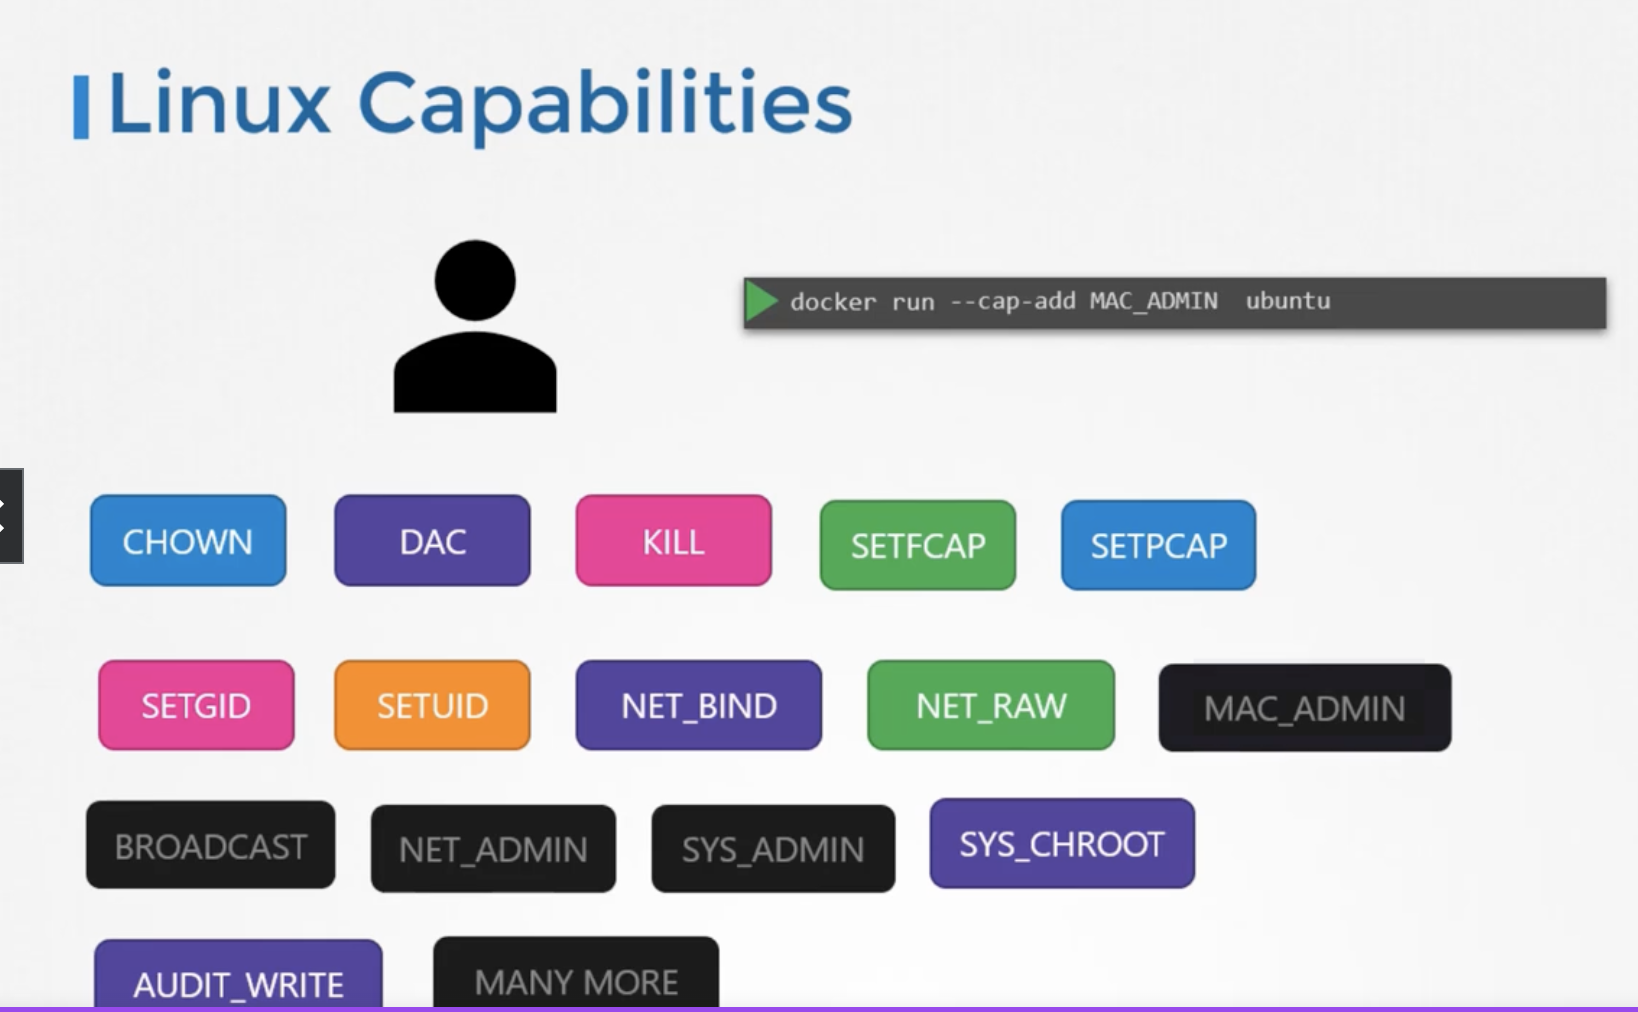
Does the root user inside the container have the same permissions as the root user on the host? The answer is no. You might wonder what level of access to the host machine this user has. In fact, Docker grants only limited permissions to the user running the container. If you want to grant more permissions, add --cap-add <capability> to the run command. Conversely, to drop a privilege, use --cap-drop. Alternatively, to grant all permissions to the container user, add --privileged.
174 Security Contexts
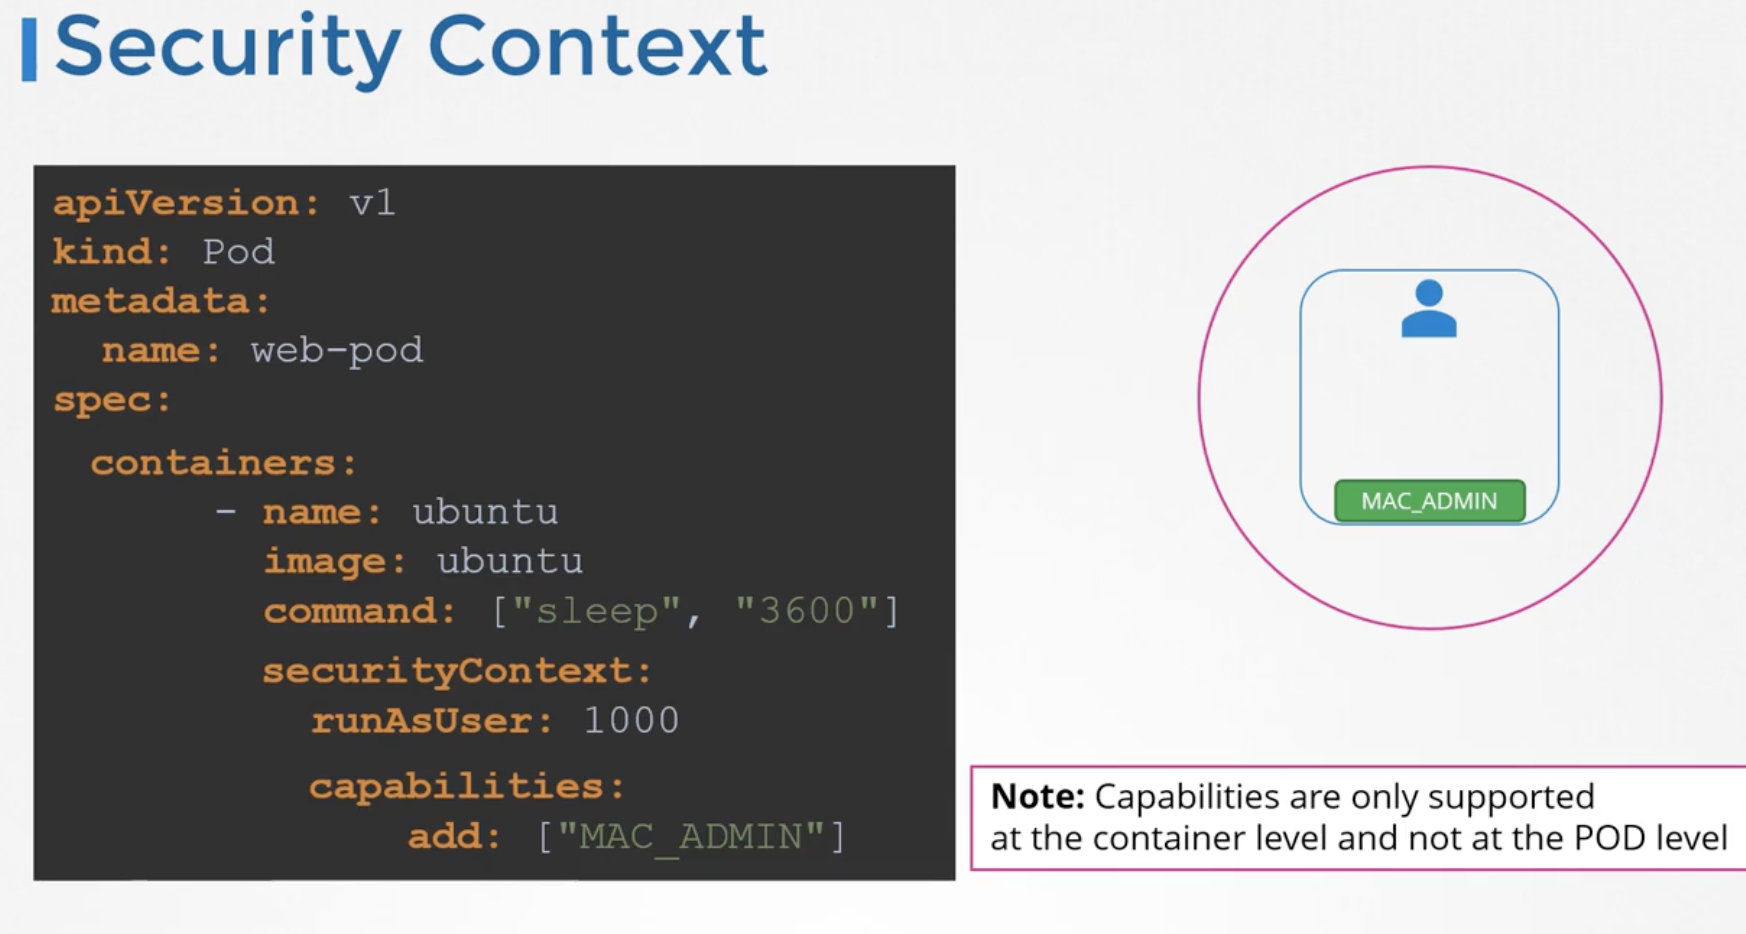
The capabilities configured in Docker can be set at the container level as shown below. They cannot be set at the Pod level.
177 Network Policy
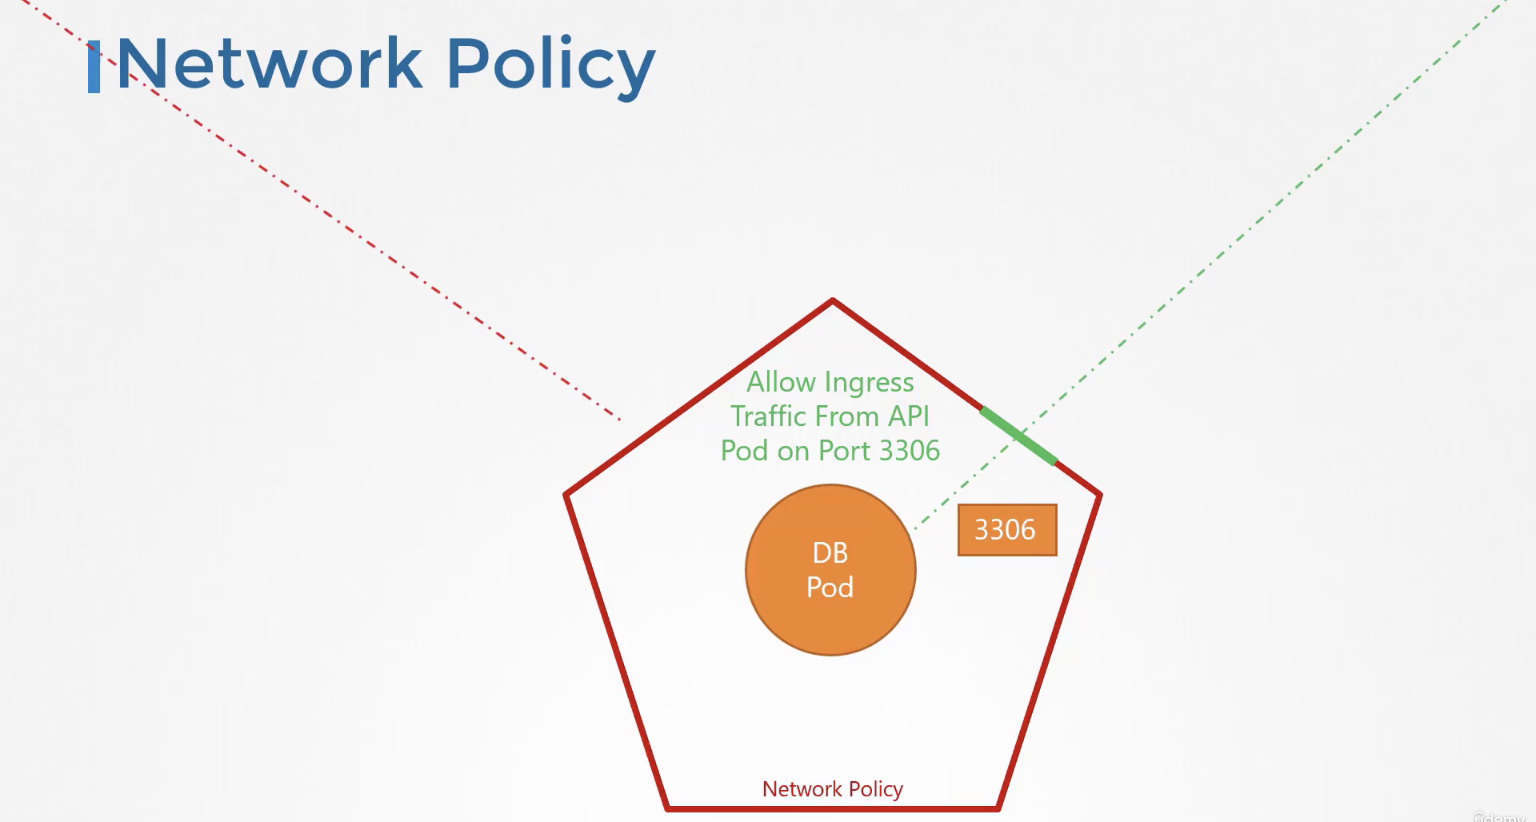
In Kubernetes, the default strategy allows all traffic within the cluster. However, if there is a need to allow only specific ports or IPs for some reason, a Network Policy can be defined.
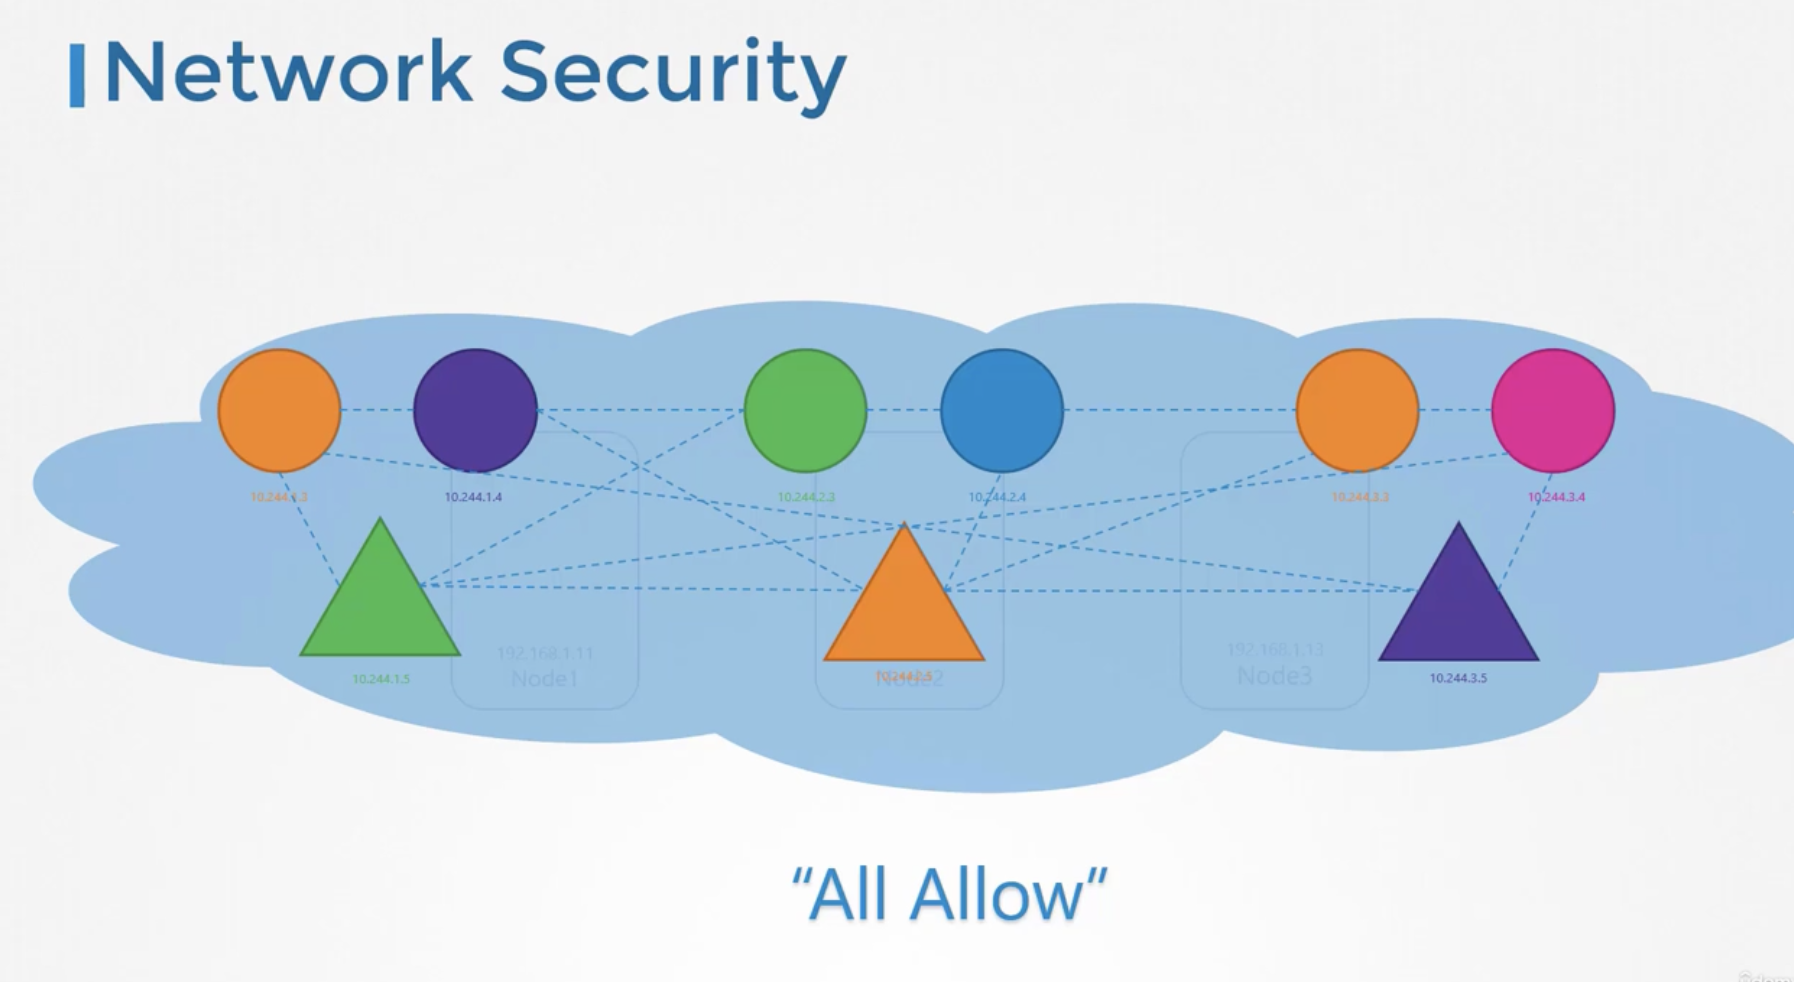
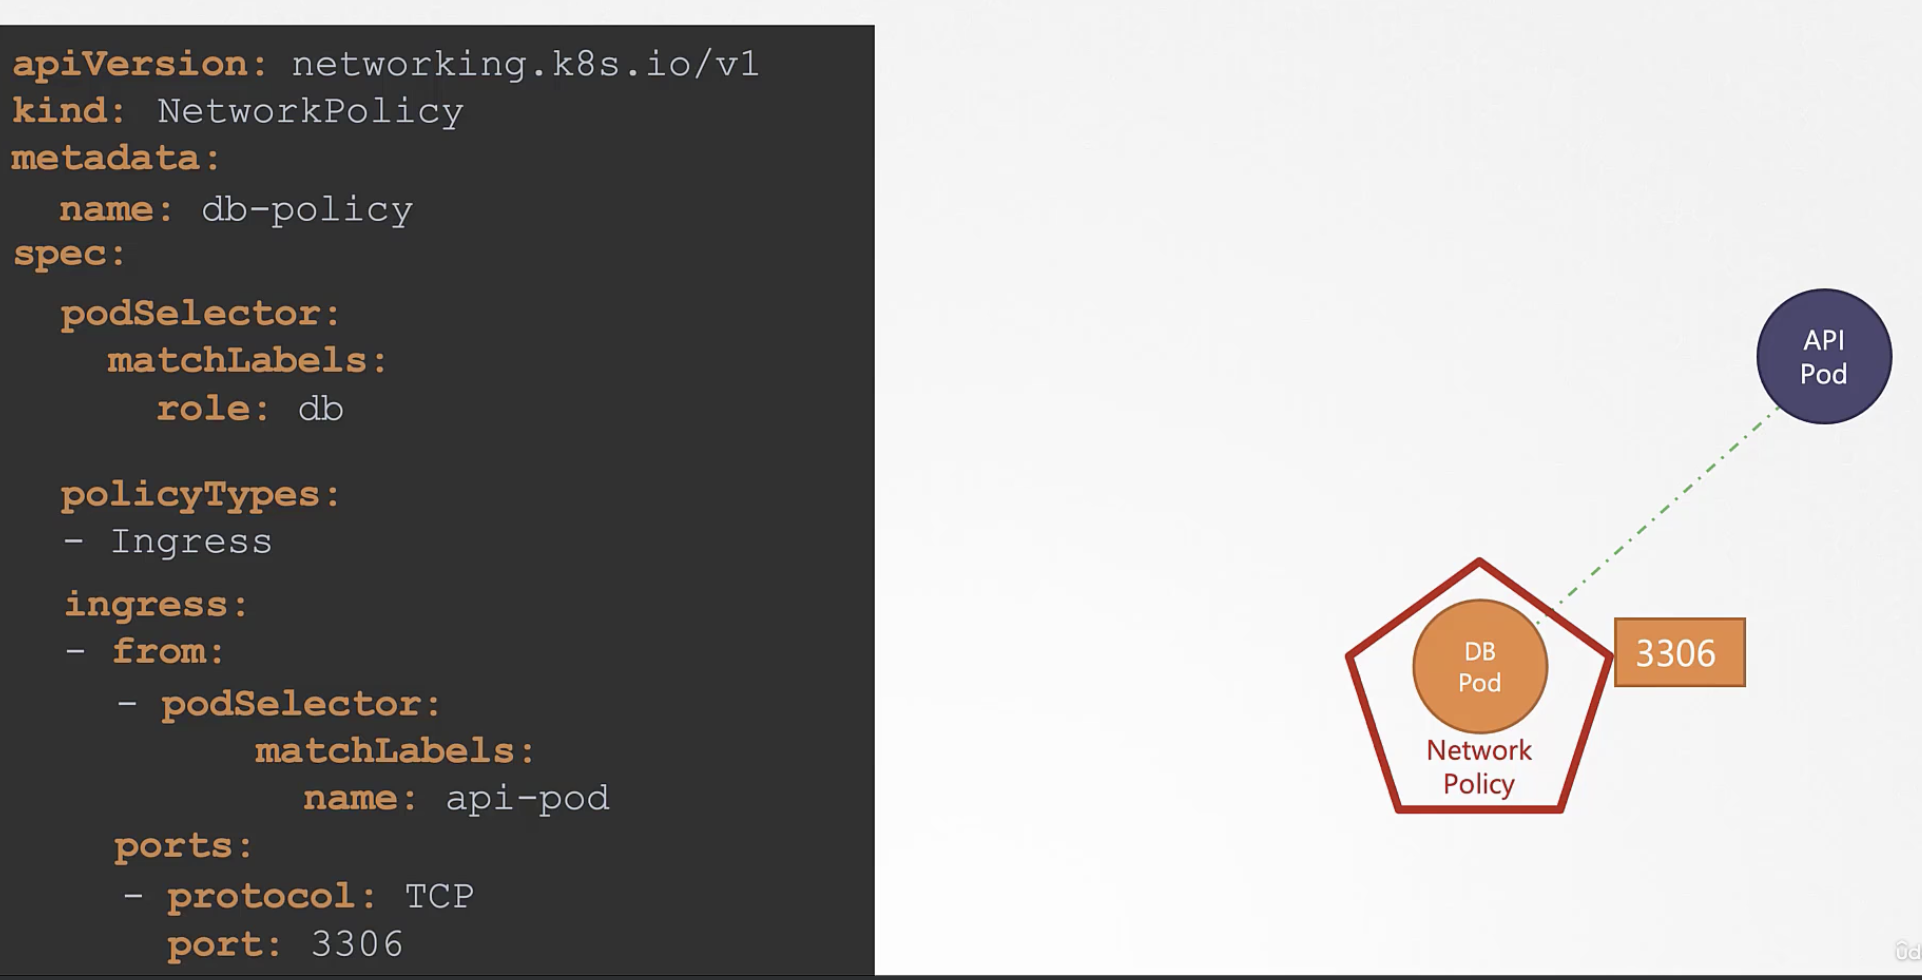
If you set a Network Policy on a DB Pod that only allows ingress on port 3306 as shown below, traffic on all other ports will be ignored.
Network Policies use labels via selectors.
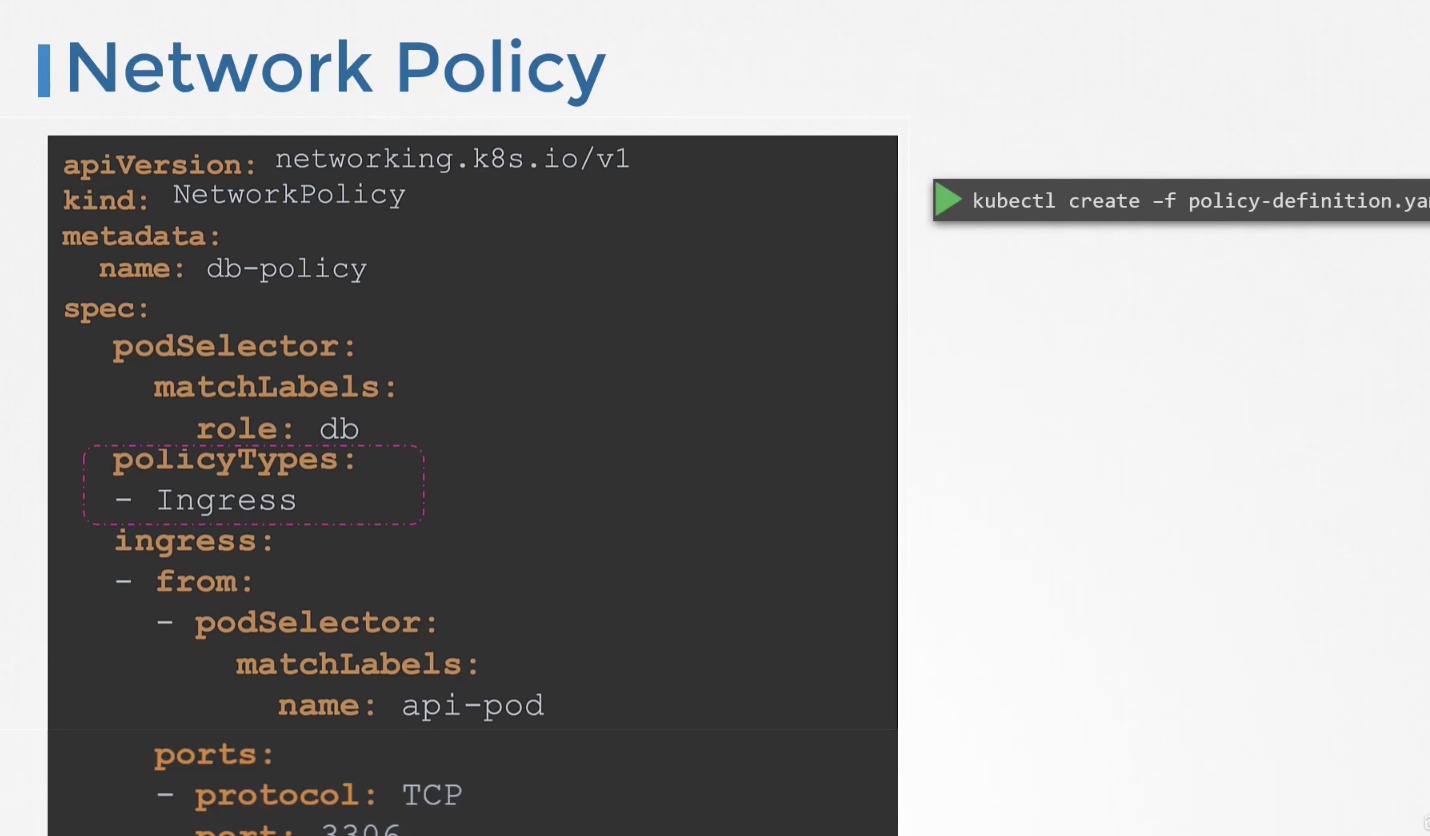
Addons that support Network Policy include Kube-router, Calico, Romana, and Weave-net. Note that Flannel does not support Network Policy, which should be considered when choosing an addon.
178 Developing network policies
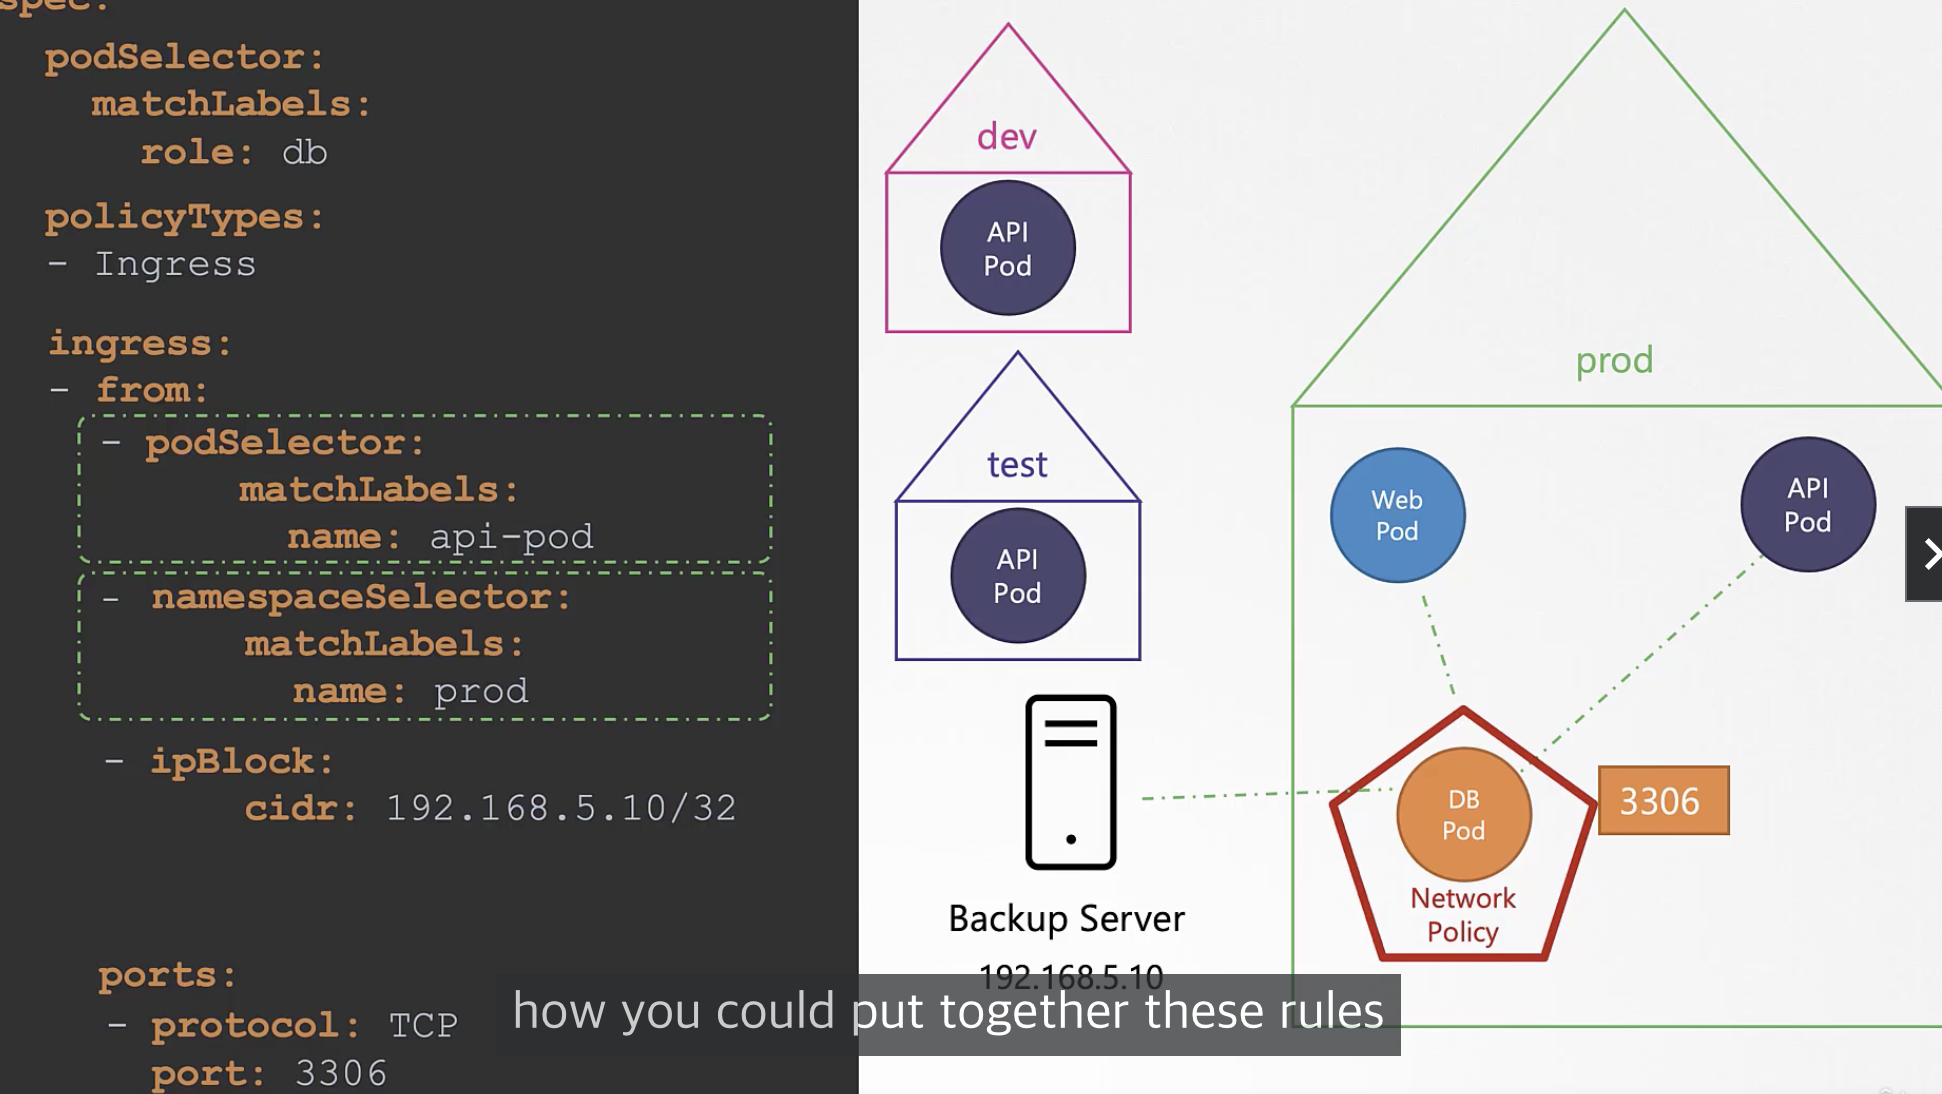
When multiple rules are defined within an ingress section, they work as OR logic -- if any of them match, access is allowed. Conversely, removing the - to combine them into a single block makes them work as AND logic. You can also define ipBlock to allow specific IPs to access the pod.
Egress network policies can be defined similarly to ingress.
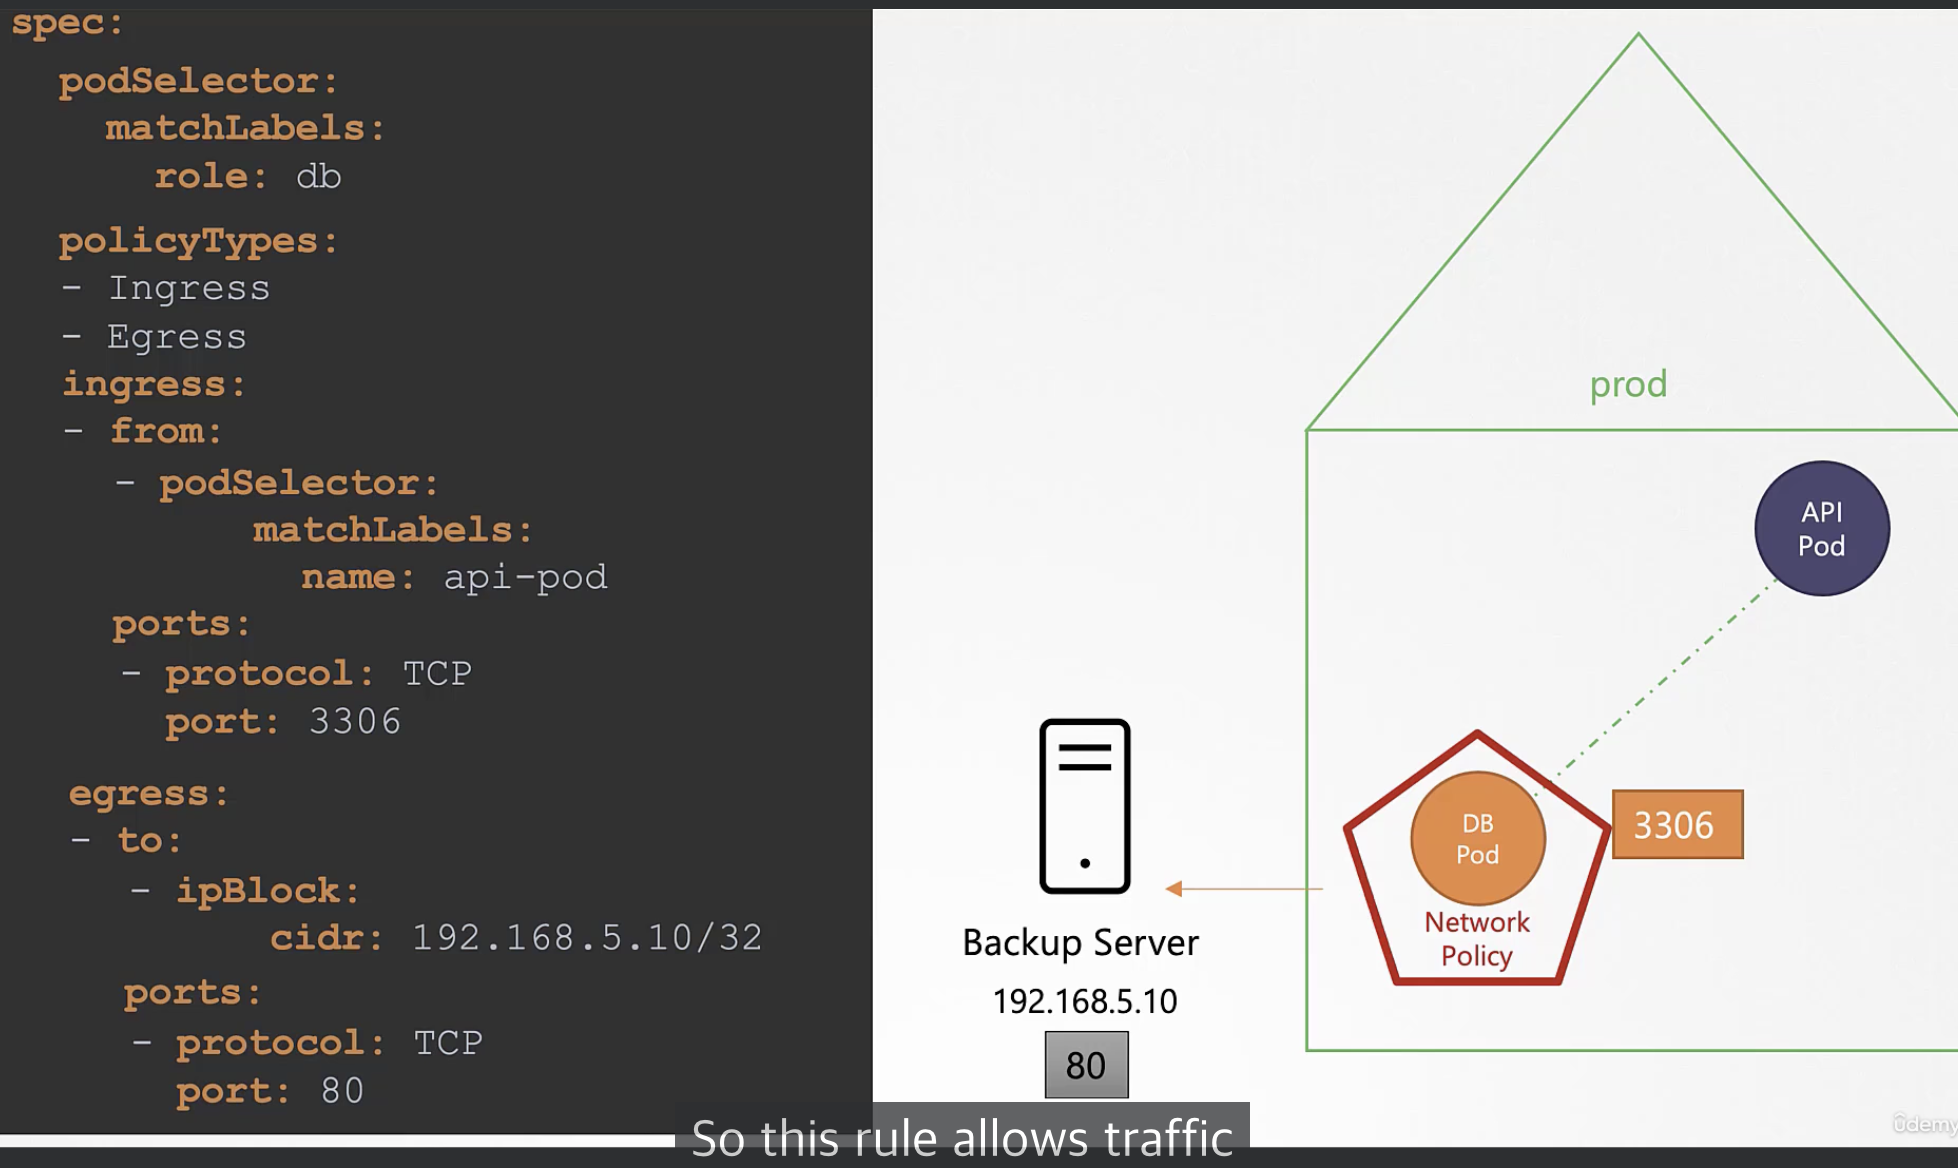
The method for creating a Network Policy is as follows.
Policy Name: internal-policy Policy Type: Egress Egress Allow: payroll Payroll Port: 8080 Egress Allow: mysql MySQL Port: 3306
apiVersion: networking.k8s.io/v1
kind: NetworkPolicy
metadata:
  name: internal-policy
  namespace: default
spec:
  podSelector:
    matchLabels:
      name: internal
  policyTypes:
  - Egress
  - Ingress
  ingress:
    - {}
  egress:
  - to:
    - podSelector:
        matchLabels:
          name: mysql
    ports:
    - protocol: TCP
      port: 3306

  - to:
    - podSelector:
        matchLabels:
          name: payroll
    ports:
    - protocol: TCP
      port: 8080

  - ports:
    - port: 53
      protocol: UDP
    - port: 53
      protocol: TCP
When creating multiple egress rules, do it as follows.
kind: NetworkPolicy
metadata:
  name: internal-policy
  namespace: default
spec:
  podSelector:
    matchLabels:
      name: internal
  policyTypes:
  - Egress
  egress:
  - to:
    - podSelector:
        matchLabels:
          name: mysql
    ports:
    - protocol: TCP
      port: 3306
  - to:
    - podSelector:
        matchLabels:
          name: payroll
    ports:
    - protocol: TCP
      port: 8080
Quiz
Q1: What is the main topic covered in "CKA_7_Security"?
CKA_7_Security
Q2: What are the key takeaways from this article?
CKA_7_Security
Q3: How can the concepts in this article be applied in practice?
Consider the practical examples and patterns discussed throughout the post.